In addition to the default attributes provided by Insider One, you can also define custom attributes. These are useful when you need to track data points not included in the default list, or when you have specific business use cases.
When creating custom attributes, ensure they comply with the platform's predefined limits to ensure smooth data processing and compatibility.
In this article, you can find answers to the following questions:
Create a custom attribute
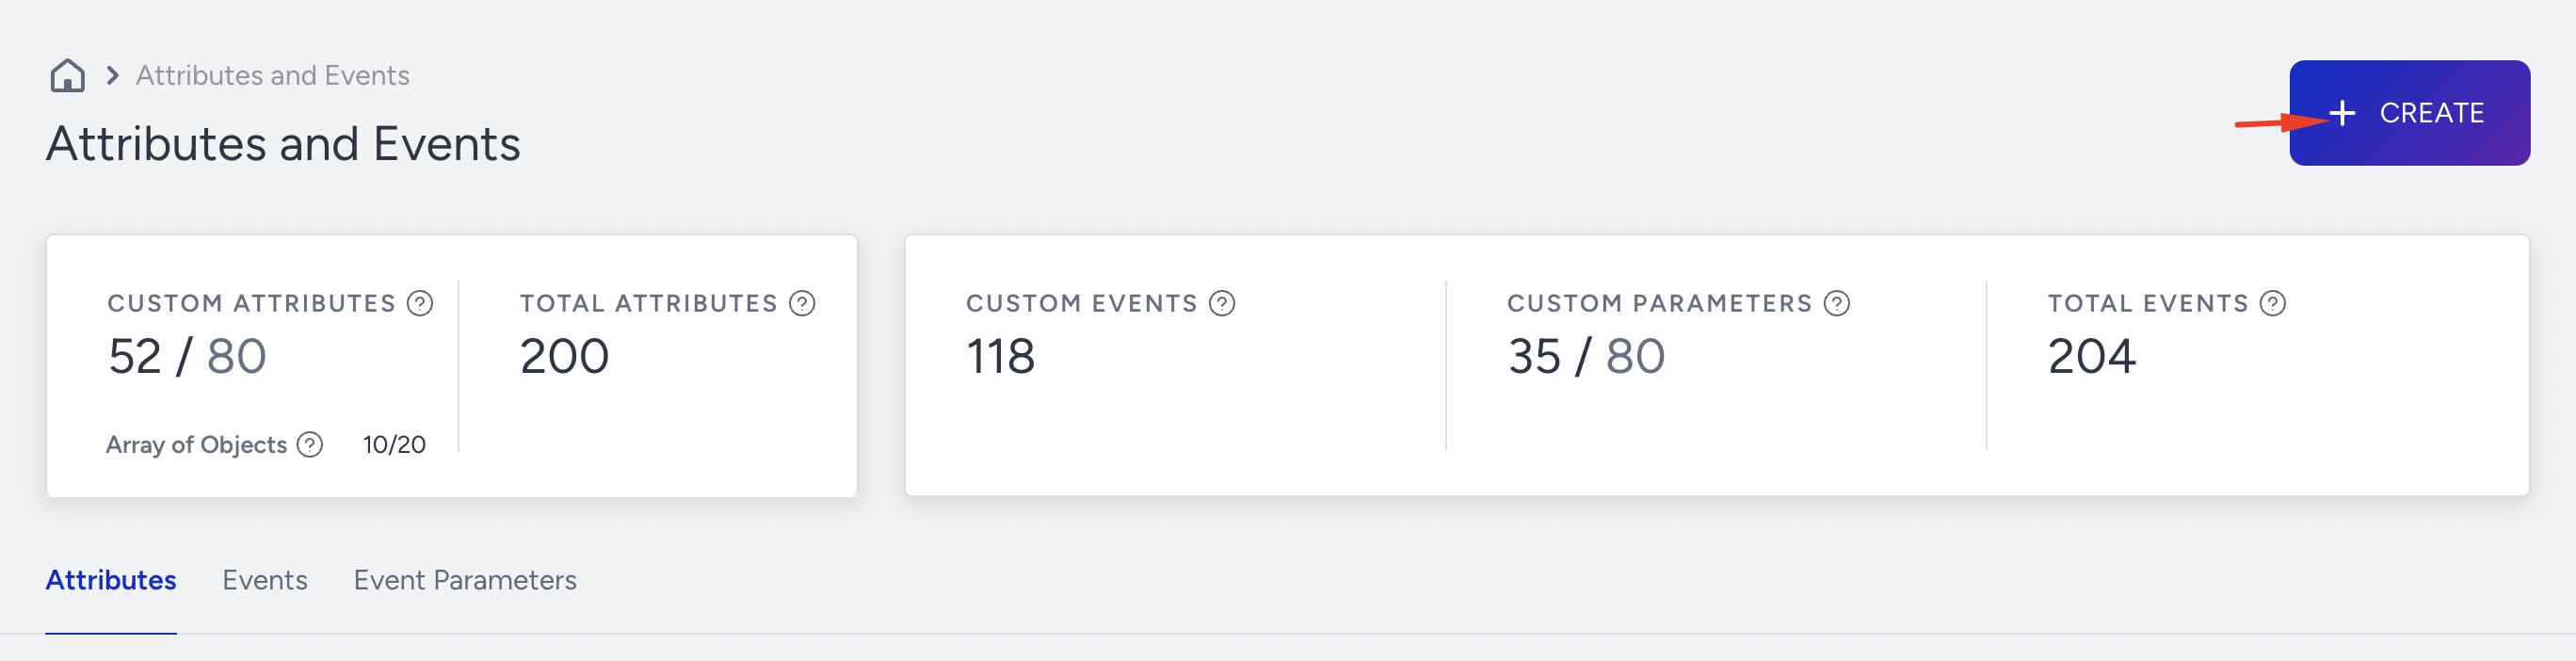
You can have up to 80 custom attributes (excluding default attributes) by default. This includes all custom attributes from the mobile application, website integration, CRM integration, and email custom fields.
To create a custom attribute,
Click the Create button when you are on the Attributes tab.
On the creation modal, fill in the necessary details:
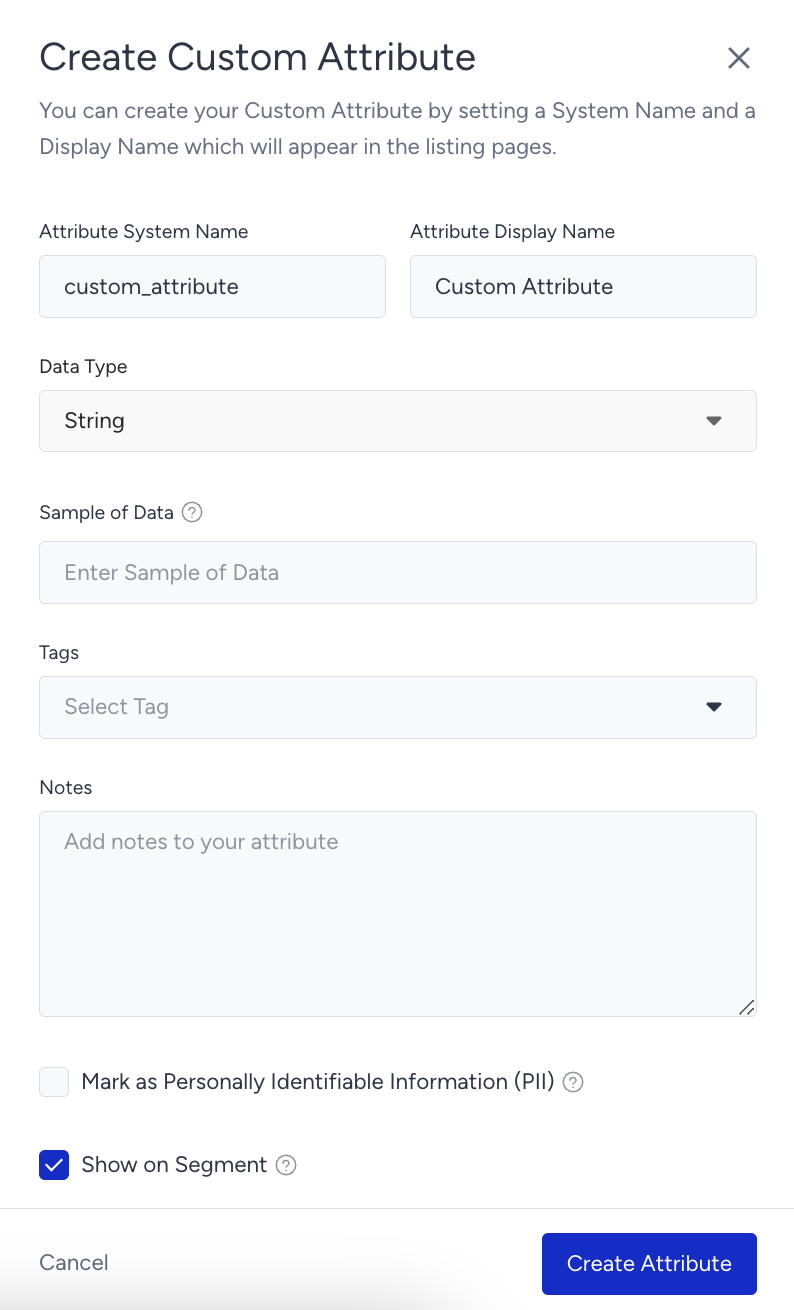
Attribute System Name: The name used for any system interaction, such as the Upsert User API parameter. It is recommended to be created in lowercase, without spaces, such as custom_attribute_name or product_cat_name.
Attribute Display Name: This is the main name of the data you will see while interacting with the InOne panel, such as selecting in segmentation, etc. Attribute Name or Product Category Name can be examples.
Data Type: This is the standard type you must define for an attribute.
The Boolean data type can only have one of two possible values: True or False. e.g. Club Member = True
The Date is a data type used to store and manipulate dates and times. It is used to represent a specific point in time in RFC 3339 format, such as 2026-01-10T15:41:00Z.
The Number is a data type represented by a number that indicates an amount. The number can be either a whole number, a positive or negative number, or a floating-point number. e.g. '712*
The Number Array is a collection of numerical values stored together, allowing for operations like sorting, searching, and calculations on the elements. e.g. "1, 2, 3, 4, 5."
The String is a data type used to represent text or a sequence of characters. It can be used to store and manipulate alphanumeric data, such as names, addresses, or messages. e.g., "Hello"
The String Array is a collection of strings that can be stored together, providing functionality for tasks such as sorting, searching, and modifying the individual string elements. e.g., "apple," "banana," "orange."
The URL is a string of characters that provides a unique address for accessing resources on the internet. e.g. "http://insiderone.com"
Sample of Data: This is an empty input area box where you can input any value, preferably designed to put some sample value of that custom attribute, so you can skim through the list of attributes with these sample values to better understand your data sets.
For example, if you have the attribute of Store ID, you can input one of the sample values: “ST0015-A”
Tags: You can add labels or keywords to help organize and categorize the data.
Notes: You can input any explanation about your attributes accordingly to remind yourself of the definition. This is an open field text input area.
Mark as PII: Mark this checkbox if you want an attribute to be marked as one that contains Personally Identifiable Information. This allows control over information access for panel users based on their roles and permissions. For example, panel users with PII access set to False cannot see the information in this attribute in the InOne panel.
The "Show on Segment" checkbox allows you to choose whether the attribute you’re creating will be available for selection while you’re creating segments.
Once you create your attributes on this page, you can use one of these data ingestion methods to pass a value for a user attribute.
Edit a custom attribute
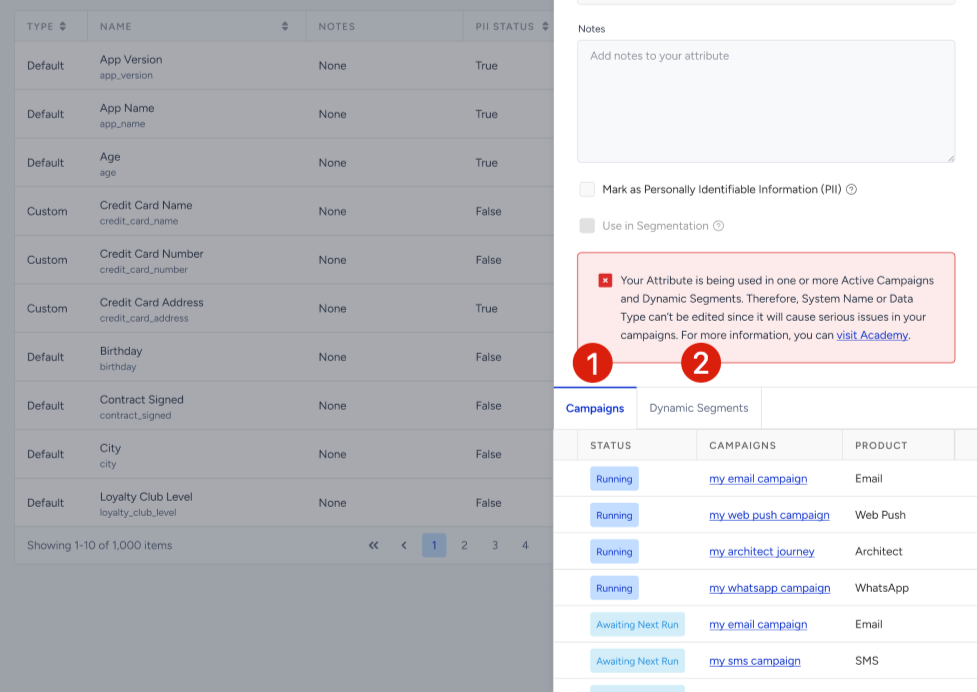
Select the Edit option from the dropdown menu against the attribute to edit a custom attribute.

When editing a custom attribute, the System Name and Data Type fields are locked to prevent potential issues with active campaigns or dynamic segments.
Upon opening the edit side modal for an attribute, you’ll see two tabs that show where the attribute is currently in use:
Active Campaigns
Dynamic Segments
You can switch between these tabs to view details on related usage.
You can edit a custom attribute depending on where it's currently being used. The ability to update fields like System Name and Data Type changes based on their usage in campaigns or dynamic segments:
Used in Both Campaigns and Dynamic Segments
System Name and Data Type are not editable.
You need to end all campaigns and delete all dynamic segments that use the attribute before editing.
Used Only in Campaigns
System Name and Data Type are not editable.
To make changes, ensure that:
All running campaigns are completed.
All related dynamic segments are deleted.
If you only stop (but don’t delete) a campaign and then edit the attribute, the campaign may not function properly when reactivated.
Used Only in Dynamic Segments
System Name and Data Type are not editable.
Once all associated dynamic segments are deleted, these fields will become editable.
Not Used in Any Campaign or Dynamic Segment
All fields, including System Name and Data Type, are fully editable.
After making your changes, don’t forget to click Save to apply them.
You can pause or resume any attribute ingestion directly on the Attributes and Events page. Pausing ingested data means that Insider One will stop accepting the data (or blocking) from flowing into its database. You might need it in case there are occurrences of sending the wrong batch of data that need to be stopped.

Notes on creating or editing attributes
The following limitations apply when working with attributes. These default rules ensure data consistency and system performance. If your use case requires adjustments (e.g., increased attribute capacity), contact the Insider One team — we can review and increase the limits to meet your needs.
Default attributes cannot be edited.
Default attributes cannot be deleted. Only custom attributes are deletable.
If you’ve reached your custom attribute limit, reach out to the Insider One team to request a cleanup of unused attributes.
Deleting an attribute currently used in a campaign may cause issues with its execution. To ensure everything works smoothly, it's recommended to remove the attribute from all active campaigns before deleting it.
Changing an attribute’s data type will overwrite existing values. For example, if a string attribute stores "true" and "false" as text, changing the type to Boolean will convert these values to true/false.