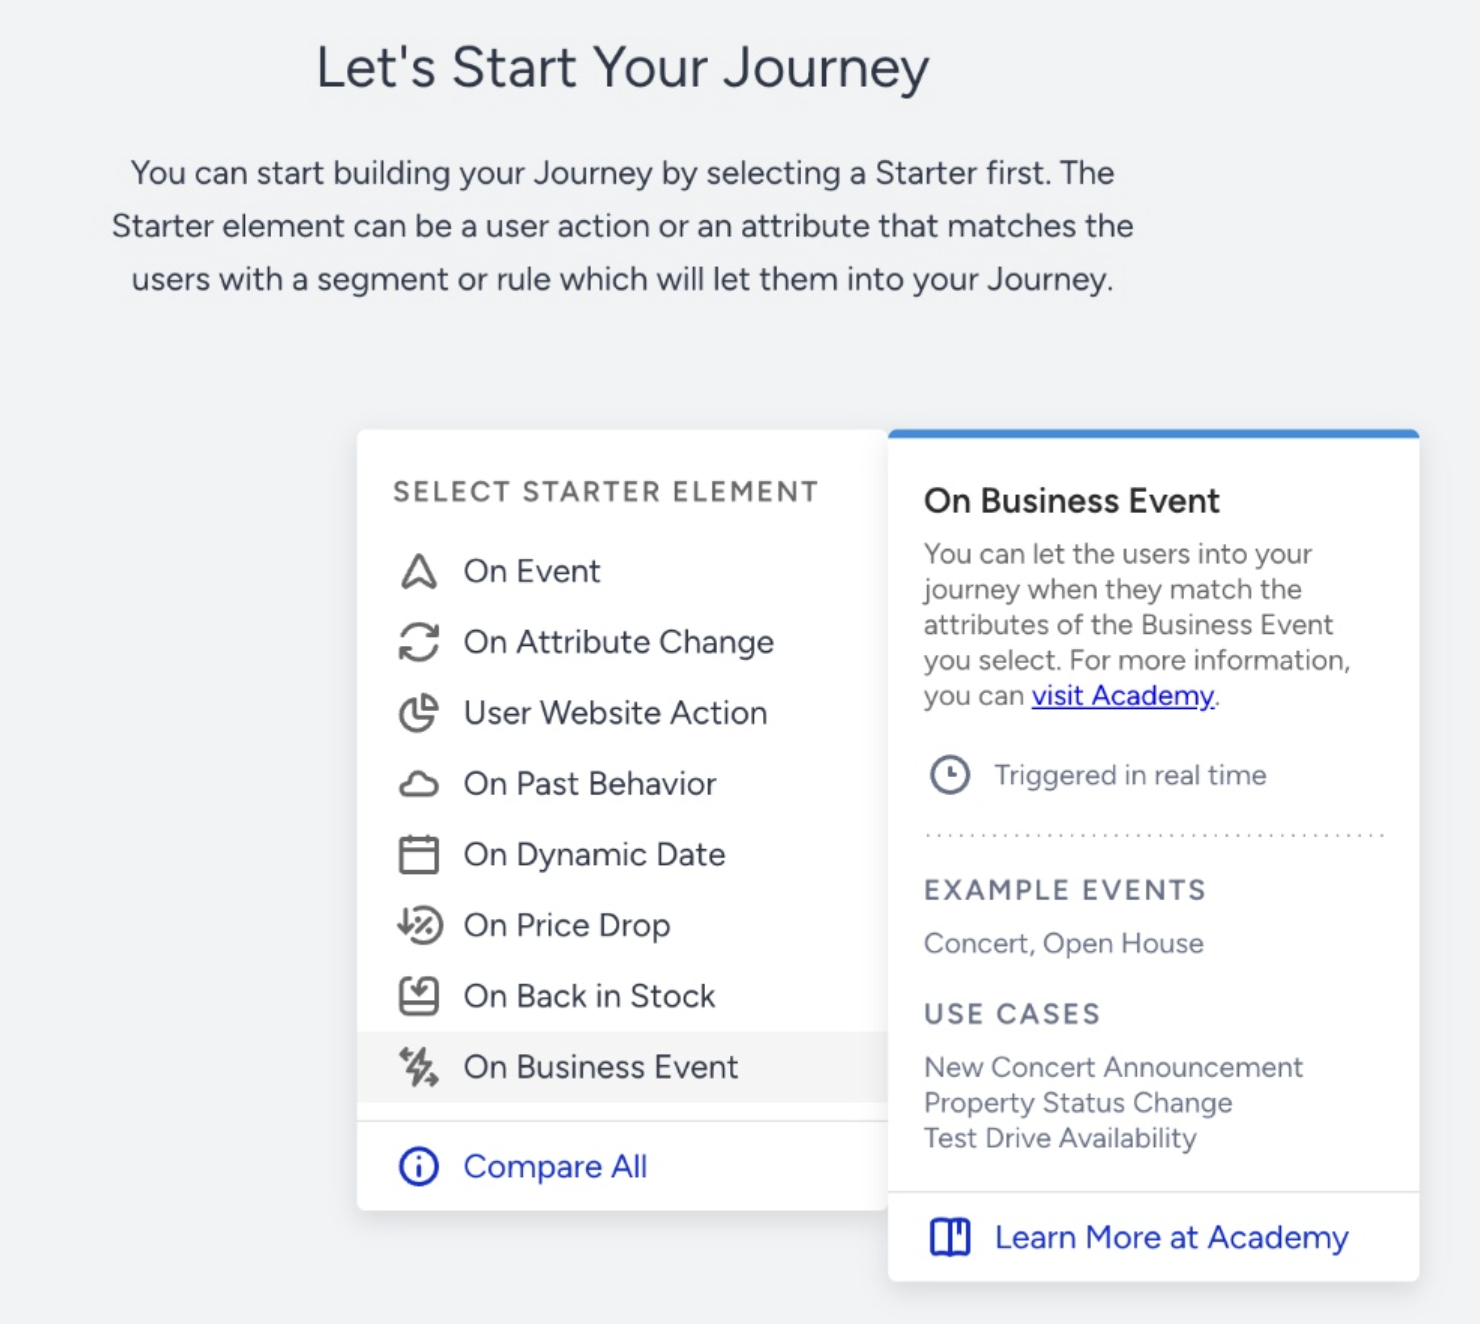
The On Business Event starter allows you to trigger real-time, personalized journeys based on external real-world events that are not tied to a specific user action. Unlike user-driven starters, this element listens for an API payload from your system and matches it against your user base instantly.
You can use the On Business Event starter in various use cases as the following:
Concert announcements: Target fans of a specific artist the moment a new tour date is announced in their residential city.
Real estate status changes: Target users interested in a specific neighborhood when a property status changes to "Open House" or "Starting Bidding".
Travel and weather advisories: Target passengers with upcoming flights to specific destinations when a weather alert or travel advisory is issued for that route.
Flash sales and marketplace events: Target high-affinity segments when a non-standard business event, like a branded content drop or a marketplace pop-up, is initiated.
Course and module unlocks: Target students enrolled in specific learning paths the moment a new instructor release or live lesson is scheduled.
Requirements
Insider Tag integration should be completed.
Mobile SDK integration should be completed for mobile app data reading.
Insider One team should map out your website for data collection.
Events should be activated for your account.
Create a business event
On Business Event starter works based on business-related events that you will send via an API call so to use this starter, you must first create a business event and define the event structure by providing a sample API payload. This sample allows Architect to validate the schema and extract parameters for segmentation and personalization.
You can use this business event in other journeys as well.
1. Select On Business Event. Click on the starter.
2. Click the Create Business Event button in the dropdown.
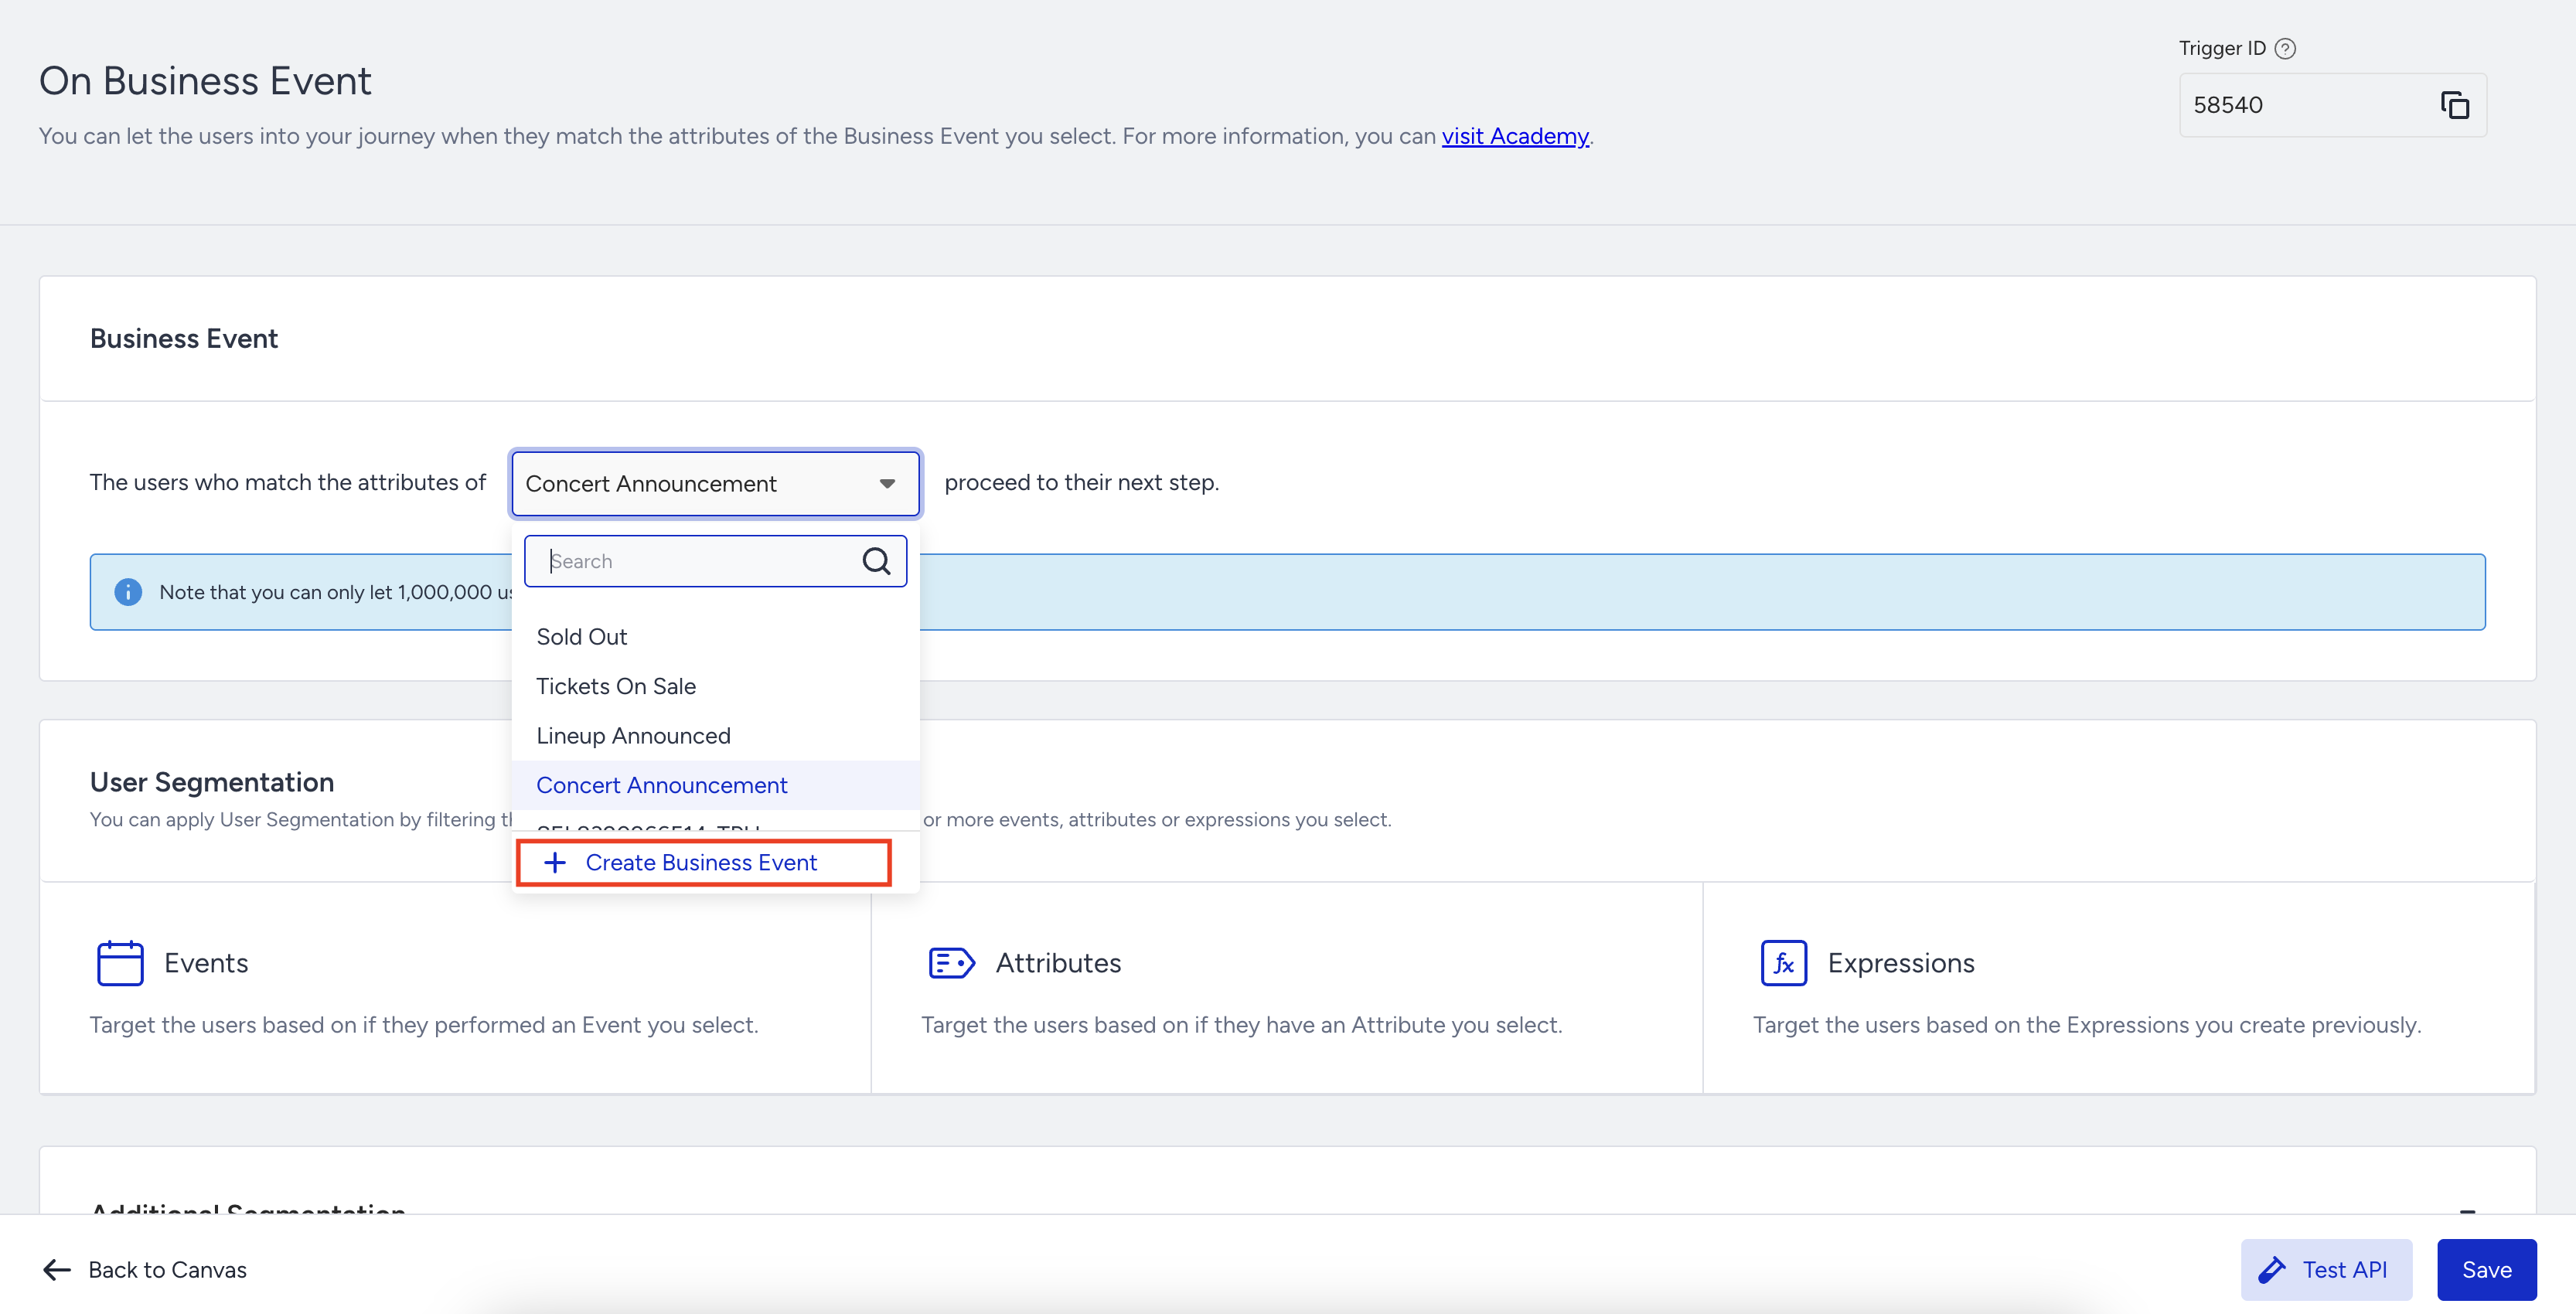
3. Enter a business event name like Concert Announcement and a description. Enter your JSON payload into the Sample API Payload field.
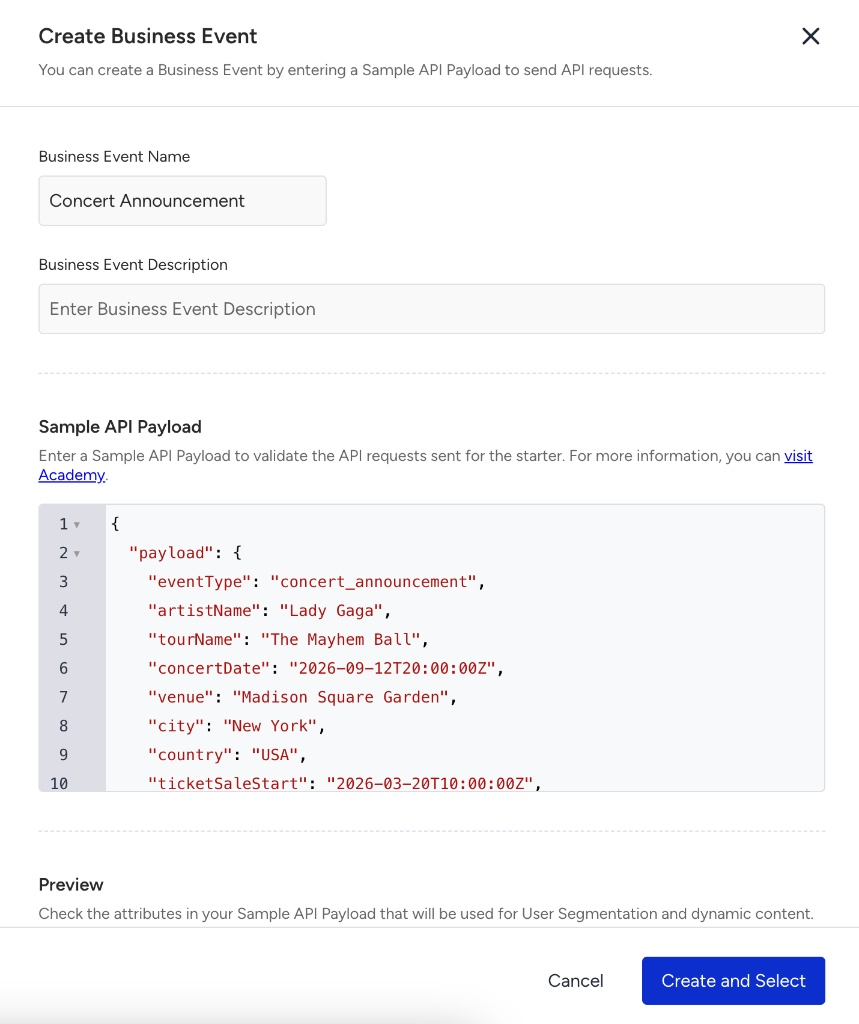
4. Review the Preview section to ensure the system correctly parses the attributes (e.g., artistName, city).
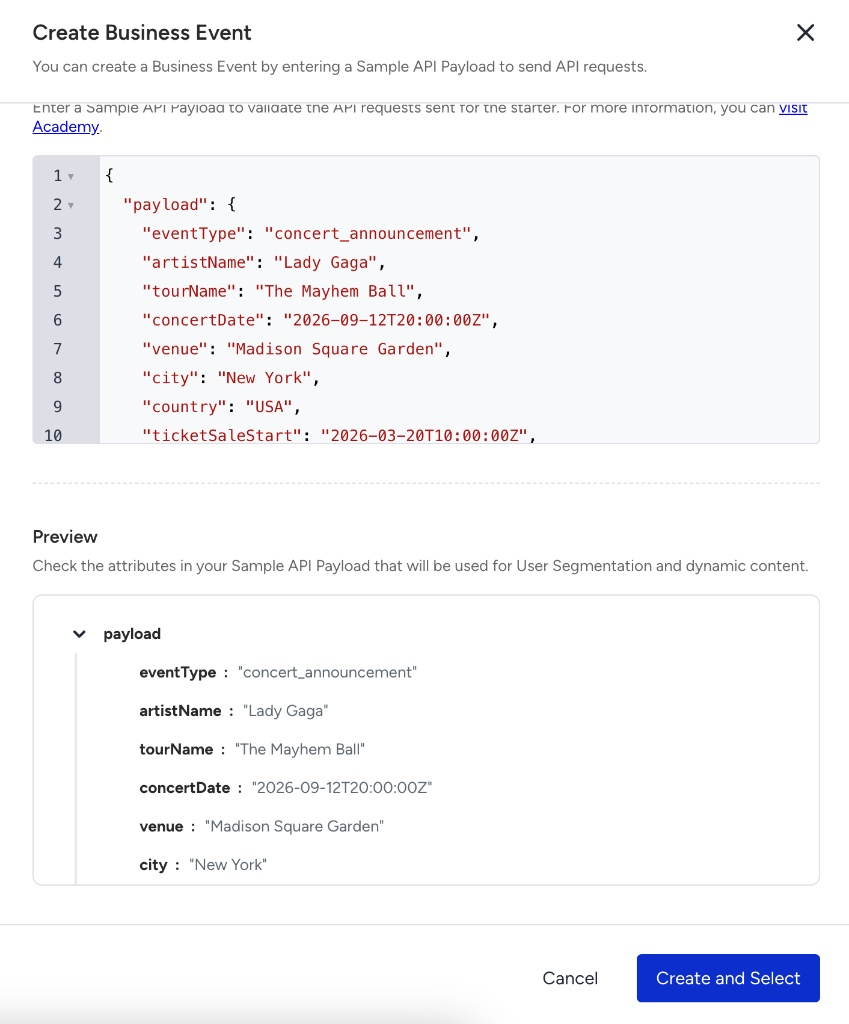
5. Click the Create and Select button to create your business event.
Manage business events
You can view the configuration and parsed attributes of any existing business event at any time in the starter settings.
You can also edit the name, description, or payload schema from the same details view.
A business event can be edited only if it is not being actively used by other journeys. If the event is in use, you must change the associated journeys’ status to passive before making any changes.
Configure the starter
After you create your business event, it will automatically be selected as the journey's trigger. If you wish to use a different event, you can also select any other business event you created before from the dropdown menu.
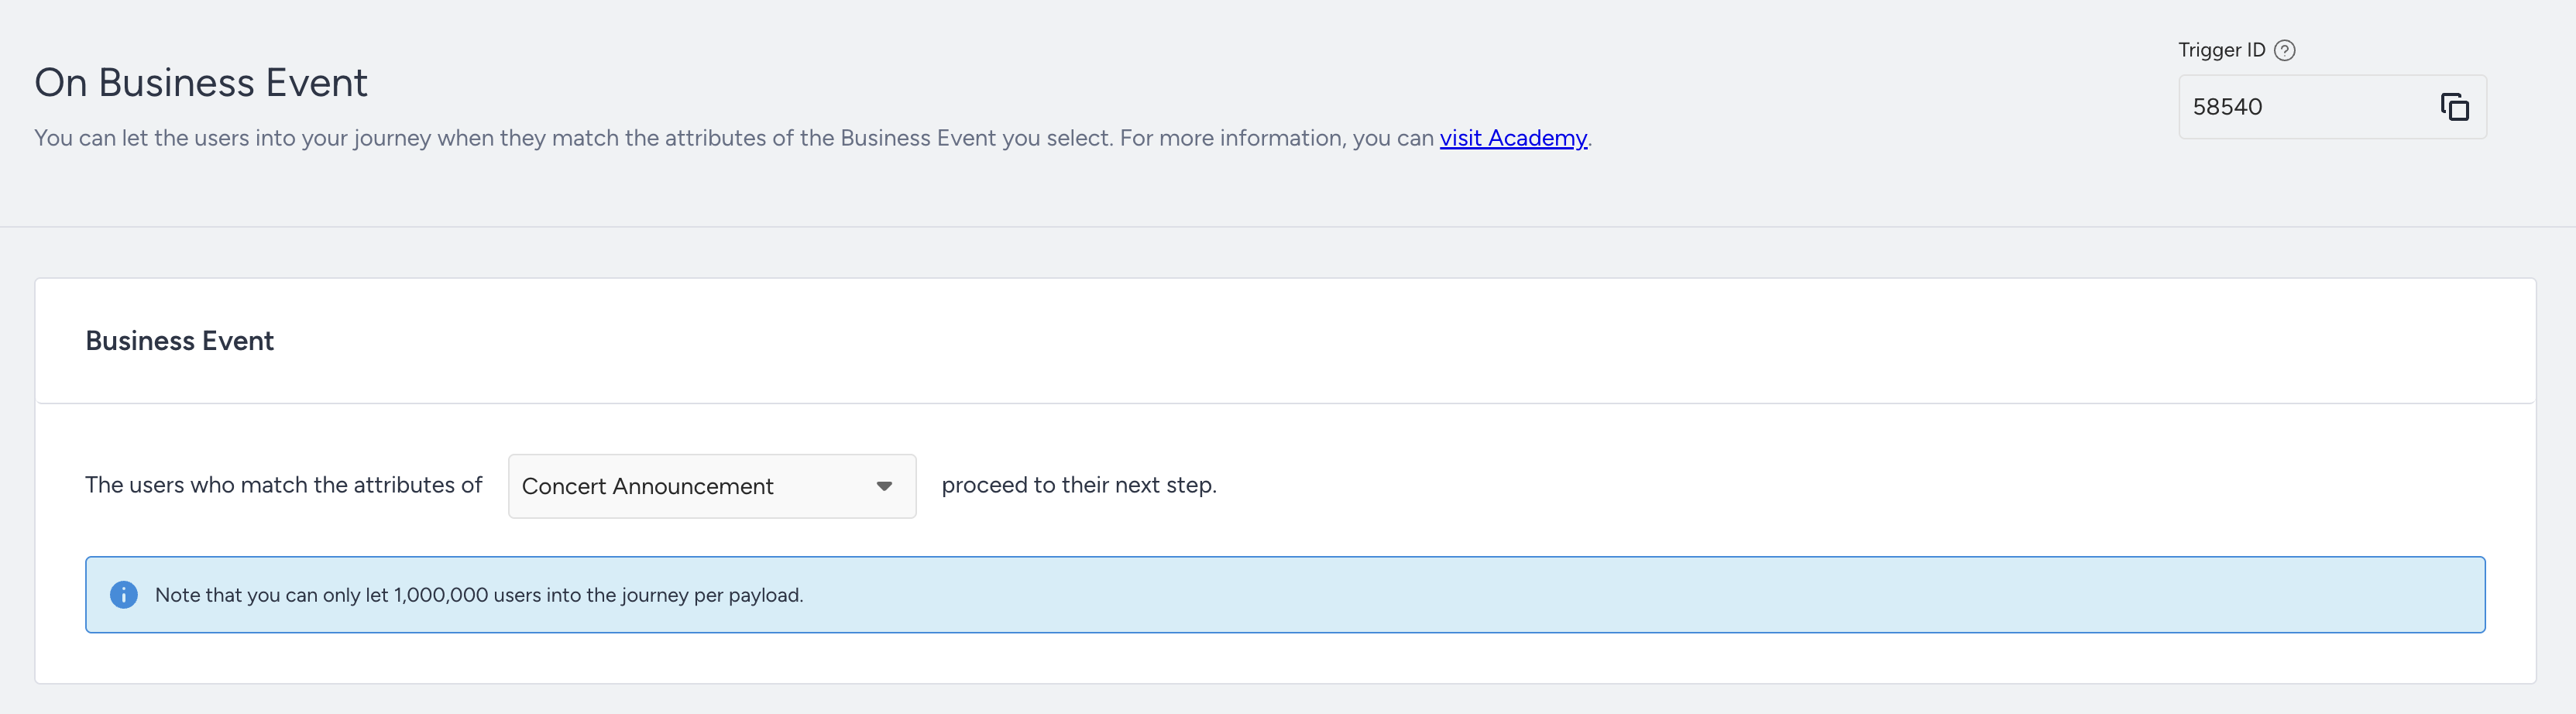
You can build your segments using events, attributes, and expressions by matching them with the attributes within your payload. These conditions will bridge the gap between your real-time business event data and your user base, and ensure only relevant users enter the journey. You must add at least one match rule to save and activate the starter.
Parameter selection: The Business Event Value dropdown automatically lists all keys defined in your API Payload, such as artistName or city.
Data consistency: Actual payload values must match the data types (e.g., string, number) defined in your payload, or the API will return an error response.
(4).png)
Select additional segmentation: You can use your standard saved segments without any additional limitations to further filter the eligible audience.
Test API
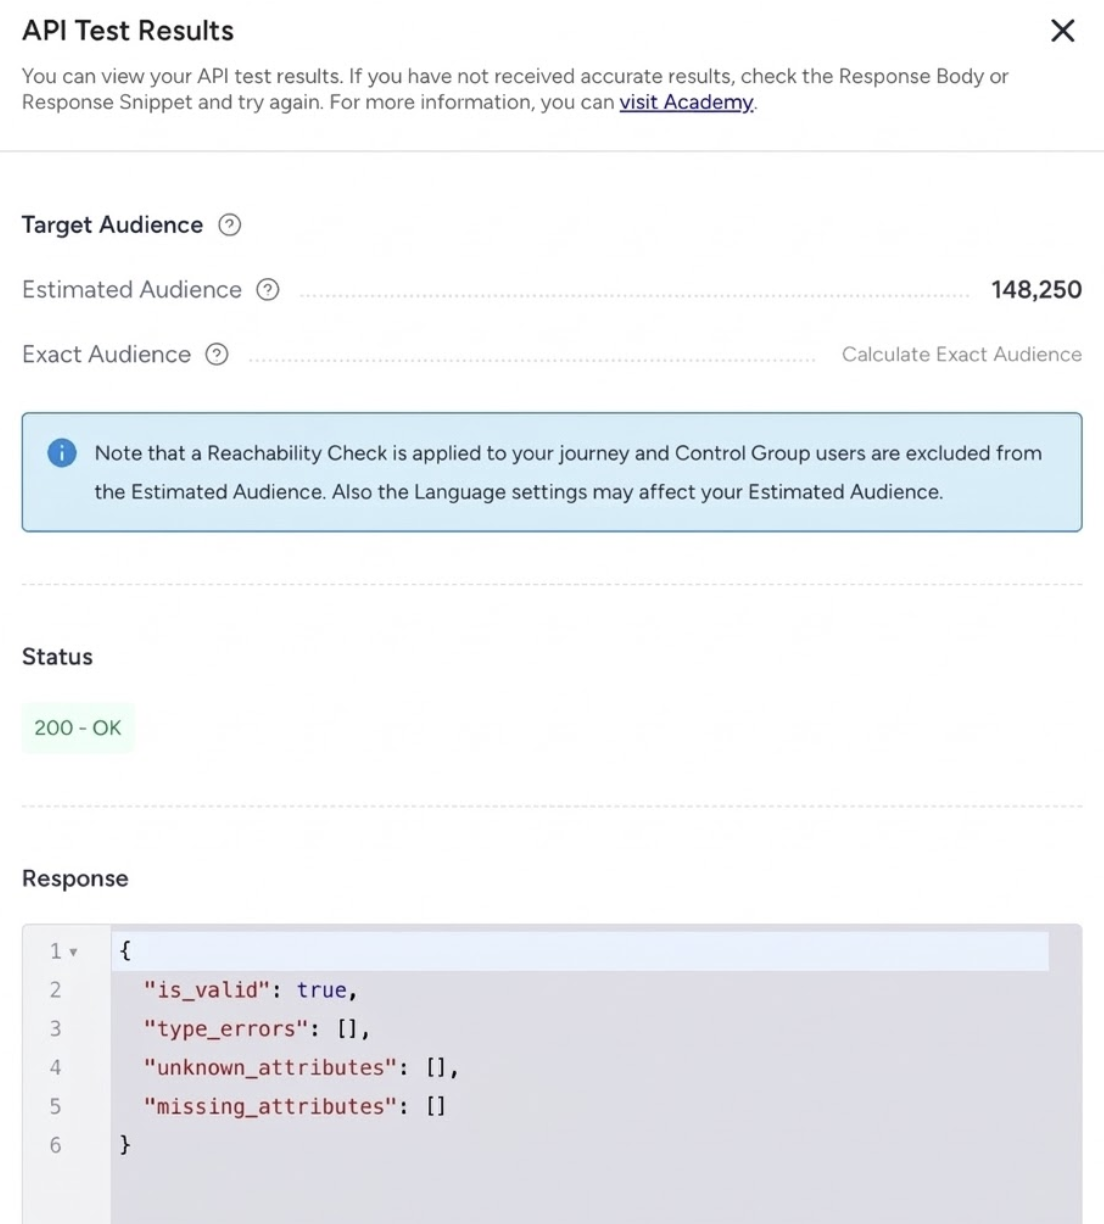
You can test the payloads you will send. You can test the validity of your payload this way and see the estimated audience size based on the segmentation rules you set up.
1. Click the Test API button.

You will see the sample payload used to create the business event. You can test with it or enter a new sample payload.
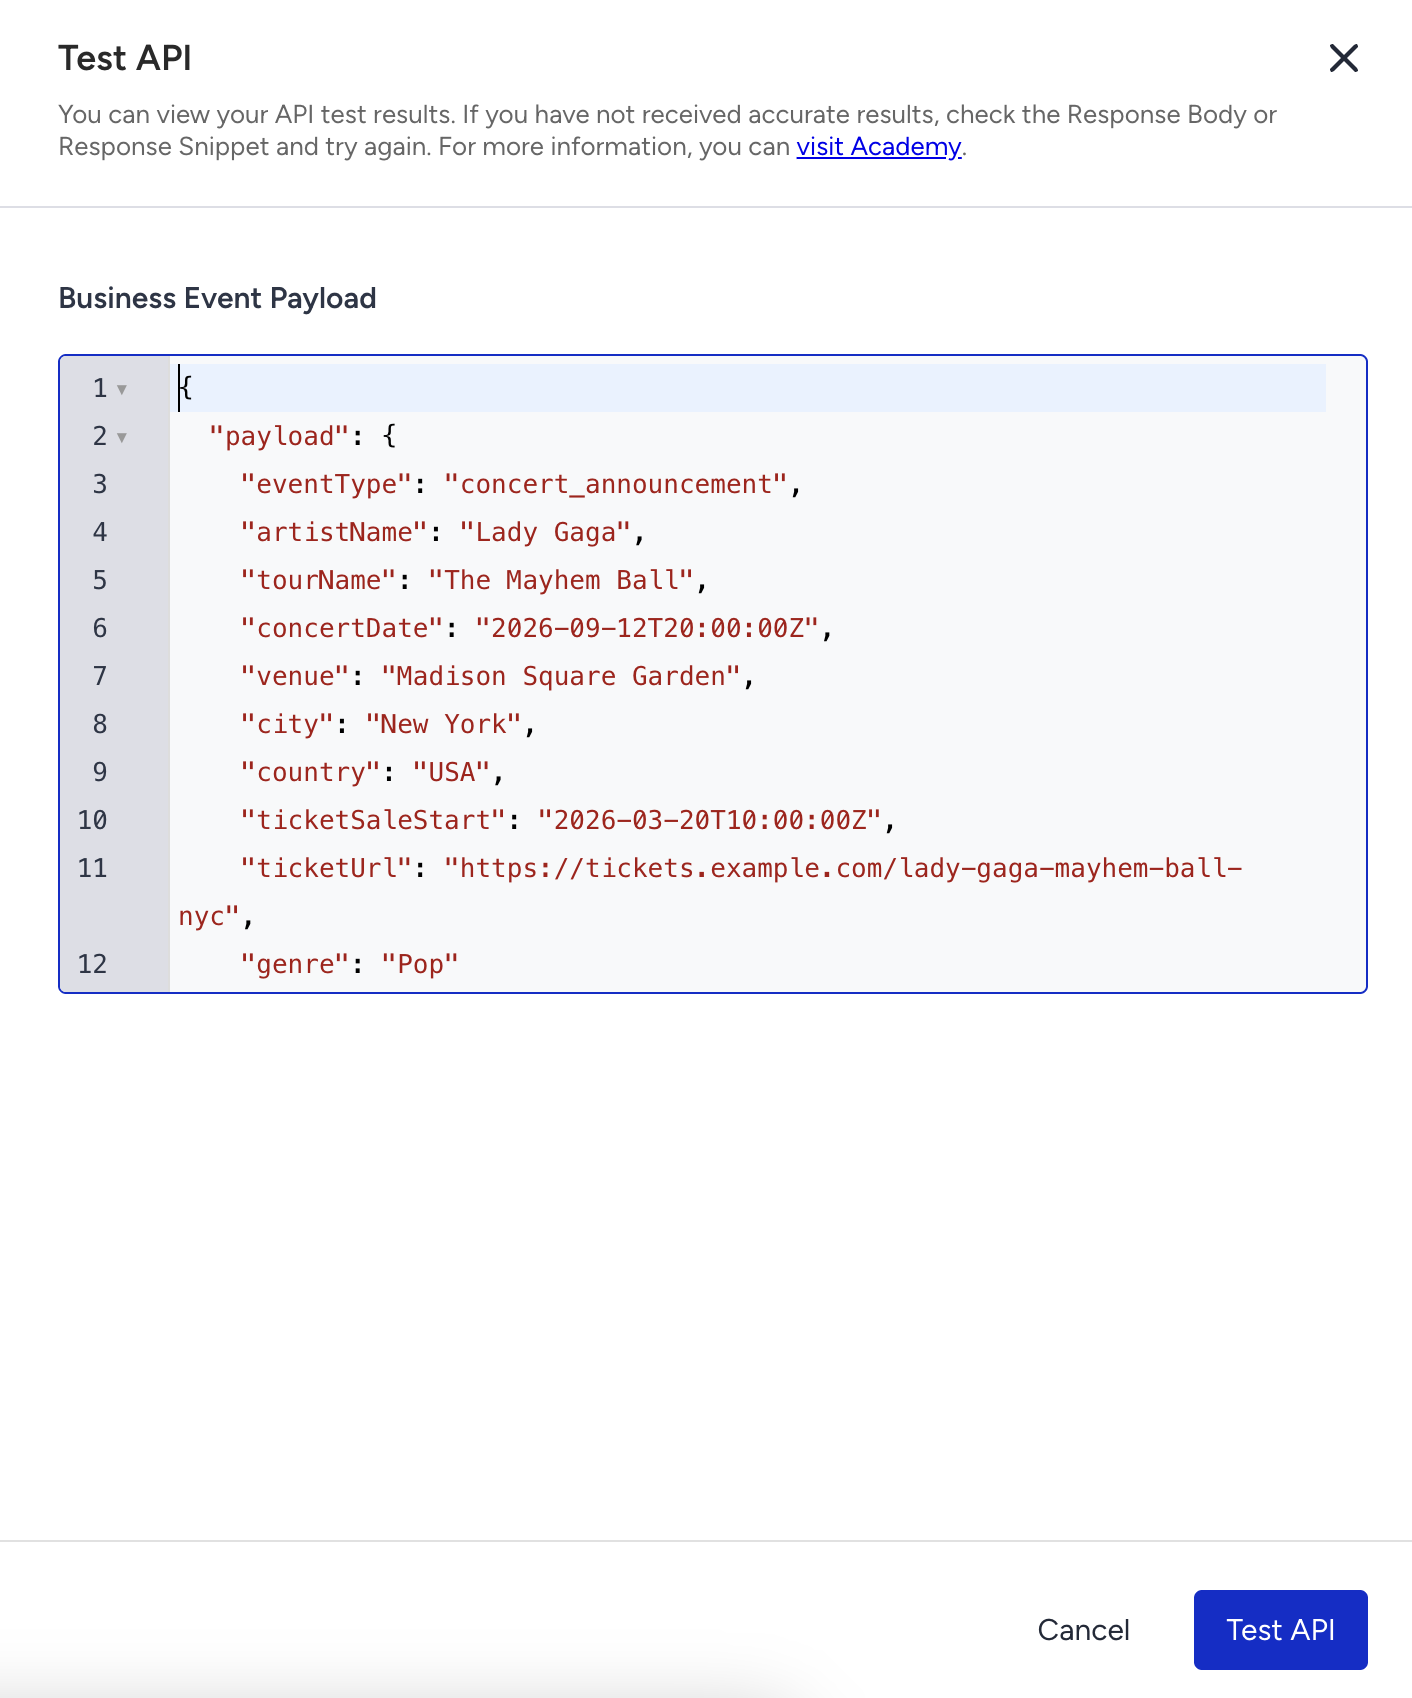
2. Click the Test API button.
3. Check your API response to ensure it does not return an error. If it does, examine the response payload to troubleshoot.
4. Verify your estimated audience size to determine the number of users that will enter the journey.
Dynamic content
You can use the parameters from your payload as dynamic content in your messages. They appear in the dynamic content dropdown.
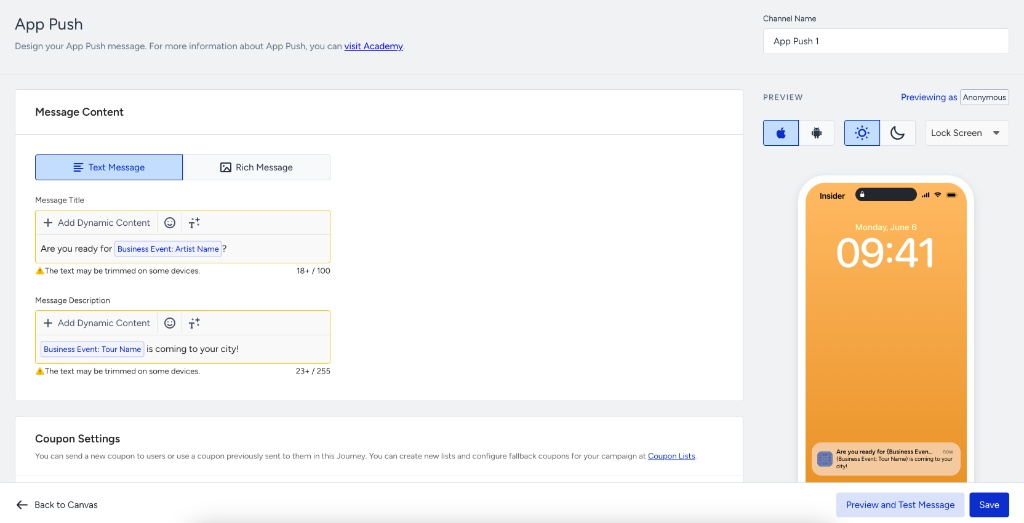
You can use the Preview as User and Test Message functionalities. When you select a user, dynamic content is replaced with values from the sample payload, so all users display the same values.

You can define fallback values for dynamic content. The fallback value applies when the corresponding request parameter is null.
Trigger the journey
After you activate the journey, you must send a live request to initiate the journey for your users.
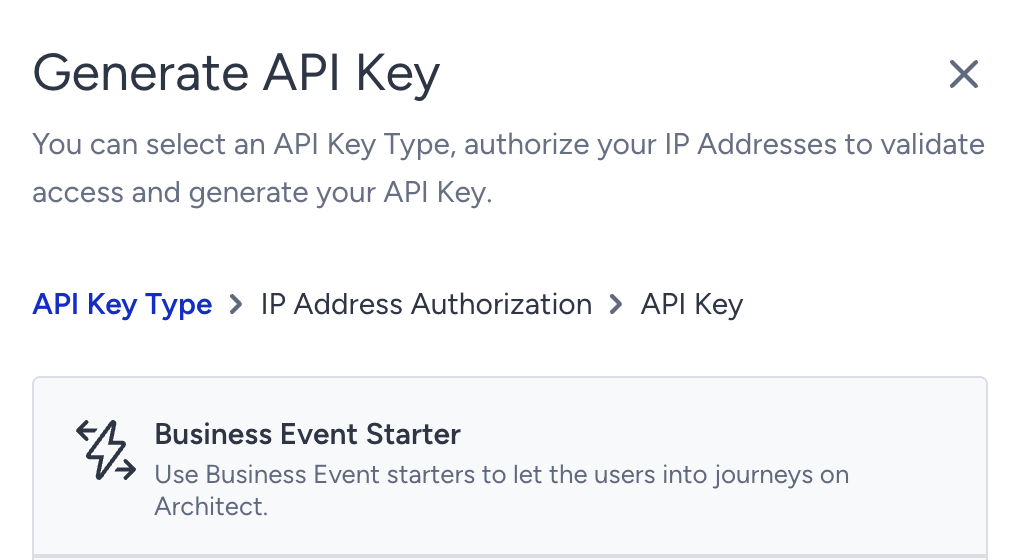
Authentication and API keys
To send a request, you must include a valid API key for authentication. Navigate to the Settings > Inone Settings > Integration Settings > API Keys to generate or retrieve your API key. Requests sent without a valid API key will be rejected by the system.
Send the request
Your system must send a POST request to the target endpoint.
Target endpoint | https://architect-business-event.useinsider.com/v1/send |
Payload format | The request must use the matching format of the sample API payload defined during creation. |
User entry | Each successful request triggers the starter and takes up to 1,000,000 users on the journey per payload. |
Rate limits | Up to 5 requests per panel per hour. For every additional request within that hour, the system will return an error. |
Idempotency | Always include an idempotencyKey to prevent duplicate entries if the same API call is sent multiple times. |
Header | Description | Sample Value |
|---|---|---|
x-api-key | This key is required to authorize your request. Refer to API Authentication Tokens to generate your token. | 1a2b3c4d5e6f |
content-type | application/json | You should enter it as application/json at all times. |
Sample API payload
Below is a sample payload for a concert announcement event. The same format must be followed when triggering the live journey.
{
  "payload": {
    "eventType": "concert_announcement",
    "artistName": "Lady Gaga",
    "tourName": "The Mayhem Ball",
    "concertDate": "2026-09-12T20:00:00Z",
    "venue": "Madison Square Garden",
    "city": "New York",
    "country": "USA",
    "ticketSaleStart": "2026-03-20T10:00:00Z",
    "ticketUrl": "https://tickets.example.com/lady-gaga-mayhem-ball-nyc",
    "genre": "Pop"
  },
  "triggerId": 42,
  "idempotencyKey": "concert-announcement-lady-gaga-mayhem-ball-nyc-2026-09-12"
}
The Trigger ID is a unique identifier assigned to your journey and all future versions, and it serves as the routing mechanism for your API calls. While you can enter any placeholder value when defining your sample API payload, triggering an active journey requires the actual value found in the top-right corner of the On Business Event starter page. If the Trigger ID is missing from your payload, the system will return an error response. However, if the ID is provided but incorrect, you will not receive an error, but the journey will simply fail to trigger.
The Idempotency Key is a unique value that you must generate and include with every payload to ensure that each request is processed exactly once. Architect uses this key to identify and filter out duplicate requests, which is essential for preventing users from entering the same journey multiple times for the same event. Without this idempotency protection, network retries or accidental duplicate API calls could result in redundant journey entries and duplicate messages for users.
The payload object contains the specific details regarding the business event, such as event names, dates, or locations. These event parameters compare the event date against the user attributes and match users within the starter's segmentation section. Furthermore, any variable defined in this payload can later be used as dynamic content to personalize messages throughout your journey. The parameters sent in your actual API request must strictly match the keys and data types defined in your API payload. If the keys in your actual payload do not match those given during setup, or if the data format of a value is incorrect, Architect will return an error response. For example, if the genre is defined as a string in your sample but you send a number in the actual payload, the API call will fail with an error.
Test your journey
You can activate your journey in Test status to test it.
1. Click the Test icon and select your testing method. Only specific profile testing is available for this starter.
2. Provide the unique identifier (e.g., email address) of a user in the test modal to test with that user.
A yellow ribbon banner appears on the canvas, reminding you to send a payload matching the business event and user segmentation criteria to start the test. You must send an actual request as if the journey were active.

Architect evaluates your defined segmentation and verifies if the user fits the journey. The test user will enter the journey only if they match the segment configured in the starter.
Similarly, for the dry run status, you must send actual requests to the journey for users to enter.
Tips and tricks
Users may come from the Upsert User Data API or other sources without language information. Therefore, select the All Languages option in the launch settings pop-up.
You can include up to 1 million users in your journey, even if your segment is larger. Narrow your segment to control the users who enter the journey.
Use additional segment filters to improve user segmentation.
Since the Trigger ID remains the same when you create a new journey version, you do not need to adjust your payload each time.