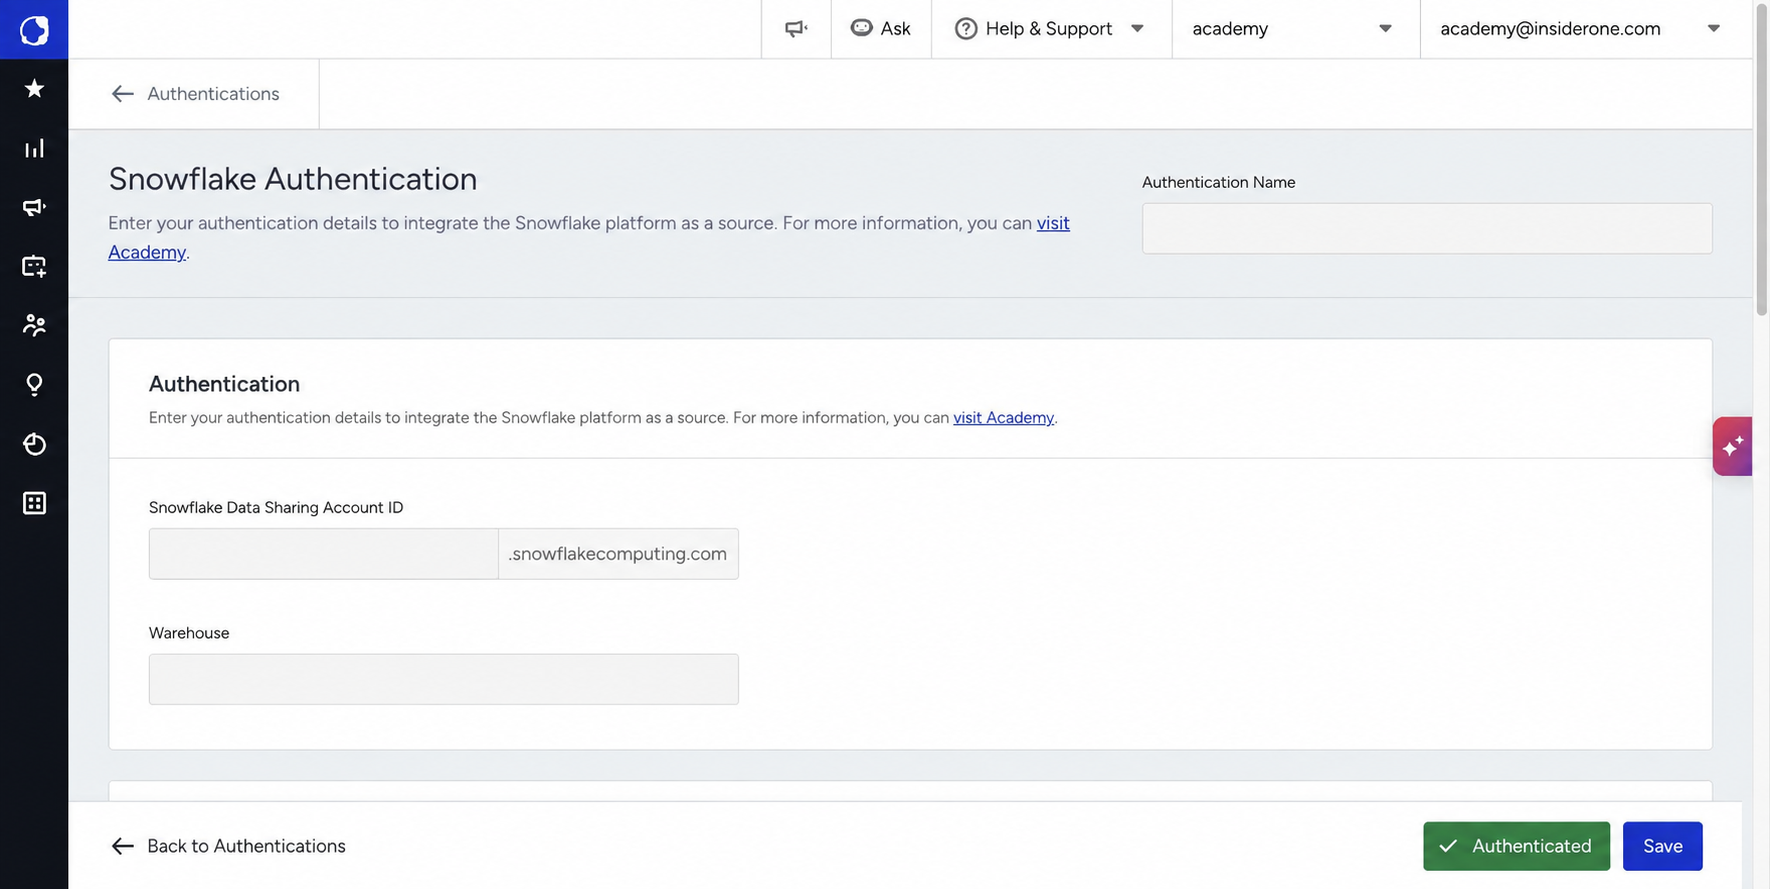
This page lists what you prepare in Snowflake and what you enter in Insider One to create a Snowflake authentication. For instructions on how to create, use, and manage authentications, refer to Authentications.
Before you begin
A Snowflake Enterprise or Business Critical account.
ACCOUNTADMIN access for the user who sets up the authentication.
Access to the schema and tables that include user and event data.
The name of the warehouse you want Insider One to use. To get it, go to Compute > Warehouses in Snowflake.
Your account value. To find it, go to Account Details in Snowflake and copy the first part of the Account/Server URL.
The size of the warehouse determines throughput. For large, initial loads (where you have a high volume of data), we recommend scaling up the warehouse to maximize parallel processing and achieve the fastest possible ingestion time.
If your Snowflake account uses a network policy, add the Insider One IP addresses to its allowed IP list. Without this, Insider One's connection is blocked and the authentication does not verify. If your account does not use a network policy, you can skip this step. To see the addresses, refer to Allowlist the Insider One IP addresses.
Enter the authentication details
Open the Snowflake authentication form as described in the Create an authentication section of Authentications. Then complete the following steps.
Enter your Snowflake Data Sharing Account ID. The field ends with .snowflakecomputing.com.
Enter your Warehouse.
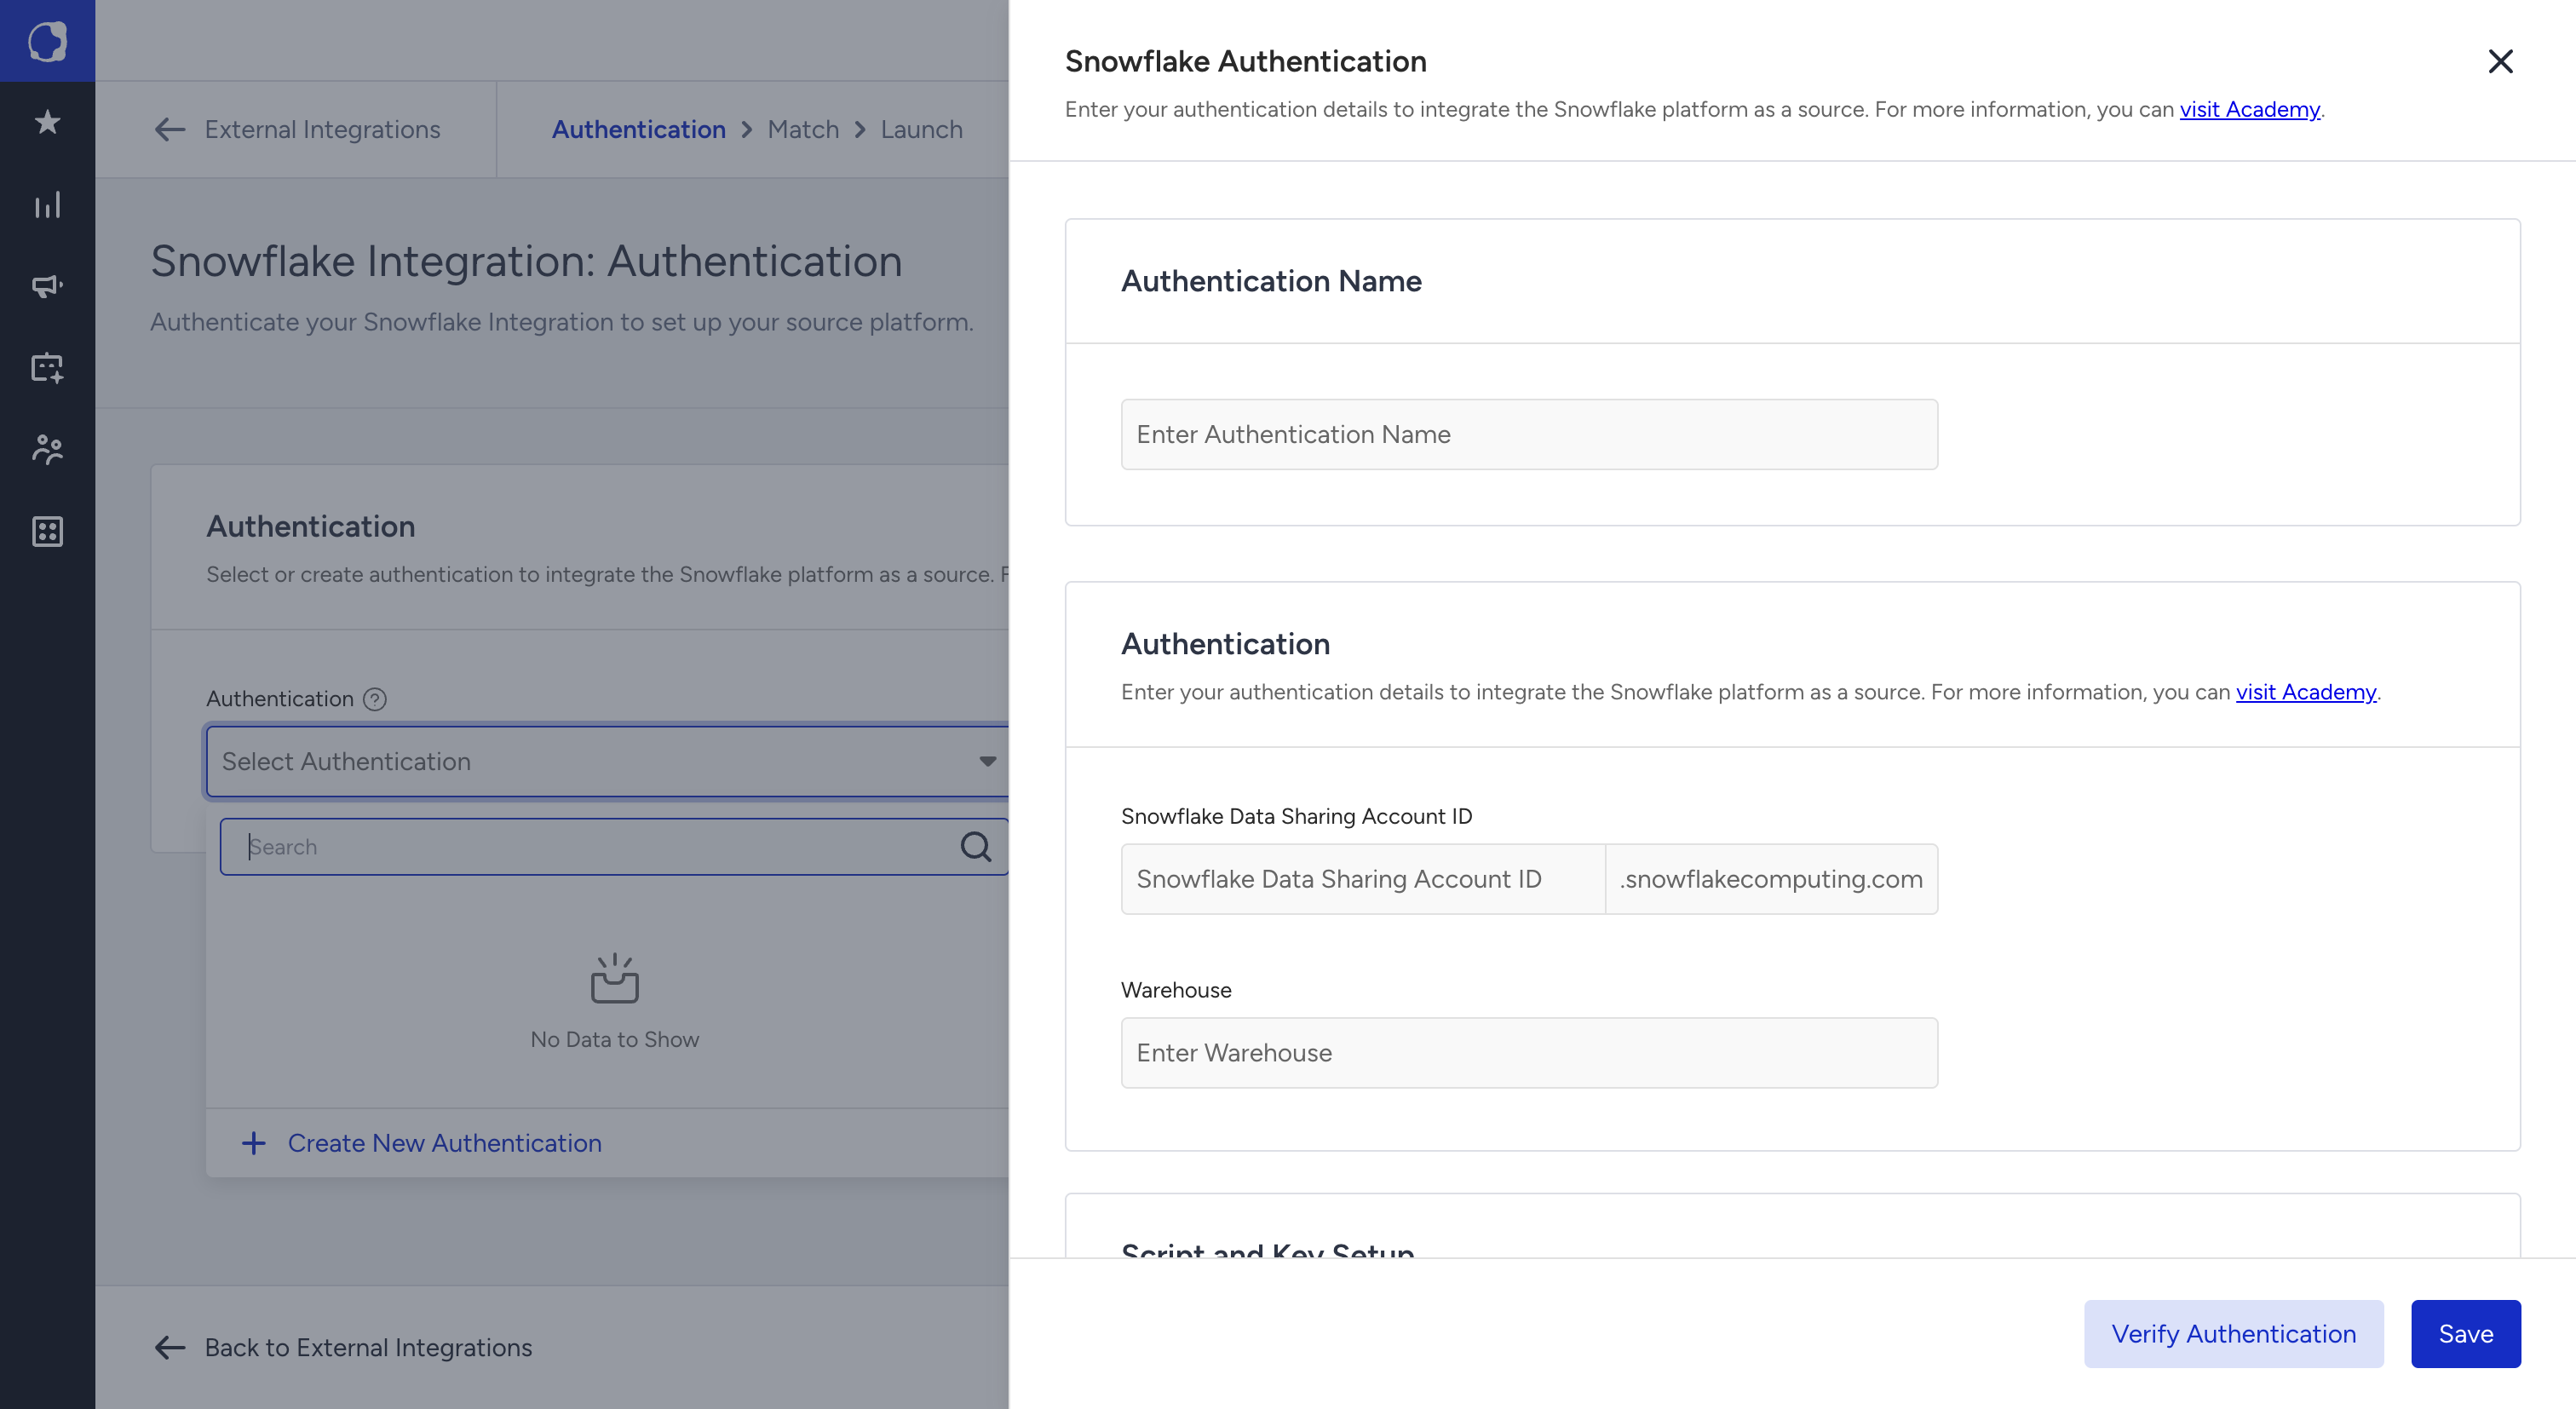
Set up the script and key
In the Script and Key Setup section, you create a secure Snowflake User and RSA key pair to enable your Insider One Snowflake integration. Make sure you grant the necessary permissions to the schemas you want to sync to Insider One.
To create a Private Key and a Public Key, copy the following script and run it in the terminal of your local machine.
openssl genrsa 2048 | openssl pkcs8 -topk8 -inform PEM -out rsa_key.p8 -nocryptopenssl rsa -in rsa_key.p8 -pubout -out rsa_key.pubUpload the Private Key file you generated. You can upload either a decrypted file or an encrypted file and enter your Passphrase. Upload a PEM file no larger than 5 MB. The SQL values are filled in automatically from the PEM file you upload and the Warehouse name you enter.
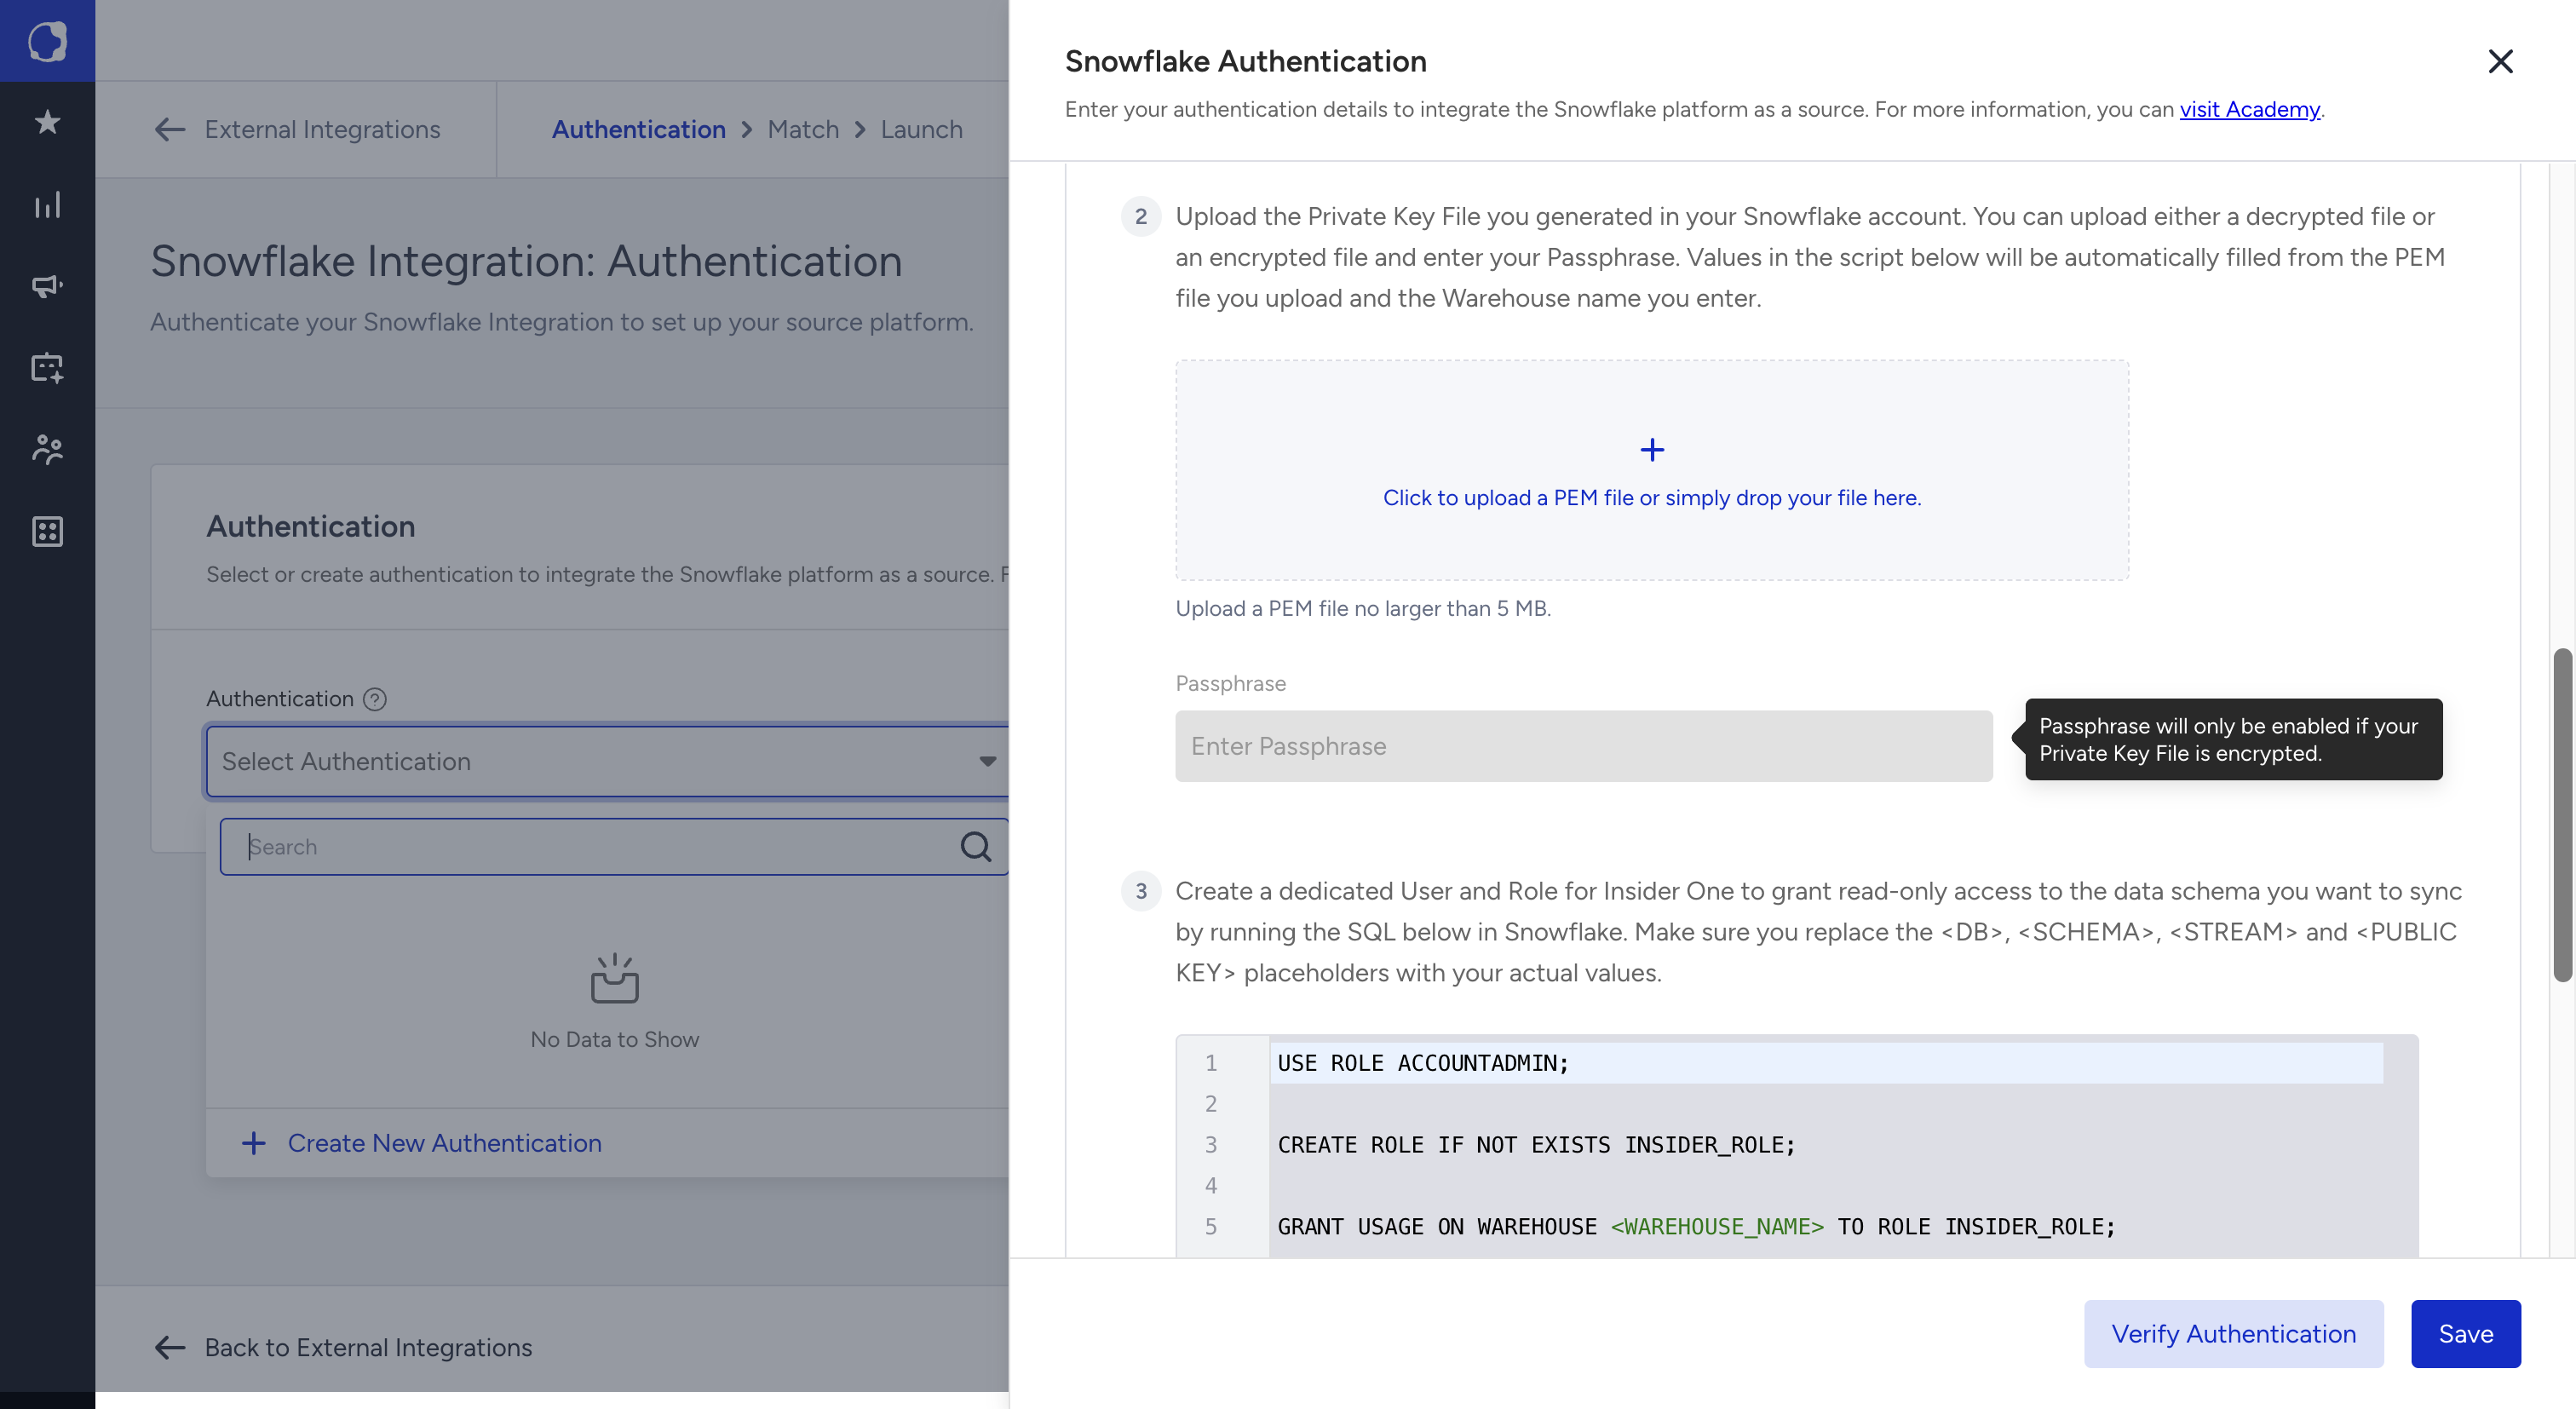
To create a dedicated User and Role for Insider One with read-only access to the data schema you want to sync, run the following SQL in Snowflake. Copy the SQL from the form.
USE ROLE ACCOUNTADMIN;CREATE ROLE IF NOT EXISTS INSIDER_ROLE;GRANT USAGE ON WAREHOUSE <WAREHOUSE_NAME> TO ROLE INSIDER_ROLE;CREATE USER IF NOT EXISTS INSIDER_USERDEFAULT_ROLE = INSIDER_ROLEDEFAULT_WAREHOUSE = <WAREHOUSE_NAME>DEFAULT_NAMESPACE = <DB_NAME>.<SCHEMA_NAME>MUST_CHANGE_PASSWORD = FALSERSA_PUBLIC_KEY = '<RSA_PUBLIC_KEY>';GRANT ROLE INSIDER_ROLE TO USER INSIDER_USER;CREATE OR REPLACE STORAGE INTEGRATION INSIDER_INTEGRATION_<PARTNER_NAME>TYPE = EXTERNAL_STAGESTORAGE_PROVIDER = 'S3'STORAGE_AWS_ROLE_ARN = '<PREFILLED_BY_INSIDER_ONE>'STORAGE_AWS_EXTERNAL_ID = '<PREFILLED_BY_INSIDER_ONE>'ENABLED = TRUESTORAGE_ALLOWED_LOCATIONS = ('<PREFILLED_BY_INSIDER_ONE>');GRANT USAGE ON INTEGRATION INSIDER_INTEGRATION_<PARTNER_NAME> TO ROLE INSIDER_ROLE;GRANT USAGE ON DATABASE <DB_NAME> TO ROLE INSIDER_ROLE;GRANT USAGE ON SCHEMA <DB_NAME>.<SCHEMA_NAME> TO ROLE INSIDER_ROLE;GRANT SELECT ON ALL TABLES IN SCHEMA <DB_NAME>.<SCHEMA_NAME> TO ROLE INSIDER_ROLE;GRANT SELECT ON FUTURE TABLES IN SCHEMA <DB_NAME>.<SCHEMA_NAME> TO ROLE INSIDER_ROLE;GRANT SELECT ON STREAM <DB_NAME>.<SCHEMA_NAME>.<STREAM_NAME> TO ROLE INSIDER_ROLE; --Make sure that the table you select has an active Stream dedicated for Insider.In the form SQL, the storage integration name, role ARN, external ID, and allowed location are filled in for your account. The
<WAREHOUSE_NAME>value is filled in from the Warehouse field, and the key values are filled in from the PEM file you upload. Replace every placeholder that remains in the SQL, such as<DB_NAME>,<SCHEMA_NAME>, and<STREAM_NAME>,with your actual values.
The table you want to sync needs an active Stream dedicated to Insider One. To learn how to prepare the Stream, refer to Import Data from Snowflake to Insider One.
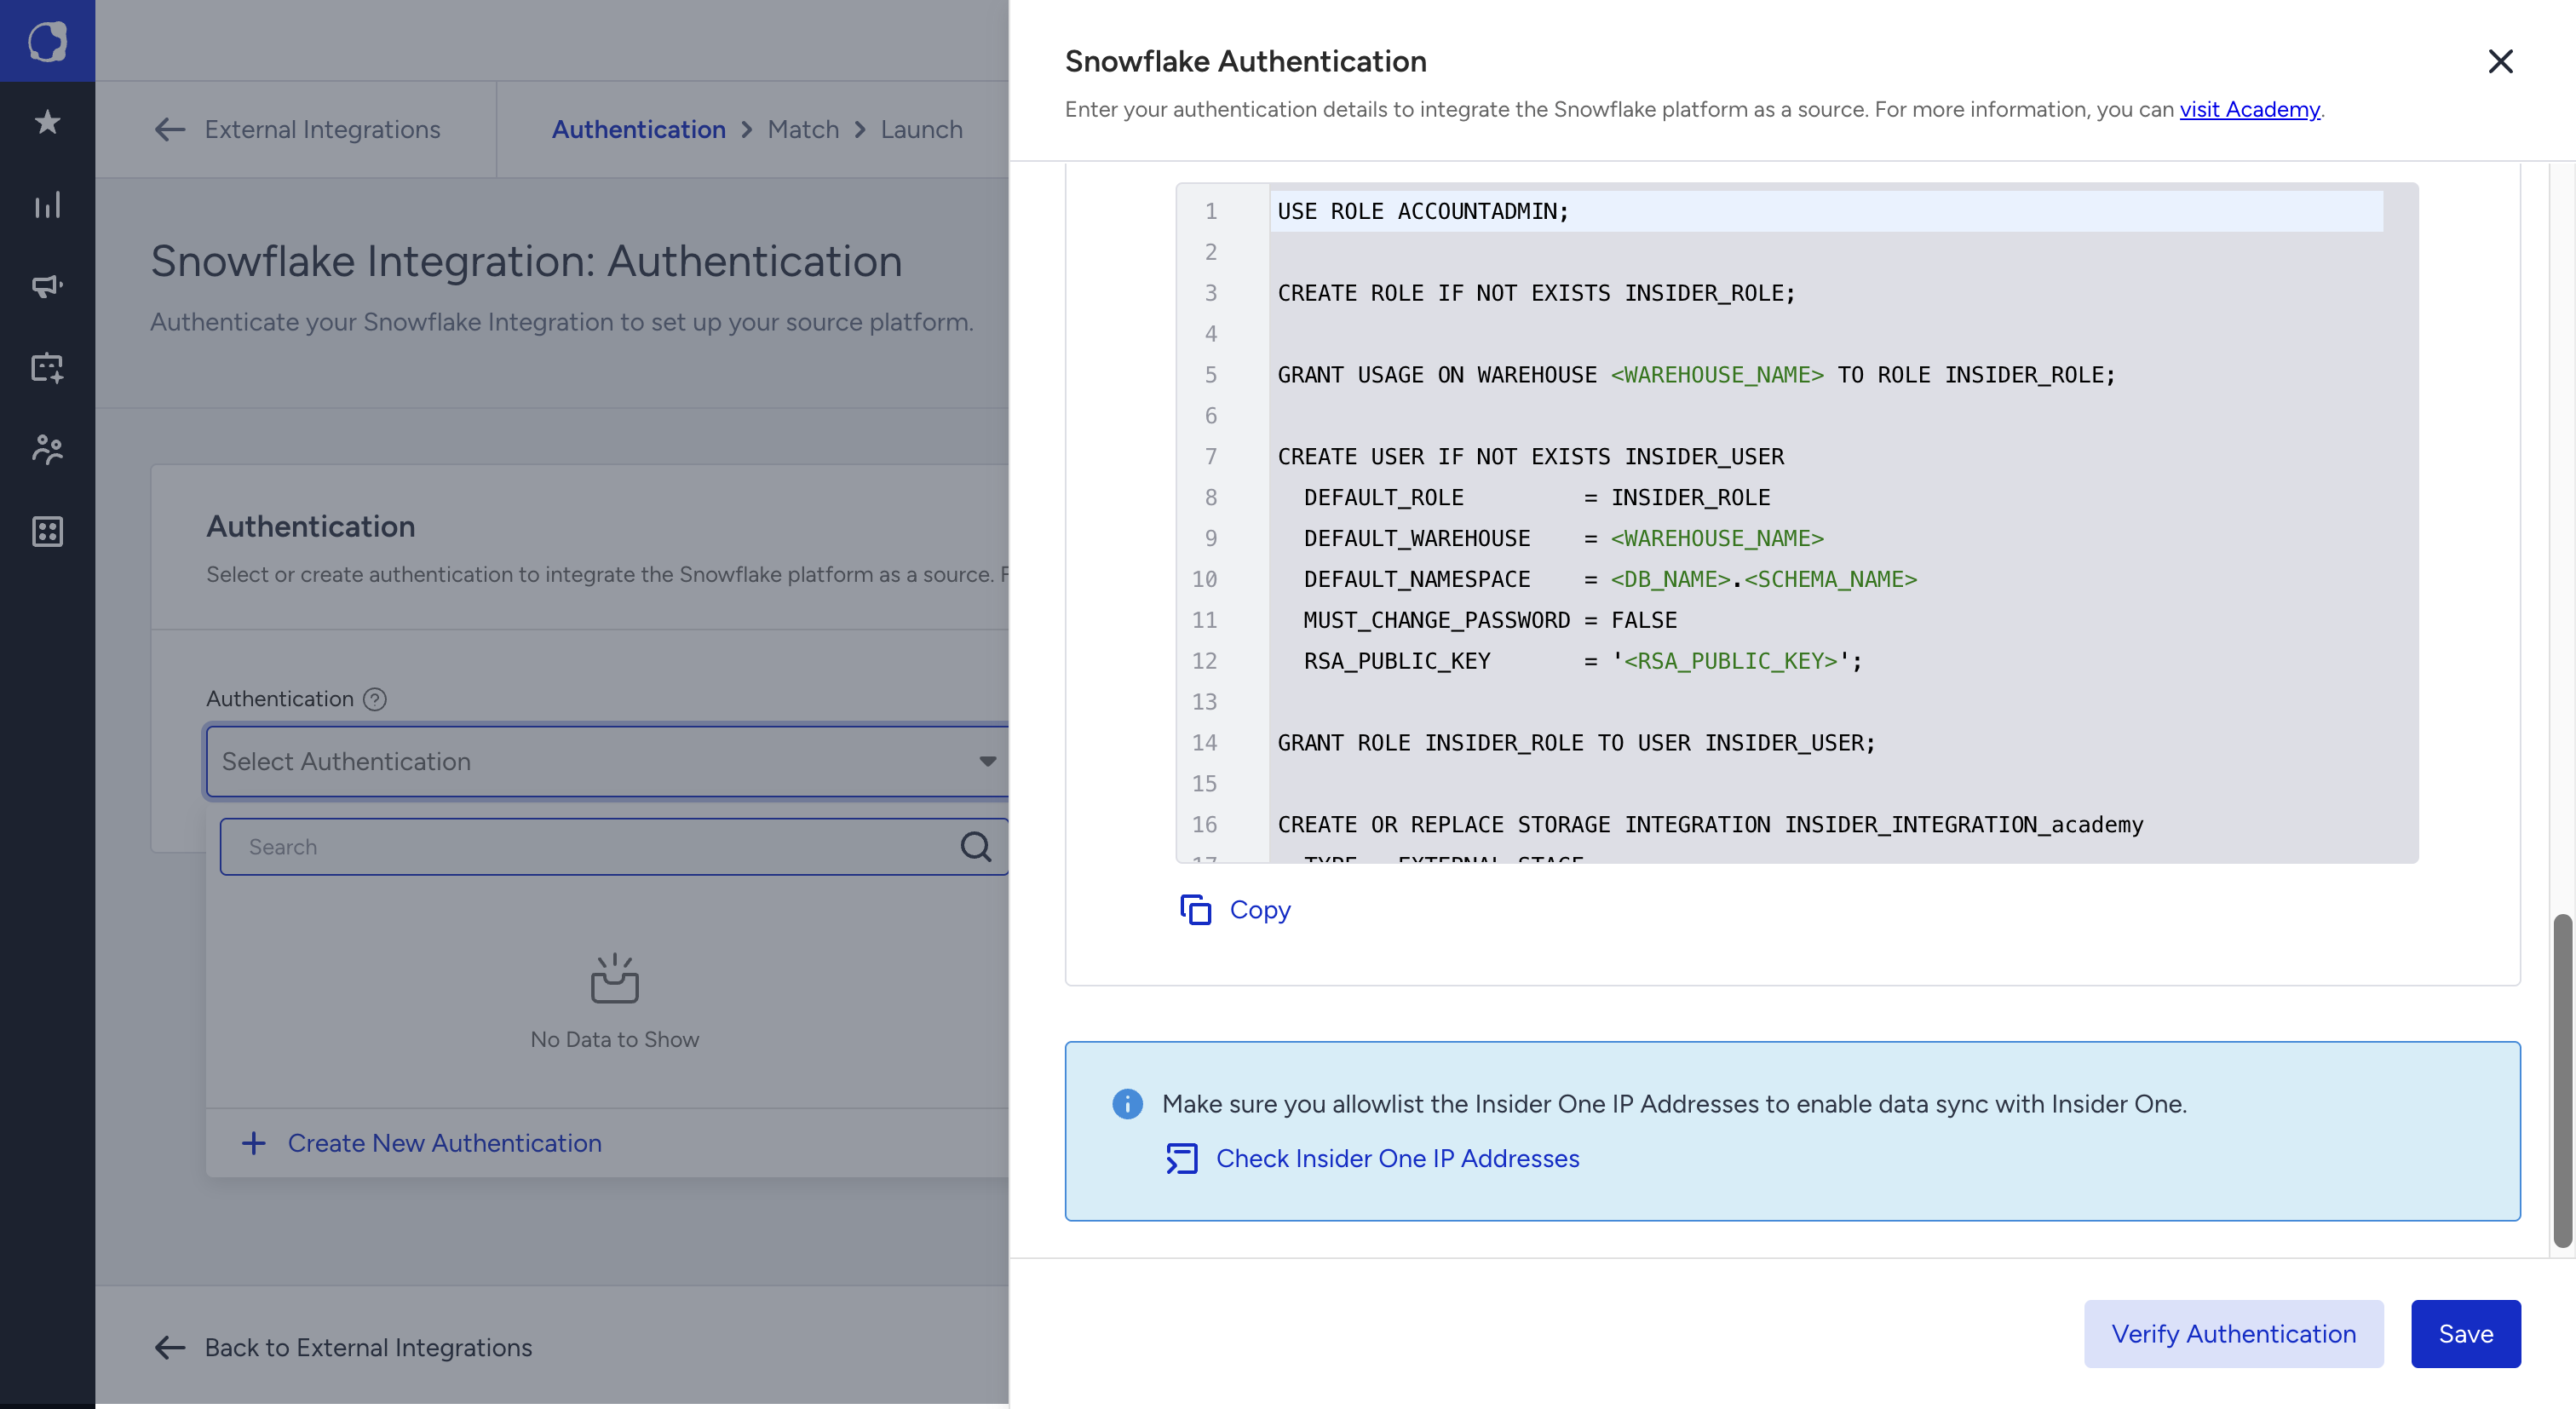
If you replace
<RSA_PUBLIC_KEY>yourself, use only the raw key value. Do not include the lines-----BEGIN PUBLIC KEY-----and-----END PUBLIC KEY-----.
Do not modify any values in the SQL except those enclosed in
< >. For example, the default user role should remainINSIDER_ROLE.
Allowlist the Insider One IP addresses
The form ends with this information box: "Make sure you allowlist the Insider One IP Addresses to enable data sync with Insider One." To see the addresses, click Check Insider One IP Addresses.
Verify and save the authentication
After you run all the SQL successfully on the Snowflake side, click Verify Authentication. After a successful verification, the button turns into a green Authenticated label with a check mark.
Click Save.