Journey Prioritization is crucial for companies that aim to stay competitive and achieve their business goals. It enables the delivery of personalized and consistent experiences to customers across channels. Companies can prioritize their journeys to focus resources on the most impactful interactions, thereby improving engagement, retention rates, and customer satisfaction.
According to research conducted on journey prioritization, companies with a strong strategy experience a 91% higher retention rate, 29% higher customer satisfaction, and a 32% increase in customer lifetime value compared to those without prioritization. Additionally, prioritizing journeys leads to a 50% increase in customer satisfaction and 25% increase in revenue.
The abundance of customer data available today underscores the need for journey prioritization. With insights into behaviors, preferences, and pain points, companies can create tailored journeys. However, without prioritization, irrelevant experiences may overwhelm customers, leading to reduced engagement and satisfaction.
In summary, journey prioritization is essential for achieving better business outcomes, optimizing customer experiences, and leveraging the power of customer data.
This article explains the following:
- How does the prioritization algorithm work?
- How do you utilize journey prioritization?
- Example scenario
- How do you use journey prioritization?
Prioritization is the preferred orchestration method for advanced marketing teams. It offers flexibility and avoids broken and conflicting customer journeys and messages. In Architect, you can combine prioritization rules to ensure customers receive the best experience while receiving the necessary messages.
It is important to note that prioritization is not the same as frequency capping. Frequency capping is a "first-come, first-served" approach where the earliest scheduled message gets sent, regardless of relevance. Prioritization, however, strategically selects the most appropriate or important message for each customer at a specific moment regardless of its send time.
You can use prioritization and frequency capping to implement a holistic marketing strategy. Frequency capping ensures that customers are not overwhelmed with excessive messages, while prioritization ensures that the right message is delivered to each customer at the right time. This combined approach optimizes the value and impact of your communication efforts, leading to improved customer experiences, higher engagement, and better results.
For example, consider two prioritization groups: Group 1 and Group 2. Under Group 1, you have three journeys ordered as A, B, and C, while under Group 2, the order is D, E, and F. Each journey within a group is assigned a priority level, and the groups themselves are also assigned priority levels relative to each other.
Now, imagine a scenario where a user becomes eligible for journey A (under Group 1) and journey D (under Group 2) simultaneously. In this case, the Journey Prioritization feature considers the priority levels assigned to both individual journeys and their respective groups.
If Group 1 has a higher prioritization level than Group 2, the system will prioritize the journeys within Group 1 over the ones in Group 2. As a result, even though the user is eligible for journeys A and D, the system will direct the user to journey A because it belongs to the higher-priority group, Group 1.
This hierarchical approach ensures that not only individual journeys but also the groups that contain them are prioritized. You can set priority levels for both groups and individual journeys to control the order in which users experience different groups of journeys, aligning with your specific business objectives and customer engagement strategies.
When multiple journeys are eligible for a user within the same prioritization group, the system performs real-time eligibility checks to determine the highest-priority journey based on each journey's individual priority. The timeout duration still applies, allowing higher-priority journeys to become eligible during that waiting period.
How does the prioritization algorithm work in Architect?
The real-time eligibility checks follow these steps:
- User Eligibility: When a user becomes eligible for multiple journeys, the system identifies all eligible journeys based on defined criteria and user attributes.
- Priority Evaluation: The system evaluates the priority levels assigned to each eligible journey and compares them. Higher-priority journeys are given precedence over lower-priority ones.
- Timeout Duration: The system waits for the configured timeout duration, allowing higher-priority journeys to become eligible during that period.
- Determining the Highest-Priority Journey: At the end of the timeout duration, the system determines the highest-priority journey for which the user is eligible. If no higher-priority journey becomes eligible within the waiting period, the user is directed to the journey with the highest priority.
- Managing User Exits and Entries: The Journey Prioritization feature seamlessly manages user exits and entries between journeys. The system automatically handles the transition if a user is already engaged in a lower-priority journey and becomes eligible for a higher-priority journey.
The following cases help you get a better understanding of how the journey prioritization works in different scenarios, including edge cases and potential caution points:
Case 1
| Case | Simultaneous eligibility for multiple journeys |
| Example | A user, John, becomes eligible for Journey A and Journey B simultaneously. |
| Scenario | Journey A has a higher priority than Journey B. |
| How it works | The system performs real-time eligibility checks and evaluates the priority levels of both journeys. As Journey A has a higher priority, John is directed to Journey A. Journey B is ignored in this case. |
| Caution | There cannot be multiple journeys with the same priority setting. |
Case 2
| Case | Eligibility for multiple journeys under different groups |
| Example | A user, John, becomes eligible for Journey A under Group 1, and Journey B under Group 2 simultaneously. |
| Scenario | Group 1 has a higher priority than Group 2. |
| How it works | The system performs real-time eligibility checks and evaluates the priority levels of both journeys and groups. Since Group 1 has higher priority, John is directed to Journey A rather than Journey B. Between-group prioritizations are always superior to in-group prioritizations. |
| Caution | There cannot be multiple journeys with the same priority setting. |
Case 3
| Case | Change in journey eligibility during the timeout duration |
| Example | A user, Sarah, becomes eligible for Journey C and Journey D simultaneously during the timeout duration of 1 minute. |
| Scenario | Journey C has a higher priority than Journey D. |
| How it works | The system performs real-time eligibility checks during the timeout duration. If Journey C remains the highest-priority journey after the timeout, Sarah will be directed to Journey C. However, if Journey D has a higher priority than Journey C and becomes eligible during the timeout, Sarah will be directed to Journey D instead. |
| Caution | Setting an appropriate timeout duration is essential to allow for potential changes in journey eligibility. If the timeout duration is too short, there may not be enough time for higher-priority journeys to become eligible, resulting in suboptimal user experiences. |
Case 4
| Case | User already engaged in a journey |
| Example | User Emma is currently in Journey X when she becomes eligible for higher-priority Journey Y. |
| Scenario | Journey Y has a higher priority than Journey X. |
| How it works | The system automatically manages the user's journey transition. Emma exits Journey X and enters Journey Y, ensuring she is constantly engaged in the highest-priority journey she is eligible for. |
| Caution | Abruptly exiting users from a journey they are already engaged in may disrupt their experience. When moving users between journeys, care should be taken to ensure a seamless transition and continuity of user context. |
Case 5
| Case | Testing and debugging journeys |
| Example | Marketer Alex wants to test and debug Journey Z without following the regular prioritization process. |
| Scenario | Journey Z is in the development or troubleshooting phase. |
| How it works | Alex can utilize the bypass feature by selecting the "Exit - Prioritization" reason code. This allows Alex to directly access Journey Z without going through the normal prioritization process, making testing and debugging the journey easier. |
| Caution | The bypass feature should only be used for testing and debugging. Once testing is complete, it's essential to disable it to ensure the regular prioritization process resumes. |
How do you utilize Journey Prioritization?
Before applying any prioritization to your journeys, you can consider how to:
- Define journey priorities to set priority levels,
- Configure timeout duration,
- Analyze the effectiveness of prioritization with reporting.
Define journey priorities
You can assign priority levels to your journeys in multiple ways. You can use a numerical scale (e.g., 1-5), with 1 representing the highest-priority journey and 5 the lowest-priority journey. Alternatively, you can use labels such as "High," "Medium," and "Low" to categorize the journeys. Choose a method that aligns with your preferences and provides a clear understanding of the prioritization hierarchy.
Prioritization within a group
Prioritization within a group allows for differentiating journeys based on their relative importance and desired outcomes. Assigning priority levels to journeys within a group ensures that higher-priority journeys are given precedence over lower-priority ones, optimizing the user experience within that group.
Prioritization between groups
Prioritizing between groups can be advantageous when there are distinct objectives or stages in the customer journey that require different levels of attention. It allows for strategic resource allocation and focus across multiple groups, prioritizing the most impactful journeys throughout the entire customer journey.
You can consider the following factors that influence the priority levels of journeys:
- Alignment with customer journey stages: Consider how prioritization within and across groups aligns with the different stages of the customer journey. Certain groups may be more relevant at specific stages, and prioritizing between them can help guide users through the various stages with tailored experiences.
- Business impact: Evaluate the potential impact of a journey on your business objectives. Journeys that directly contribute to revenue generation or customer retention may be assigned higher priority levels.
- Customer value: Assess the value each journey brings to your customers. Journeys that provide personalized experiences, address specific pain points, or deliver exceptional value to customers may receive higher priority levels.
- Strategic goals: Consider how well each journey aligns with your strategic goals. Journeys that support key initiatives, such as promoting new products or expanding into new markets, may be given higher priority levels.
- Conversion potential: Analyze the likelihood that journeys will lead to conversions or desired outcomes. Journeys with a higher conversion rate or a significant impact on user behavior may warrant higher priority levels.
- Seasonality and campaigns: Consider any seasonal factors or time-sensitive campaigns that require specific journeys to be prioritized during certain periods. For example, a holiday-themed campaign may warrant higher priority for related journeys during the corresponding season.
Configure timeout duration
Configuring the timeout duration is a crucial aspect of the Journey Prioritization feature. The timeout duration is the waiting period a user must wait before entering an eligible journey. You can set an appropriate timeout duration to strike a balance between giving higher-priority journeys a chance to become eligible and ensuring a timely progression through the user journey.
You can consider the following steps when configuring the timeout duration:
- User behavior analysis: Analyze typical user behavior patterns across your journeys. Understand the average time users take to complete a journey or move from one stage to another. This analysis helps you set a timeout duration that aligns with the expected user journey duration.
- Journey complexity: Evaluate the complexity and length of your journeys. If your journeys involve multiple stages, decision points, or interactive elements, you may need to set a longer timeout to give users enough time to progress through the journey.
- User experience considerations: Consider the desired user experience and engagement levels. A longer timeout duration may give users more time to explore and engage with the content of a journey, while a shorter duration may create a sense of urgency and prompt quicker decision-making.
- Journey frequency and demand: Assess the frequency at which users are eligible for journeys and the demand for each journey. If users frequently become eligible for journeys or specific journeys are highly in demand, you may need to set a shorter timeout duration to ensure timely progression and avoid bottlenecks.
- Business objectives: Align the timeout duration with your business objectives and desired outcomes. Consider the specific goals you want to achieve through your journeys. For example, a shorter timeout duration may be appropriate if the objective is to drive immediate conversions or time-sensitive promotions.
- User expectations and context: Consider your users' expectations and context. Consider factors such as industry norms, user preferences, and the urgency associated with the journeys. For example, users may expect faster journey progression in time-sensitive industries like travel or ecommerce, which necessitates a shorter timeout duration.
- Testing and optimization: Continuously monitor and test different timeout durations to assess their impact on user engagement and desired outcomes. Conduct A/B tests, gather feedback, and analyze relevant metrics to identify the optimal timeout duration for your specific user base and journeys.
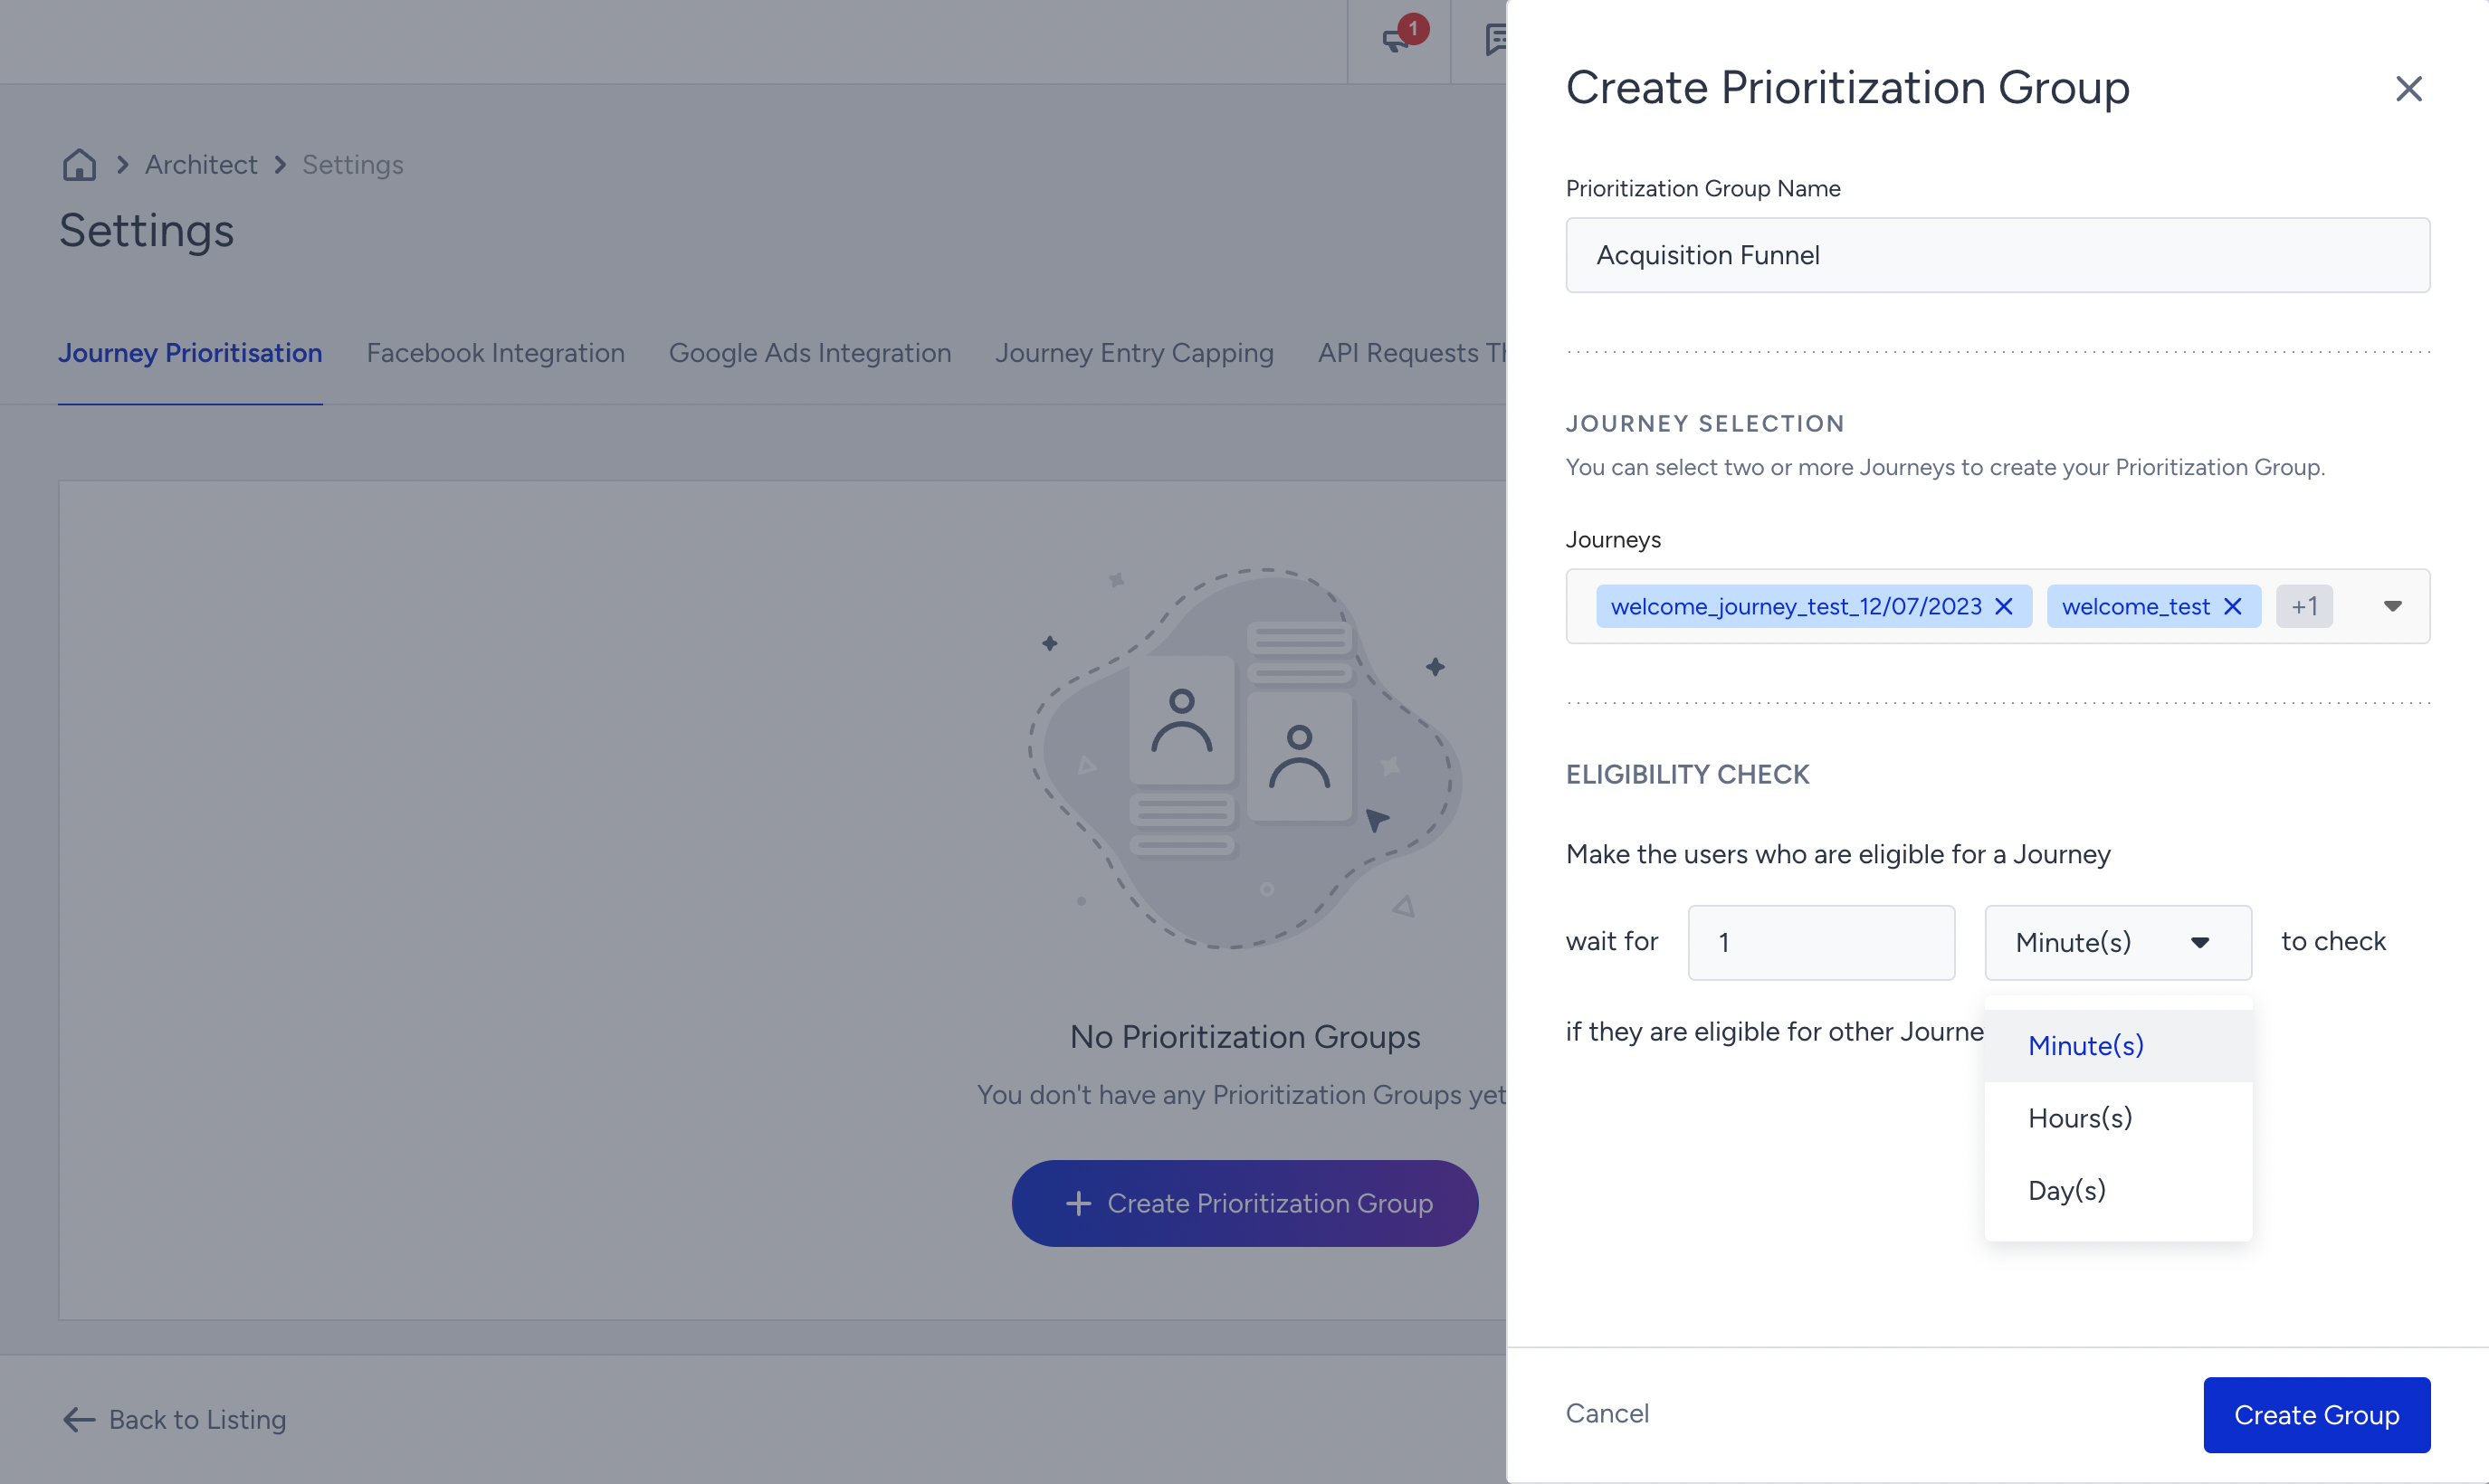
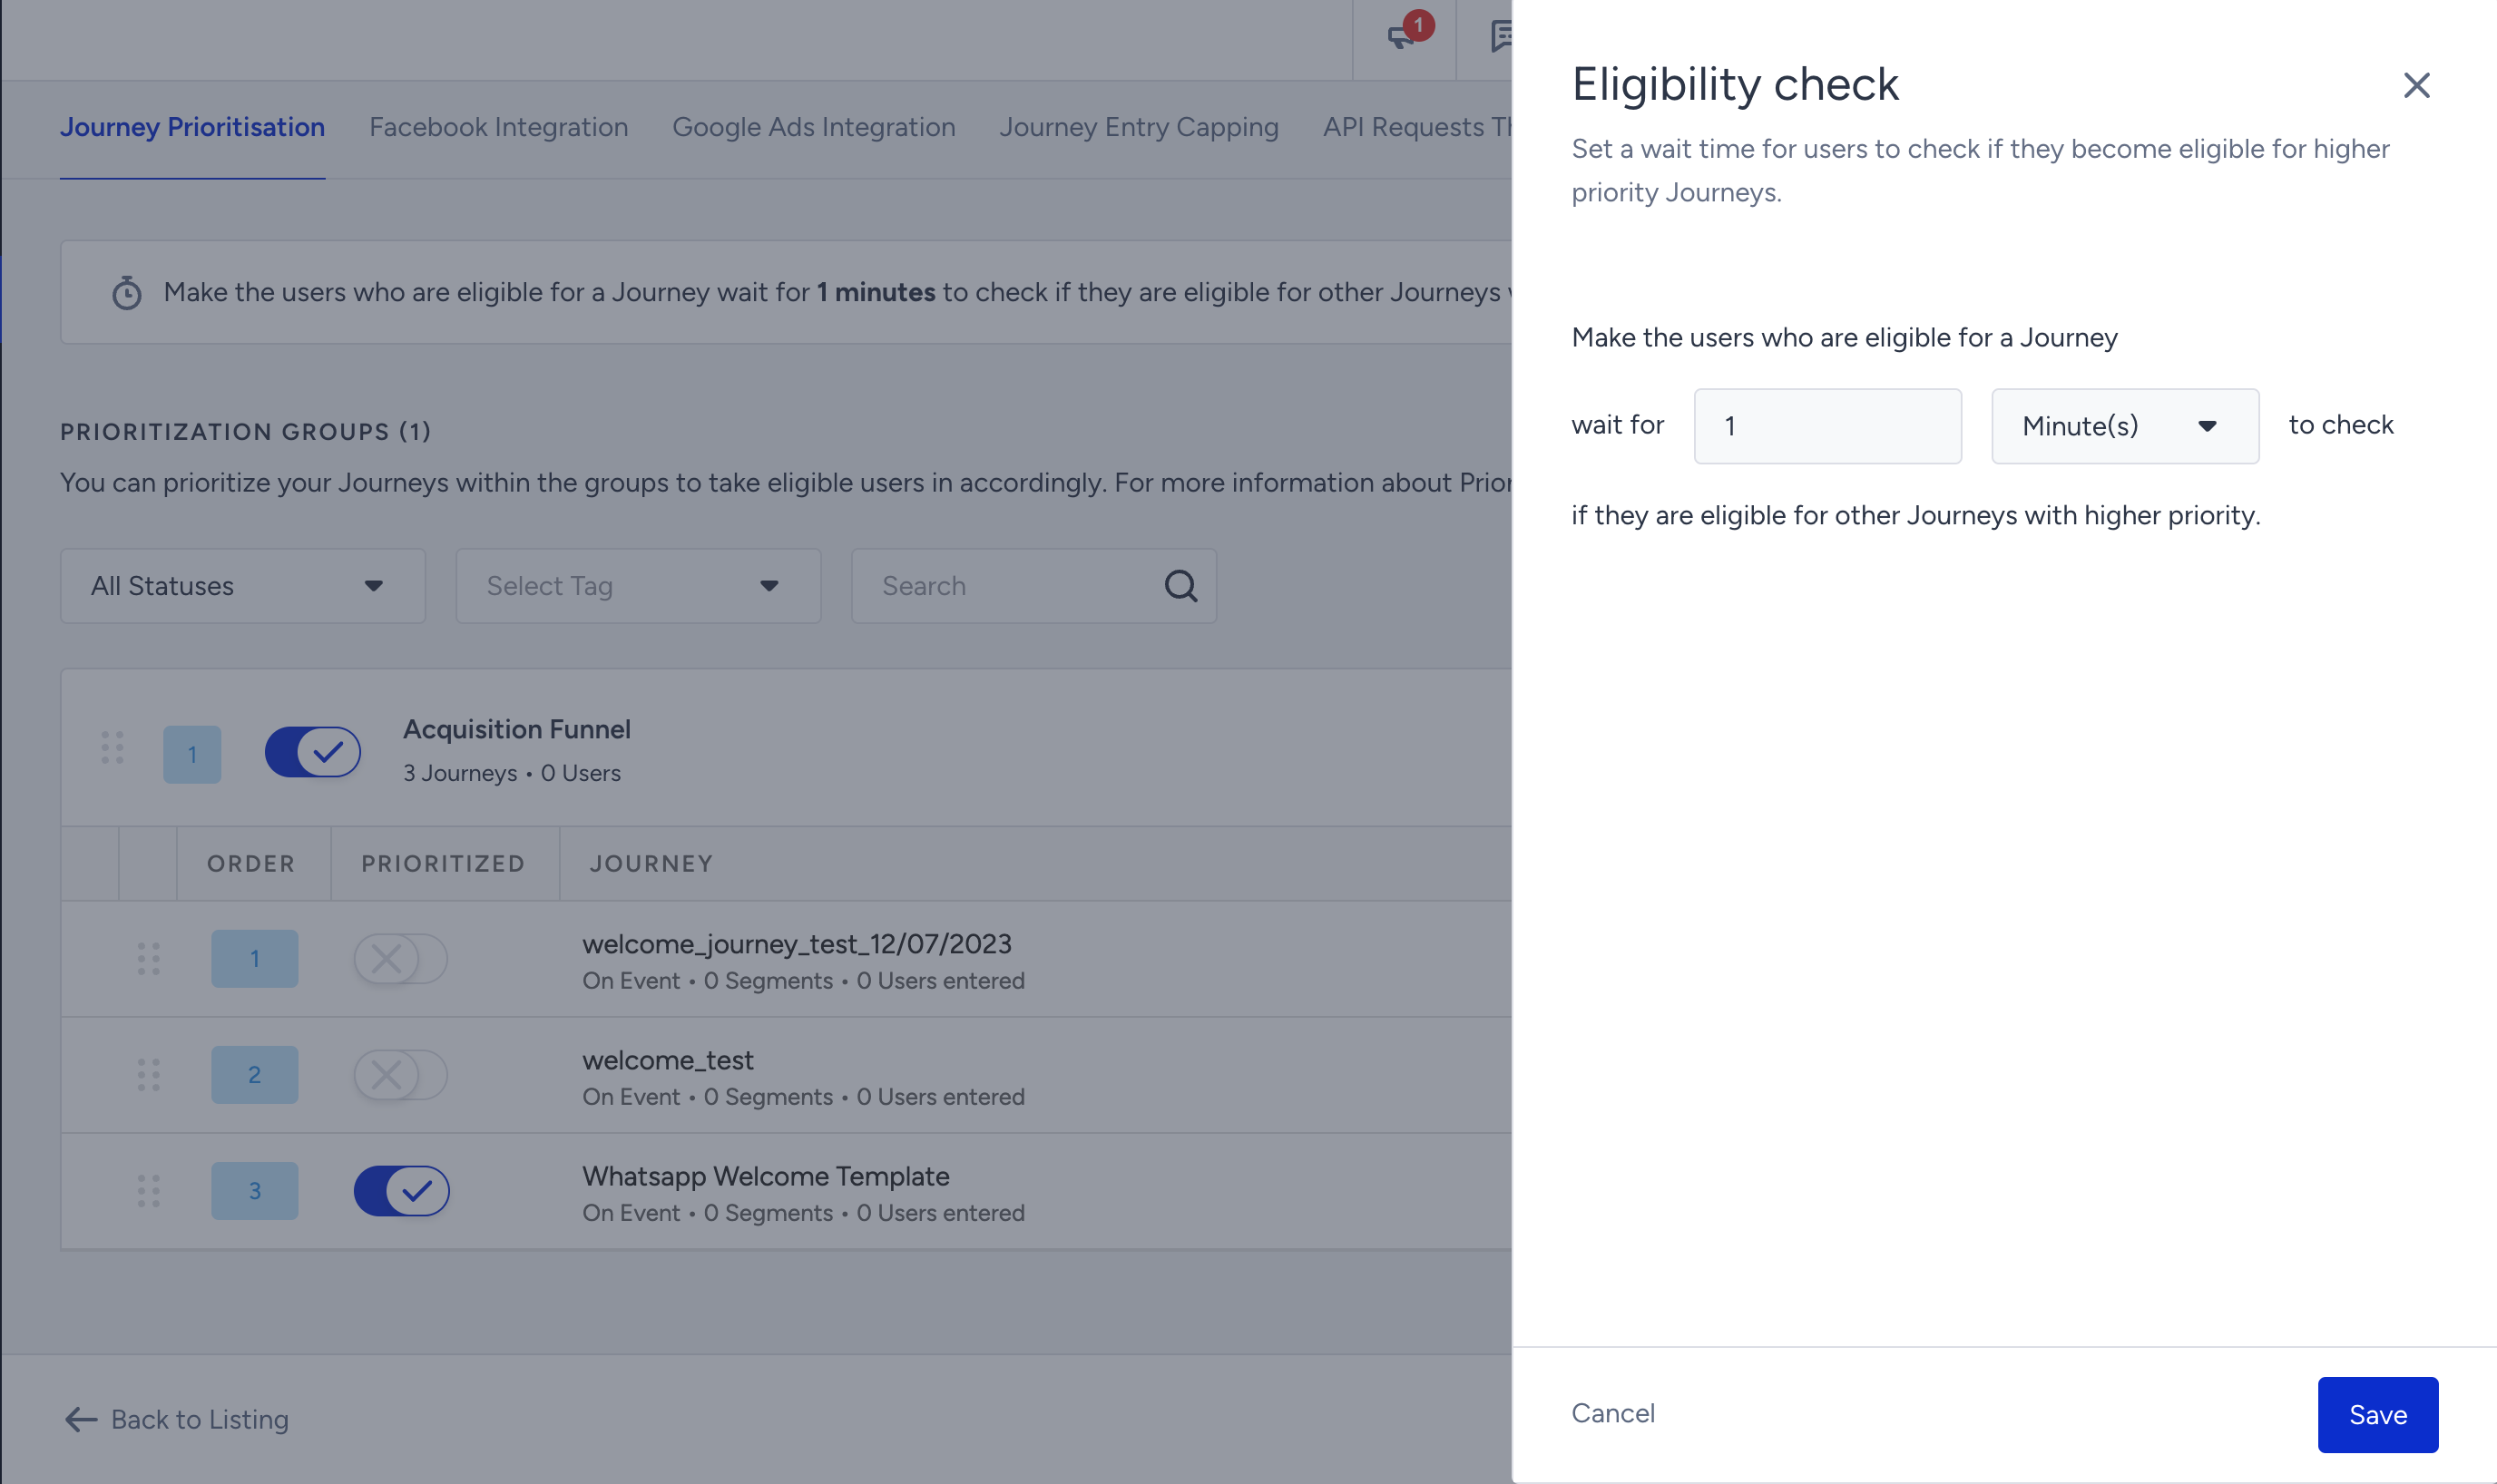
Once you have considered the factors above, you can set the timeout duration within the Journey Prioritization feature. The feature allows you to configure the timeout duration according to your specific requirements, with a minimum duration of 1 minute. You should set a duration that strikes a balance between giving higher-priority journeys a fair chance to become eligible and ensuring an optimal user experience.
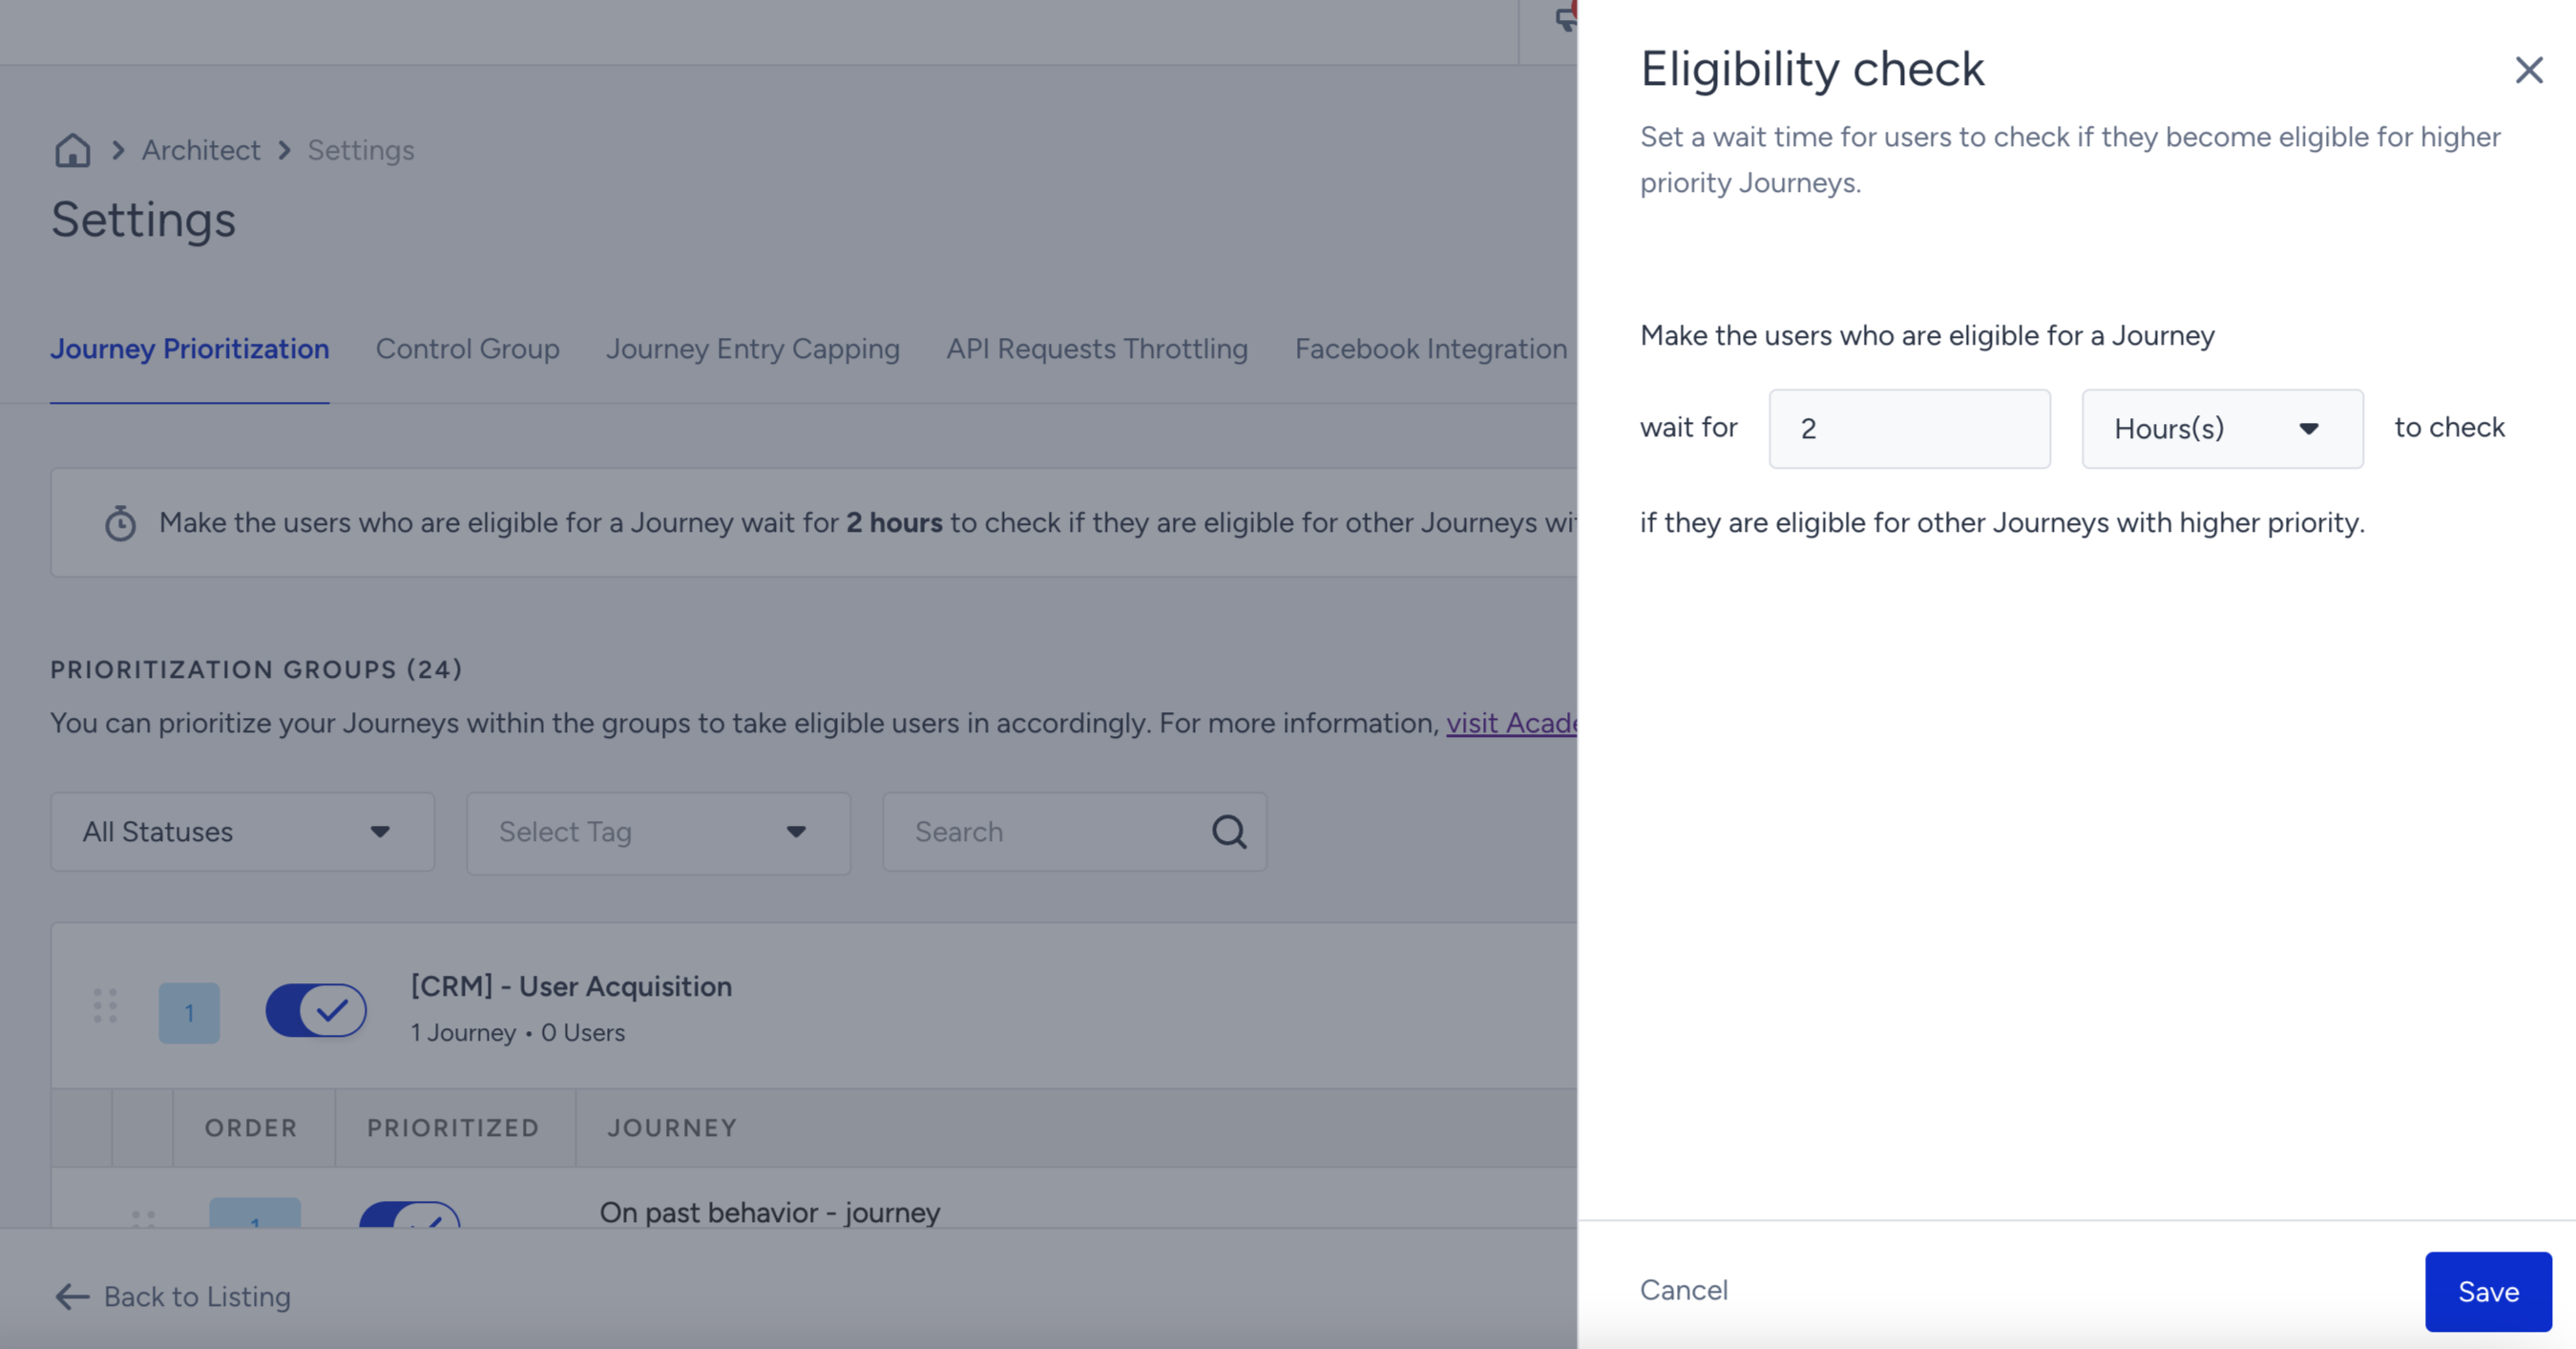
To configure the timeout duration, go to Architect > Settings > Journey Prioritization and click the Edit Eligibility button.
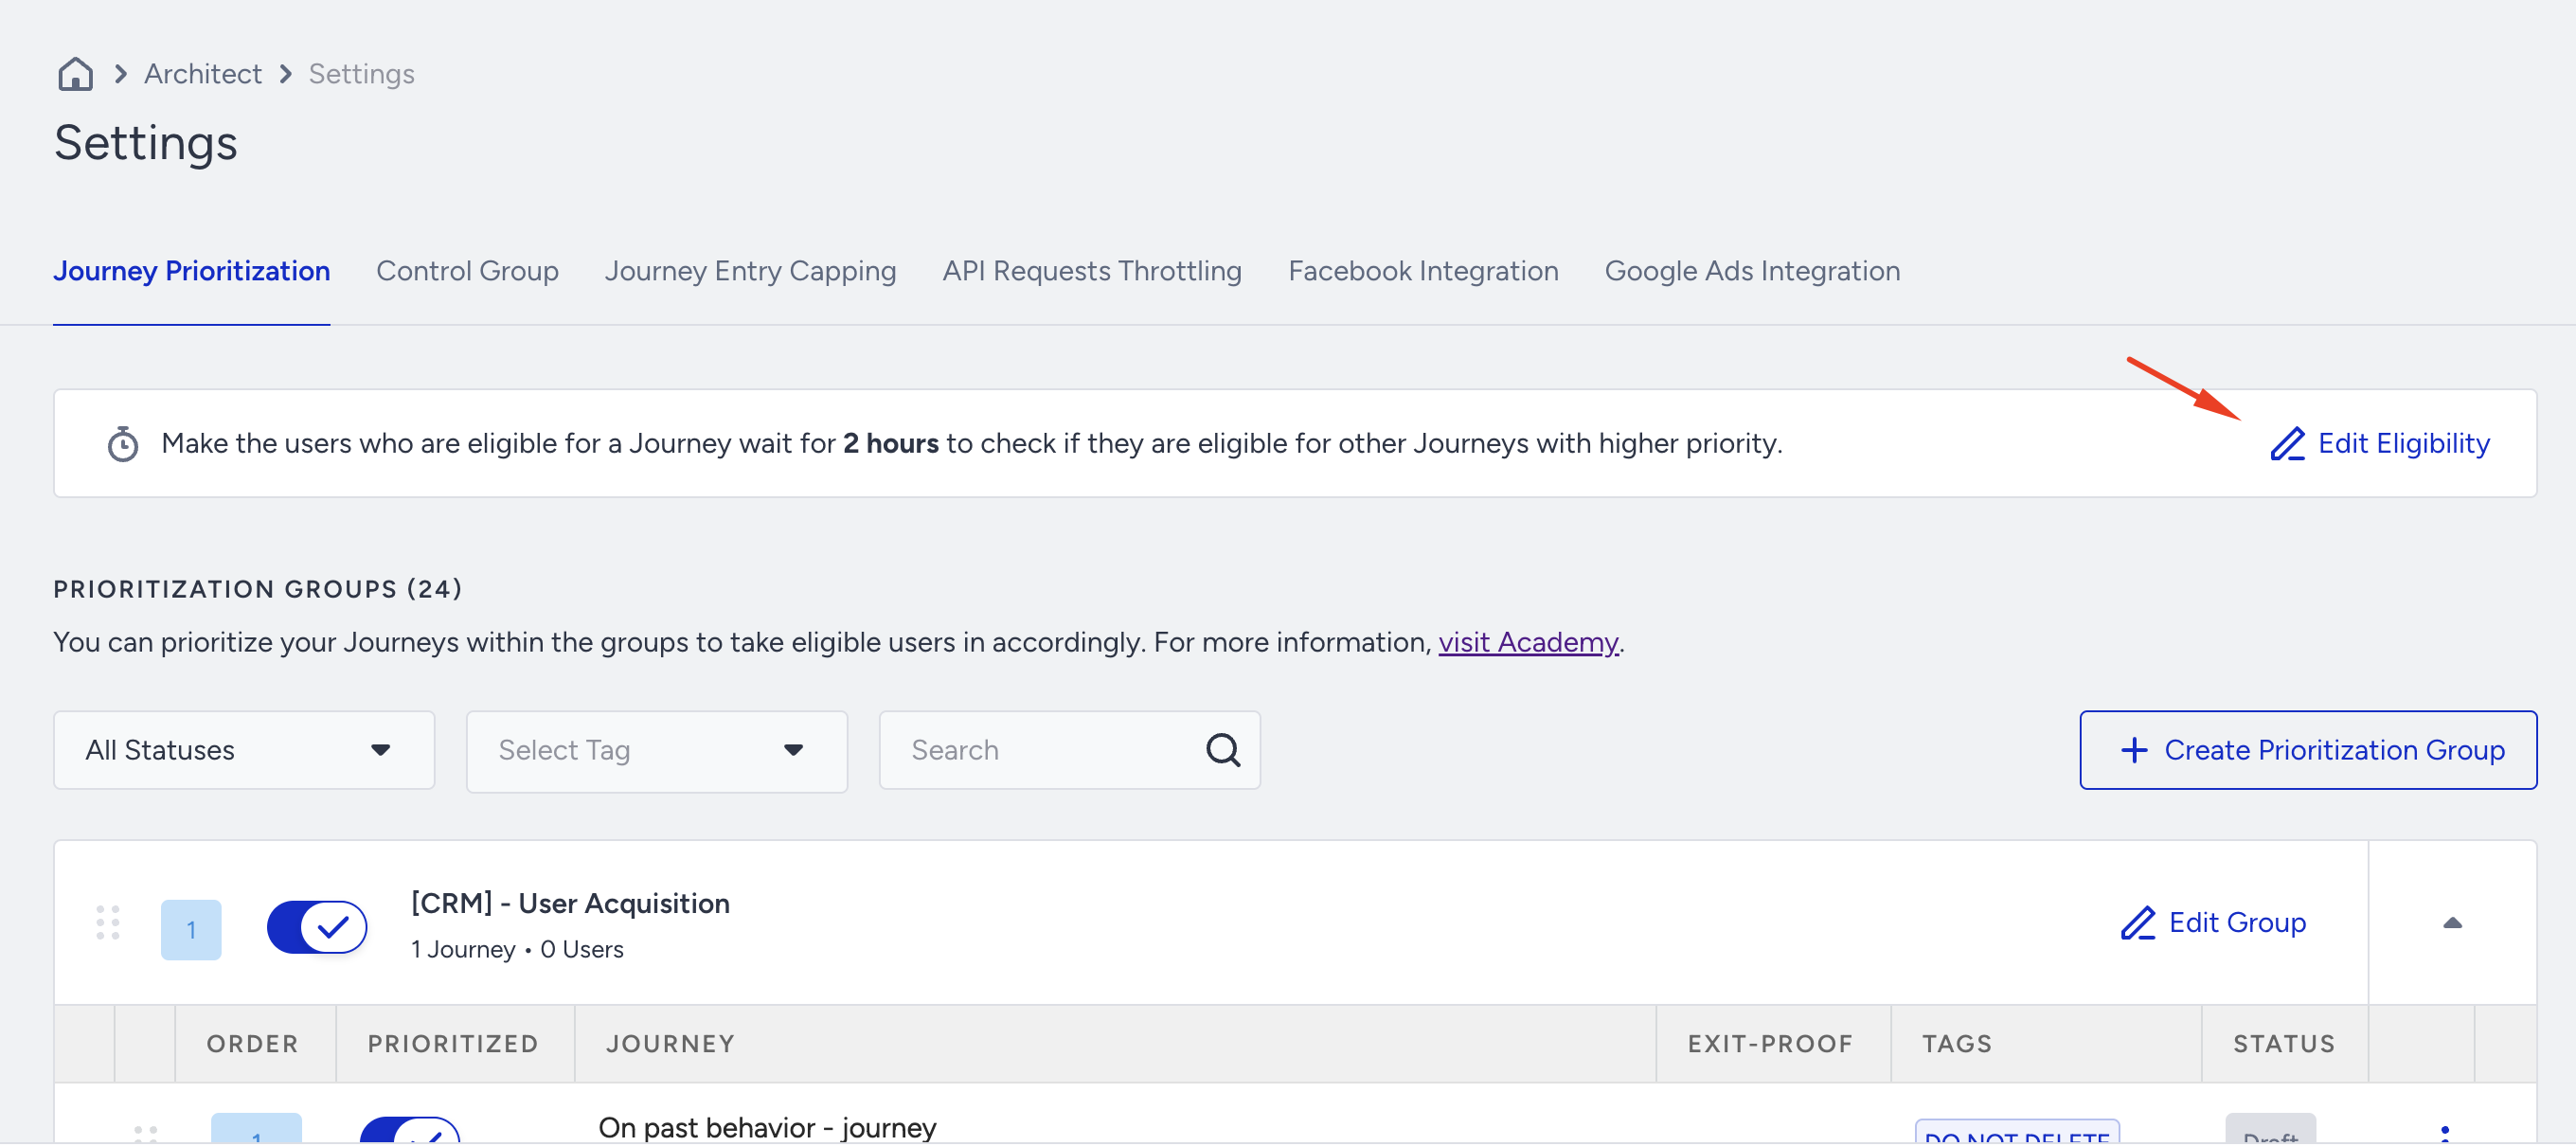
Set the eligibility duration and click the Save button to save your changes.
Reporting
The Journey Prioritization feature provides comprehensive reporting capabilities to track user journeys, exits, and other relevant metrics. The reporting feature allows you to analyze the effectiveness of your journey prioritization strategy and make data-driven decisions to improve customer experiences.
In the reporting, you will find a new reason code called Exit - Prioritization. This reason code precisely captures instances where users bypass the normal prioritization process for testing or debugging purposes. You can distinguish these exits from regular user exits to gain insights into the impact of testing activities on the overall journey performance.
You can leverage the reporting and reason codes to monitor and optimize your prioritization strategy, identify areas for improvement, and make informed decisions about adjusting priority levels or journey sequences.
Example scenario
The following detailed example can help you better understand the journey prioritization feature.
Let's say you have a company called TechAGear that sells electronic gadgets. The following multiple prioritization groups with various journeys explain how the system works, benefits customers, and addresses potential edge cases and what-if scenarios.
| GROUP 1: New Product Launches | Journey 1 | Product Showcase | Highlights newly launched products, their features, and benefits. |
| Journey 2 | Early Access Sign-up | Encourages customers to sign up for early access to upcoming product releases. | |
| GROUP 2: Promotional Campaigns | Journey 3 | Limited-time Offer | Promotes exclusive deals and discounts for a limited period. |
| Journey 4 | Flash Sale Alert | Notifies customers about flash sales with highly discounted products. | |
| GROUP 3: Customer Loyalty and Engagement | Journey 5 | VIP Program | Targets loyal customers, offering exclusive benefits and rewards. |
| Journey 6 | Product Review Campaign | Encourages customers to provide feedback and reviews for purchased products. |
You can analyze the prioritization feature with a breakdown of:
- Journey prioritization and customer flow
- Benefits and customer experience
- What-if scenarios
Journey prioritization and customer flow
When a customer visits the TechGear website or app, the Journey Prioritization system evaluates their eligibility for different journeys based on their profile, behavior, and preferences. Suppose a customer is eligible for multiple journeys within the same prioritization group. In that case, the system evaluates the priority levels assigned to each journey to determine the most relevant and impactful one.
For example, if a customer is eligible for both Product Showcase and Early Access Sign-up journeys, the system will prioritize the Product Showcase journey if it has a higher priority level.
Customers will flow through the prioritized journeys, receiving personalized experiences based on their eligibility and the assigned priority levels.
Benefits and customer experience
Prioritizing the Product Showcase journey ensures that customers are exposed to the latest product offerings, helping them stay informed and excited about new releases.
The Limited-time Offer and Flash Sale Alert journeys provide customers exclusive access to time-sensitive promotions, creating a sense of urgency and driving conversions.
The VIP Program journey rewards loyal customers, enhancing their engagement and fostering brand loyalty.
The Product Review Campaign encourages customers to share feedback, contributing to the overall customer experience and building trust in TechGear's products and services.
What-if scenarios
Simultaneous eligibility for journeys within the same group
If a customer becomes eligible for both Limited-time Offer and Flash Sale Alert journeys simultaneously, the system will prioritize the journey with the higher priority level. If both have the same priority, additional criteria, such as timeout duration or predefined rules, may be considered to determine the journey.
Change in journey eligibility during timeout duration
If a customer becomes eligible for the VIP Program journey during the timeout duration of the prioritized Product Showcase journey, the system will assess the priority levels. If the VIP Program has a higher priority, the customer will be directed to that journey after the timeout. Otherwise, they will continue in the Product Showcase journey.
Multiple prioritization groups
Customers can flow through different prioritization groups based on their eligibility. The system ensures that the highest-priority journey is prioritized within each group. If a customer is eligible for journeys across different groups, the system follows the same priority evaluation process, and the user will not be engaged in multiple ones but only one journey even if they are from different groups.
How do you use Journey Prioritization?
To start prioritizing your journeys, follow these steps:
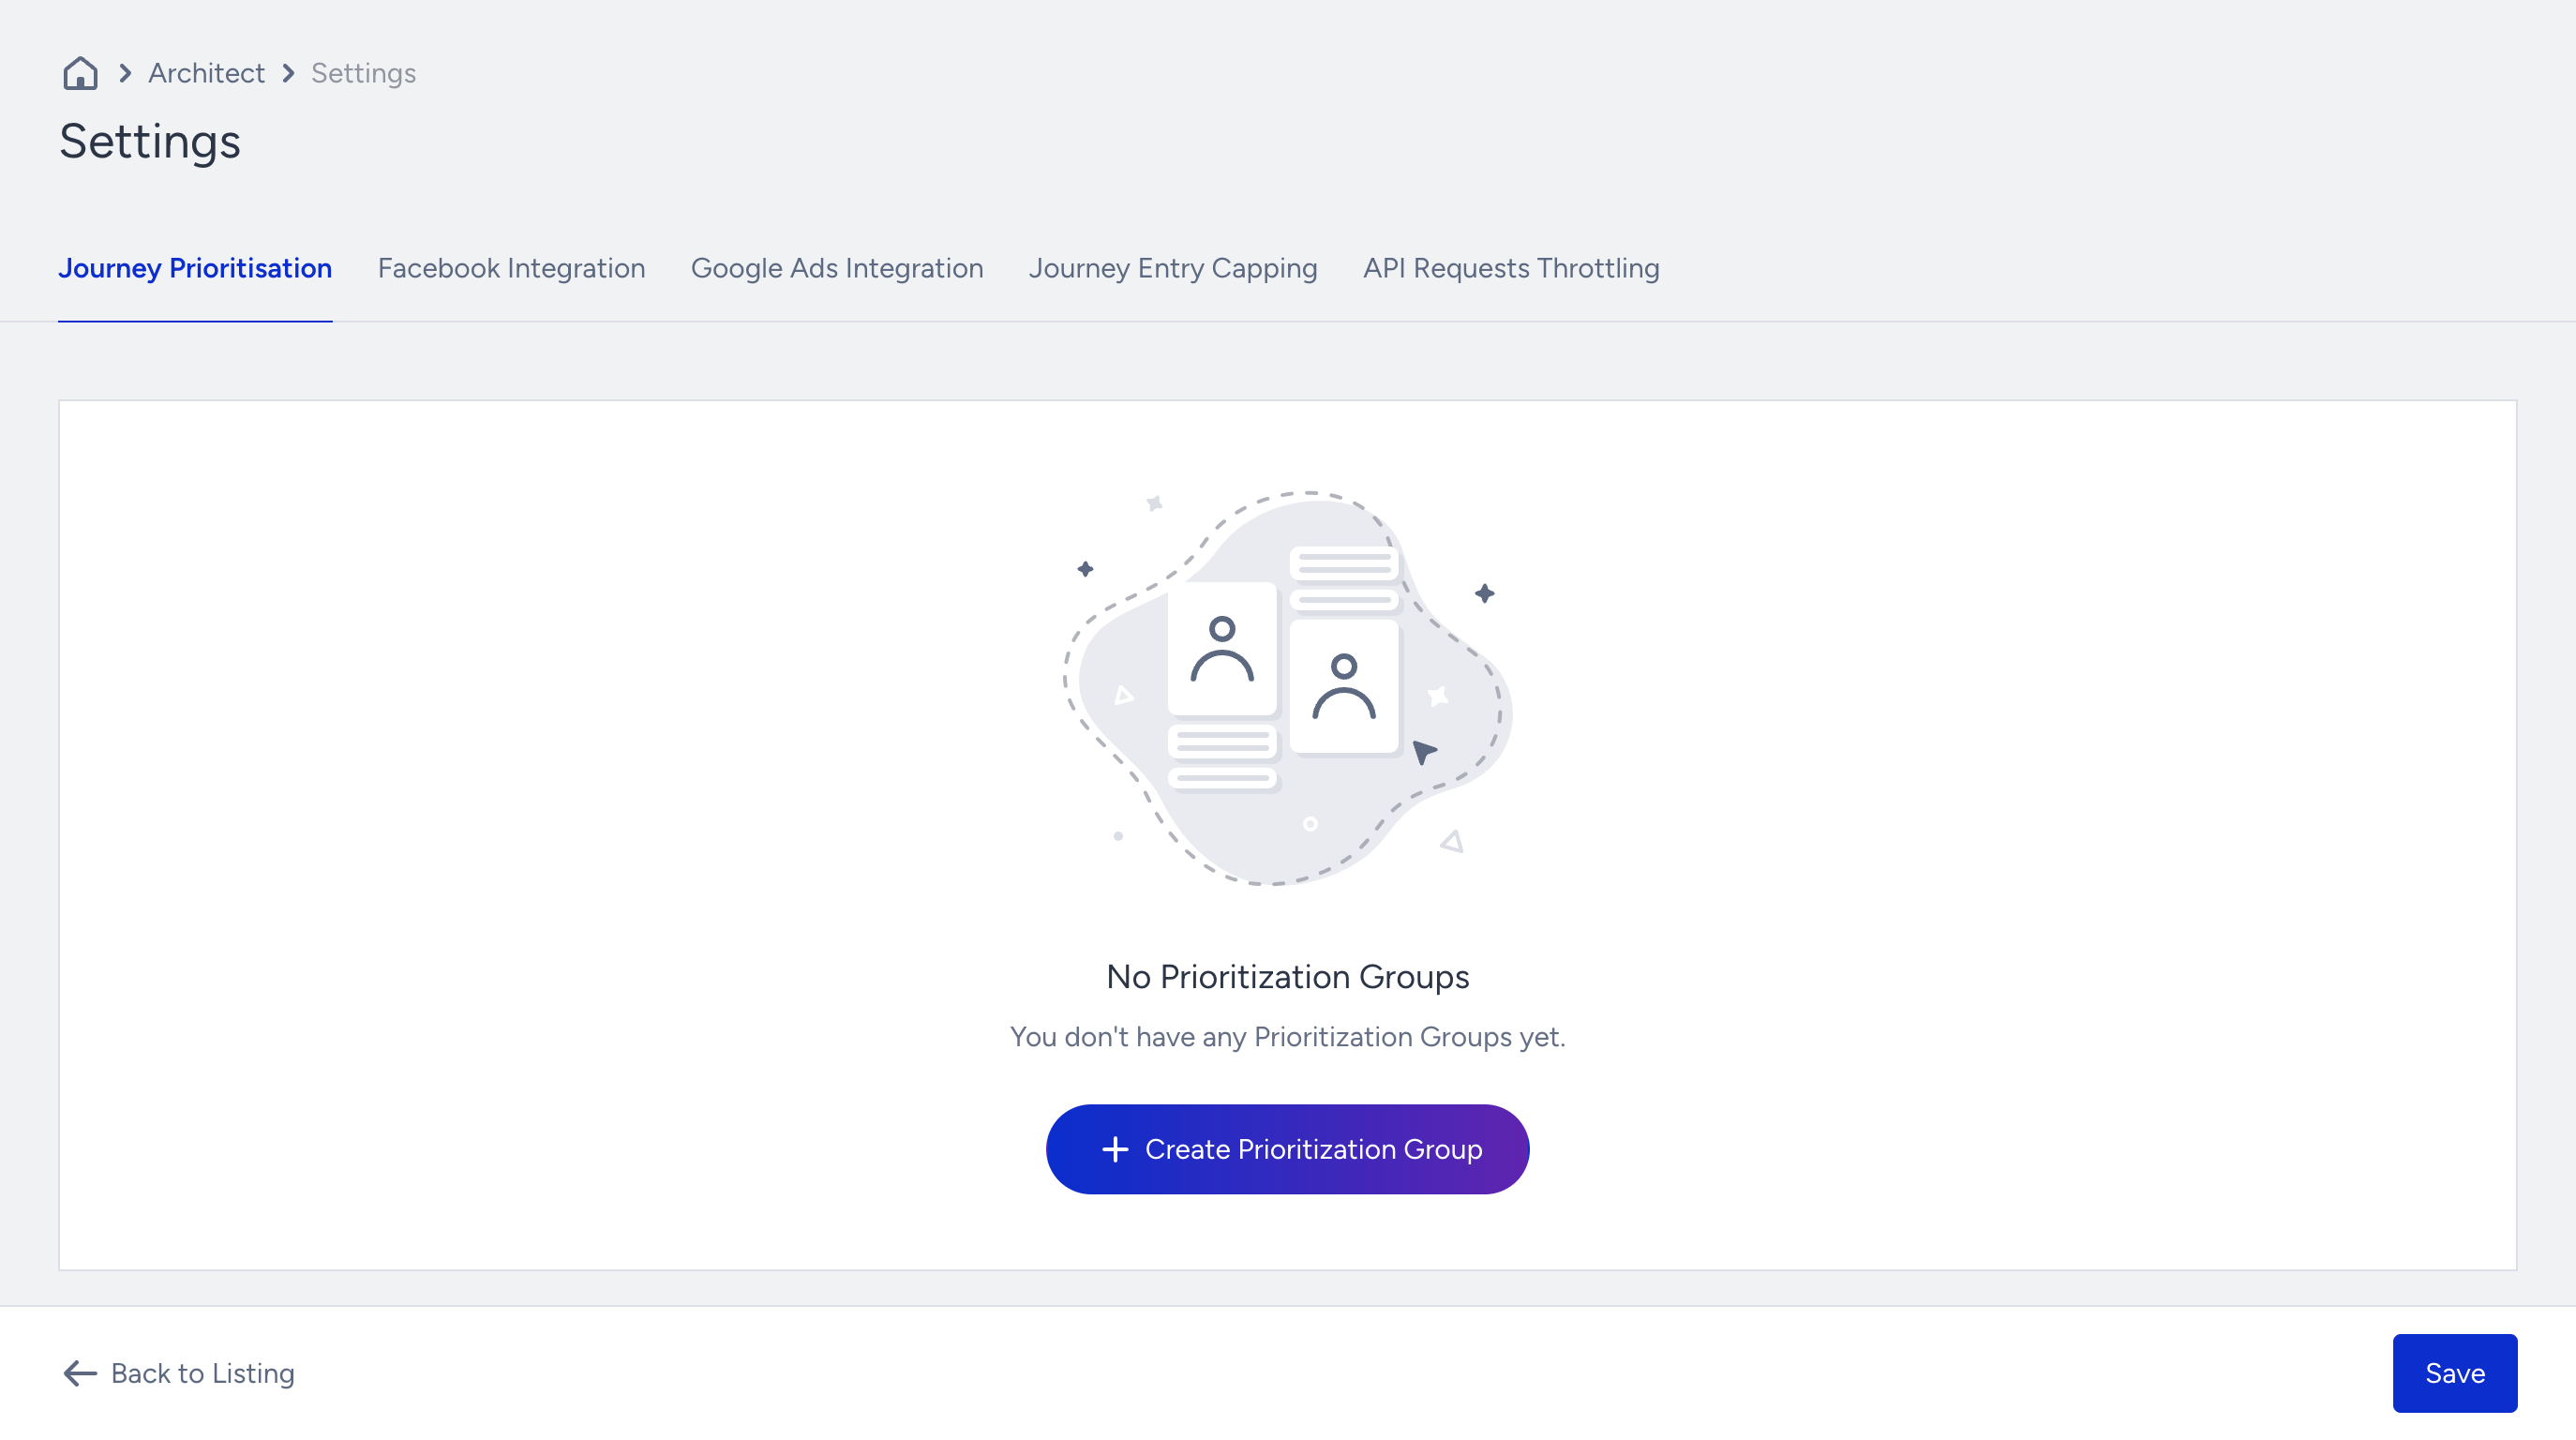
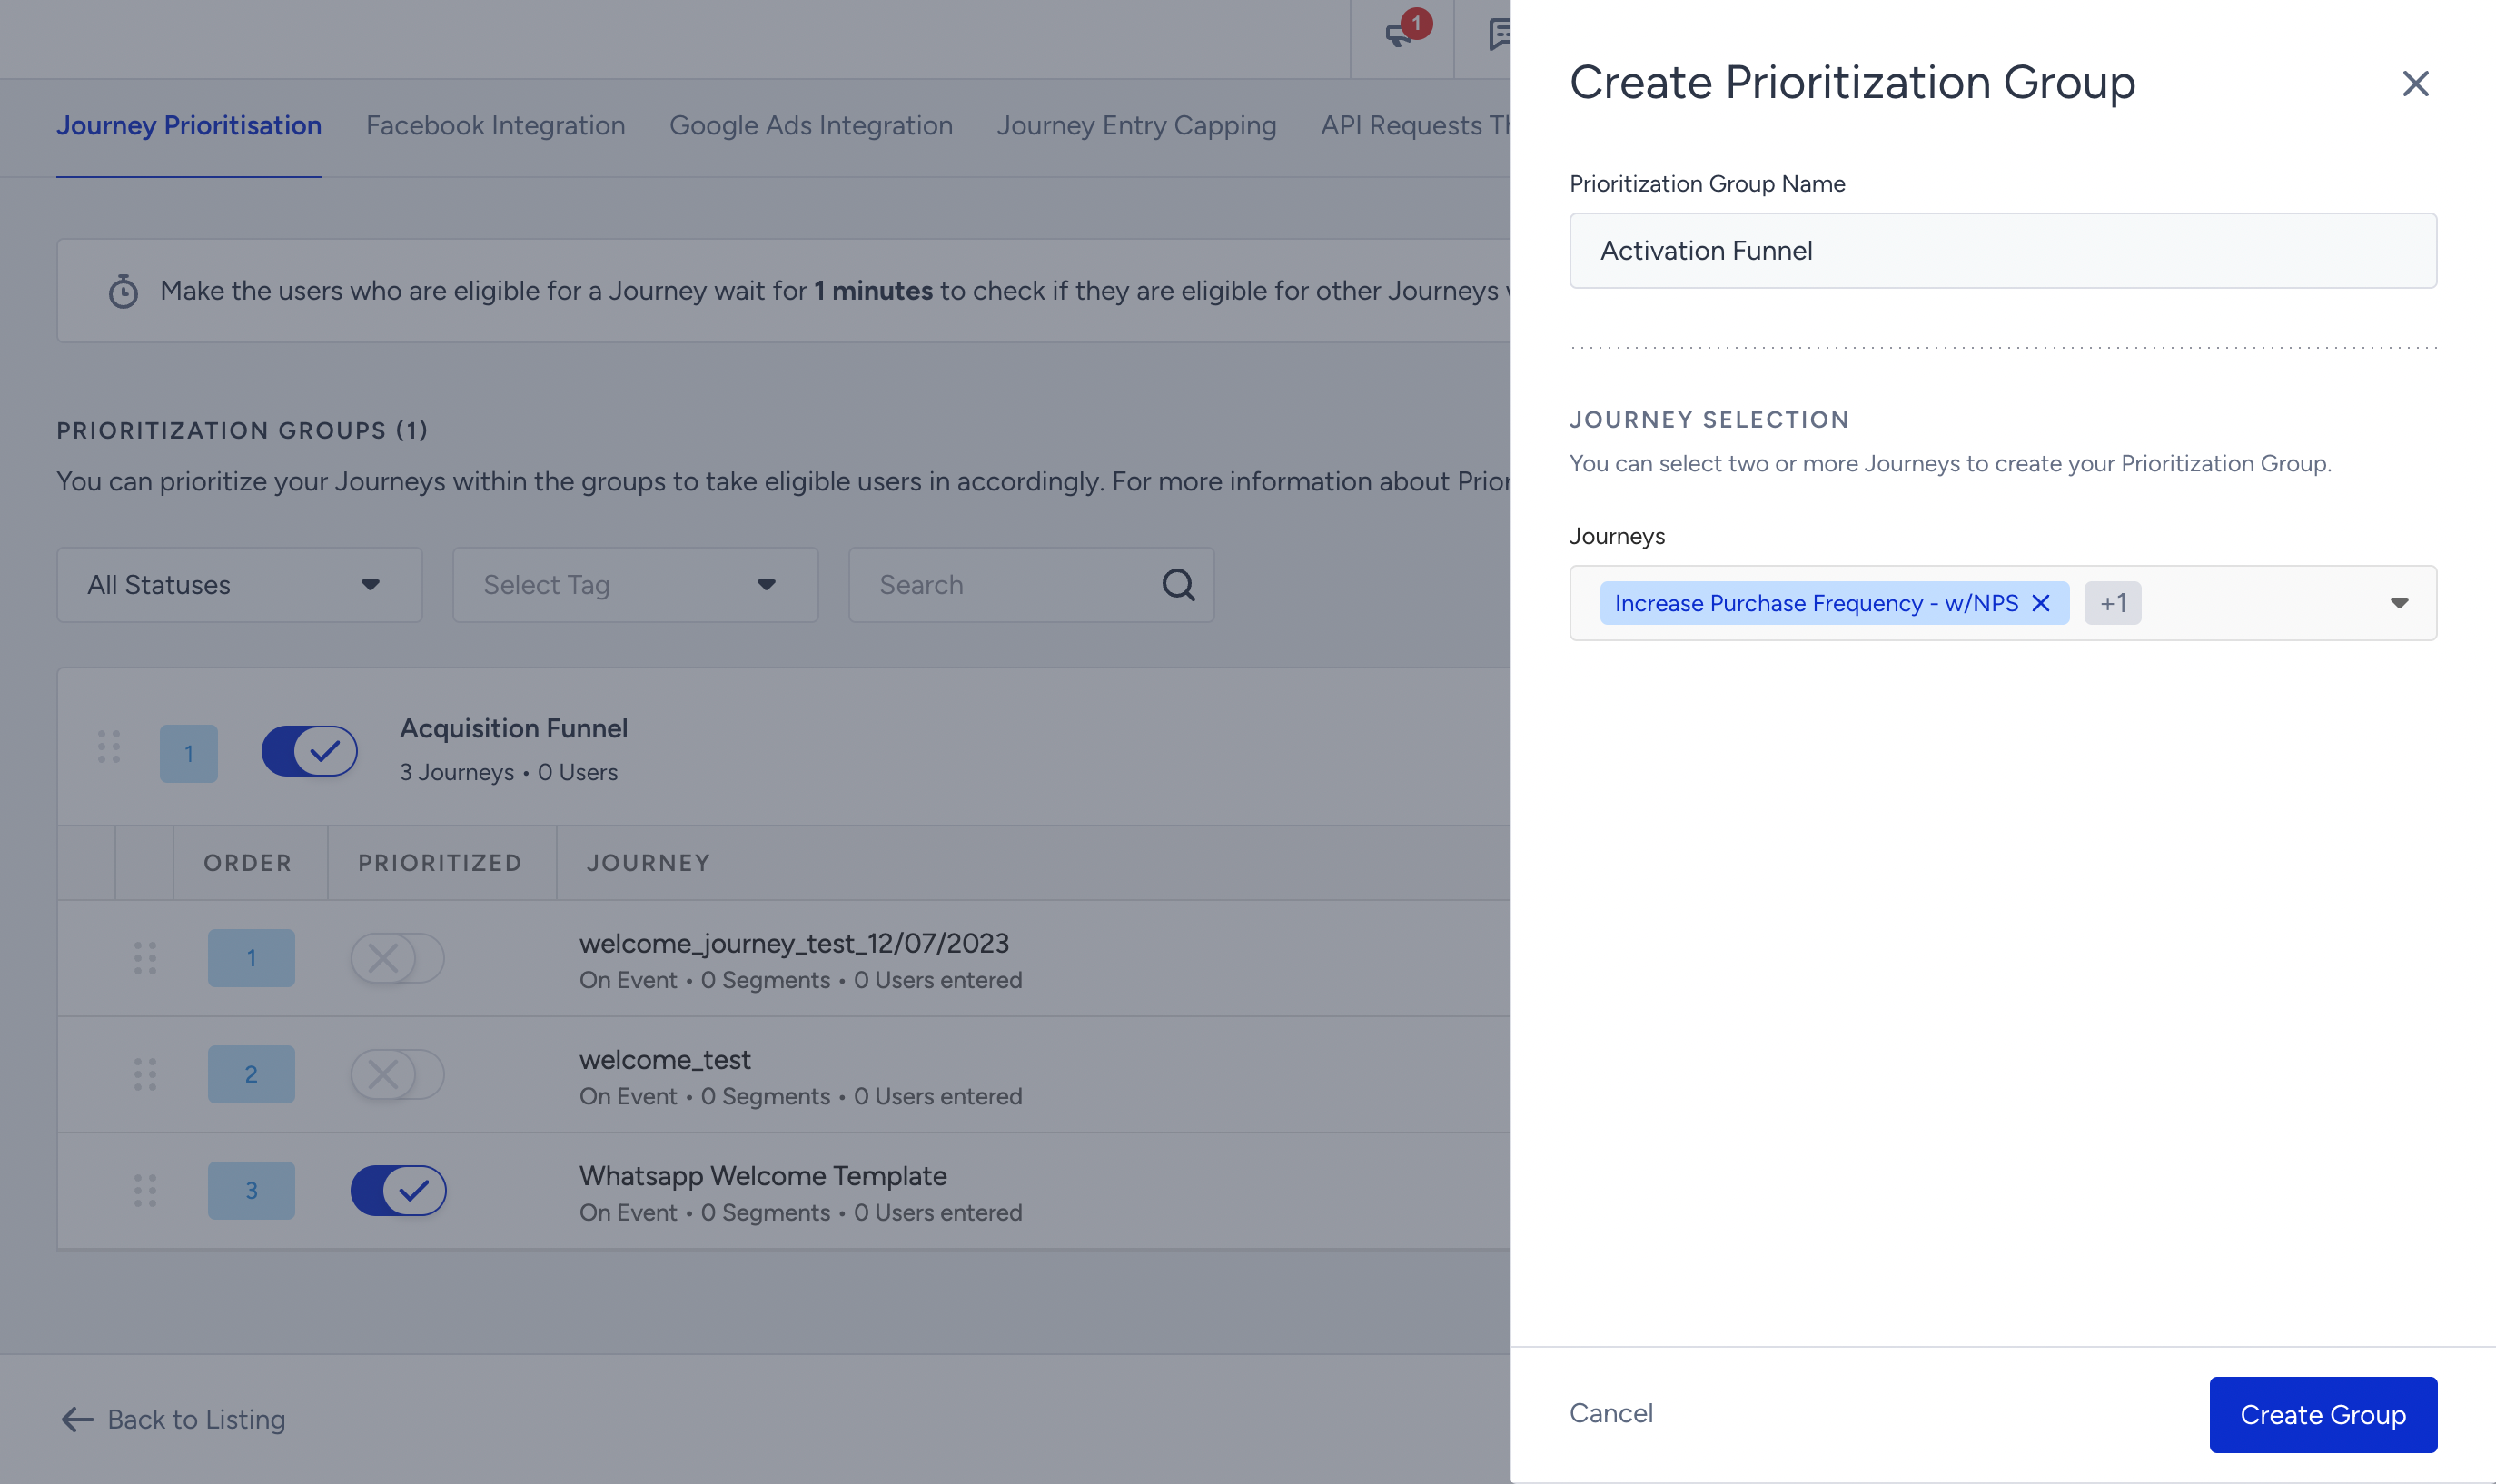
1. Navigate to Campaigns > Architect > Settings > Journey Prioritization to click the Create Prioritization Group button.
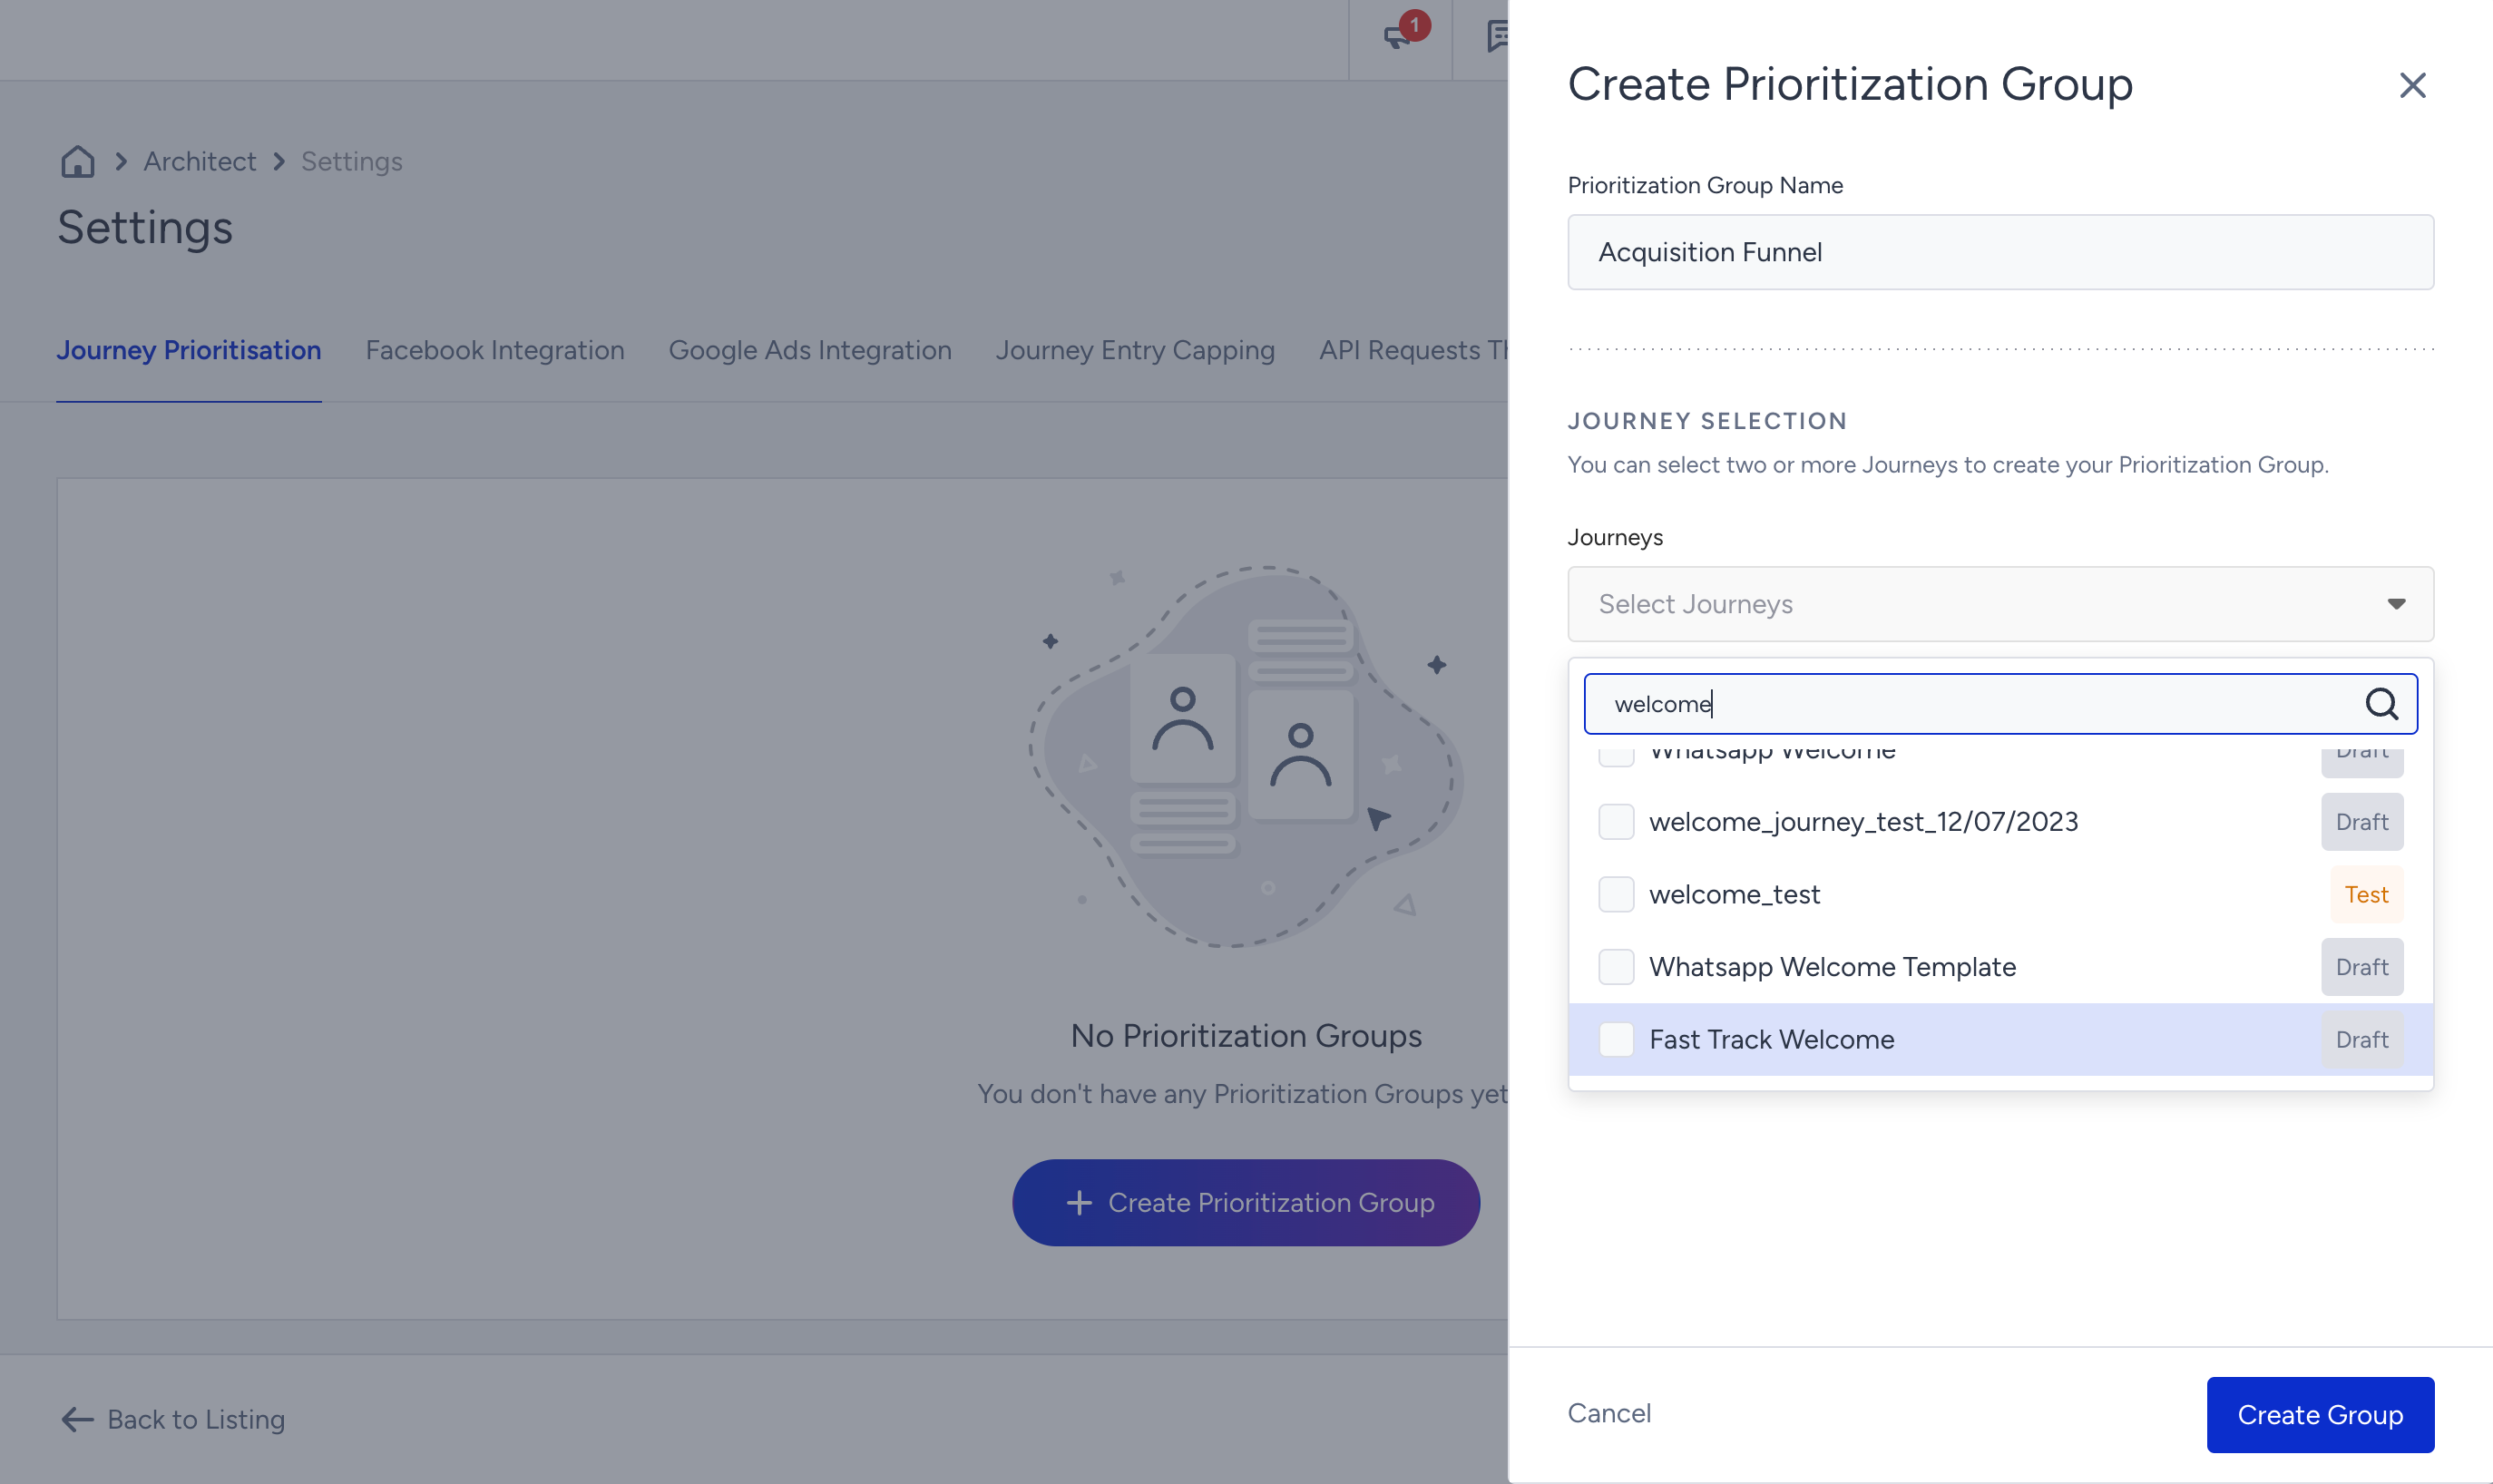
2. Enter a name for your prioritization group that reflects its purpose, and select the desired journeys from the dropdown menu to include in this group.
3. Determine the eligibility duration for users. This duration specifies how long the system will wait before deciding once a user becomes eligible for a journey.
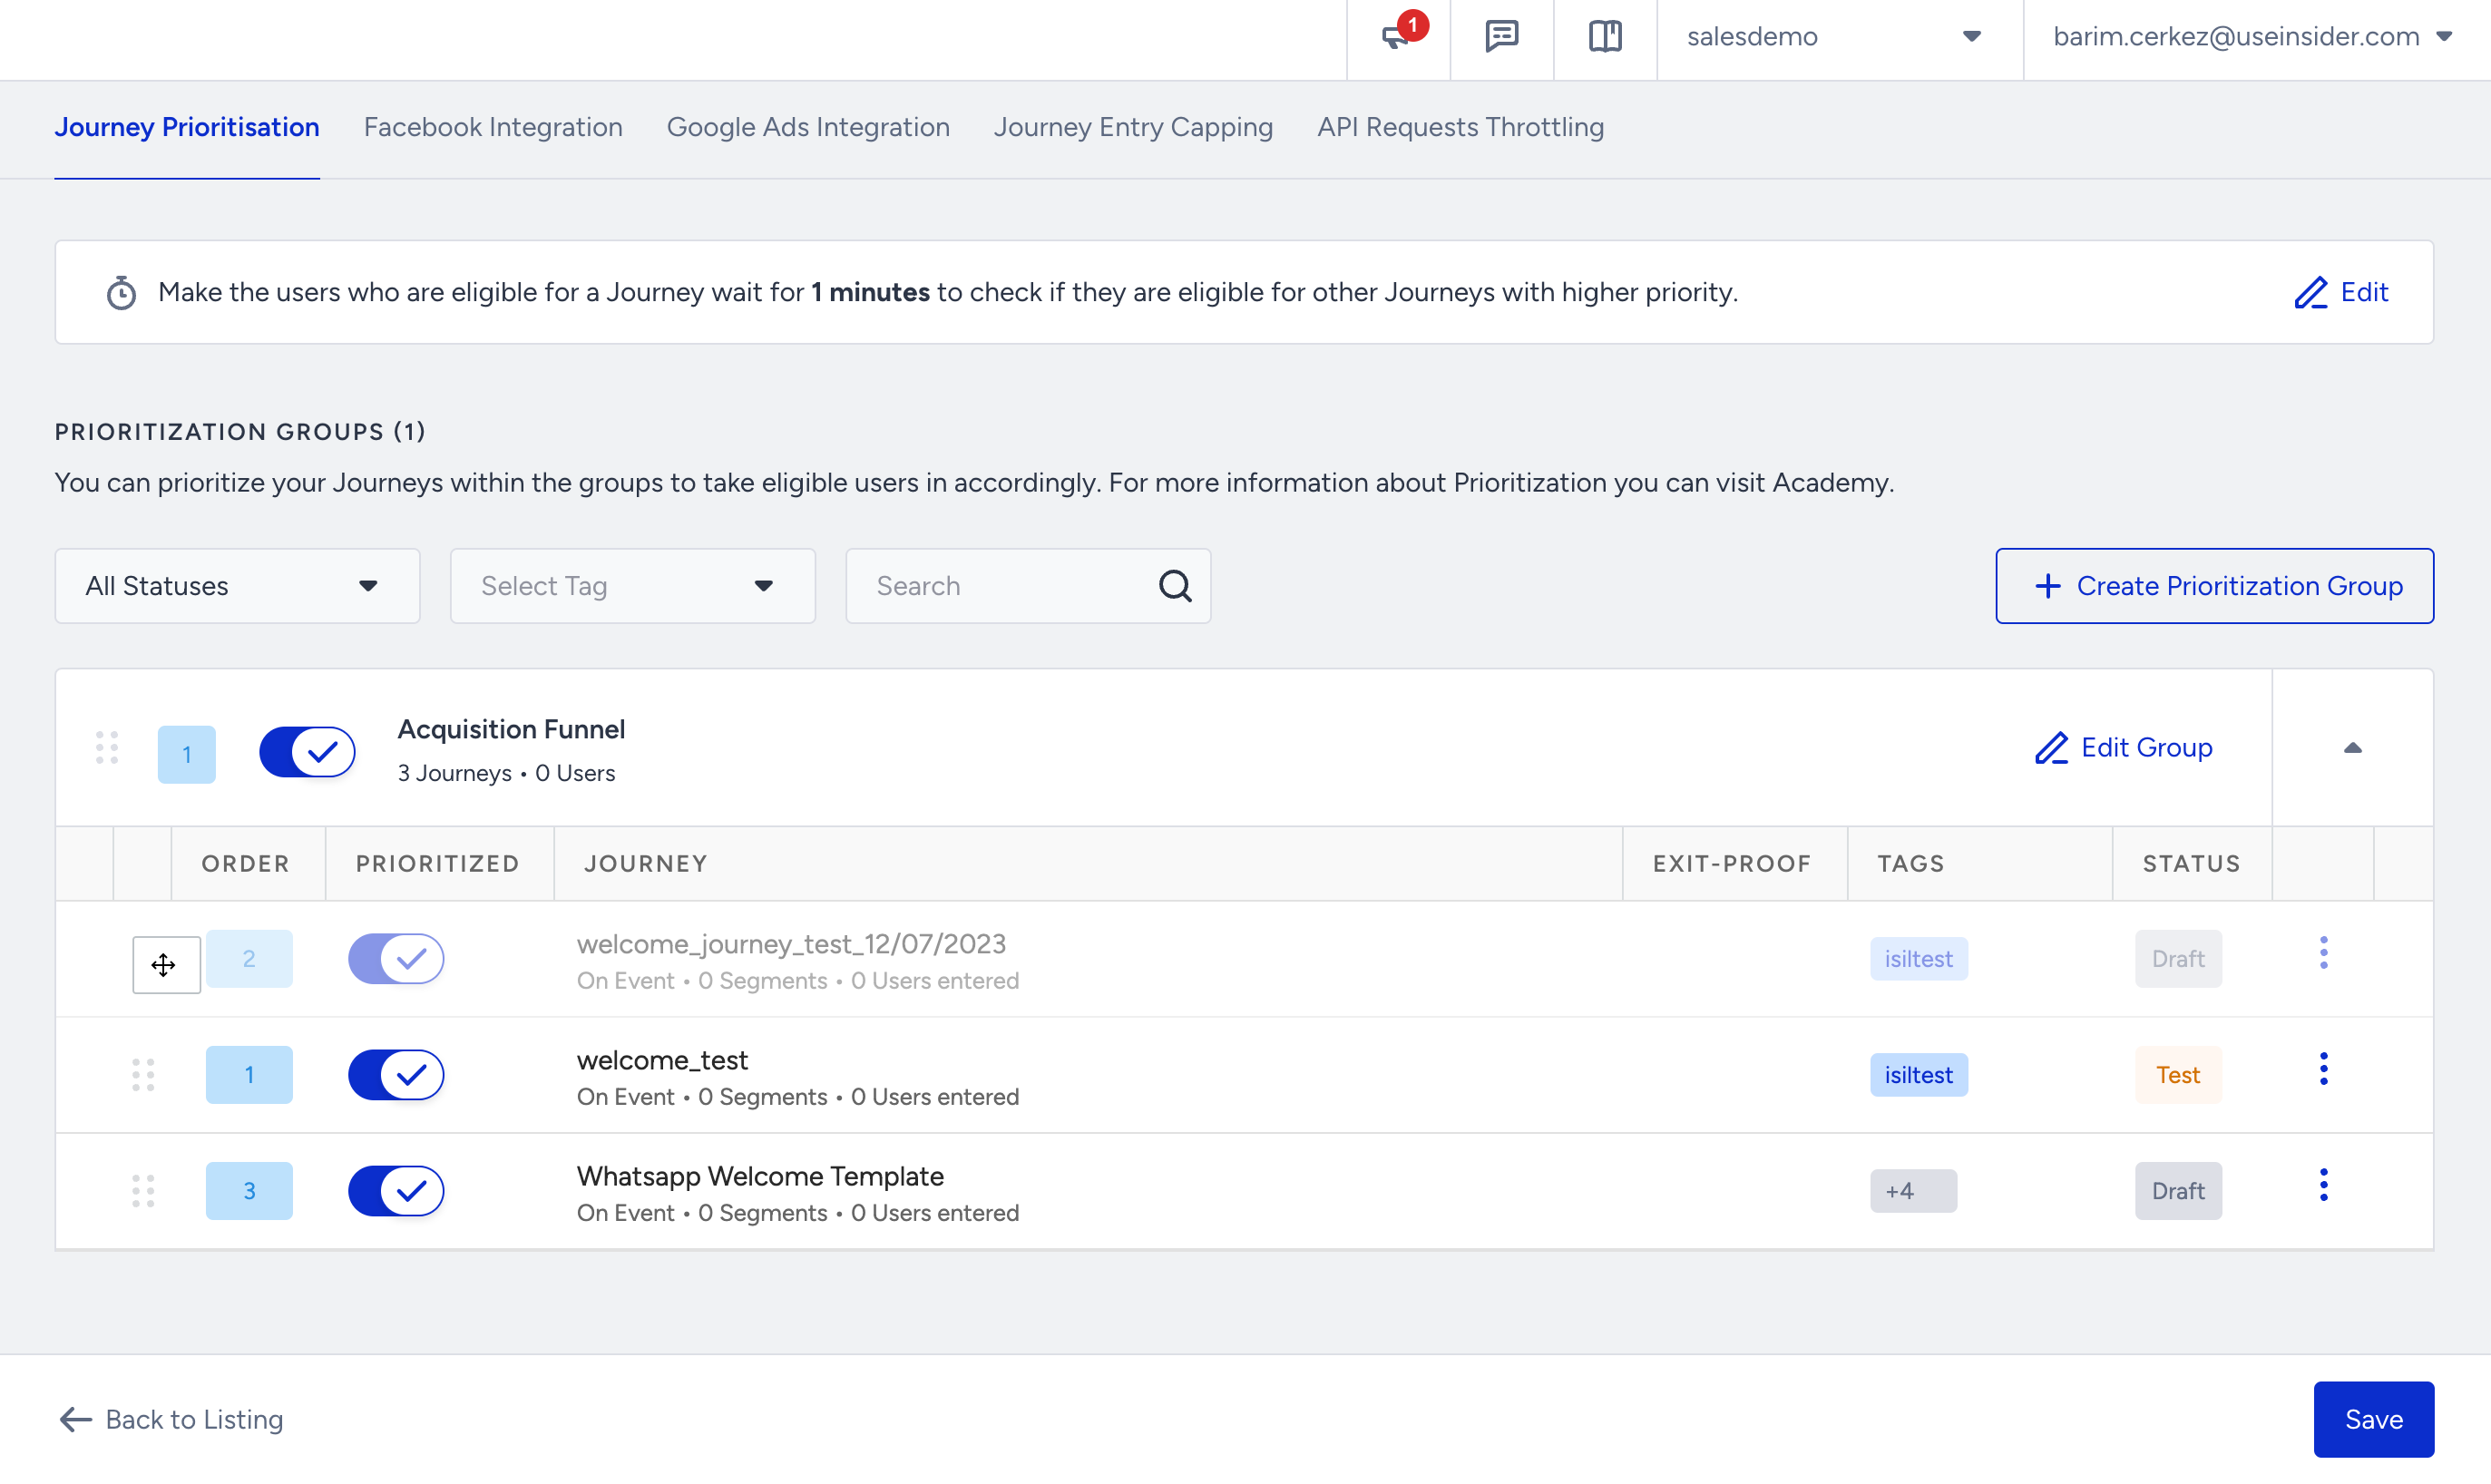
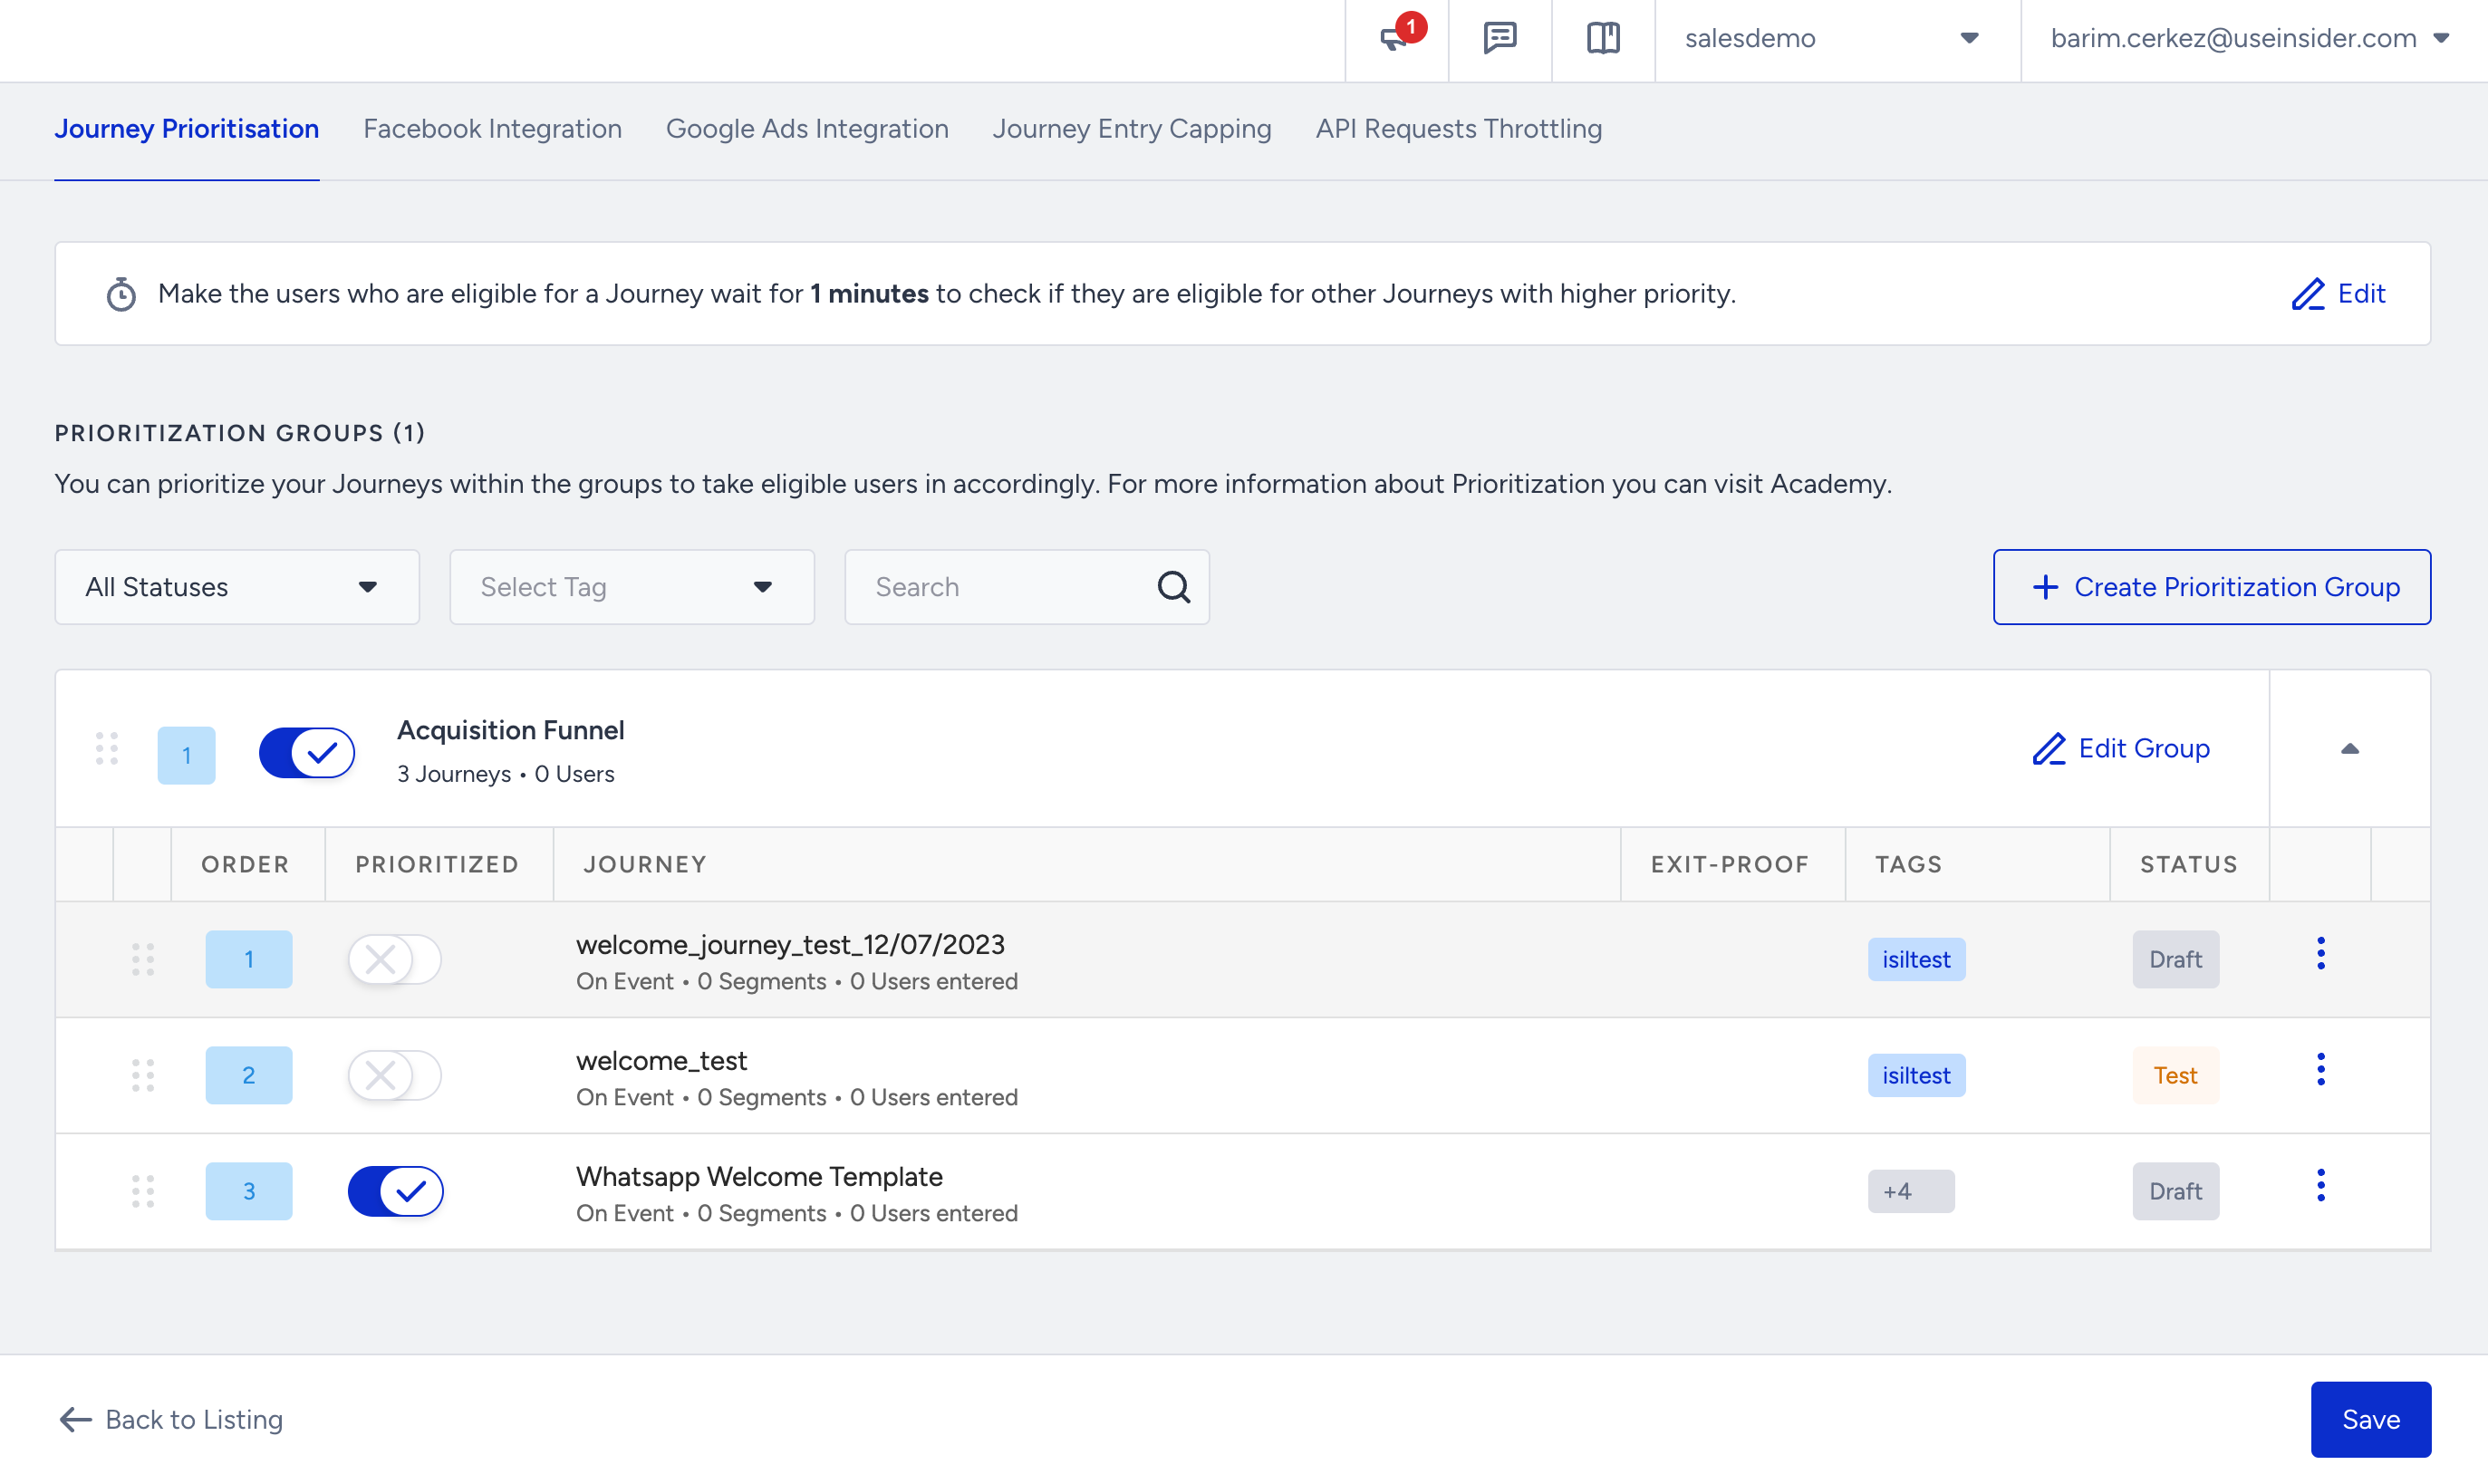
4. Drag and drop the journeys to arrange their prioritization. This allows you to define the order in which users will be directed to the journeys within the group.
5. If you need to test a specific journey before launching it, you can bypass the prioritization group that contains that journey. This allows you to exclude the journey from the prioritization process temporarily.
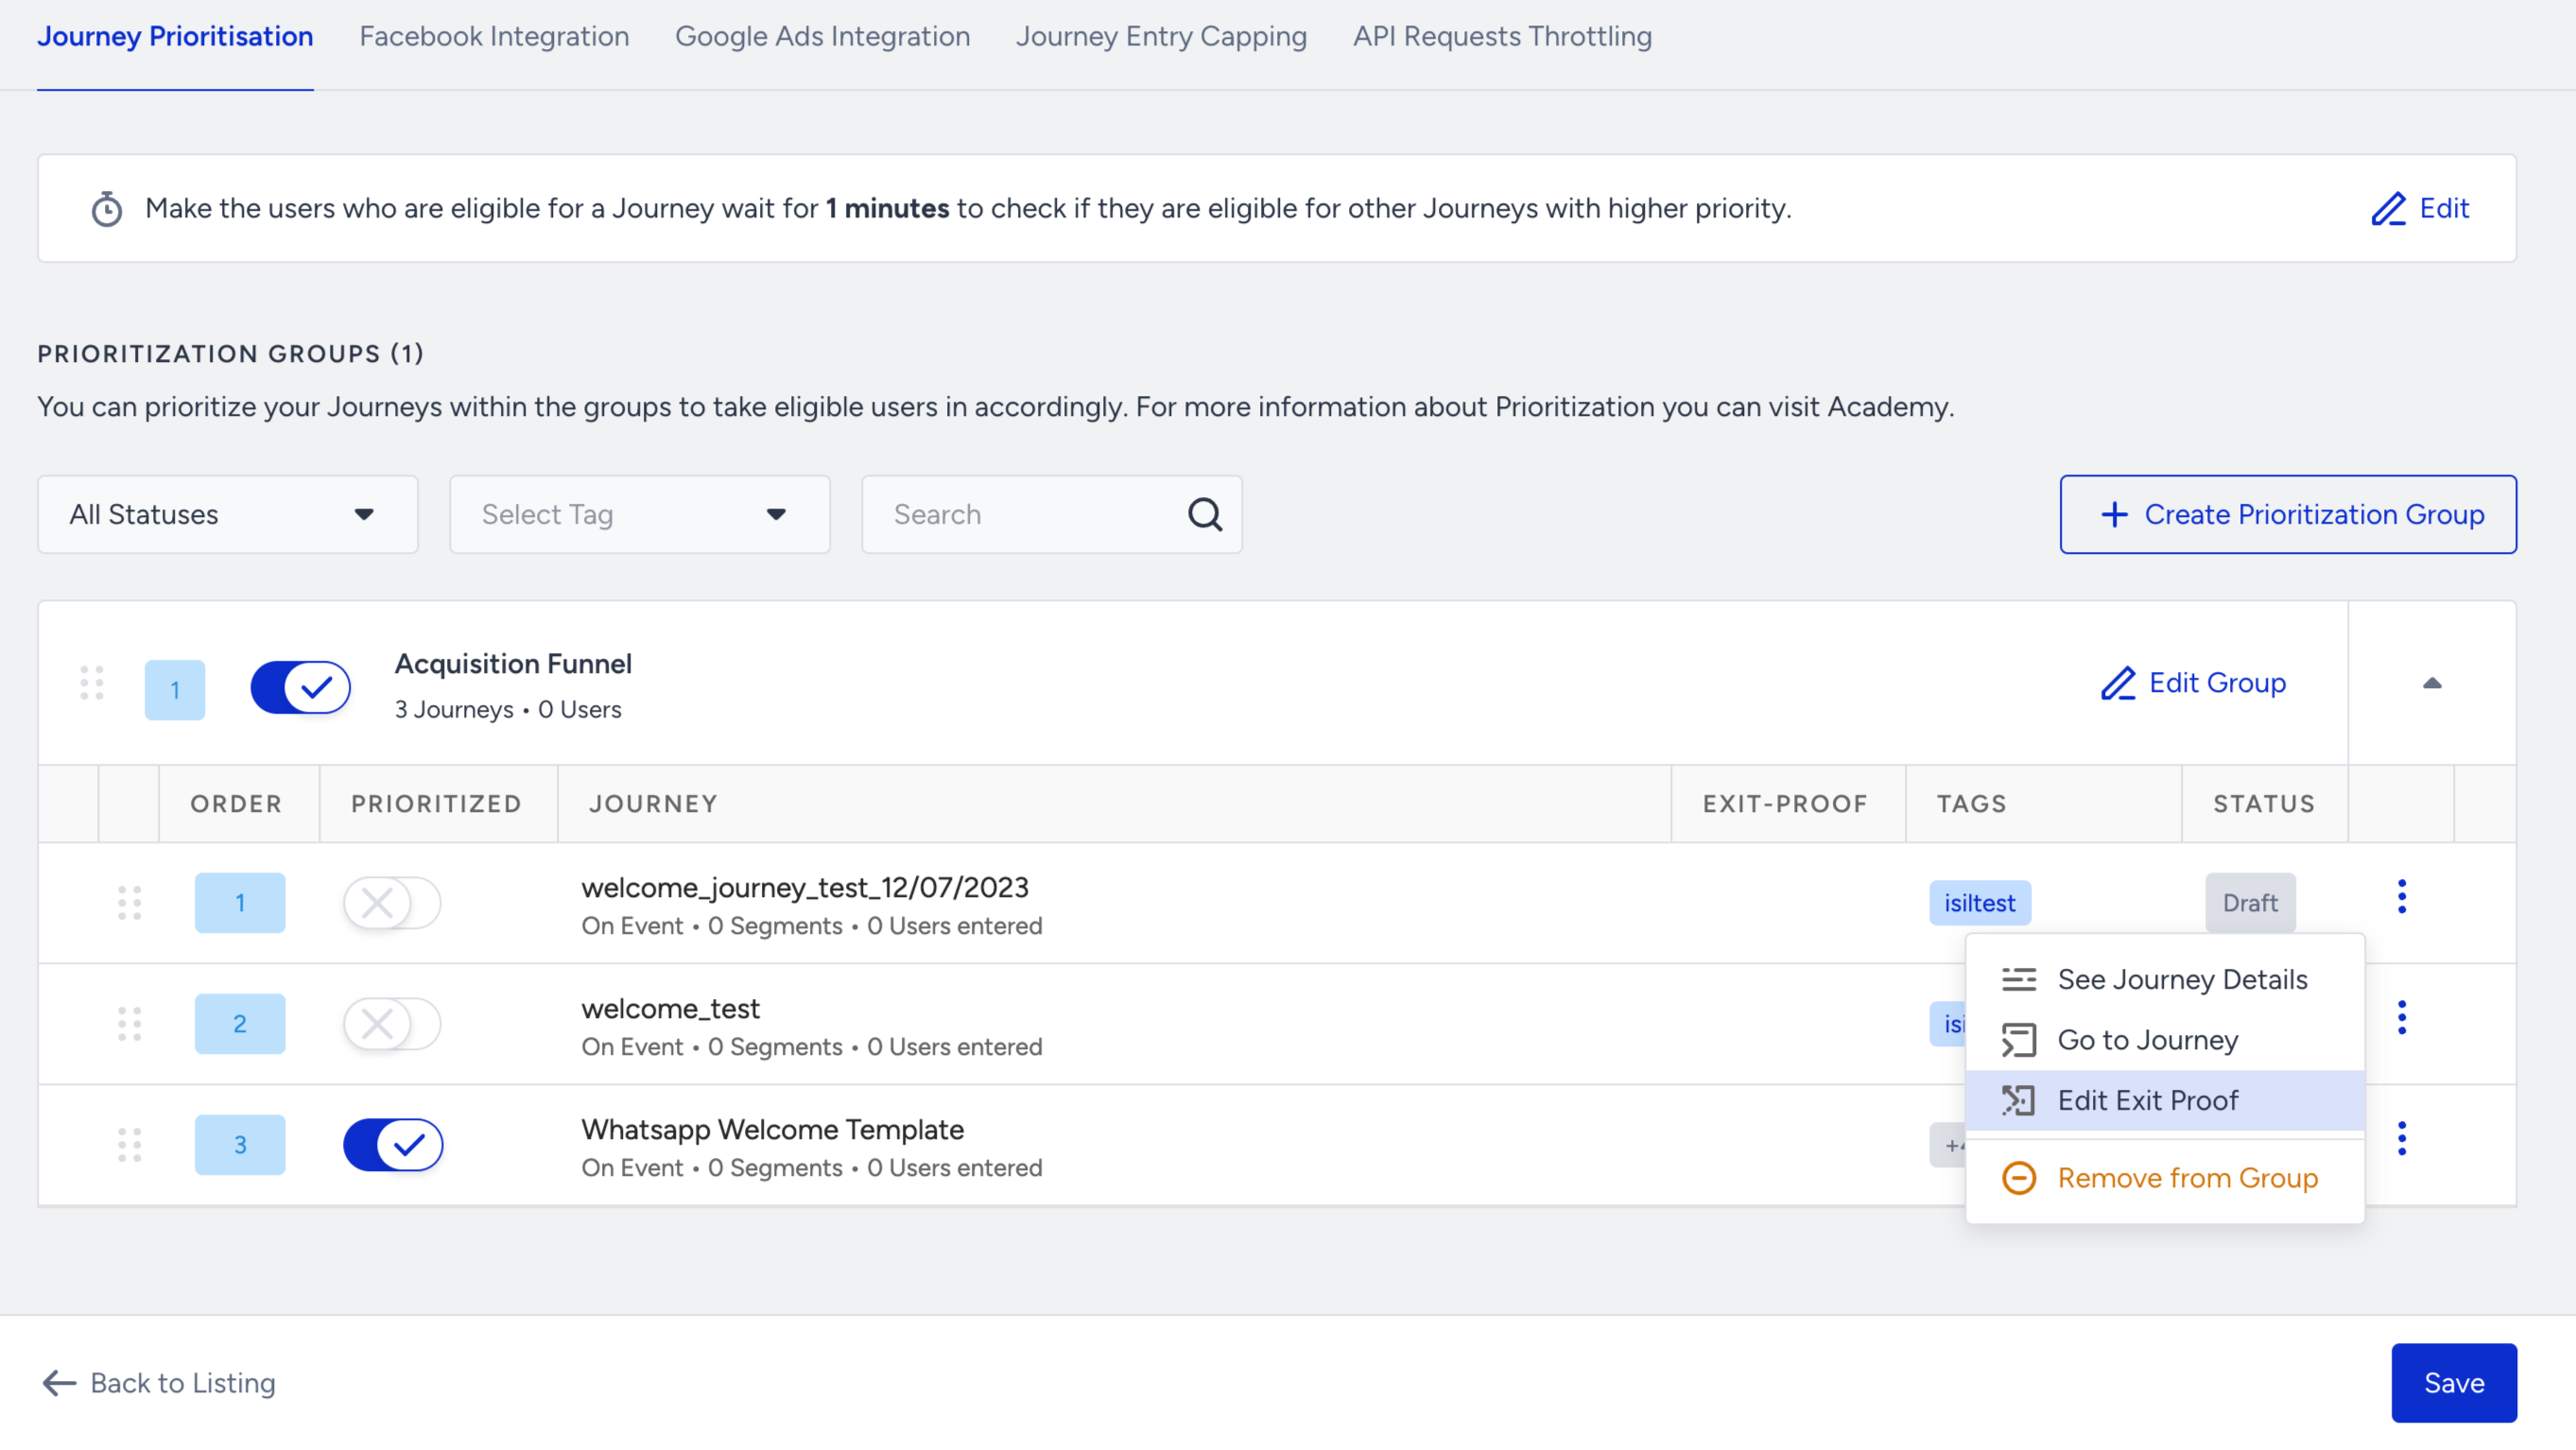
6. To modify the group name or the journeys included in it, click the Edit Group button. This enables you to make changes to the group composition as needed.
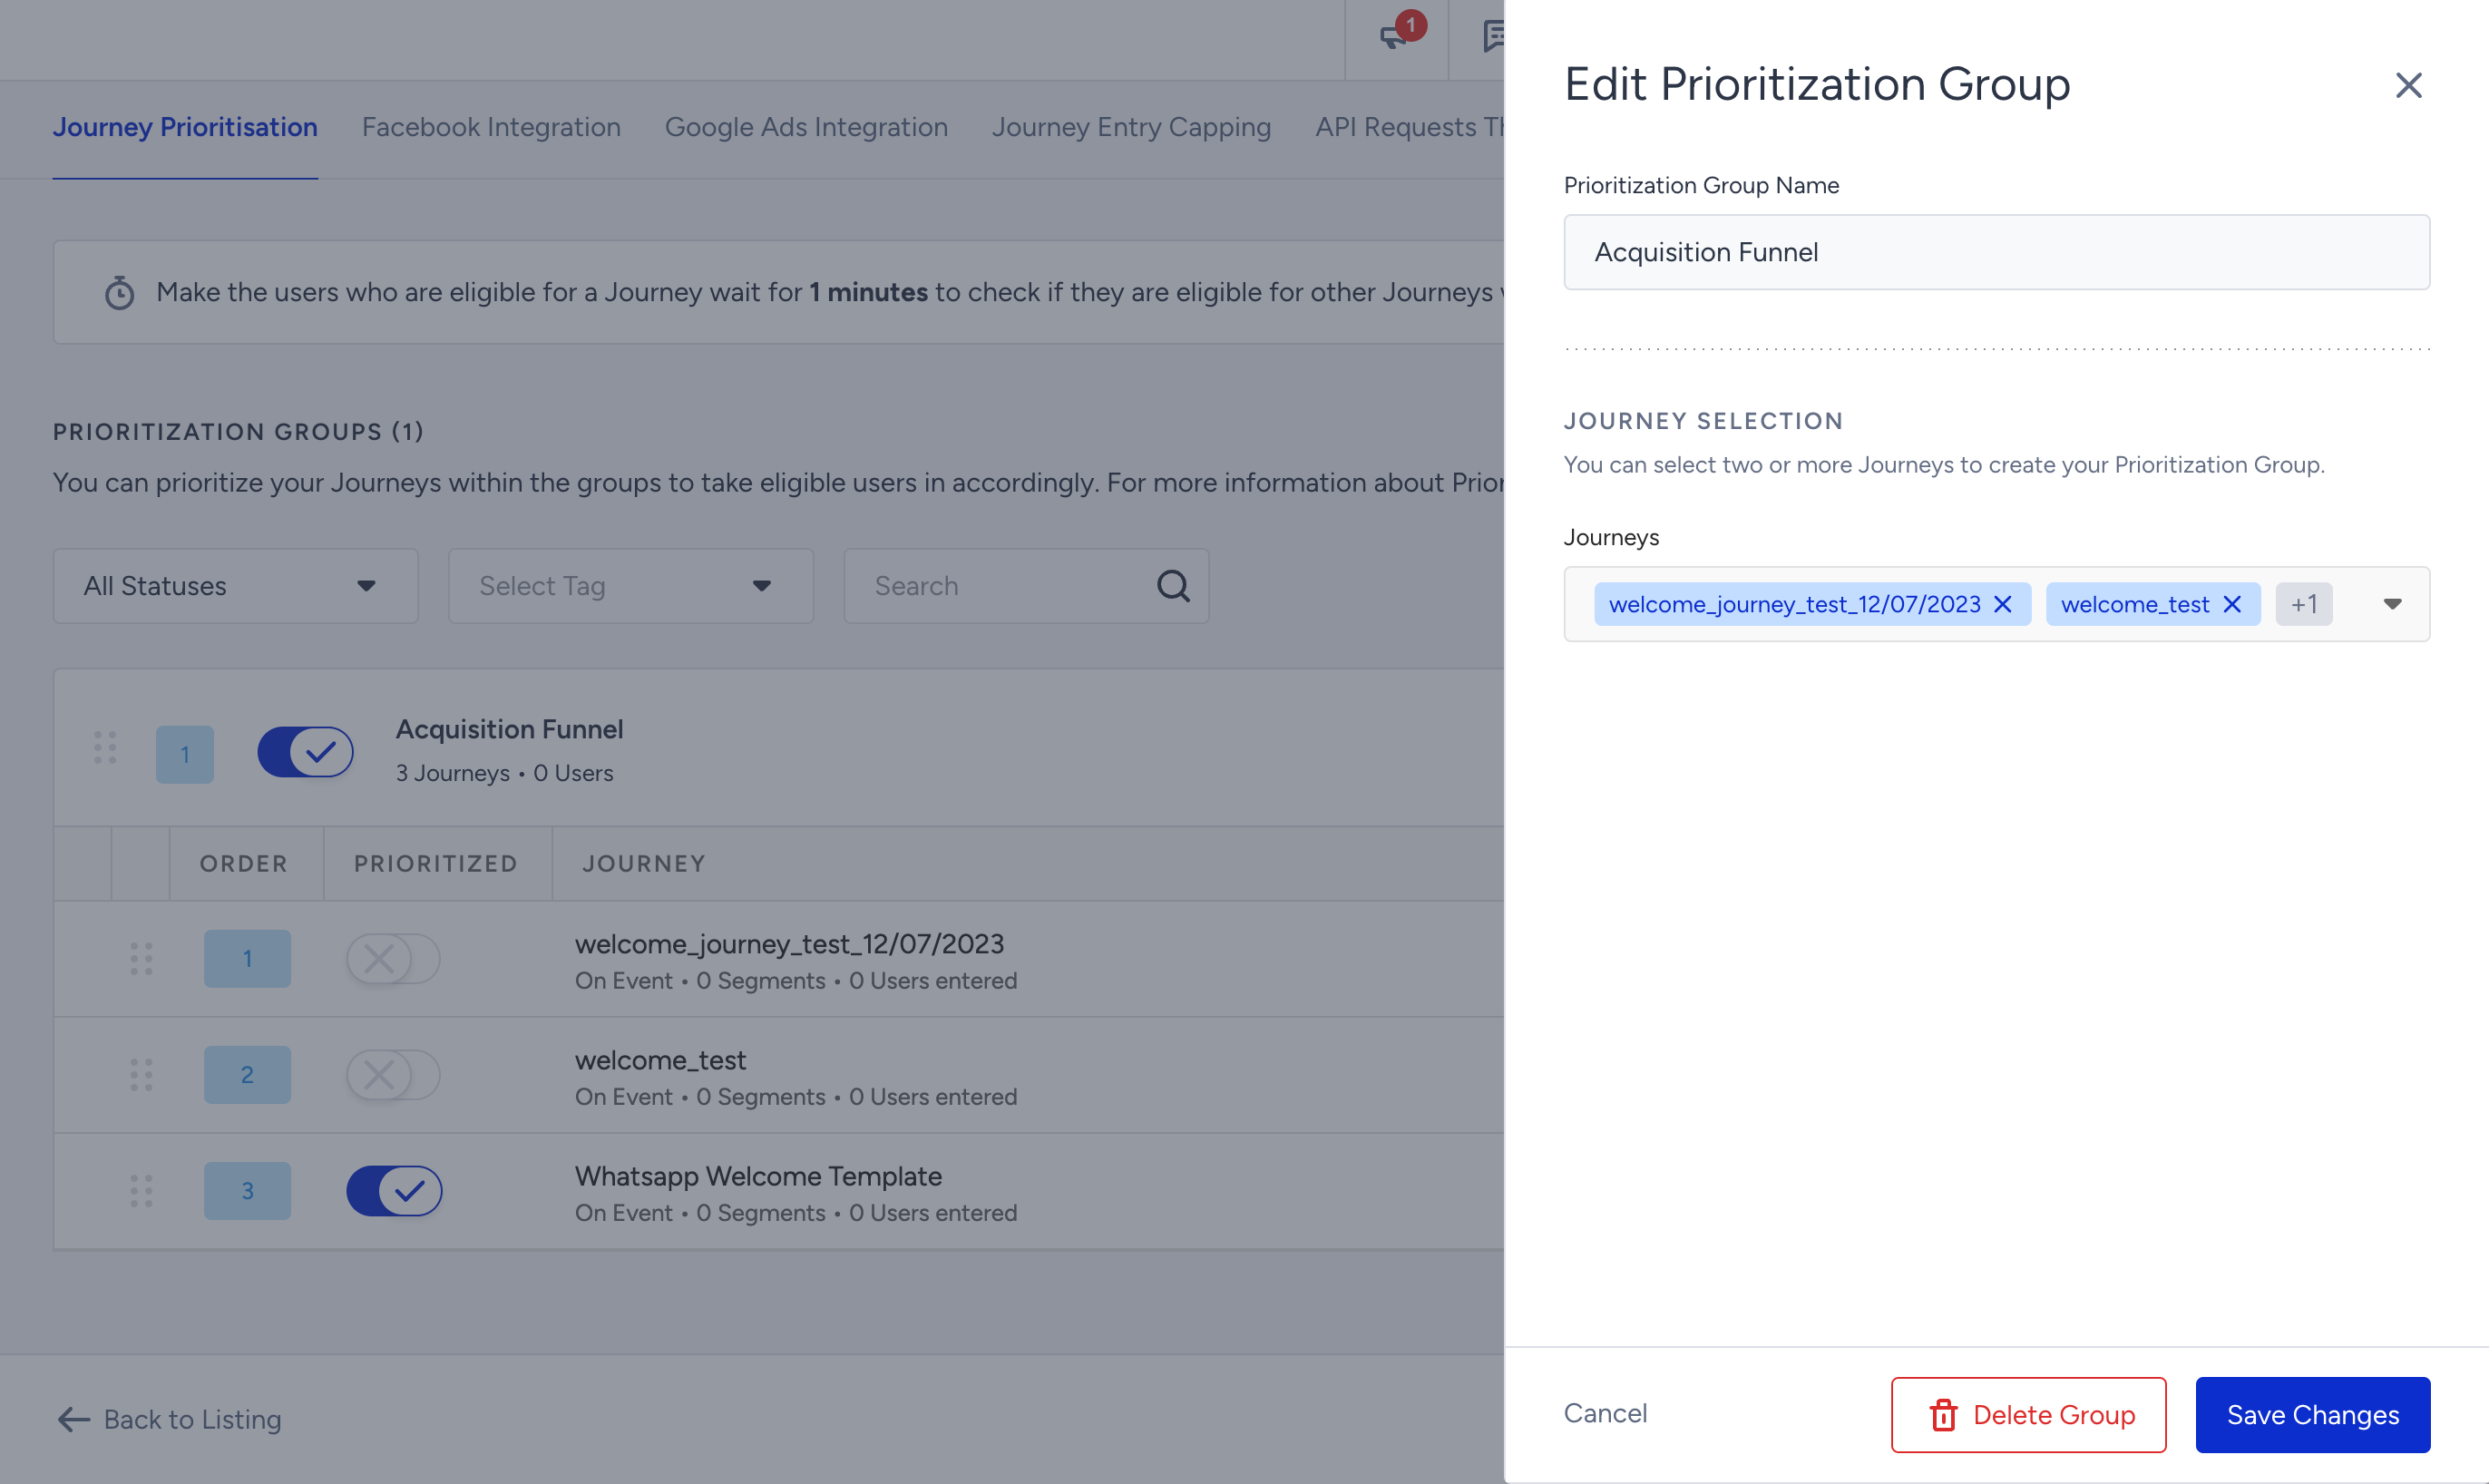
7. To create more prioritization groups, click the Create Prioritization Group button again. Repeat the process to create a new group with its own set of journeys. The first group you created will always have the highest priority.
8. If you want to use the Exit-Proof feature on a journey, toggle on the Exit-Proof option on the side modal and click the Save button.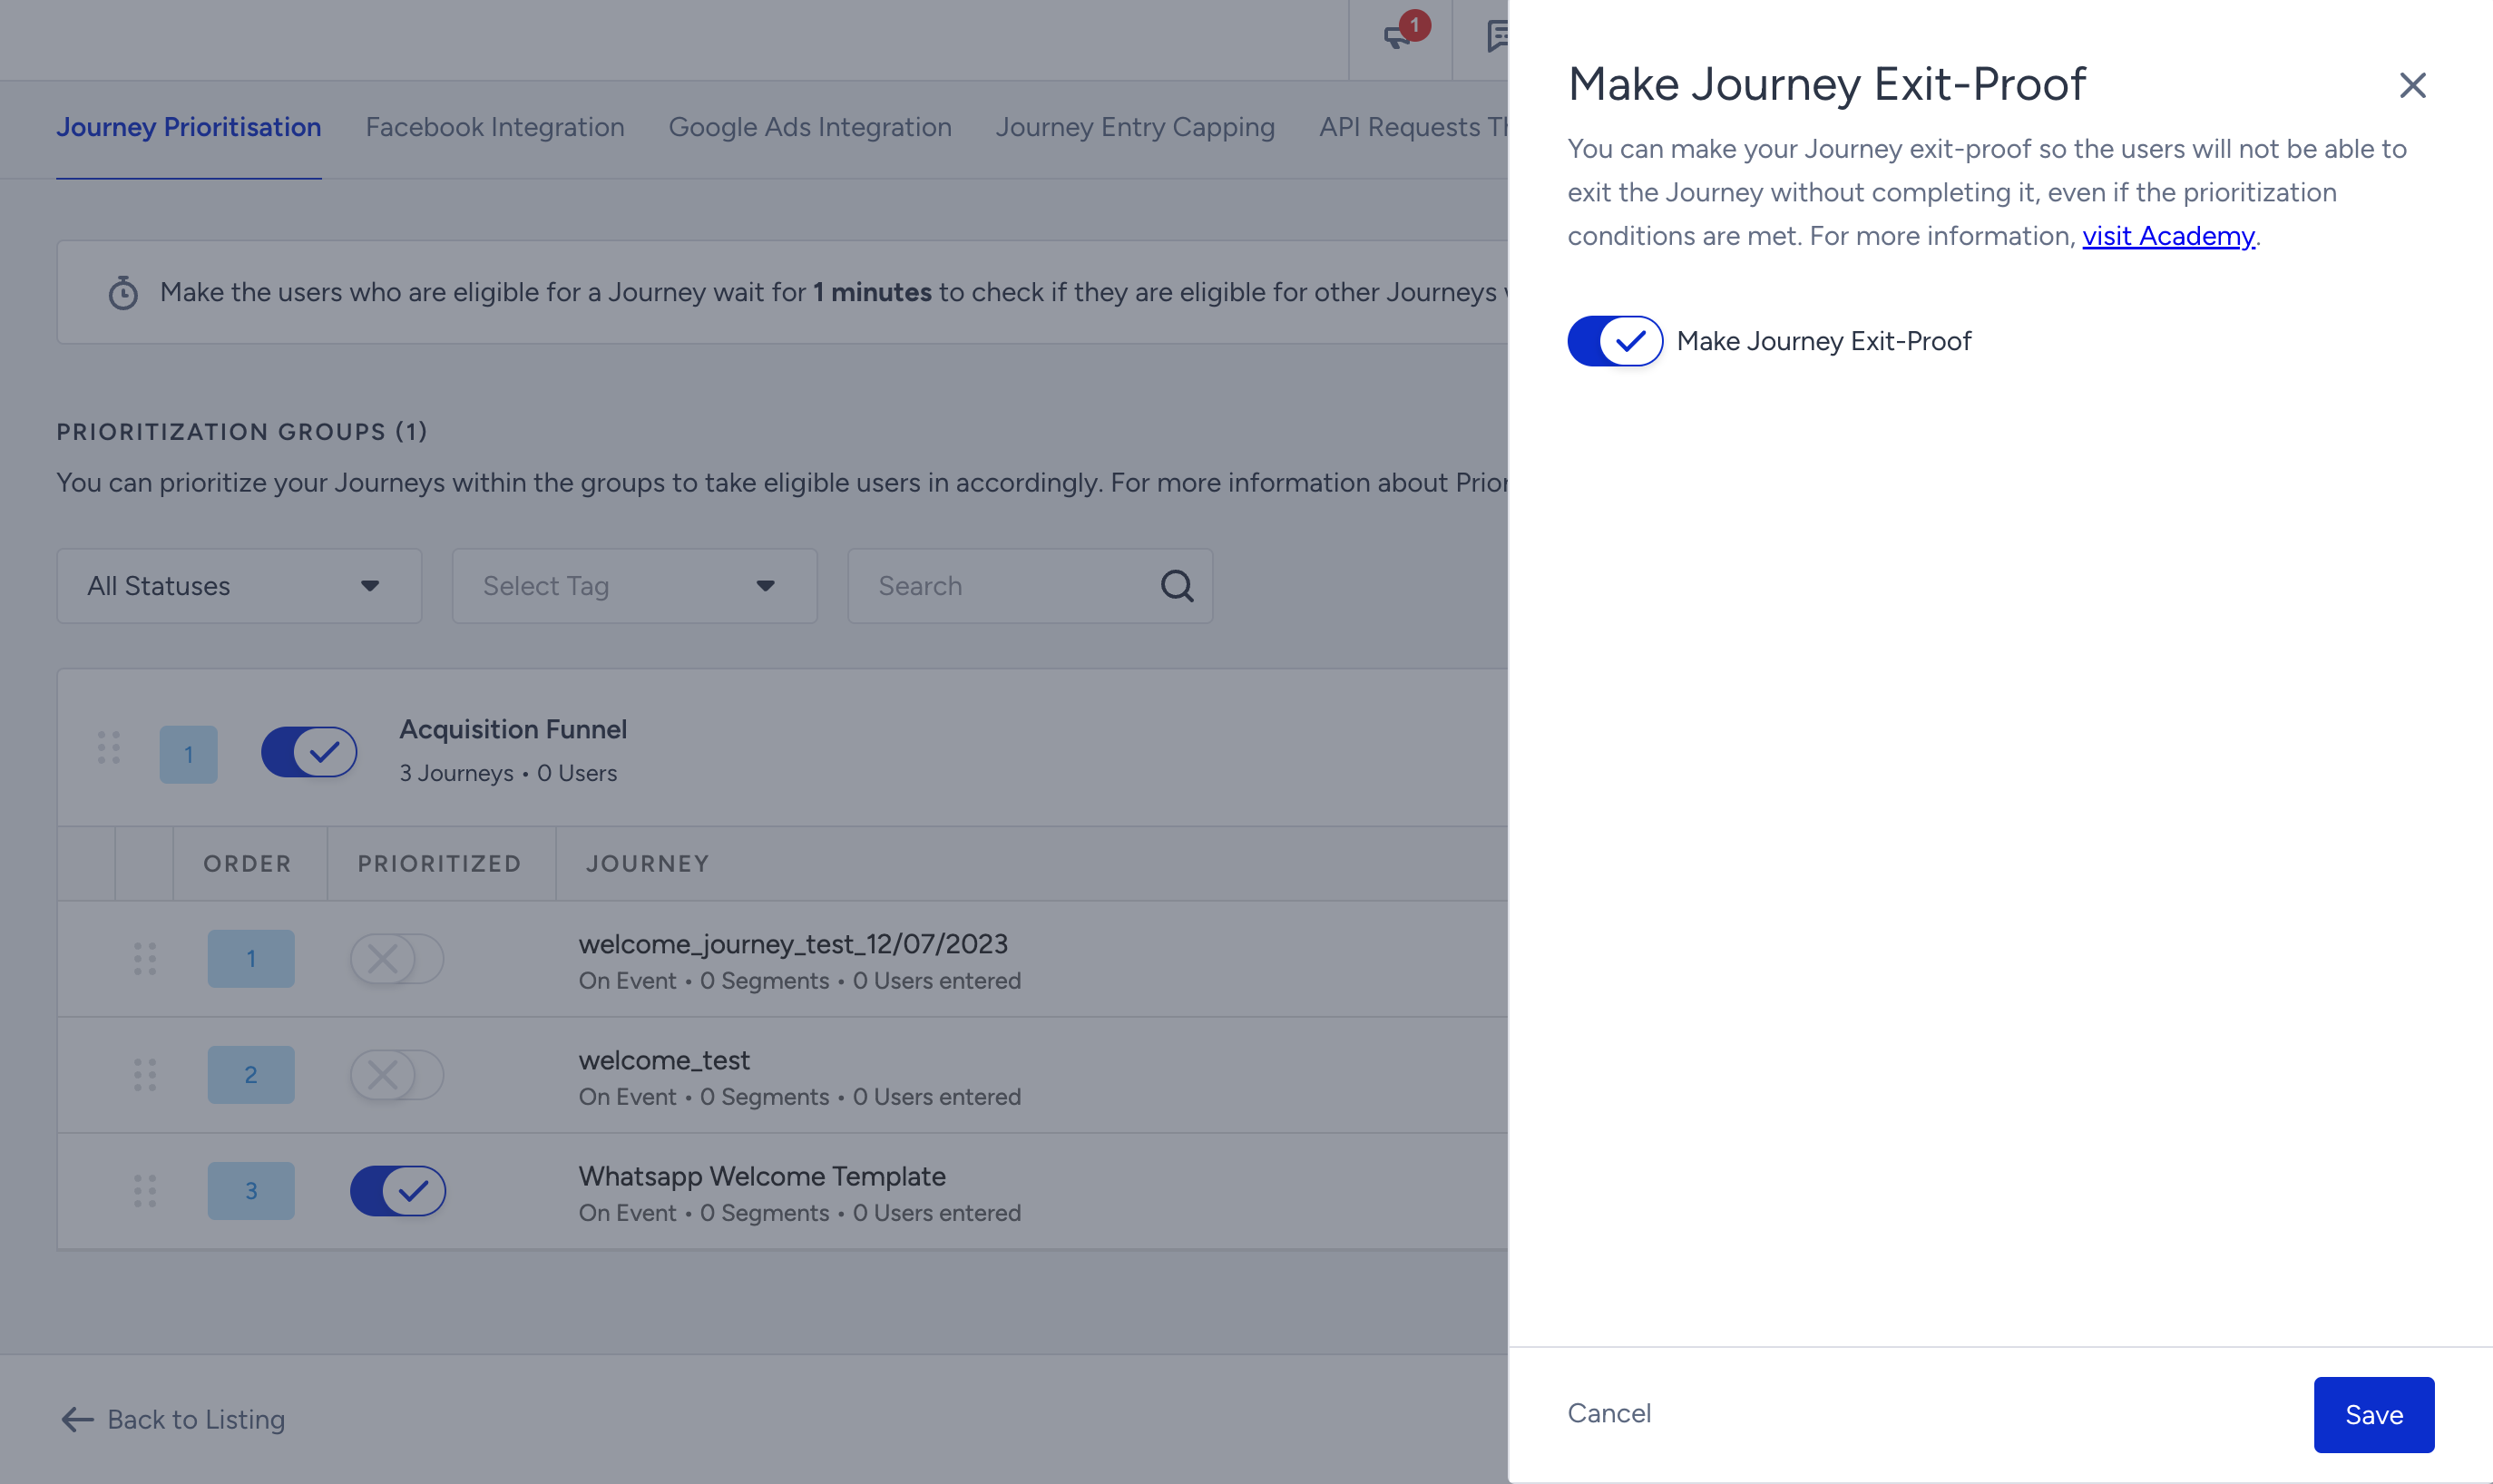
When you enable this option for a specific journey, the users who enter the journey will not be forcibly redirected to a higher prioritization journey even if they meet the eligibility conditions for another journey. This option ensures that the users complete the ongoing journey before being redirected to a different journey.
It is recommended to use the Exit-Proof option selectively and primarily for journeys that require uninterrupted completion.
9. If you want to change the time duration for the eligibility check, click the Edit button above the respective field. This allows you to modify the duration as required.
Any changes made to the settings are automatically saved. These changes will be effective for all users and journeys within the prioritization groups.
Journey Prioritization history
Journey Prioritization helps you troubleshoot journey entrance behavior and understand which journeys are set to be more prioritized for your account. To support this, Journey Prioritization History provides a chronological log of all configuration changes made to your priority groups.
With this history, you can see exactly who changed what and when. This makes it easy to audit your prioritization setup and investigate any unexpected behavior at journey entry.
View the history
To view the history, click the History button on the Journey Prioritization page. The history opens in a side drawer.
If no actions have been recorded yet, the History button is disabled, and an infobox explains that no history exists.
The following actions are recorded in the history log:
- Created a prioritization group: A new priority group was added
- Deleted a prioritization group: An existing priority group was removed
- Enabled prioritization for a group: A group's status was set to active
- Disabled prioritization for a group: A group's status was set to inactive
- Added a journey to a prioritization group: One or more journeys were added to a group
- Removed a journey from a prioritization group: One or more journeys were removed from a group
- Enabled prioritization for a journey in a group: A journey within a group was activated
- Disabled prioritization for a journey in a group: A journey within a group was deactivated
- Updated group priority: The order of priority groups was changed (reordering)
- Updated journey priority: The order of journeys within a group was changed (reordering)
- Enabled exit-proof for a journey: The exit-proof setting was turned on for a journey
- Disabled exit-proof for a journey: The exit-proof setting was turned off for a journey
- Updated Eligibility Check Duration: The eligibility time window was changed
- Updated group name: A priority group was renamed
Each history entry shows:
- Description of the change
- Timestamp in DD.MM.YYYY HH:MM format
- User who made the change (name and title)
Entries that involve multiple journeys (e.g., reordering several journeys at once) support expand/collapse to keep the view compact, with the view collapsed by default.
History entries are shown in reverse chronological order (newest first) and grouped by time period: today, yesterday, and last week.
Results load in batches. Click the Load More at the bottom of the drawer to see older entries.
Filters
You can narrow down history results using the following filters:
- Date range: Select a start and end date to view changes within a specific time window.
- Action type: Filter by the type of change (e.g., group created, priority changed, journey added, exit-proof toggled).
- User: Filter by the person who made the change. Internal Insider employees are marked with an "Insider" badge.
For example, you notice that a journey's entrance numbers dropped unexpectedly last Tuesday. You can open the Prioritization History, set the date range to last Tuesday, and filter by action type. You can quickly see whether someone reordered journeys, disabled a group, or changed the eligibility duration, and who made the change.