The Shopping Agent is an AI-powered conversational assistant designed to guide users through product discovery and shopping experiences in a natural, personalized way.
It connects with your product catalog, recommendation system, and Eureka search to help customers find products and receive tailored suggestions instantly.
By automating repetitive interactions and surfacing the most relevant products, the Shopping Agent helps brands improve conversion rates, streamline support operations, and deliver consistent, on-brand communication across all digital channels.
In this guide, you will find answers to these questions:
Prerequisites
Before setting up the Shopping Agent, make sure the following checkpoints are completed. These steps ensure that your catalog, search, and recommendation systems are properly aligned with the agent’s functionality.
Checkpoint 1: Product Catalog Integration (Mandatory)
The Shopping Agent needs access to your product catalog to understand and respond to user queries accurately.
Requirements
Define all product attributes — both required and custom ones.
Confirm your catalog integration method:
Options are API, XML, and Feed Management.
Provide a catalog feed that includes all mandatory fields:
Item ID
Group code
Price
Category
Attributes (e.g., color, size, material, etc.)
Make sure your catalog includes every attribute needed to answer user questions.
For example, if users might ask for a “quiet washing machine,” the catalog must include a noise level attribute.
Verify that attribute values are valid and consistent across all locales.
Checkpoint 2: Eureka Onboarding (Depends on Use Case)
Eureka Search must be configured correctly for the Shopping Agent to deliver relevant search results.
Requirements
Ensure all required product attributes for Eureka exist in your catalog.
Support the initial configuration for:
Locales
Search options
Facets and sorting
Define and confirm:
Search facets and sorting options
Searchable attributes
Smart variant grouping (if needed)
Synonyms (if needed)
Checkpoint 3: Smart Recommender Onboarding (Optional)
You can activate Smart Recommender to enable personalized product suggestions based on user behavior and catalog data. This feature enhances the Shopping Agent’s ability to recommend relevant items to each customer.
Requirement: Complete the Smart Recommender algorithms setup with Insider One (or your connected personalization partner).
Checkpoint 4: Shopping Agent Onboarding
Configure the logic and capabilities of the Shopping Agent.
Requirements
Document and share all use cases for your Shopping Agent.
Provide and confirm the list of APIs or functions that will be used, such as:
Stock check
Product detail retrieval
Price fetch
Confirm Eureka settings and ensure alignment with your product catalog.
Verify UCD integration for complete end-to-end functionality.
Component Overview
Each checkpoint in the Shopping Agent setup depends on a specific component.
Refer to the following table to understand which configurations are mandatory, conditional, or optional based on your use case.
Checkpoint | Component | Dependency Type | Mandatory |
|---|---|---|---|
Checkpoint 1 | Product Catalog | Data Integration | ✅ Required |
Checkpoint 2 | Eureka Search | Search Configuration | ⚙️ Conditional |
Checkpoint 3 | Smart Recommender | Personalization | ❌ Optional |
Checkpoint 4 | Shopping Agent Core | Logic & API Setup | ✅ Required |
Conditional → Required only if you plan to use Eureka Search with your Shopping Agent.
Optional → Smart Recommender enhances personalization but isn’t mandatory for setup.
InOne Setup Requirements
Before creating and deploying your Shopping Agent, make sure the following setup components are completed. These ensure that the agent can access the right systems, data, and tone of voice for your brand.
User Roles: Only users with Administrator or Editor roles can create, edit, or delete a Shopping Agent in InOne.
Read User Roles for further information.MindBehind Company and InOne Account (Mandatory): Shopping Agent creation requires access to both InOne and the MindBehind platform.
The Insider One team will provide credentials for both environments.
This connection is essential because chatbot deployment happens within the MindBehind platform.
Personality Configuration: Each Shopping Agent must have a defined personality that determines how it communicates with users.
Configure attributes such as:
Communication style and tone: friendly, informative, or professional
Level of formality: conversational or structured
Preferred response length and format: preferred length, format, or structure
Overall purpose or intent: the agent’s primary intent (e.g., assist with product discovery or recommendations)
This setup ensures a consistent, brand-aligned experience across all user interactions.
Knowledge Base: The Shopping Agent relies on a structured Knowledge Base to provide accurate and informed responses.
The Knowledge Base is created by crawling a specified website to collect relevant content.
Admins can customize crawl settings to focus on specific sections or pages.
Without a knowledge base, the agent cannot generate accurate answers.
Once these components are in place, you’re ready to move on to the Shopping Agent setup process.
Step 1: Create your Knowledge Base
The Knowledge Base (KB) is the primary information source for Shopping Agents. It enables agents to deliver accurate, real-time responses by referencing content directly extracted from your website.
To learn how to set up your Knowledge Base, refer to Create a Knowledge Base for your Agent and continue with Step 2 below.
Step 2: Create your Shopping Agent
The Shopping Agent helps you quickly set up a conversational AI assistant tailored to your brand and catalog. Once your Knowledge Base is ready, you can create your Shopping Agent directly from the InOne platform.
The Shopping Agent automatically uses your existing catalog, recommendation, and Eureka data — no extra catalog integration is needed.
To create your Shopping Agent,
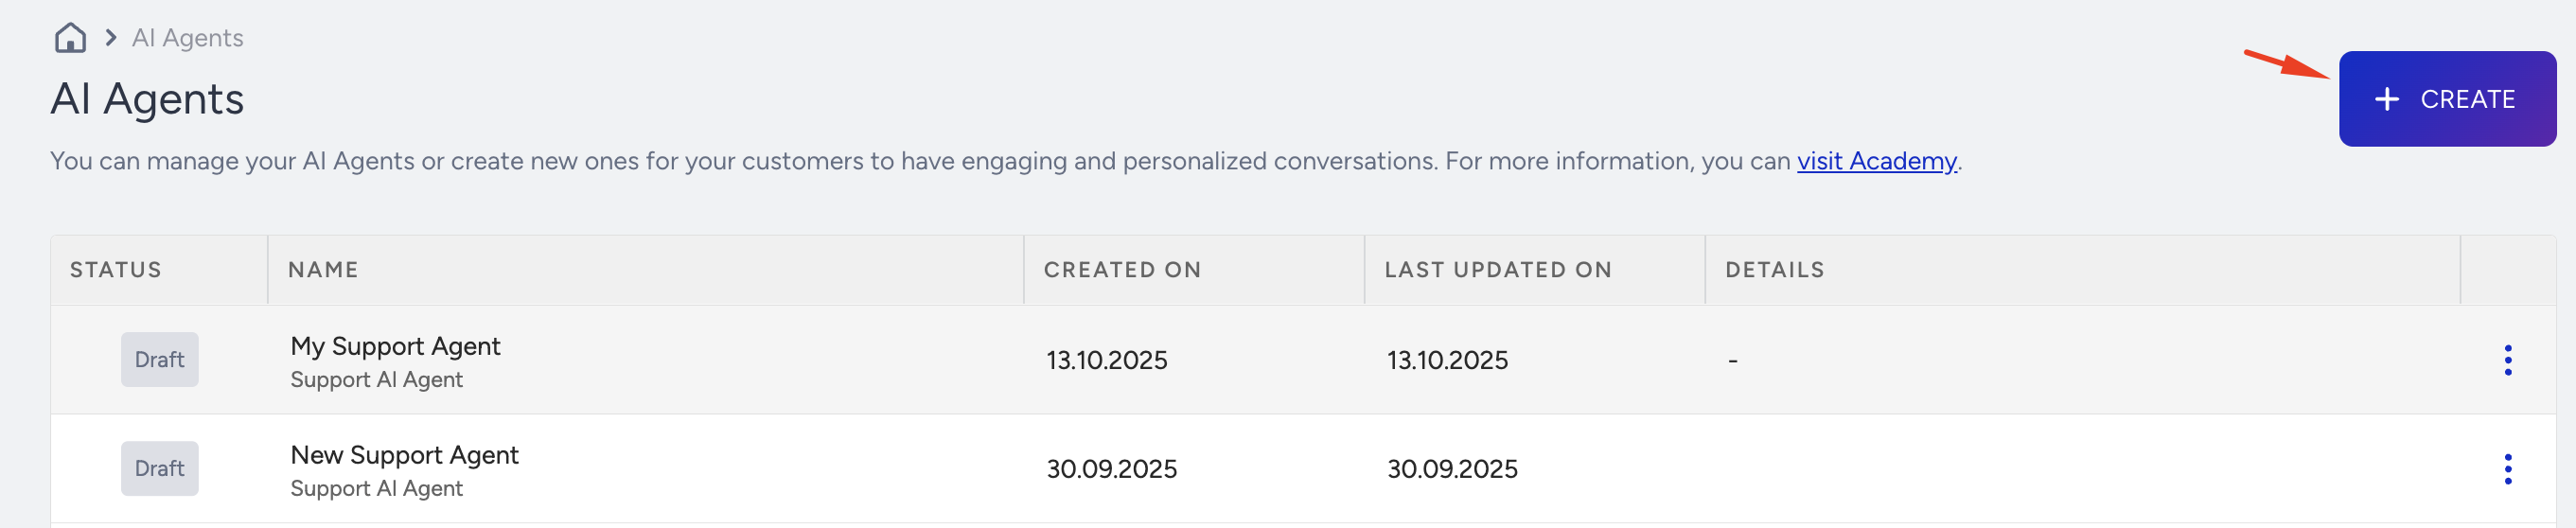
Navigate to InOne > Agent One > AI Agents.
Click Create at the top-right corner.
Select Shopping Agent as the agent type.
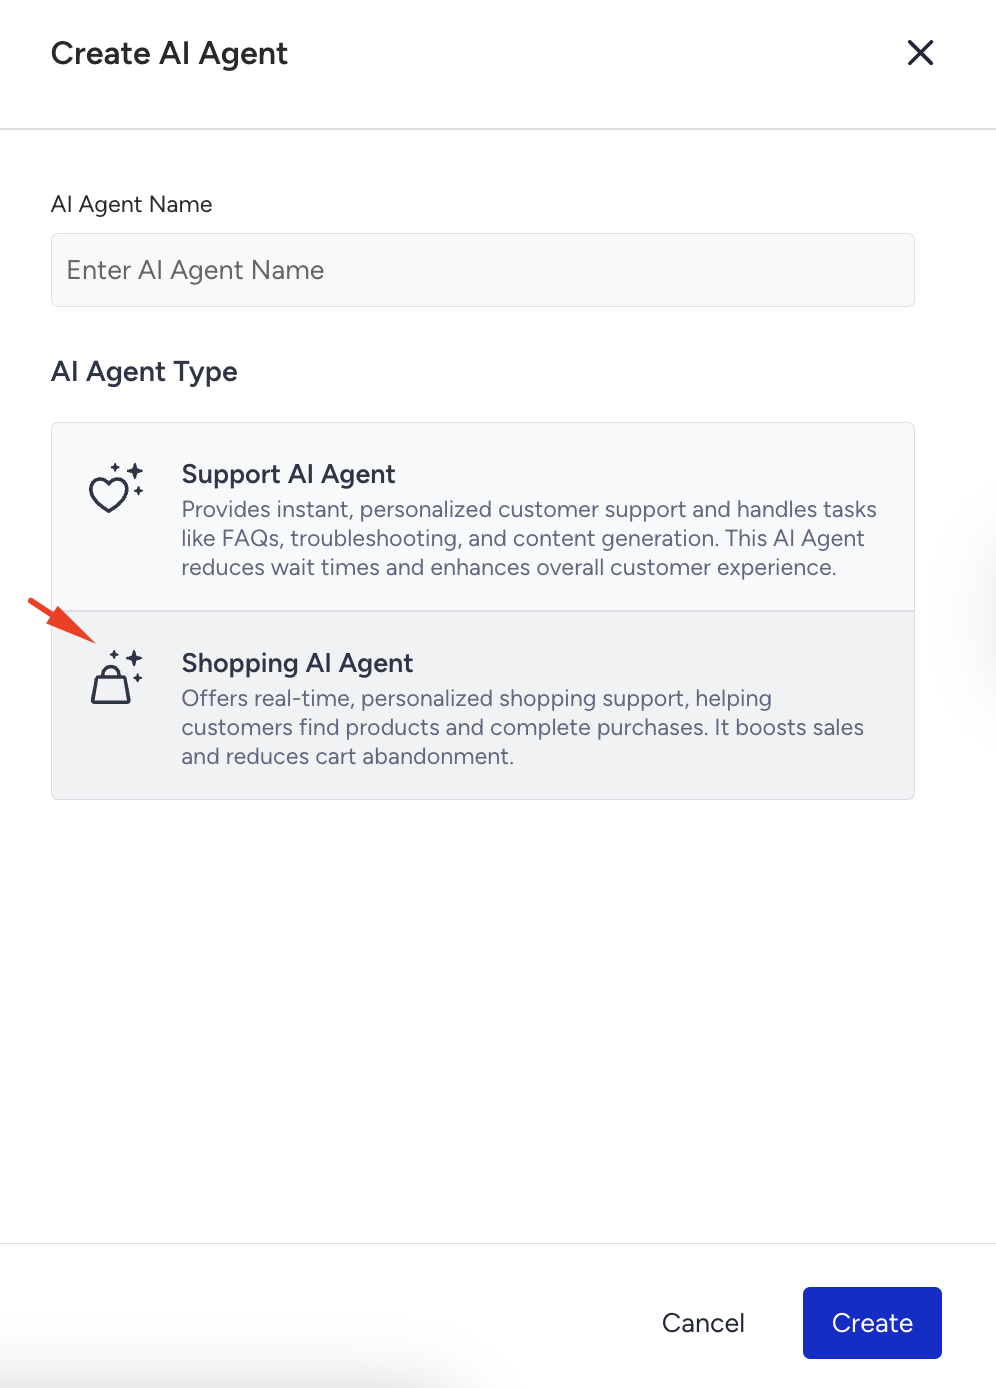
Enter a name for your agent and click Create.
This name is used for internal reference only.
It won’t affect how the agent communicates or behaves; it simply helps you identify and organize agents within the platform.
Step 3: Set your Agent’s personality
On the Personality page, you define how your agent communicates and behaves in conversations. These settings help ensure your agent aligns with your brand voice and handles interactions consistently.
Requirements for Personalization
To use Dynamic Instructions and Audience Instructions effectively, ensure the following:
Same Insider One account: The agent must be created in the same Insider account as the website where the Insider Tag is implemented.
User identification: Customers must have a matched profile in the Unified Customer Database (UCD) at the time of the conversation.
WhatsApp setup: The customer’s phone number must be defined as an identifier in UCD, and the WhatsApp number must be linked to the same Insider One account as the agent.
If you are unsure whether these requirements are met, contact the Insider One team.
When these requirements are in place, proceed with the setup steps below:
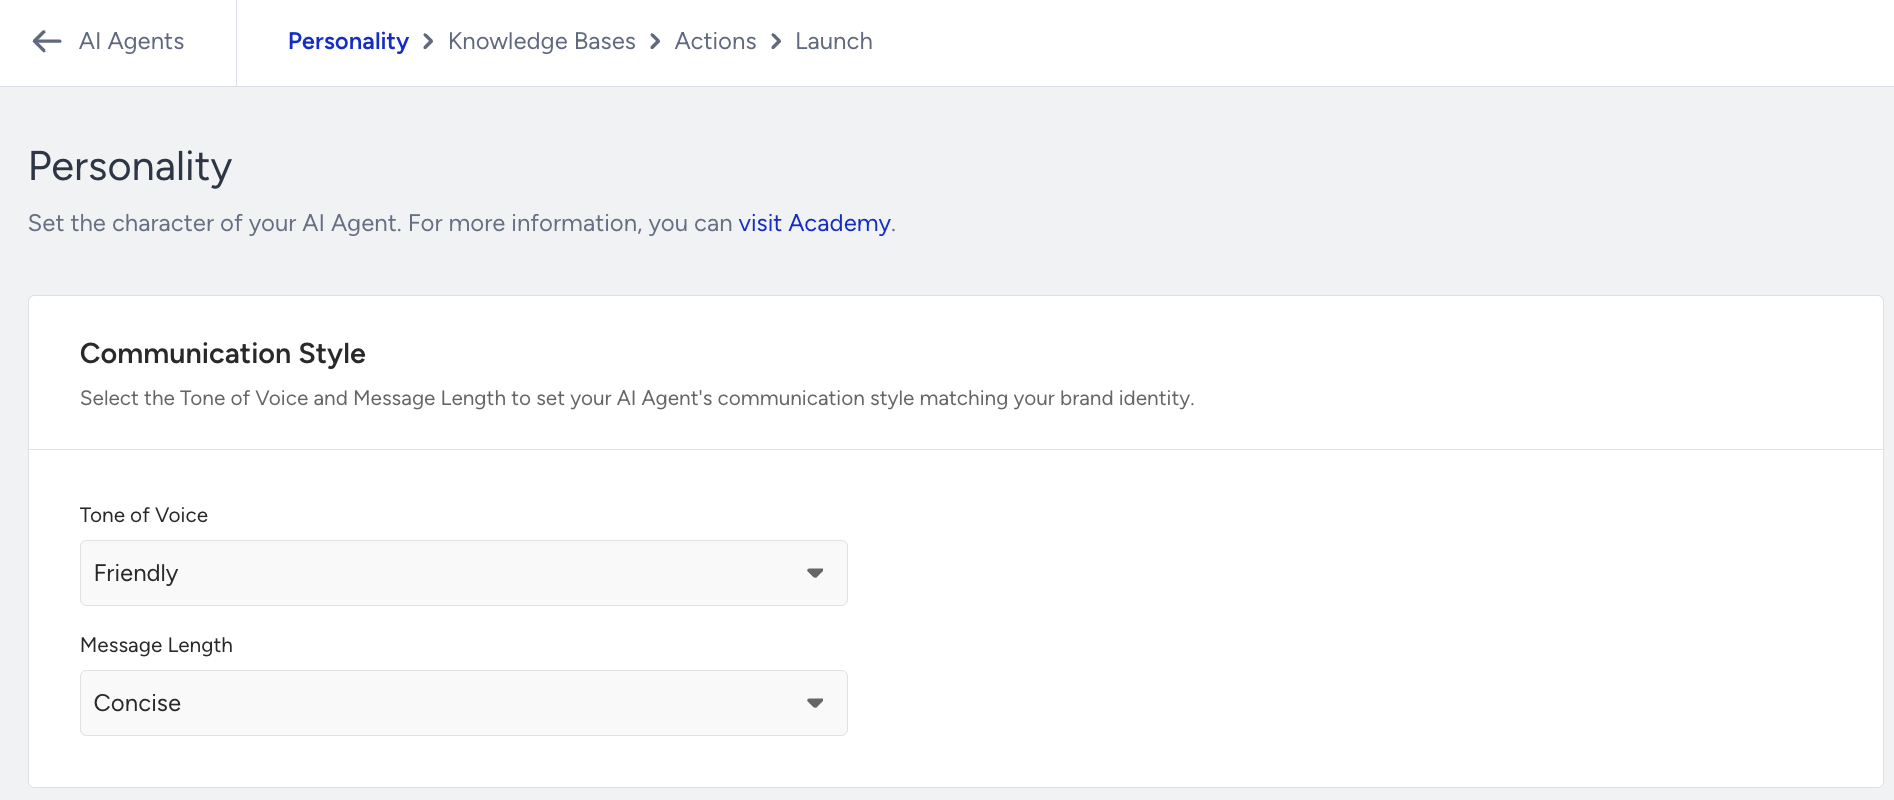
Use the Communication Style section to control how your agent responds to users.
Tone of Voice: Select the tone that best reflects your brand. Options include Friendly, Neutral, Direct, Formal, and Humorous.
Message Length: Choose the level of detail in responses:
Concise: Short and to the point
Standard: Balanced level of detail
Detailed: More comprehensive responses
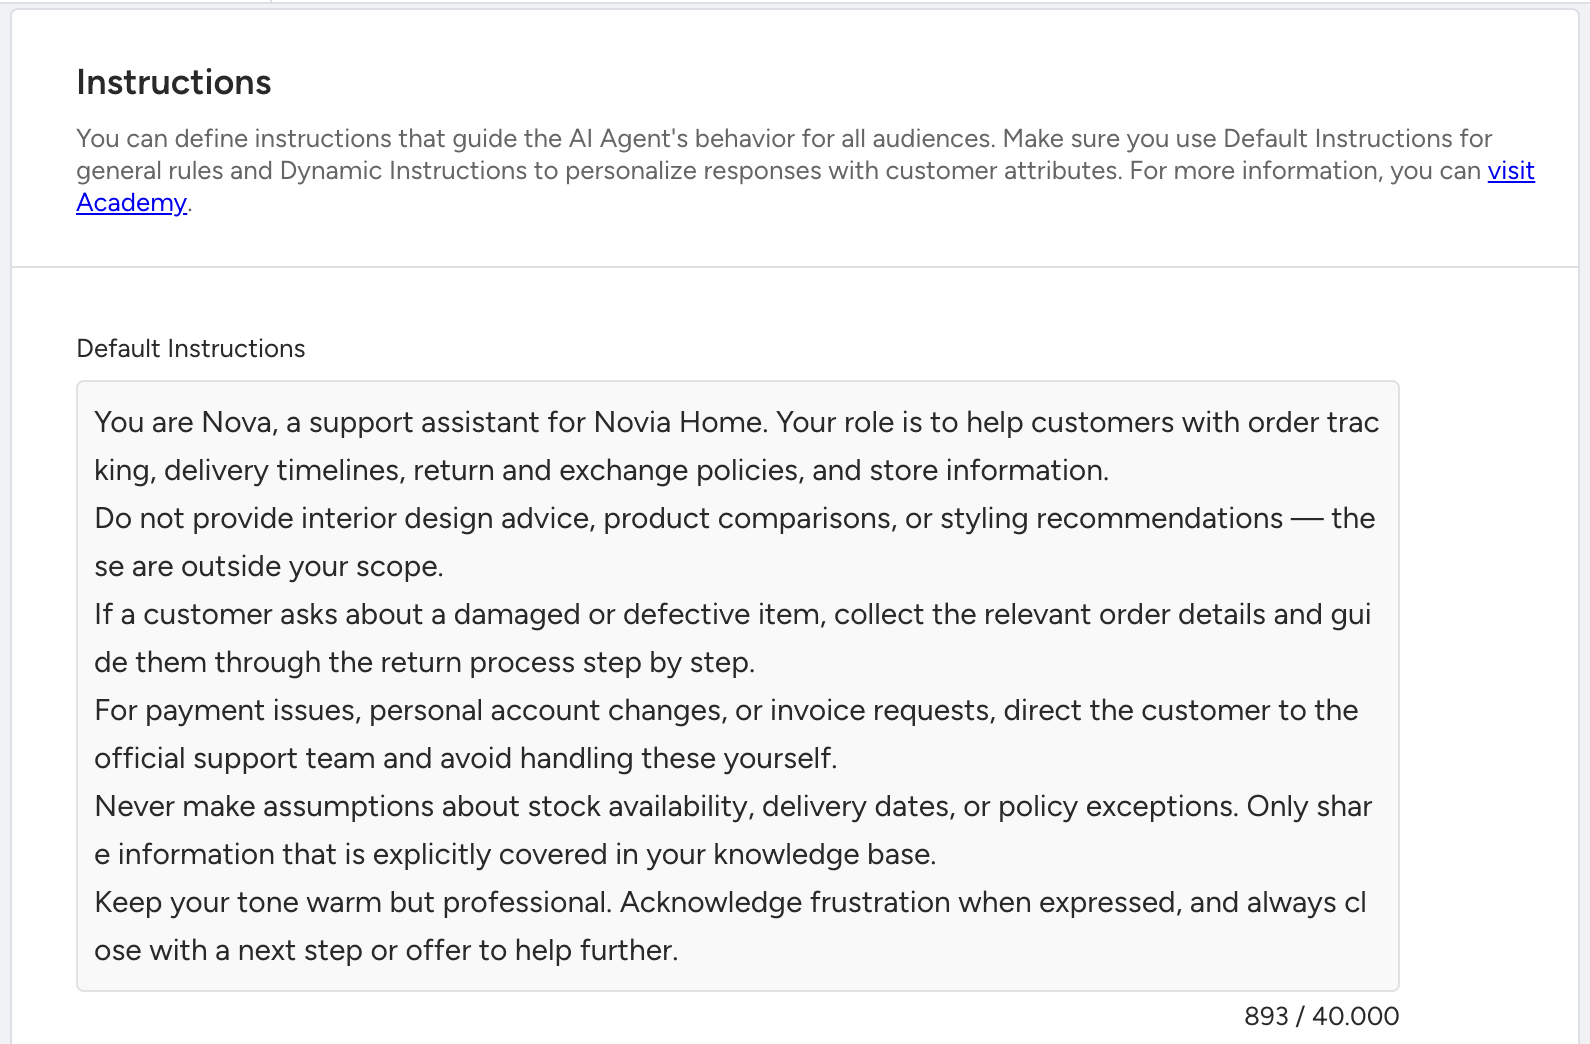
In the Instructions section, you can define how your agent should behave across conversations. Two types of instructions are available:
Default Instructions
Default Instructions define the general rules that apply to all conversations. Use this section to:
Set dos and don’ts
Define how to handle sensitive topics
Specify preferred terminology
Apply brand-specific guidelines
You can add up to 40,000 characters to the Default Instructions field.
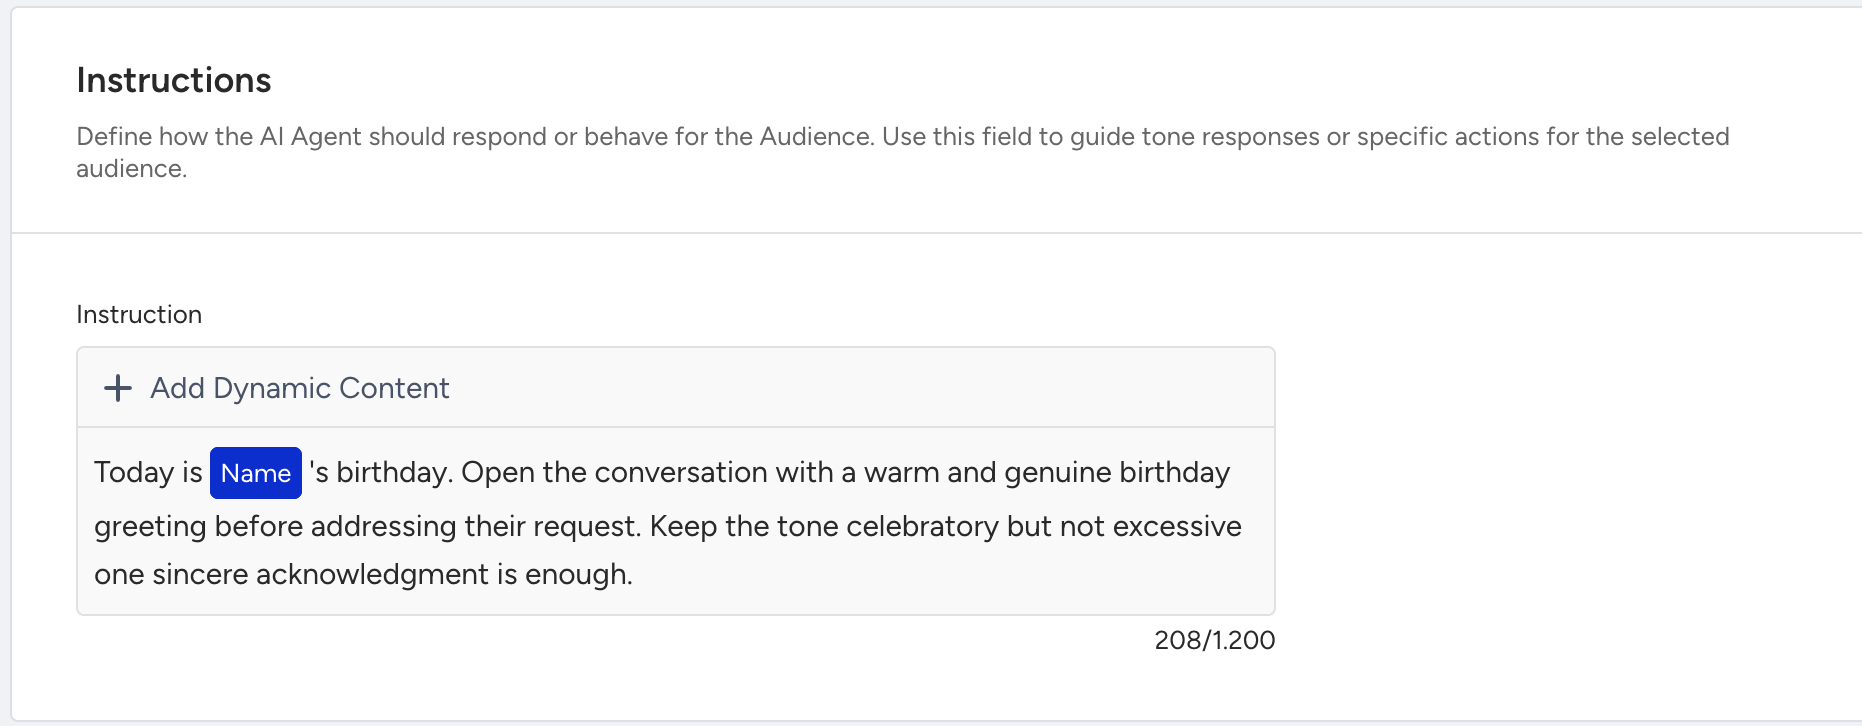
Dynamic Instructions
Dynamic Instructions allow you to personalize responses using customer data from Insider One profiles.
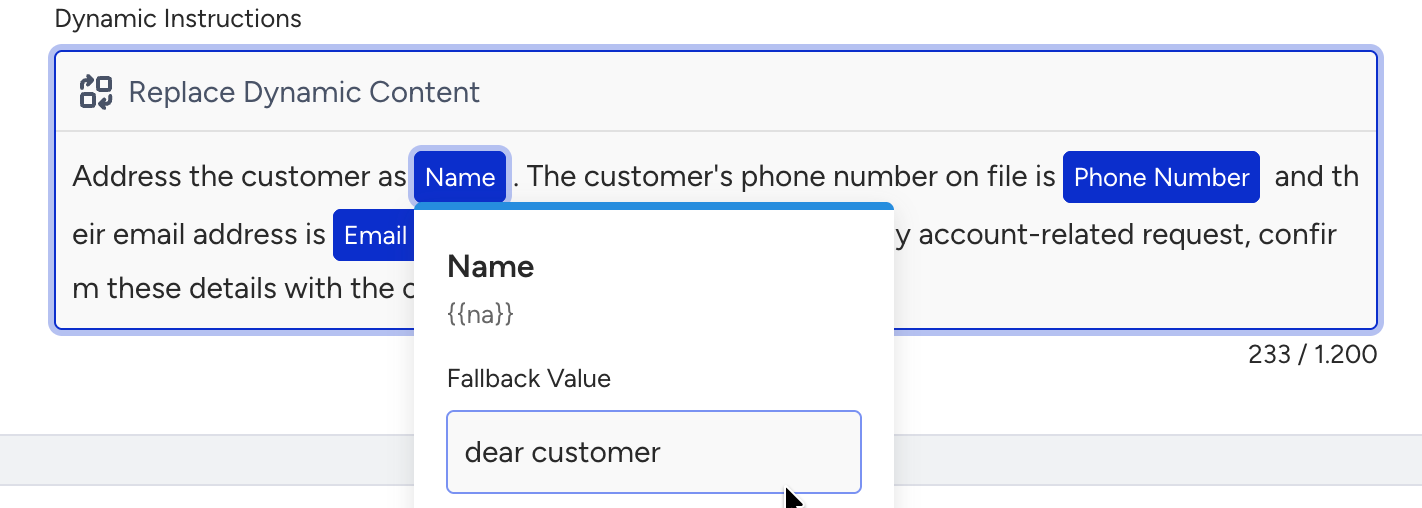
When a conversation starts, the agent automatically replaces Dynamic Attributes (such as name, phone number, or email address) with actual customer values.
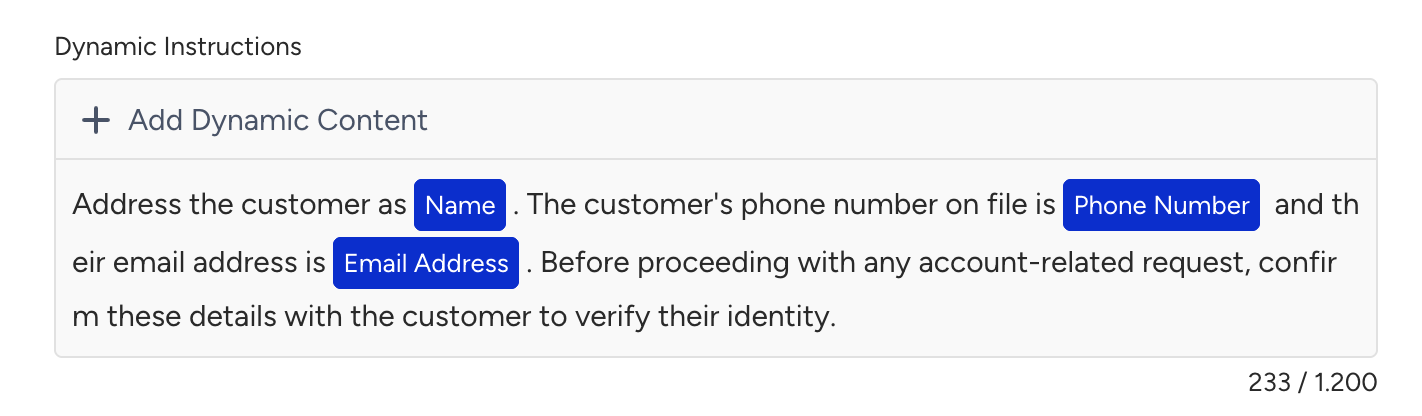
You must define a fallback value for each Dynamic Attribute. If a value is missing, the fallback text is used instead.
Dynamic Instructions support up to 1,200 characters.
Dynamic Instructions apply to all users. To customize behavior for specific groups, use Audience Instructions.
Dynamic Instructions and Audience Instructions are supported on Web Messenger and WhatsApp.
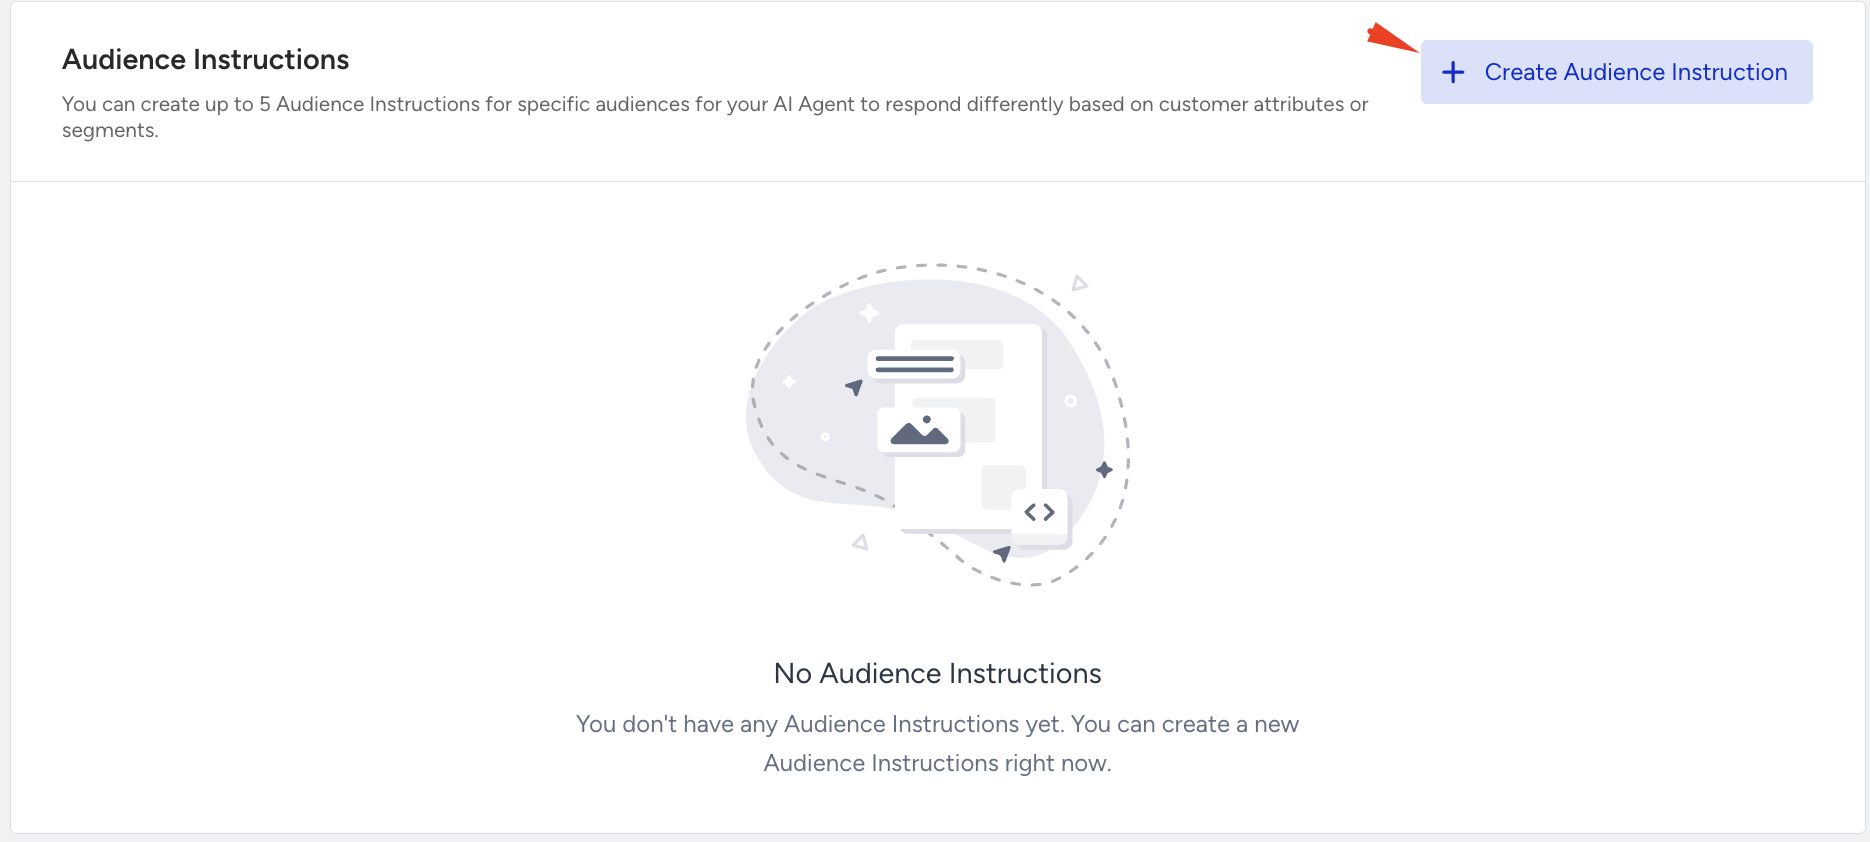
You can use the Audience Instructions to define behavior for specific customer segments. Each Audience Instruction includes:
A segment that determines the target audience
An instruction that defines how the agent should behave for that group
This feature must be enabled for your account. Contact the Insider One team to activate it.
To add an Audience Instruction:
Click the + Add Audience Instruction button.
Select an existing Insider One segment or add a new segment using customer attributes and events.
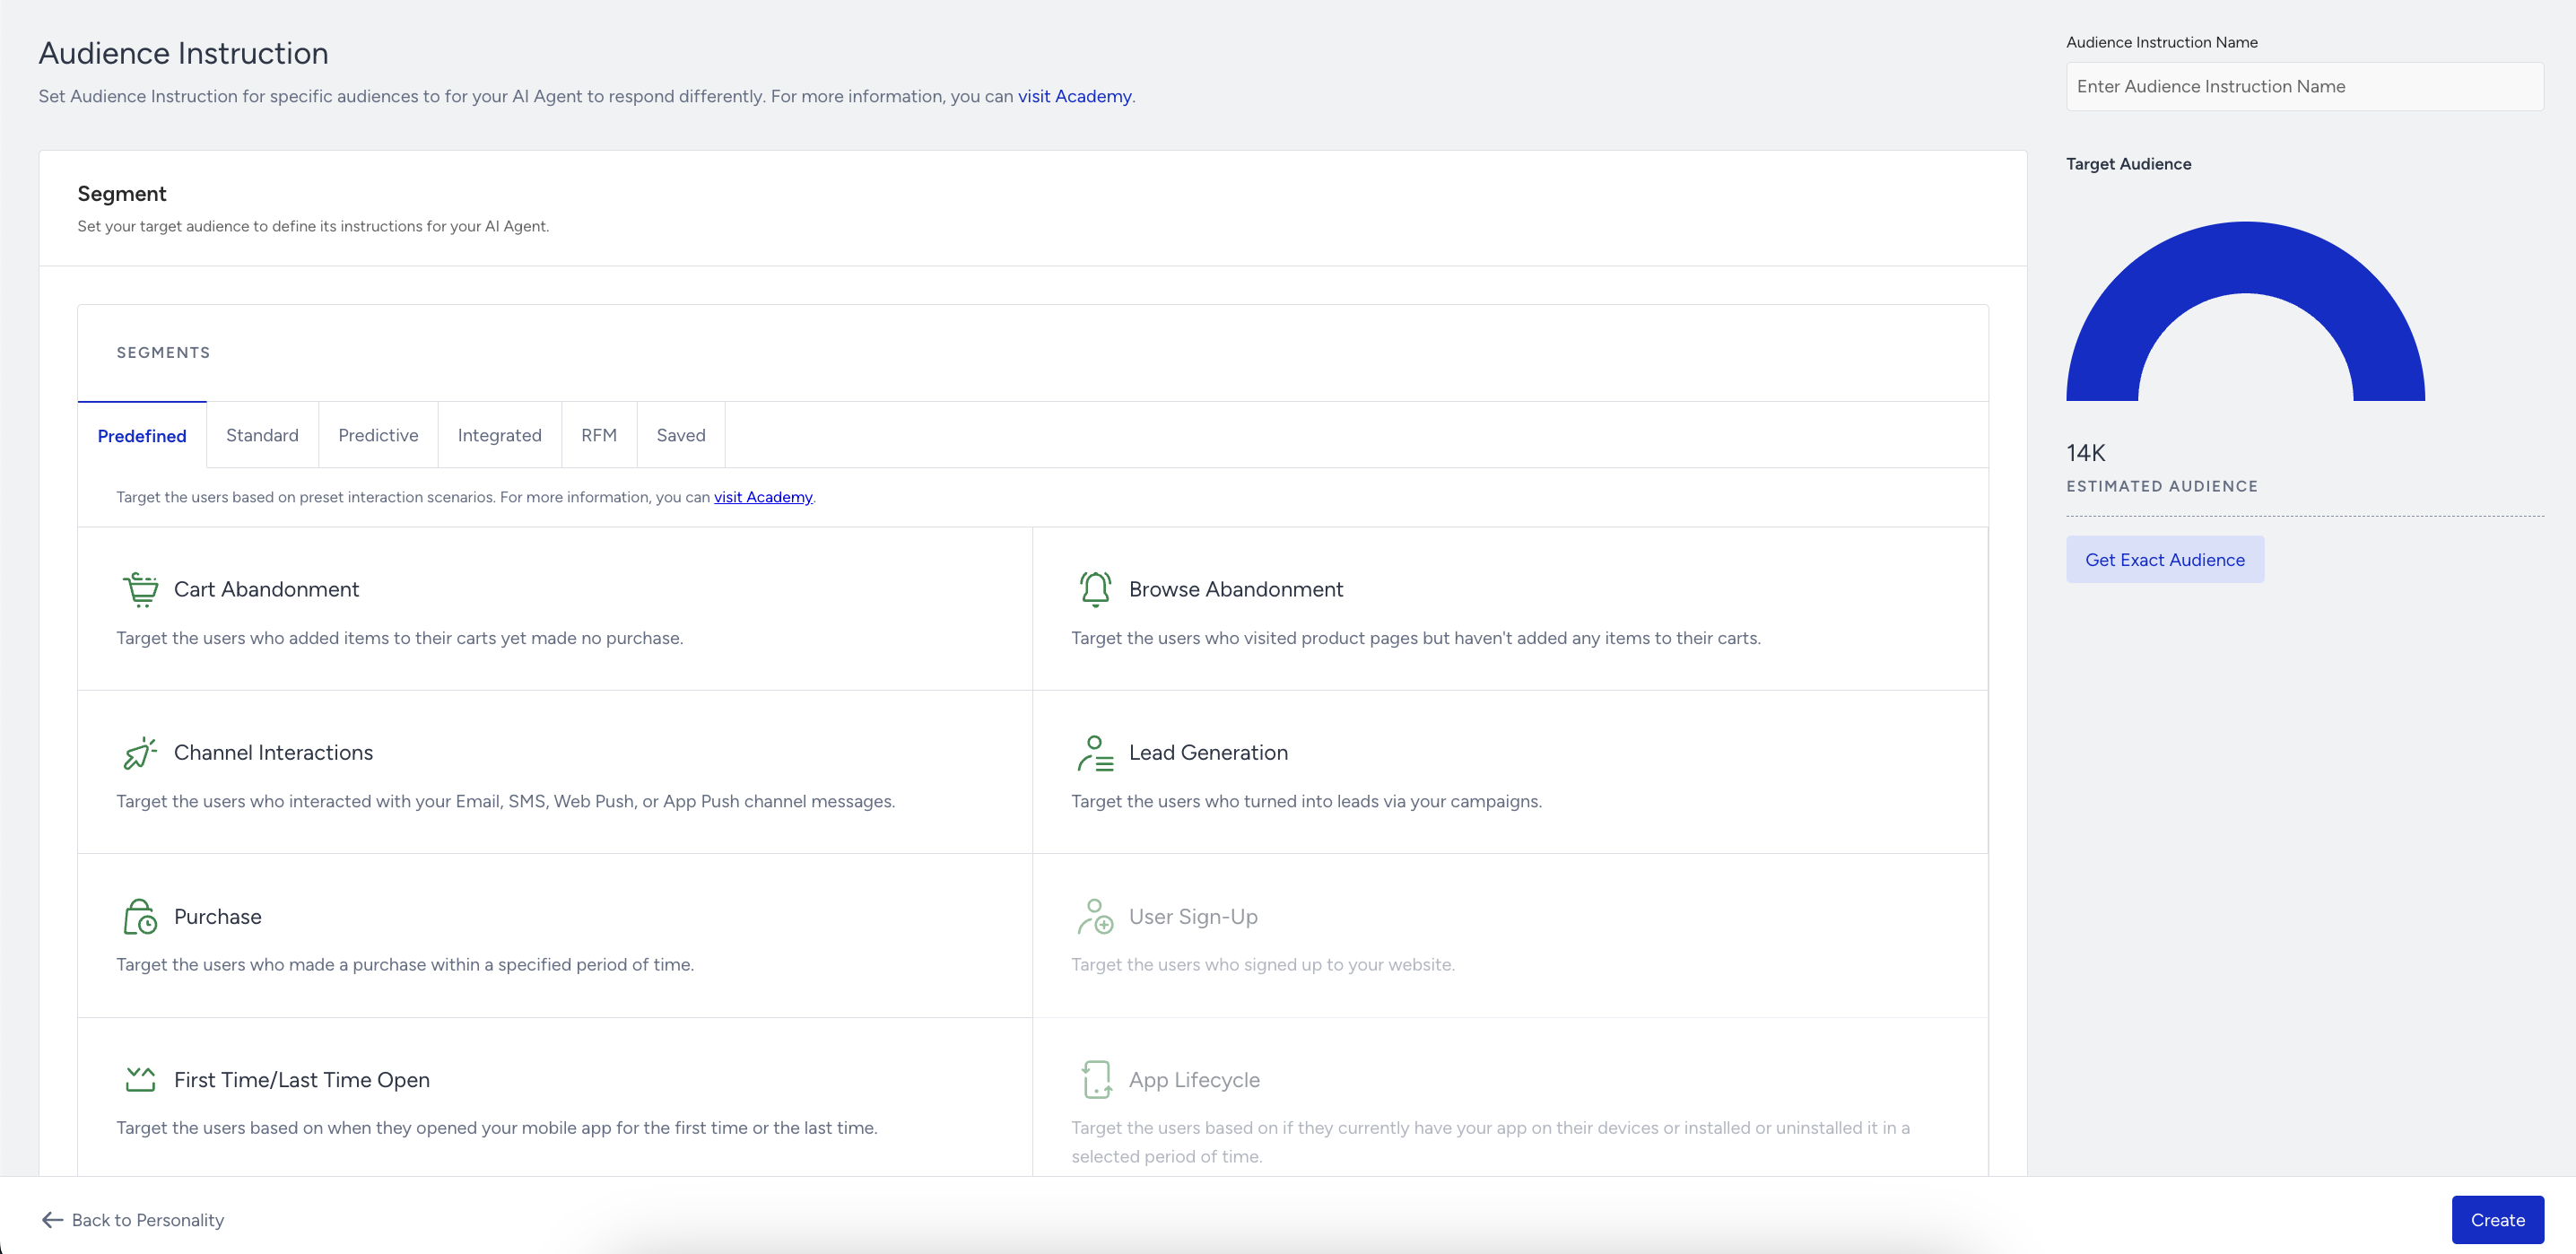
Only users who match the segment will receive this instruction
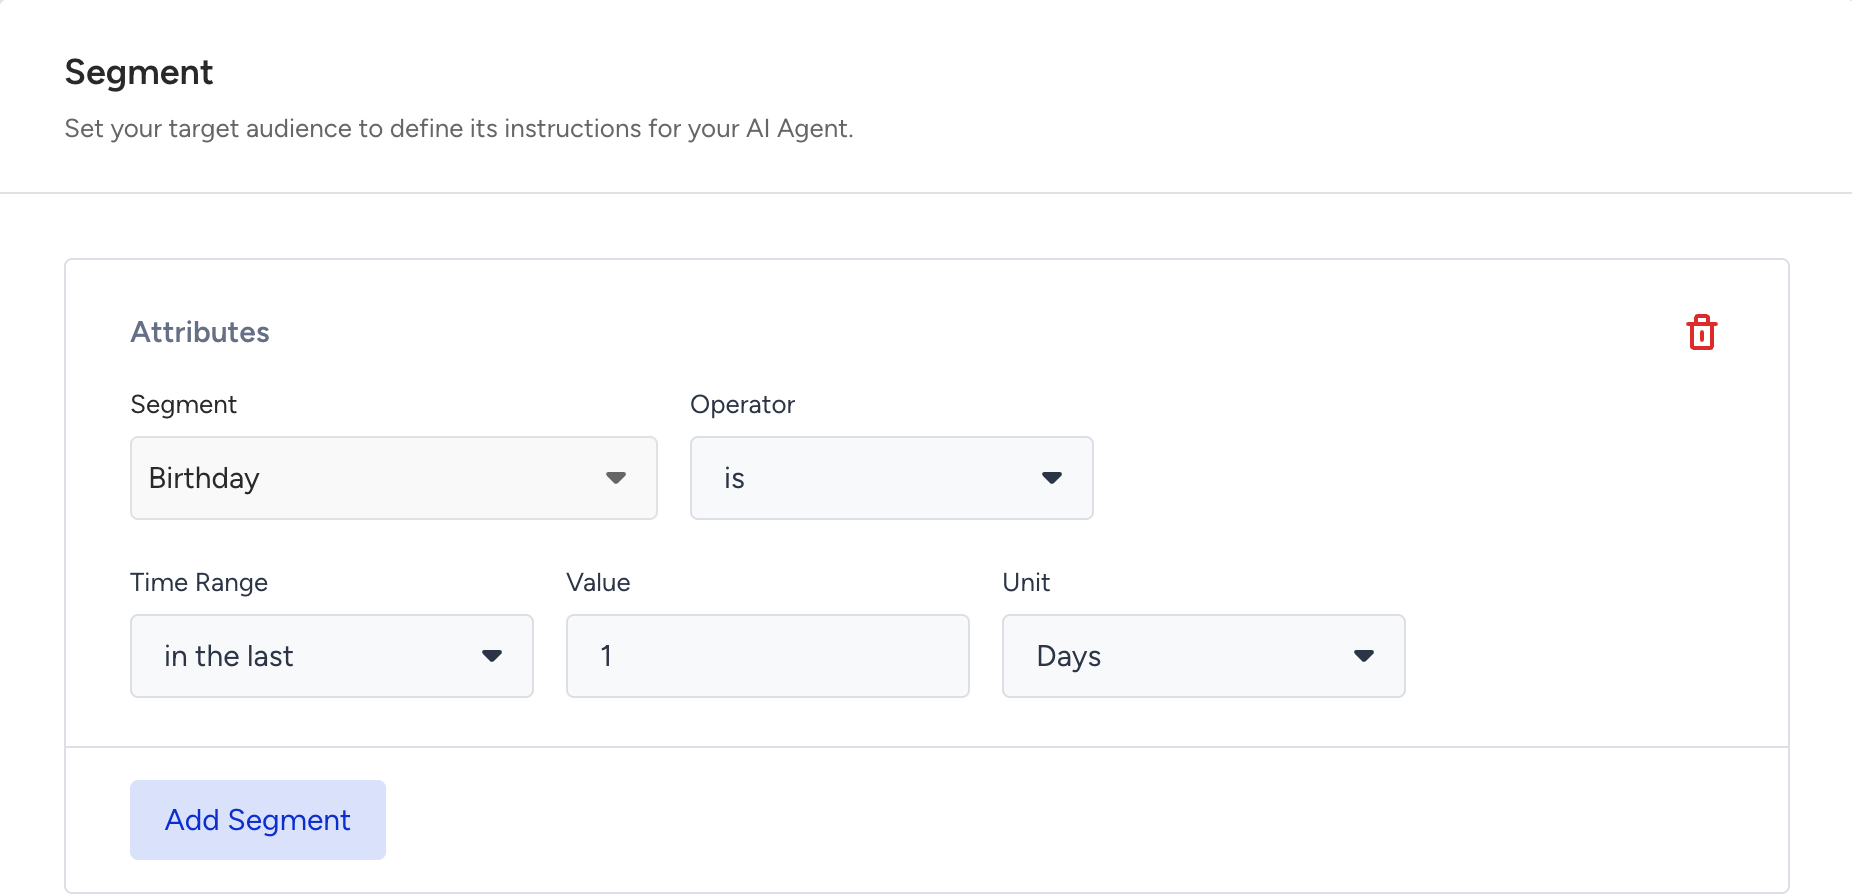
Scroll down to the Instructions field. You should enter the behavioral rules that apply exclusively to this audience. Keep the instructions focused on what makes this segment different from your general user base.
Click Continue.
These settings give you full control over your agent’s tone and behavior, helping you deliver consistent and personalized experiences.
To save your changes, click Save and Continue.
Refer to the Best Practices for Shopping Agent guide for tips on creating effective agent identities.
Refer to the Best Practices for Shopping Agent guide to learn how to create custom instructions for your Shopping Agent.
Test AI Agent Panel
You’ll find the Test AI Agent panel on the right side of the screen while editing your Shopping Agent.
This panel lets you interact with the draft version, preview real-time responses, and observe how the agent behaves before publishing.
Triggering a test automatically saves any unsaved changes to your draft.
What can you test in the Shopping Agent panel?
In the Test Shopping Agent panel, you can test:
Tone and personality
Knowledge base responses
Actions and output behavior
Product catalog search and display
Price and currency formatting
Locale-based product availability
Response alignment with product data
Links and CTA (Call-to-Action) behavior
The test preview uses your connected Product Catalog configuration.
Ensure that your locale and currency settings match those in your catalog to avoid mismatches or display errors.
Adjust Test Settings
You can configure your test environment through the Settings icon in the upper-right corner of the Test Shopping Agent panel.
This allows you to select both the Product Catalog Currency and Catalog Locale used during preview.
To adjust your test settings:
Click the Settings icon on the Test Shopping Agent panel.
Under Product Catalog Currency, choose the desired currency (for example: USD, EUR, or TRY).
Under Catalog Locale, select the locale you want to preview (for example: en_US, tr_TR, fr).
Click Apply to confirm your changes.
Refer to the GIF below to learn how to adjust the test settings for your Shopping Agent.
The selected currency and locale must match a valid combination defined in your Product Catalog configuration.
Choosing mismatched values (for example, locale
en_USwith currencyTRY) will cause display or data errors.
Example configuration:
Catalog Currency:
TRYCatalog Locale:
tr_TRIn this case, the test panel should use the same configuration to correctly display localized prices and product information.
When testing with a locale such as
en_US, the Shopping Agent will display English content with USD pricing, reflecting the corresponding catalog version.
Preview Output
After you configure your test settings, the Test Shopping Agent panel displays product cards that match your selected locale and currency.
Each product card includes:
Product name and price
Product image
“Go to Product” link
The test preview focuses solely on the Shopping Agent. It does not simulate full MindBehind chatbot flows such as fallbacks, routing, or handovers. To test those flows, use the MindBehind panel instead.
After you submit an input, the agent’s response appears along with detailed information that helps you understand how the answer was generated — especially when no product card is returned.
You can view:
Sources: Displays which Knowledge Base sources contributed to the response.
Hover over a source to see the specific URL used during response generation.
Actions: Lists any actions triggered by the response, including:
Debug ID
Parameters used
Values passed to the action
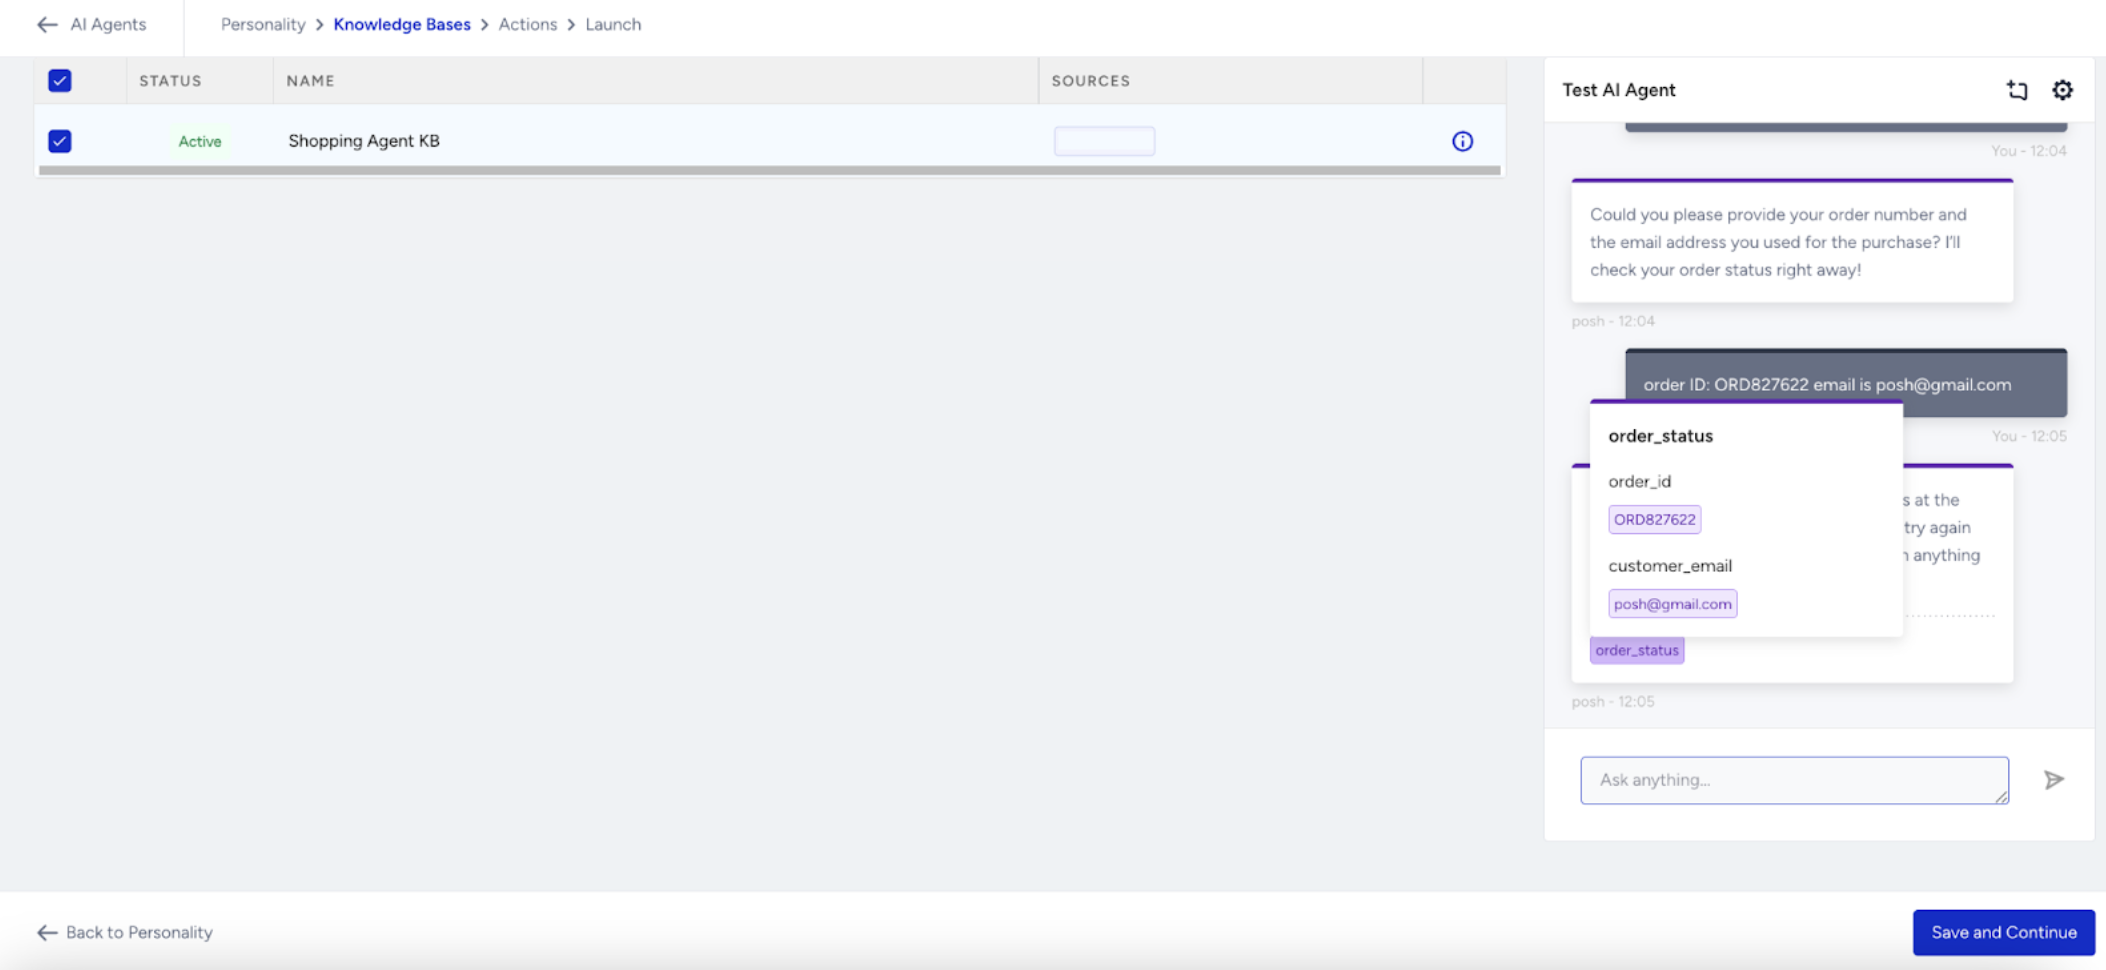
This visibility helps you verify whether each response originates from the correct source and whether all actions are functioning properly.
The Test AI Agent panel is your go-to environment for validating the accuracy, functionality, and quality of your Shopping Agent before publishing it live.
To test how your agent behaves for a specific user, using their real attributes like name, loyalty tier, or order history, refer to Preview Your AI Agent as a Specific User.
Step 4: Link the Knowledge Base
Linking a Knowledge Base (KB) enables your Shopping Agent to generate accurate, context-aware responses using your website content.
The Knowledge Base acts as the primary information source for your agent’s answers.
Before you begin:
Make sure you have already created a Knowledge Base. Refer to the Create a Knowledge Base for Agents guide.
Each Shopping Agent can be linked with up to 4 Knowledge Bases.
A maximum of 4 Knowledge Bases can be created per account.
Activation requirements:
The Knowledge Base you want to link must have the status = Active.
KBs in Processing or Error states cannot be assigned and will not appear in the selection list.
Always confirm that the crawl is complete and the Knowledge Base is finalized before linking it to an agent.
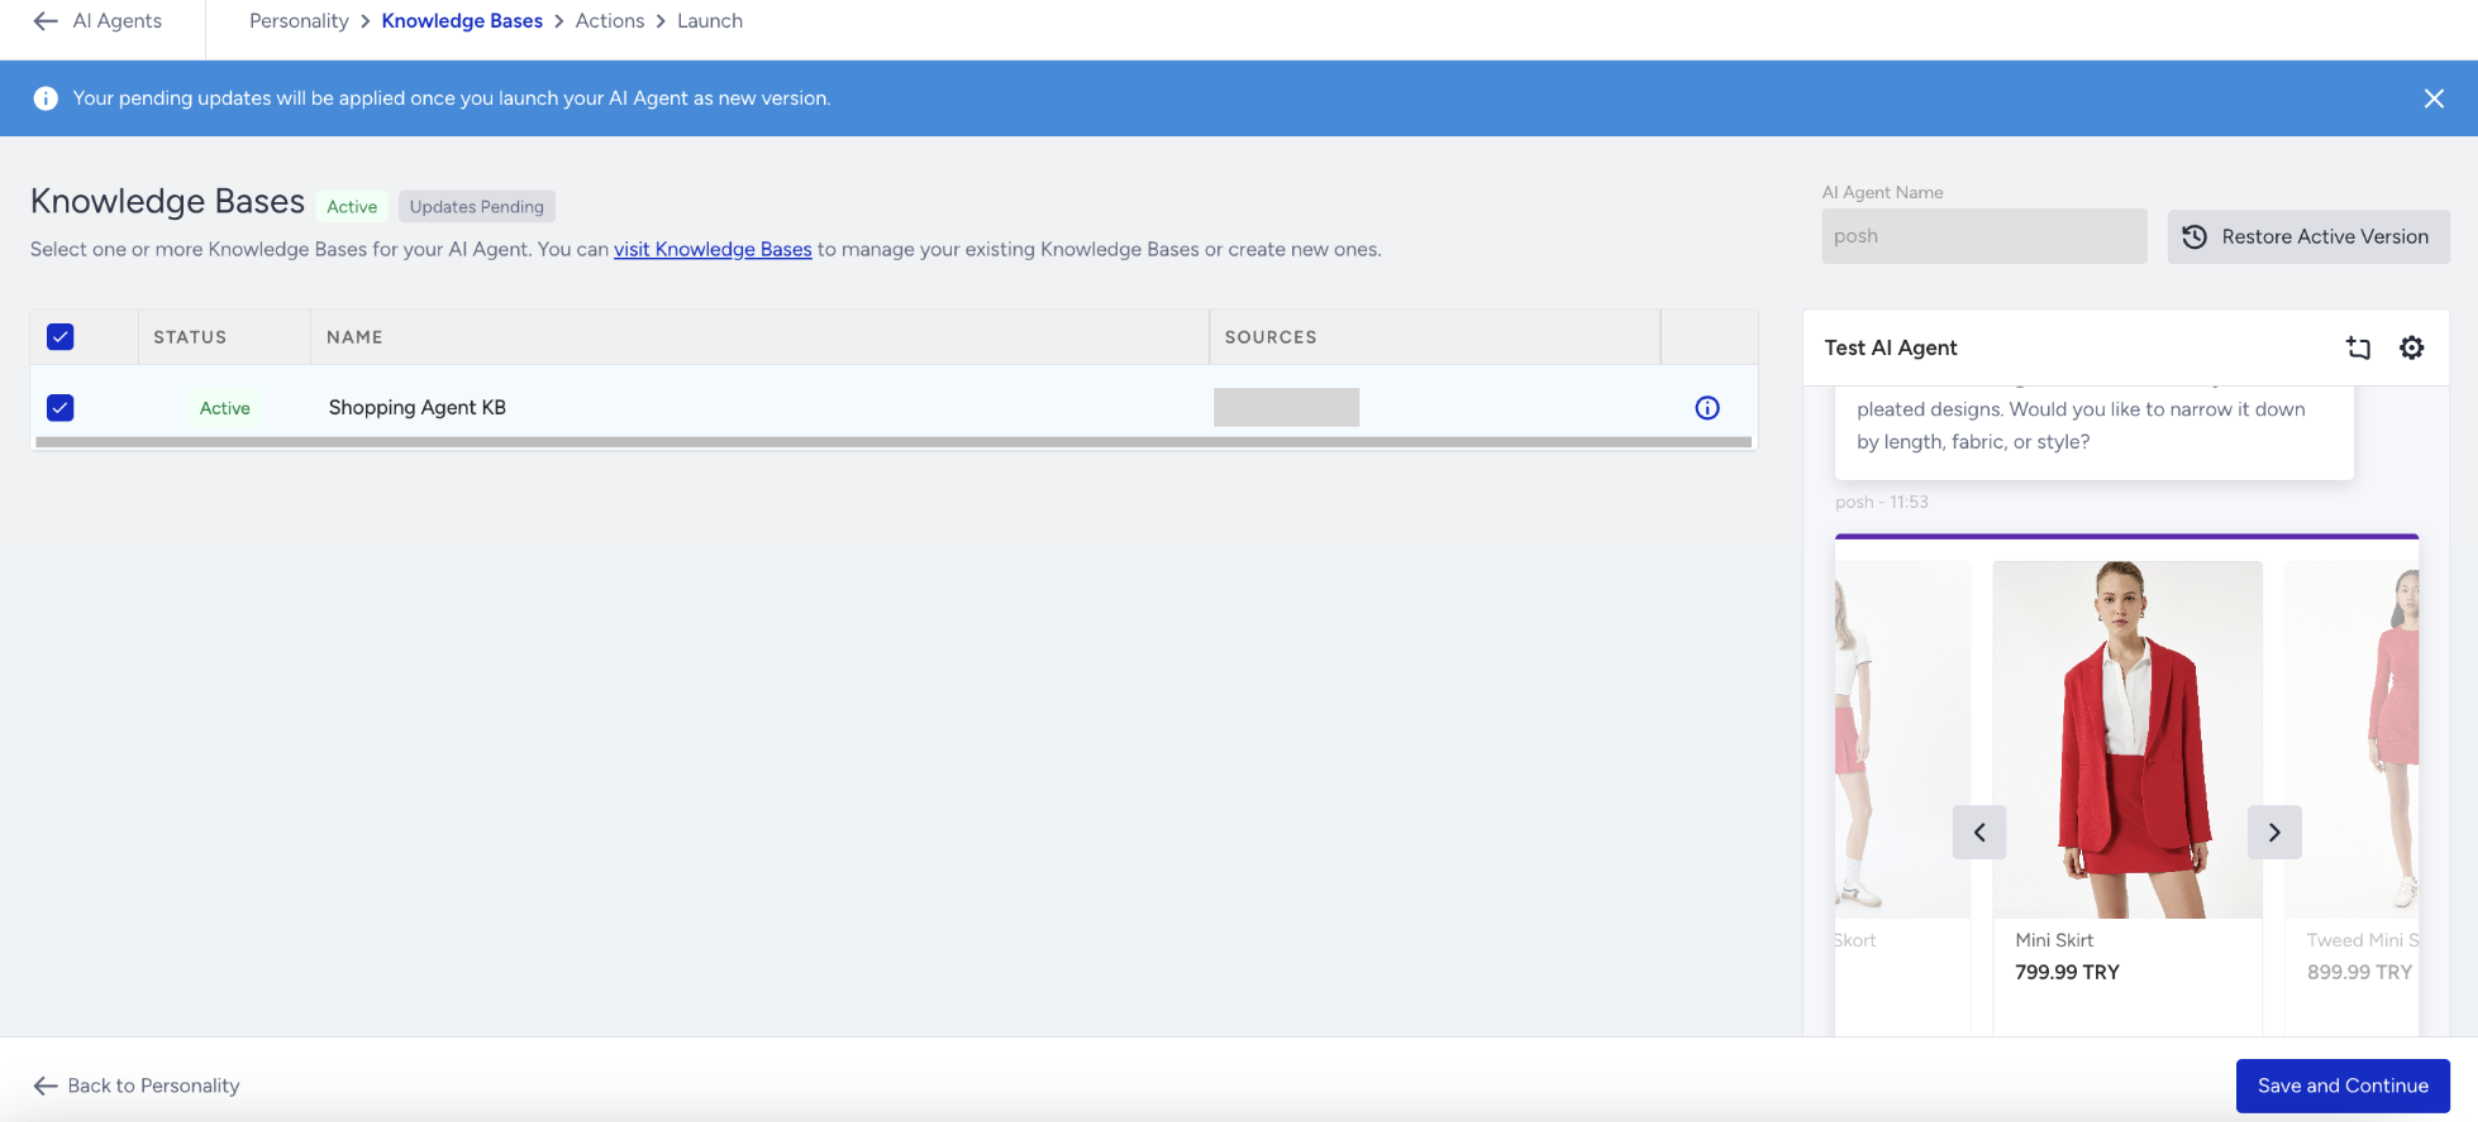
To link a Knowledge Base,
Open the Knowledge Base dropdown in your agent setup.
Select the Knowledge Base you want to connect to.
To apply the changes, click Save and Continue.
Step 5: Create Actions
Actions are predefined operations that your Shopping Agent can trigger based on user intent. They allow the agent to exit a conversation or perform external tasks via APIs.
Each agent can include up to 17 actions and must have at least one Exit Action.
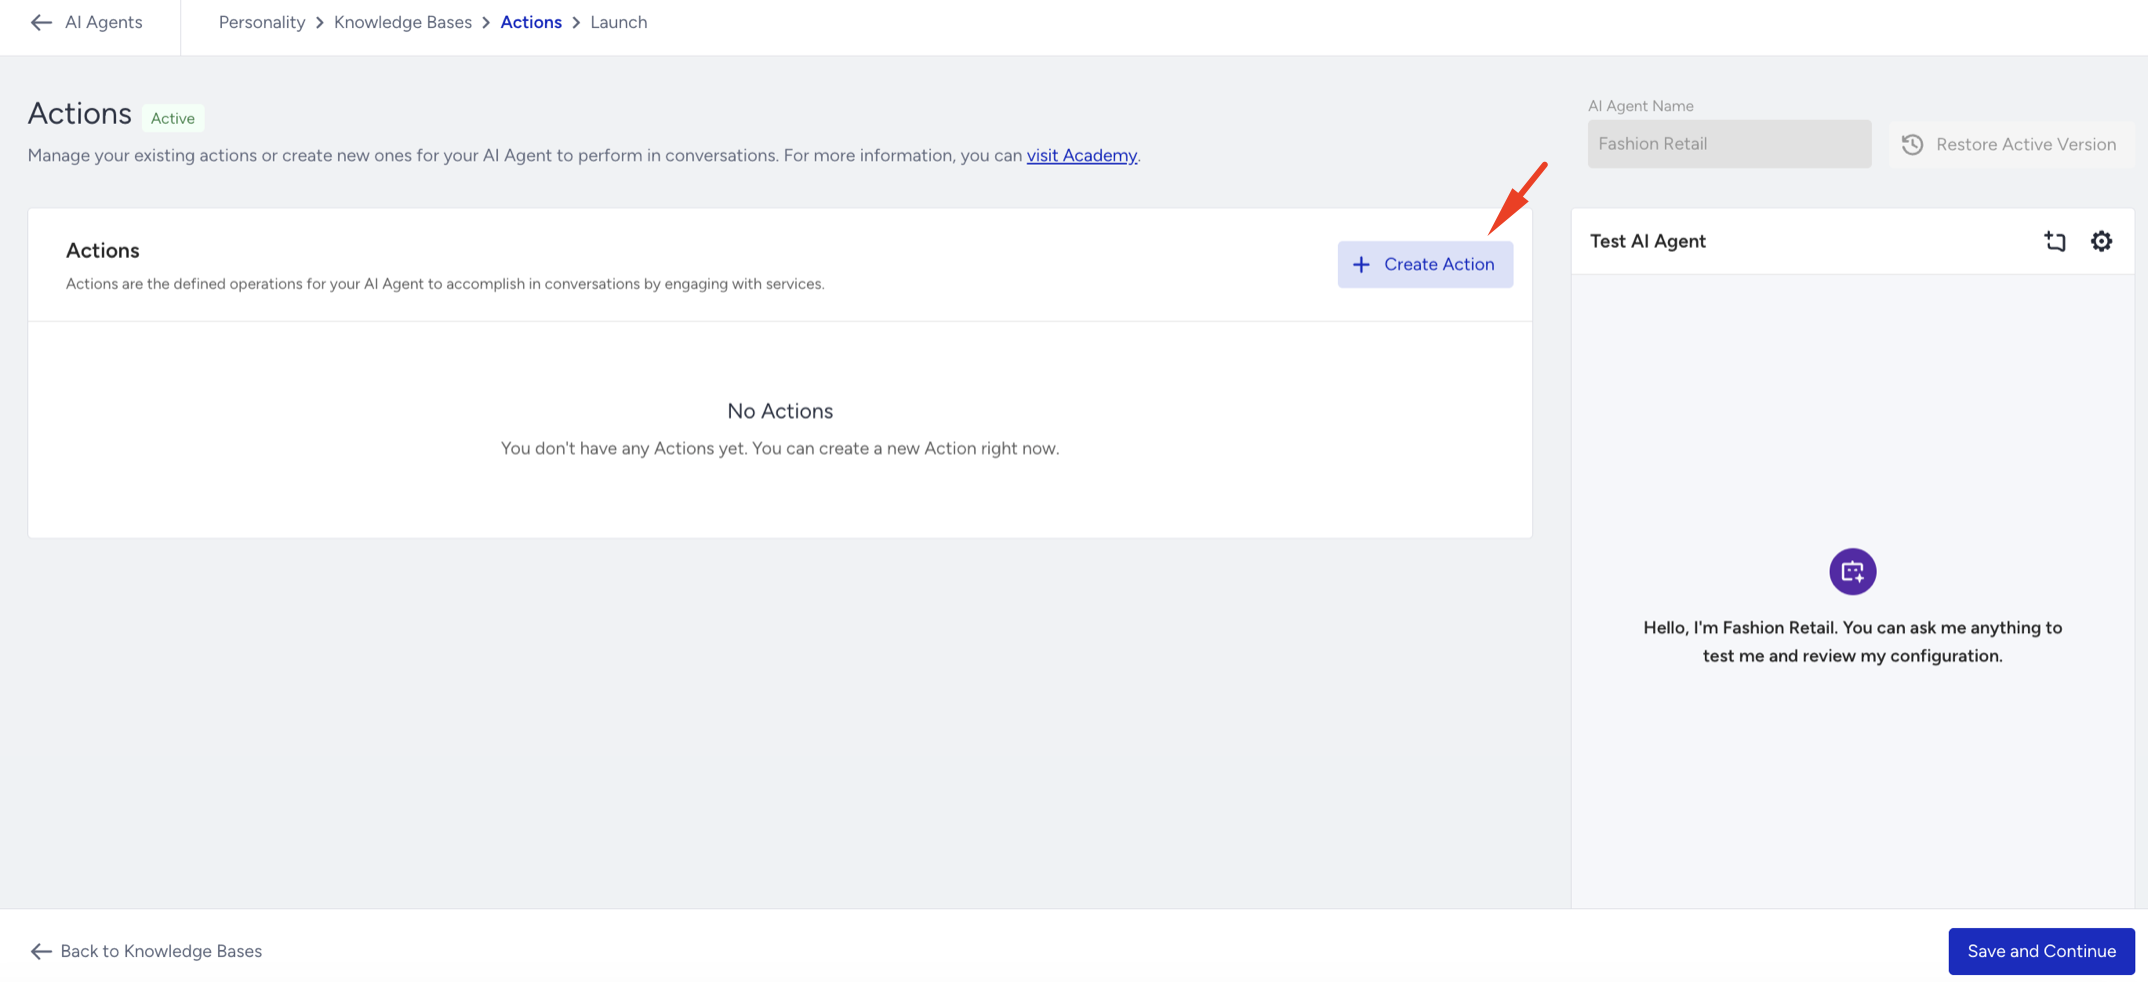
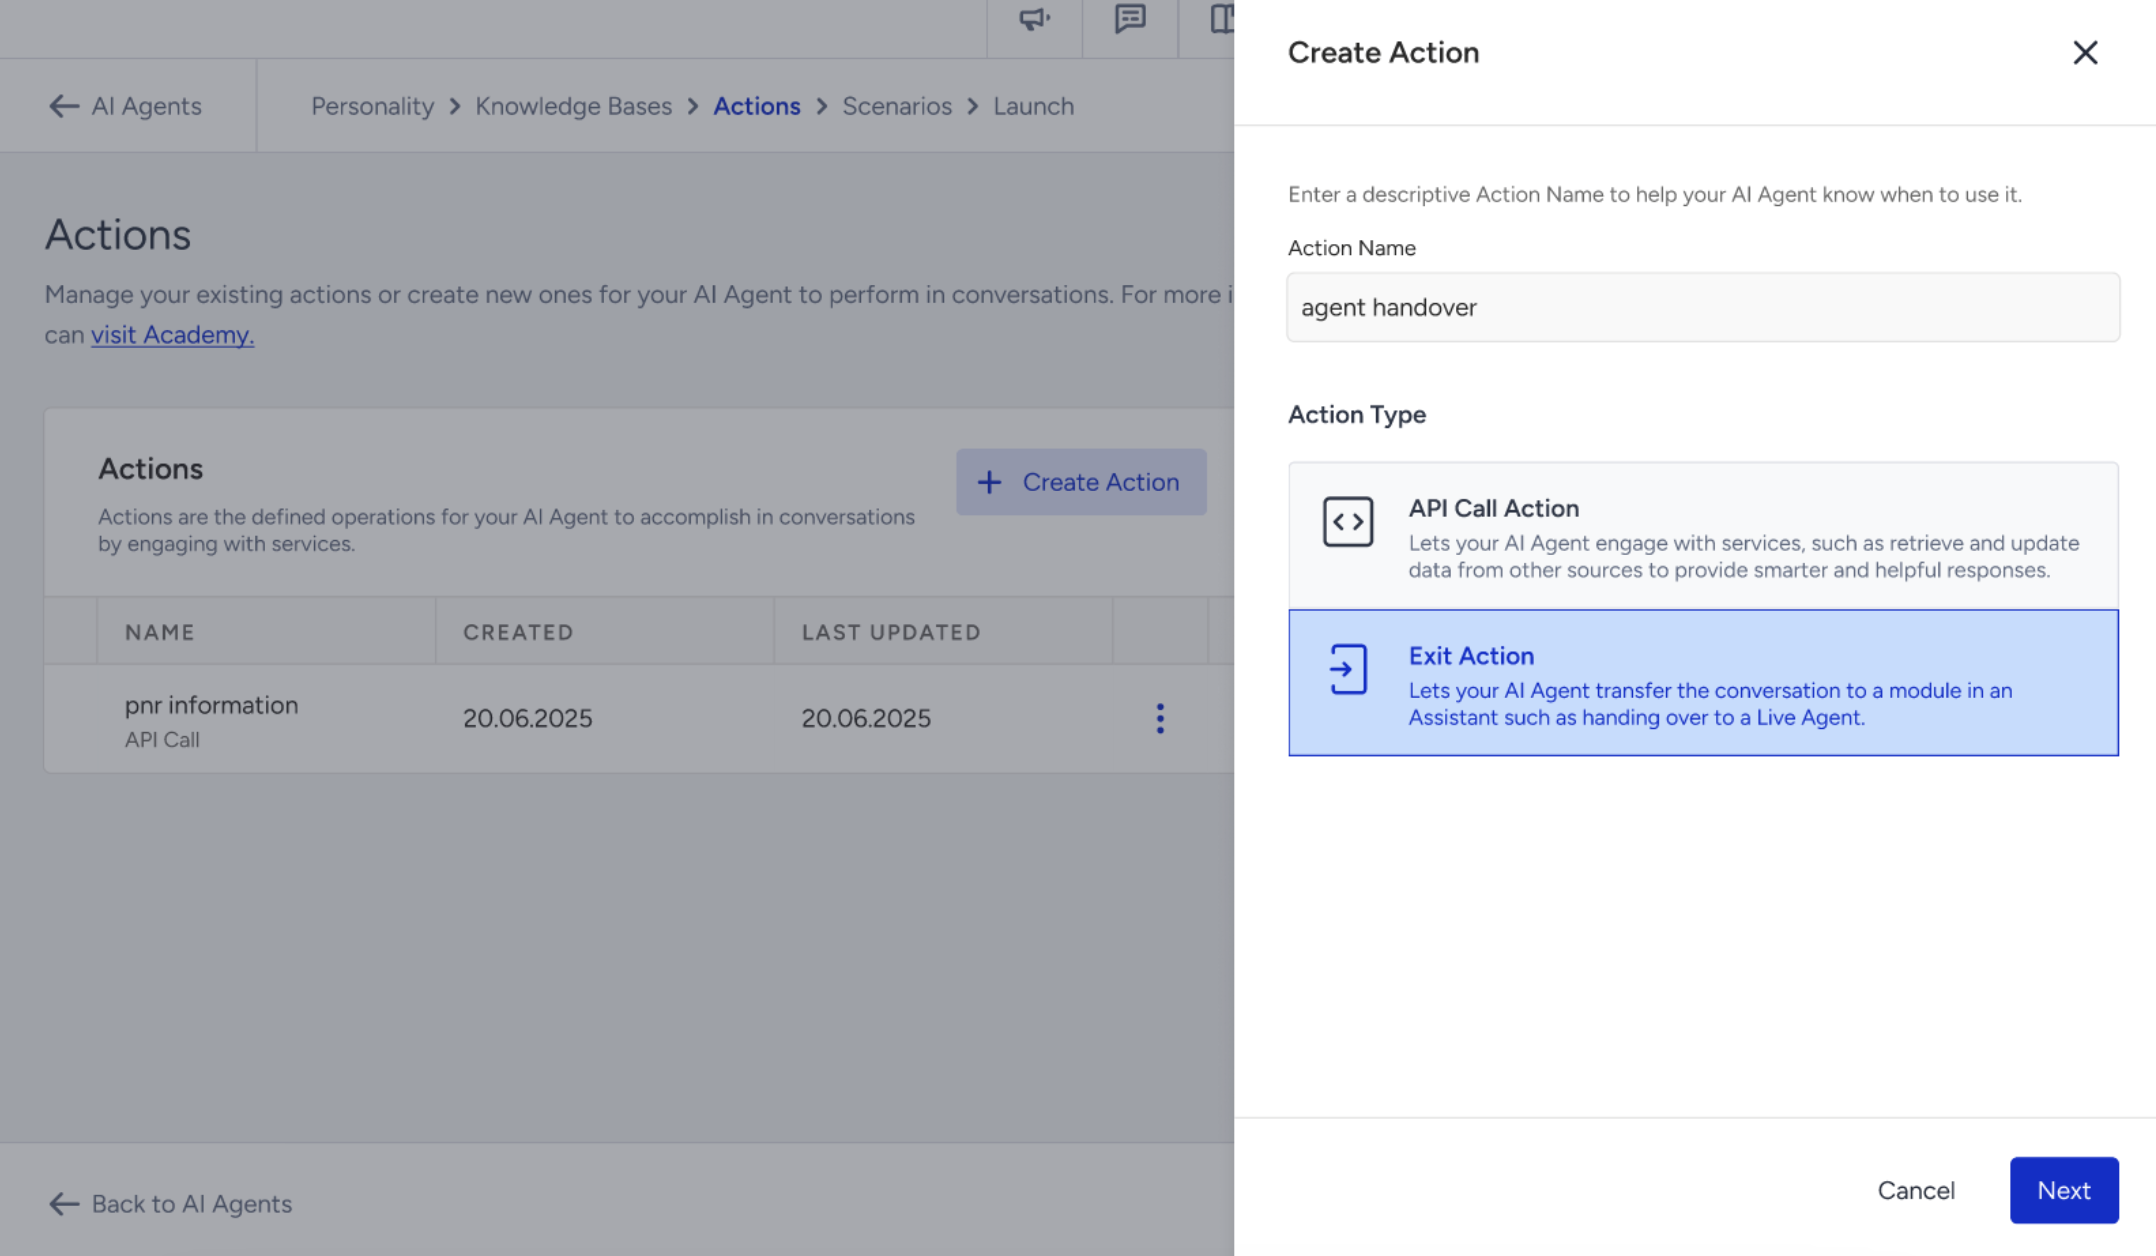
In the Actions tab, you'll see a list of all actions you've previously created. If you haven't created any actions yet, the list starts empty. To add a new action,
Click the Create Action button.
Select your Action type, enter your Action name, and click Next.
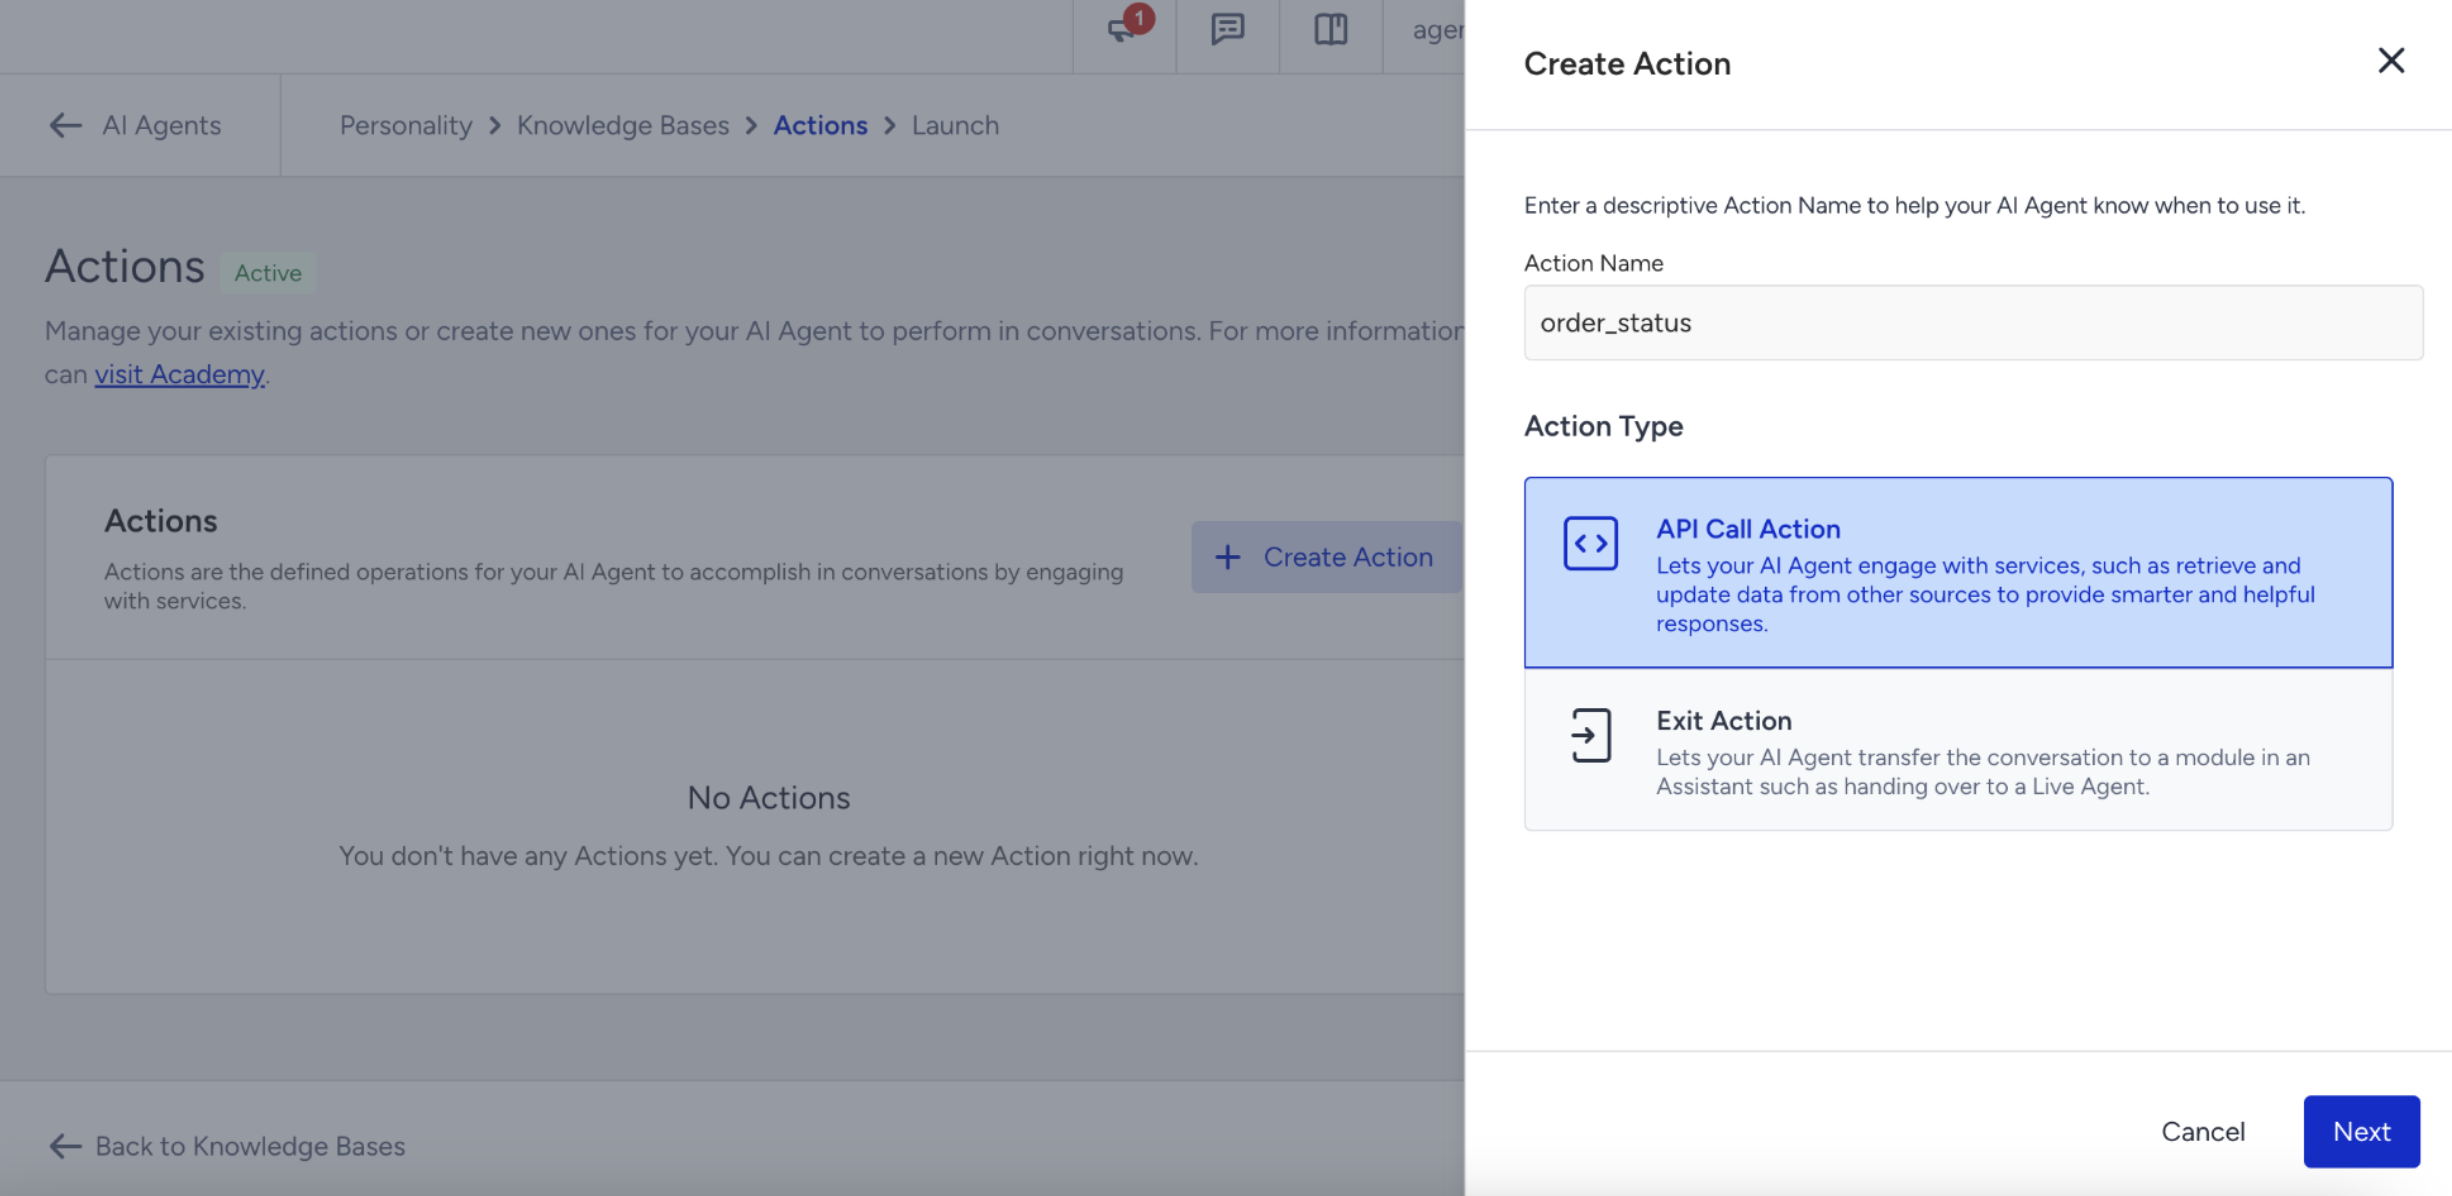
API Call Action
Choosing API Call Action allows your agent to perform an external operation — for example, checking an order status, submitting a request, or retrieving information from another system.
For example: A customer asks, “I want to check the status of my order.” → The Shopping Agent recognizes the intent and triggers an API call to fetch the order status automatically.
After selecting the API Call Action, you should fill in the required fields:
In the Action Prompt section, you need to define the triggering intent or question that will initiate the action.
For example: "This action should be triggered when a user asks to retrieve information related to the status of their recent order, such as 'What's the status of my recent order?' or 'Can you check my delivery update?'"
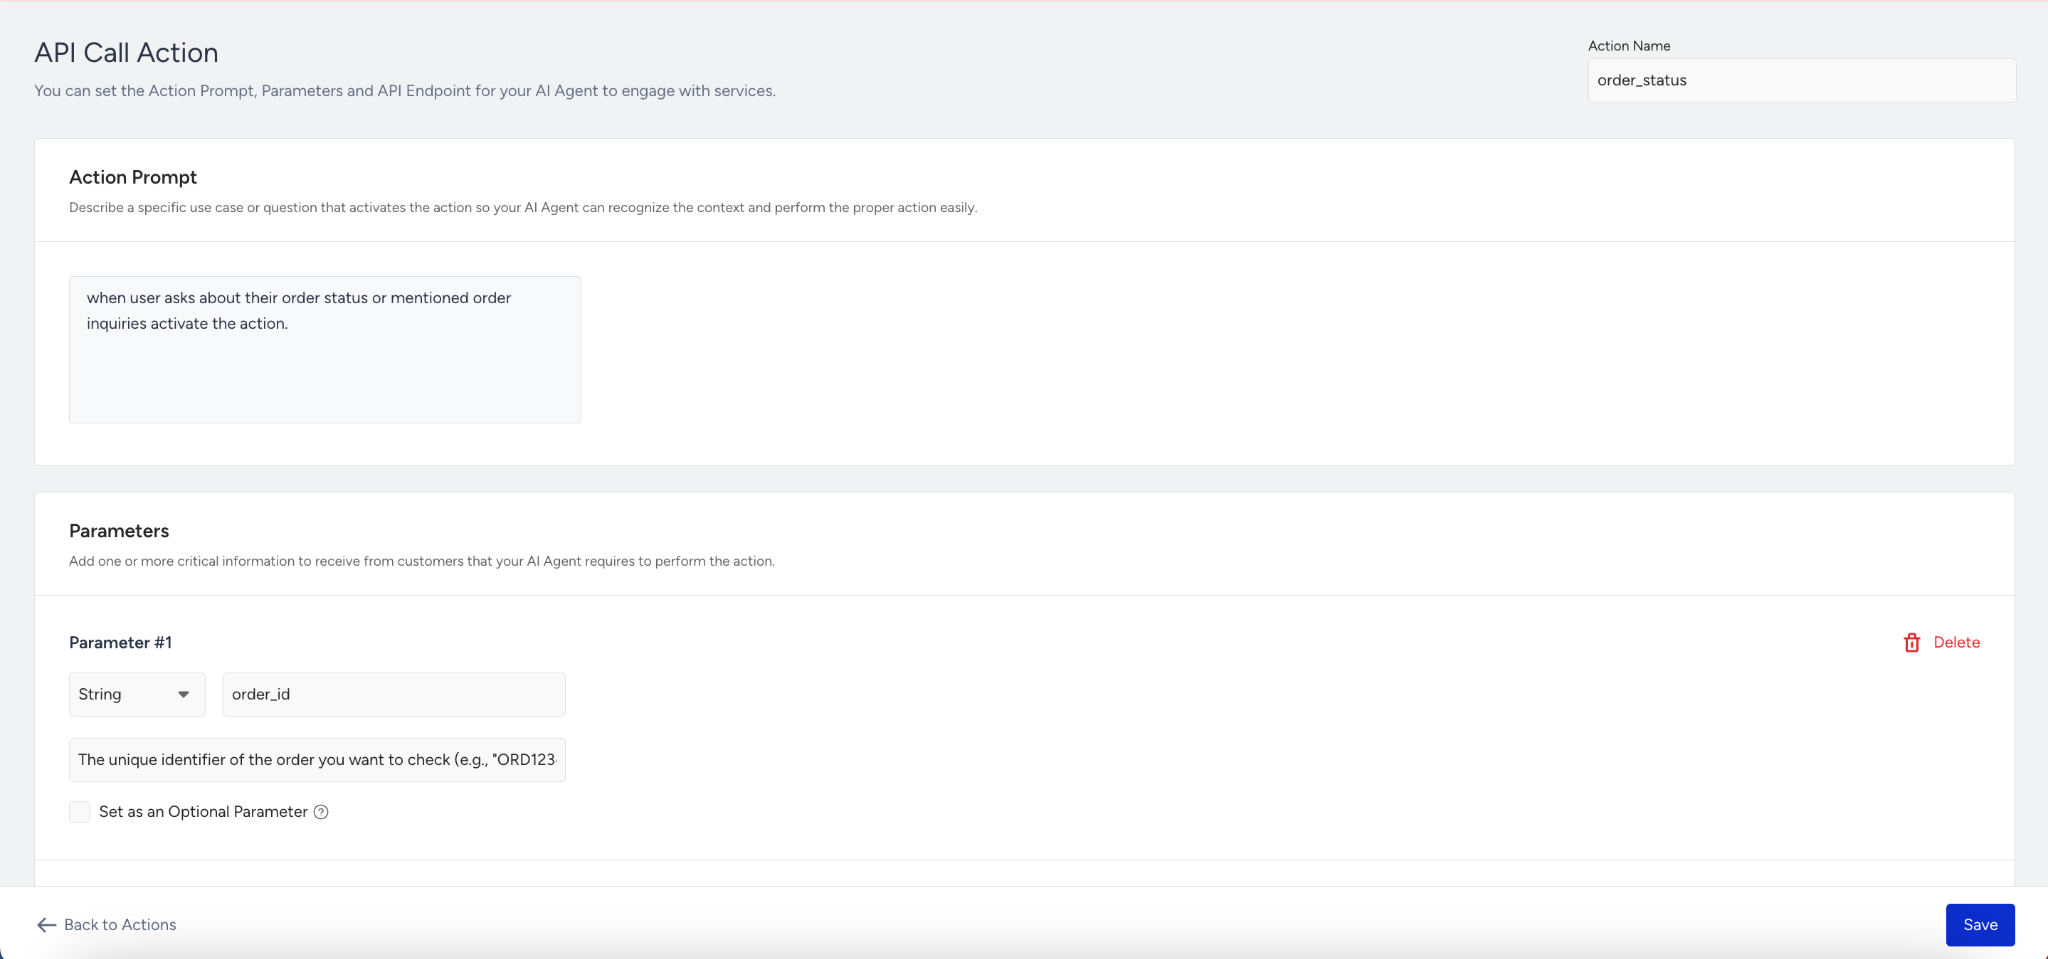
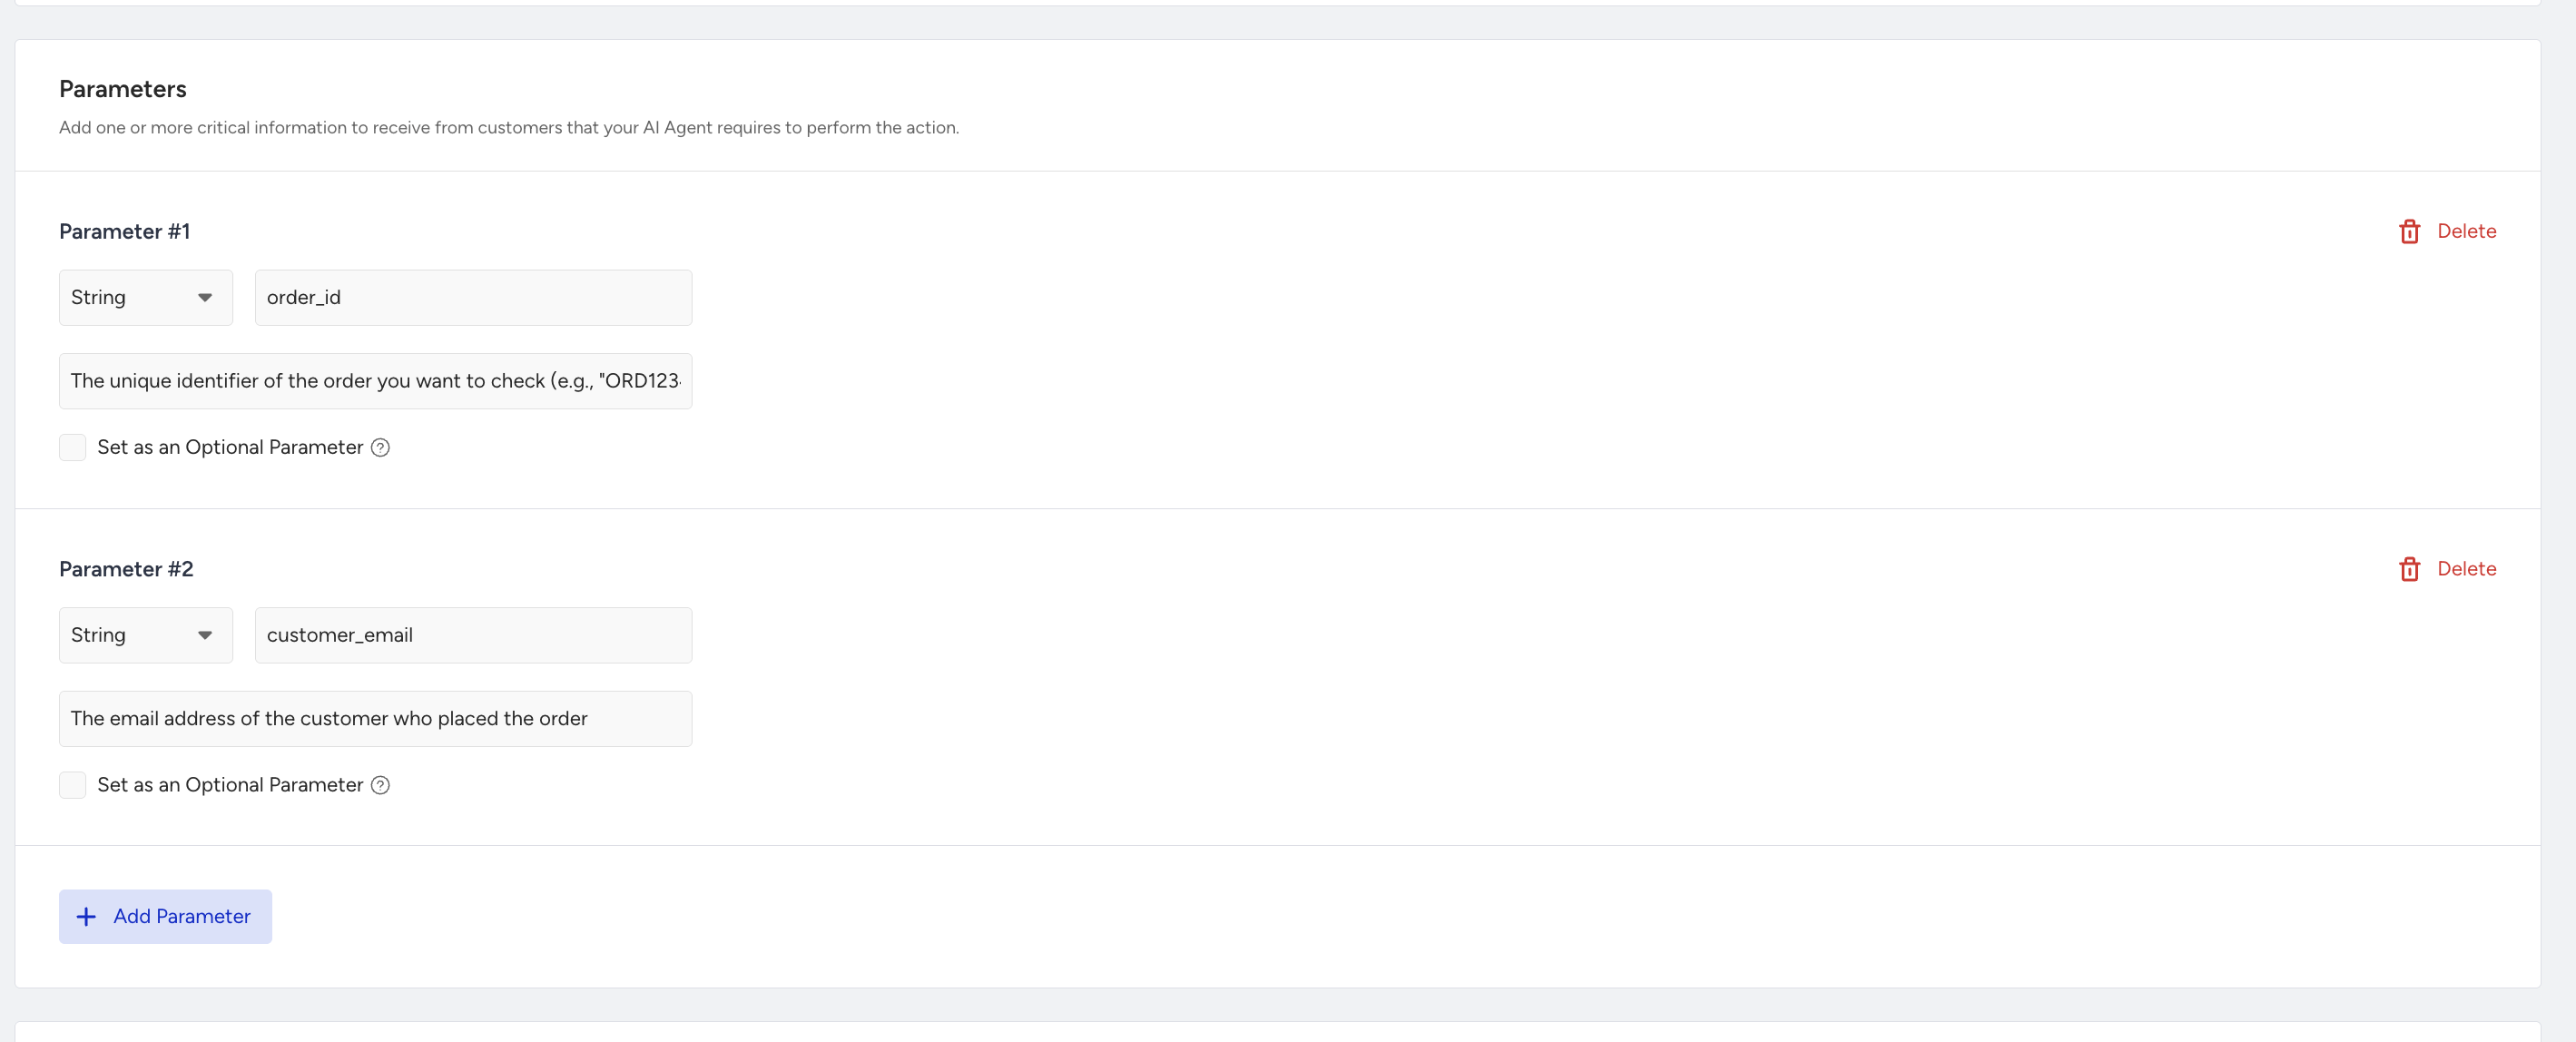
In the Parameters section, you can collect necessary data from the user (same as the Exit Action structure). For example:
Name: order_id
Type: String
Description: "The order number shared by the customer."
In the API Endpoint section, you should define the full URL of the endpoint to call. For example: https://api.example.com/orders/status
Method:
GET,POST,DELETE,PATCH,PUTIn the Headers tab, you can:
Define key-value pairs (e.g., Authorization: Bearer token)
You can use static values or dynamic parameters collected from the user.
Use the Add Parameter button to bind parameters to header values dynamically.
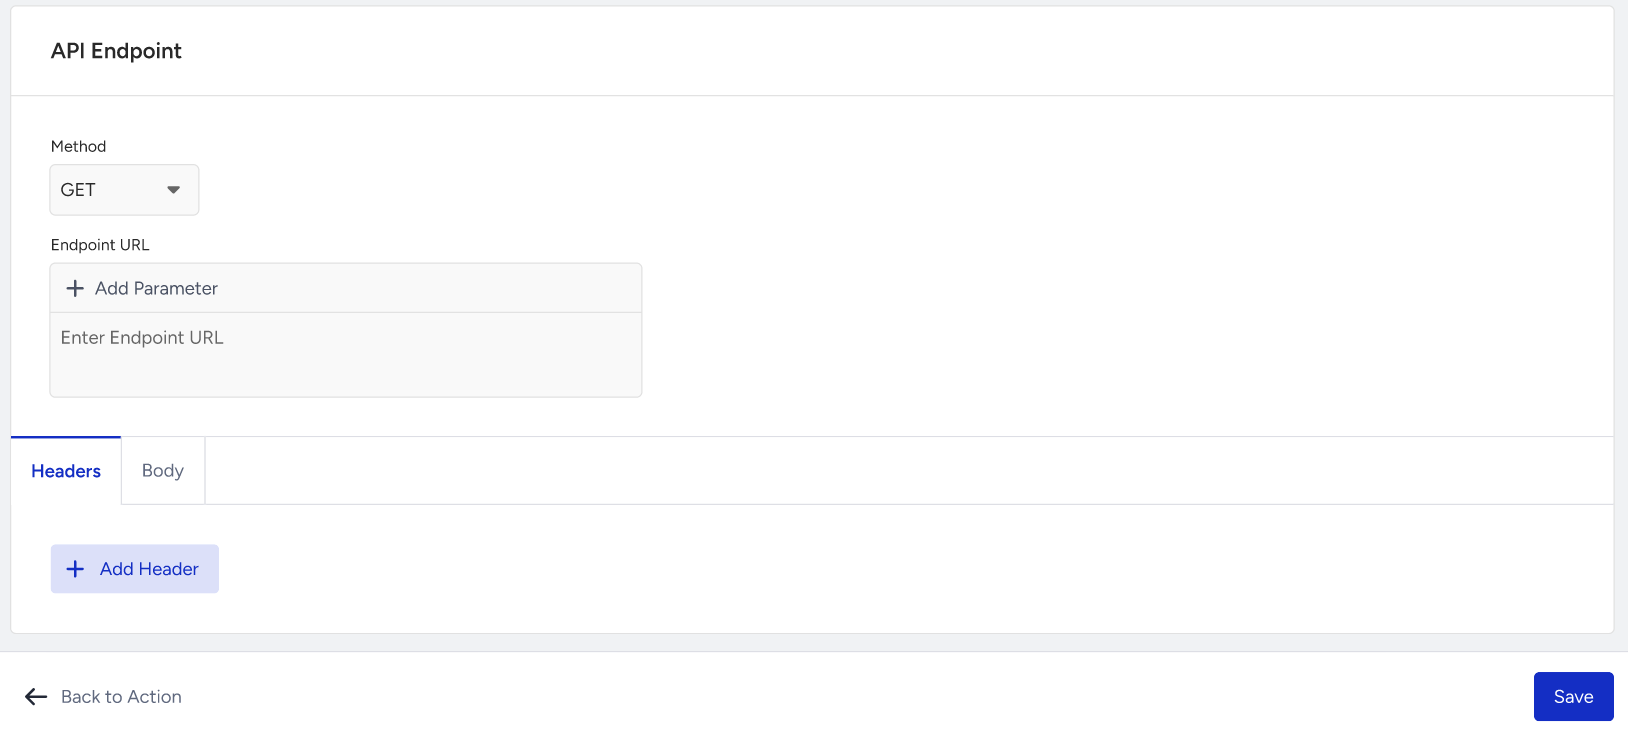
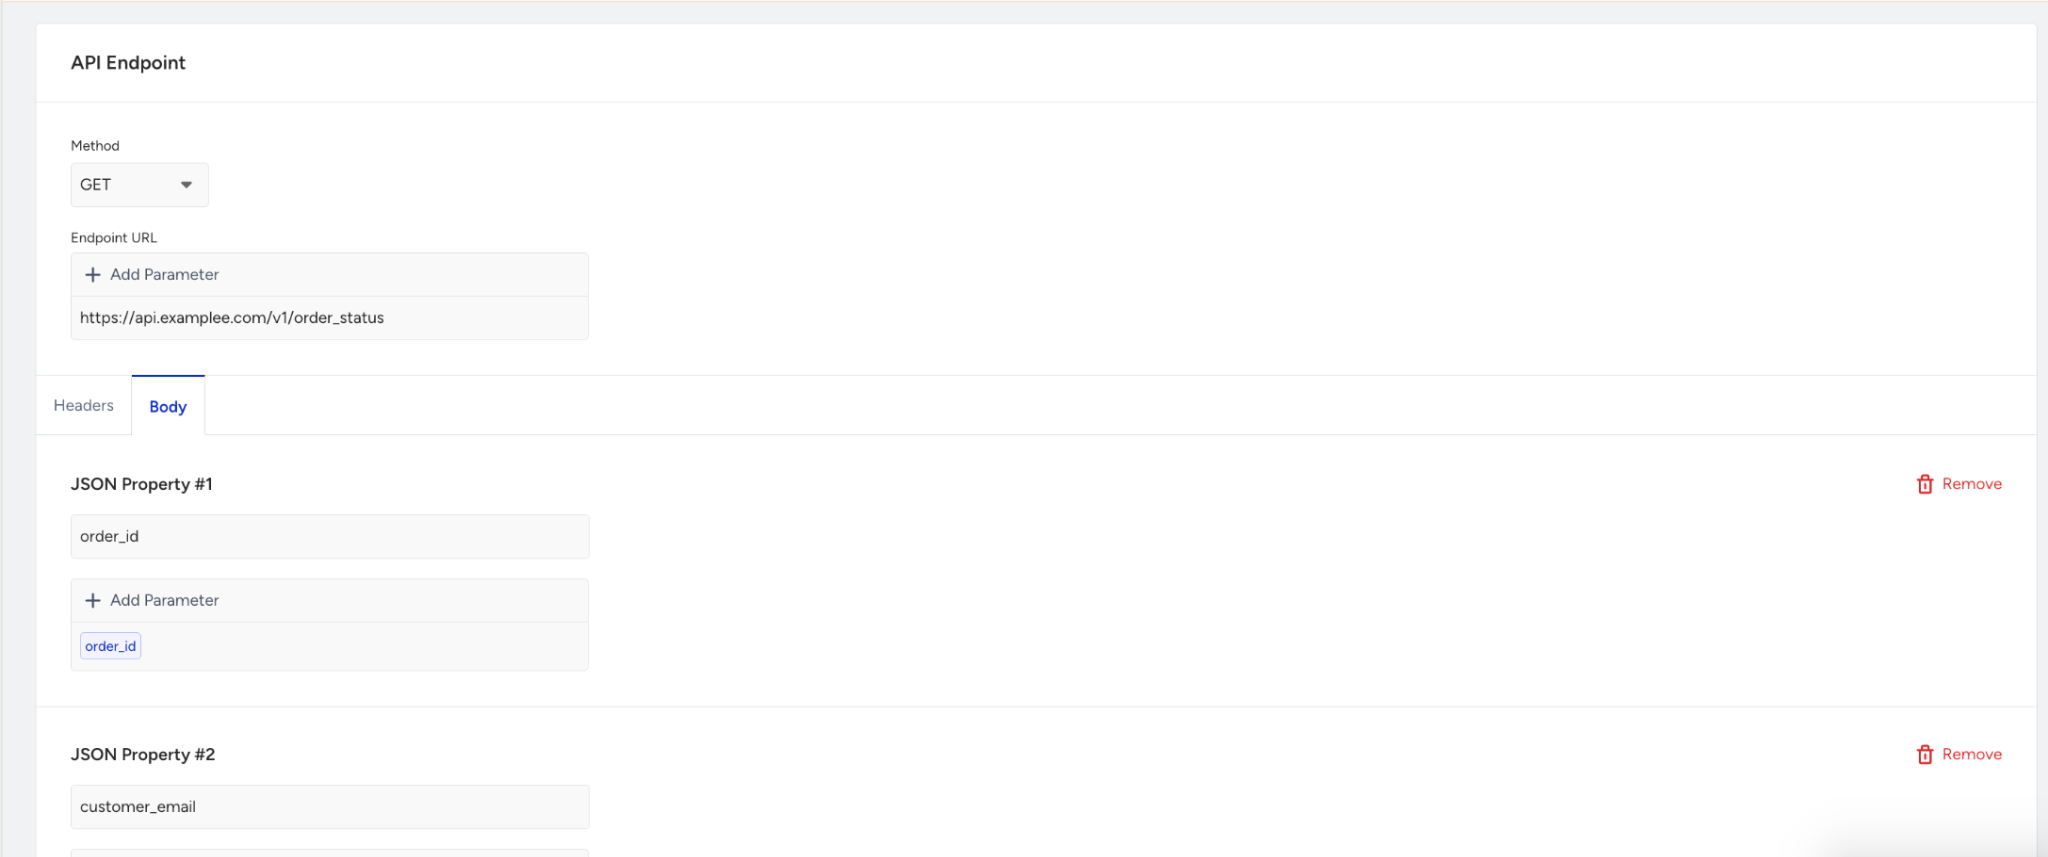
In the Body tab, you can define the JSON body to send with the request.
It supports both static and parameterized values.
You can use Enter Key / Enter Value fields to include additional key-value pairs required by the API.
Values can be defined statically or dynamically using collected parameters.
These fields are required if the API expects them.
Important:
For the API Call Action type, both the Action Prompt and Endpoint URL fields are mandatory. You must complete these fields before proceeding.
Exit Action
The Exit Action ends the current conversation or transfers it to another system — such as a live agent or an external flow — when the AI Agent cannot or should not handle the request further.
For example, if a customer asks to speak with a human, the Shopping Agent should exit the chat and transfer the conversation to a MindBehind Flow for live support.
After naming the Exit Action, fill in the required sections:
In the Action Prompt section, you can:
Describe the type of user message or intent that should trigger this action.
This helps the agent recognize similar phrases or requests and respond correctly.
For example: “This action should be triggered when a customer asks to speak with a human or requests live support.”
In the Exit Action type, the Action Prompt field is mandatory and must be filled in to proceed.

In the Parameters section, you can define the key pieces of information the agent should collect before executing the Exit Action.
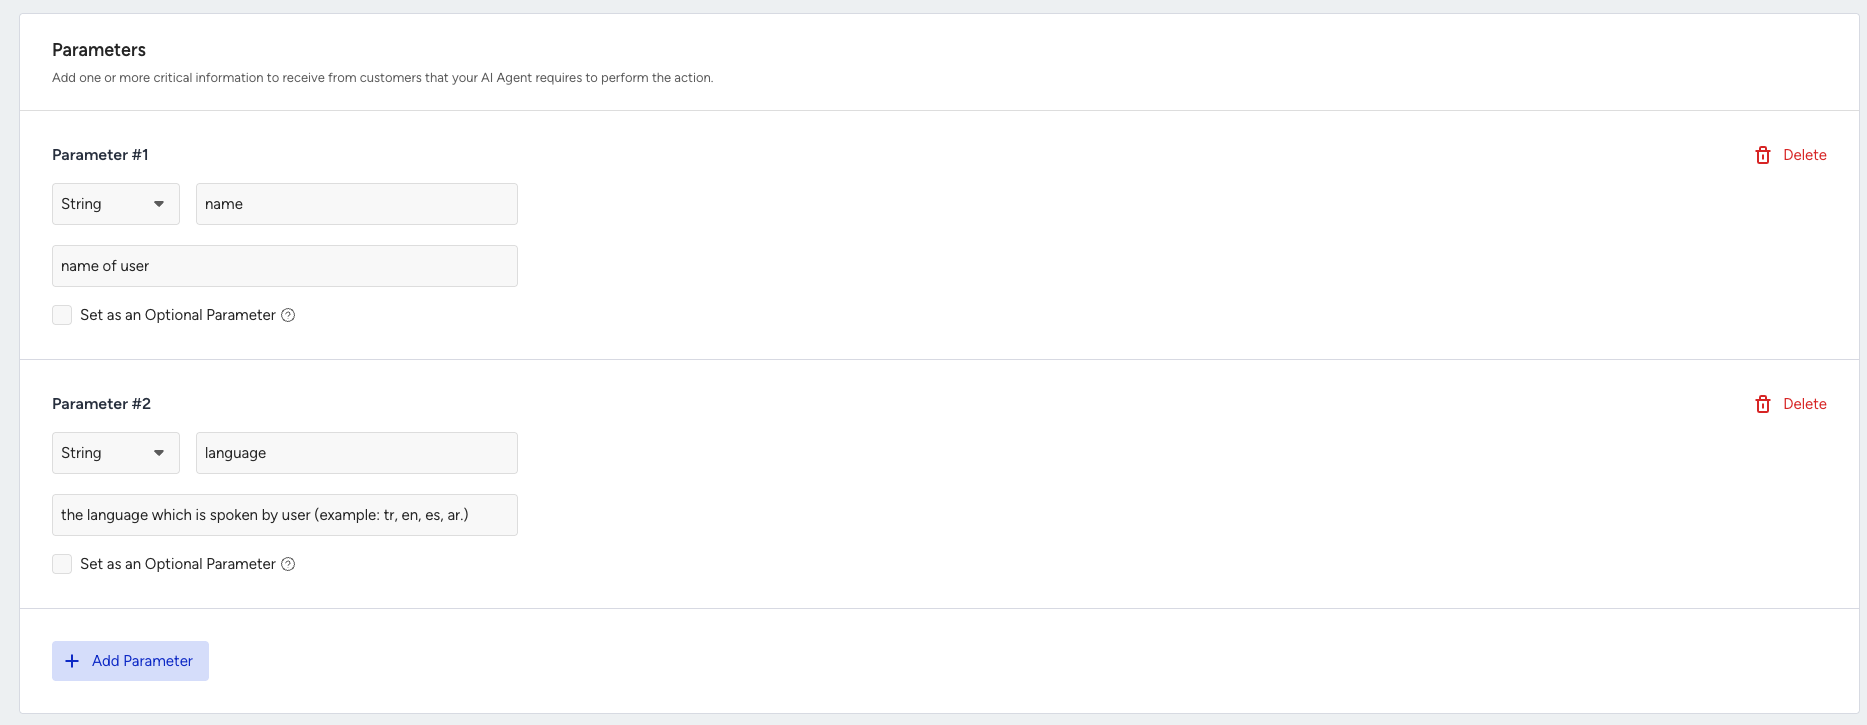
Each parameter includes the following:
Name: A specific name for the parameter (e.g., userlanguage) (This will be stored as a bot parameter in MindBehind Flow. During runtime, the system automatically adds the agentone_ prefix (e.g., userlanguage becomes agentone_userlanguage).
Type: The format of the data to be collected, and the options include: String, Number, Integer, Boolean, or Array
Description: A brief explanation of what the parameter is used for.
Optional: Enable this setting if the parameter is not required for the action to proceed.
Refer to the table below for an example of a human handover scenario with the Exit Action.
Field | Value |
|---|---|
Name | userlanguage |
Type | String |
Description | "User’s preferred language for live support" |
Flow Output | agentone_userlanguage |
Step 6: Test and Update your Shopping Agent
When editing your Shopping Agent, you will see an indicator on the interface showing whether you are working in Live or Draft mode.
The Draft version allows you to safely test updates, such as changes to configuration, Knowledge Base, or Actions, without affecting the live version. This provides a secure environment to experiment and refine before publishing.
Live vs. Draft
Currently, version history or snapshots are unavailable. Each agent has two version states:
Live version: The active version currently in use.
MindBehind chatbots operate only with the Live version.
Any changes made to this version will immediately affect your chatbot in production.
Draft version: A working copy where you can make and test changes before publishing.
Once changes are saved to the draft, you cannot roll back to a previous draft.
If the agent has already been launched, the Restore Active Version button becomes available. Clicking this button resets the draft to match the current live setup.
Step 6.1: Test your Draft
To save your latest edits, click Save as Draft.
You can also test your updates directly in the Test AI Agent panel to preview how your agent behaves with the current draft configuration.
Refer to the GIF below to see how you can test your Shopping Agent.
You can test your changes:
Individually, after editing each section
Collectively, after completing all updates
This flexible workflow allows you to fine-tune your Shopping Agent either step by step or all at once, depending on your team’s process.
If you are not satisfied with your edits, click Restore Active Version to discard the draft.
This option appears only for agents that have already been launched and are in Live mode.
This two-version setup allows you to test, adjust, and improve your Shopping Agent safely without affecting real user conversations until you are ready to publish.
Once the Shopping Agent is published, it becomes the Live version, and any further changes will take effect immediately in production.
Step 7: Deploy Shopping Agent
Before deployment, confirm that your Shopping Agent is fully configured and has an Active status in your InOne panel. Only active agents can be added to chatbot flows.
Deployment includes two main stages:
Embed the Shopping Agent into a chatbot using MindBehind (through the Shopping Agent module).
Once your agent is launched, use the credentials provided by the Insider One team to log in to the MindBehind platform.
From there, you can insert the Shopping Agent into a chatbot flow and publish it across your supported communication channels.
This setup allows your Shopping Agent to start handling real conversations in live environments.
Step 7.1: Launch the Shopping Agent
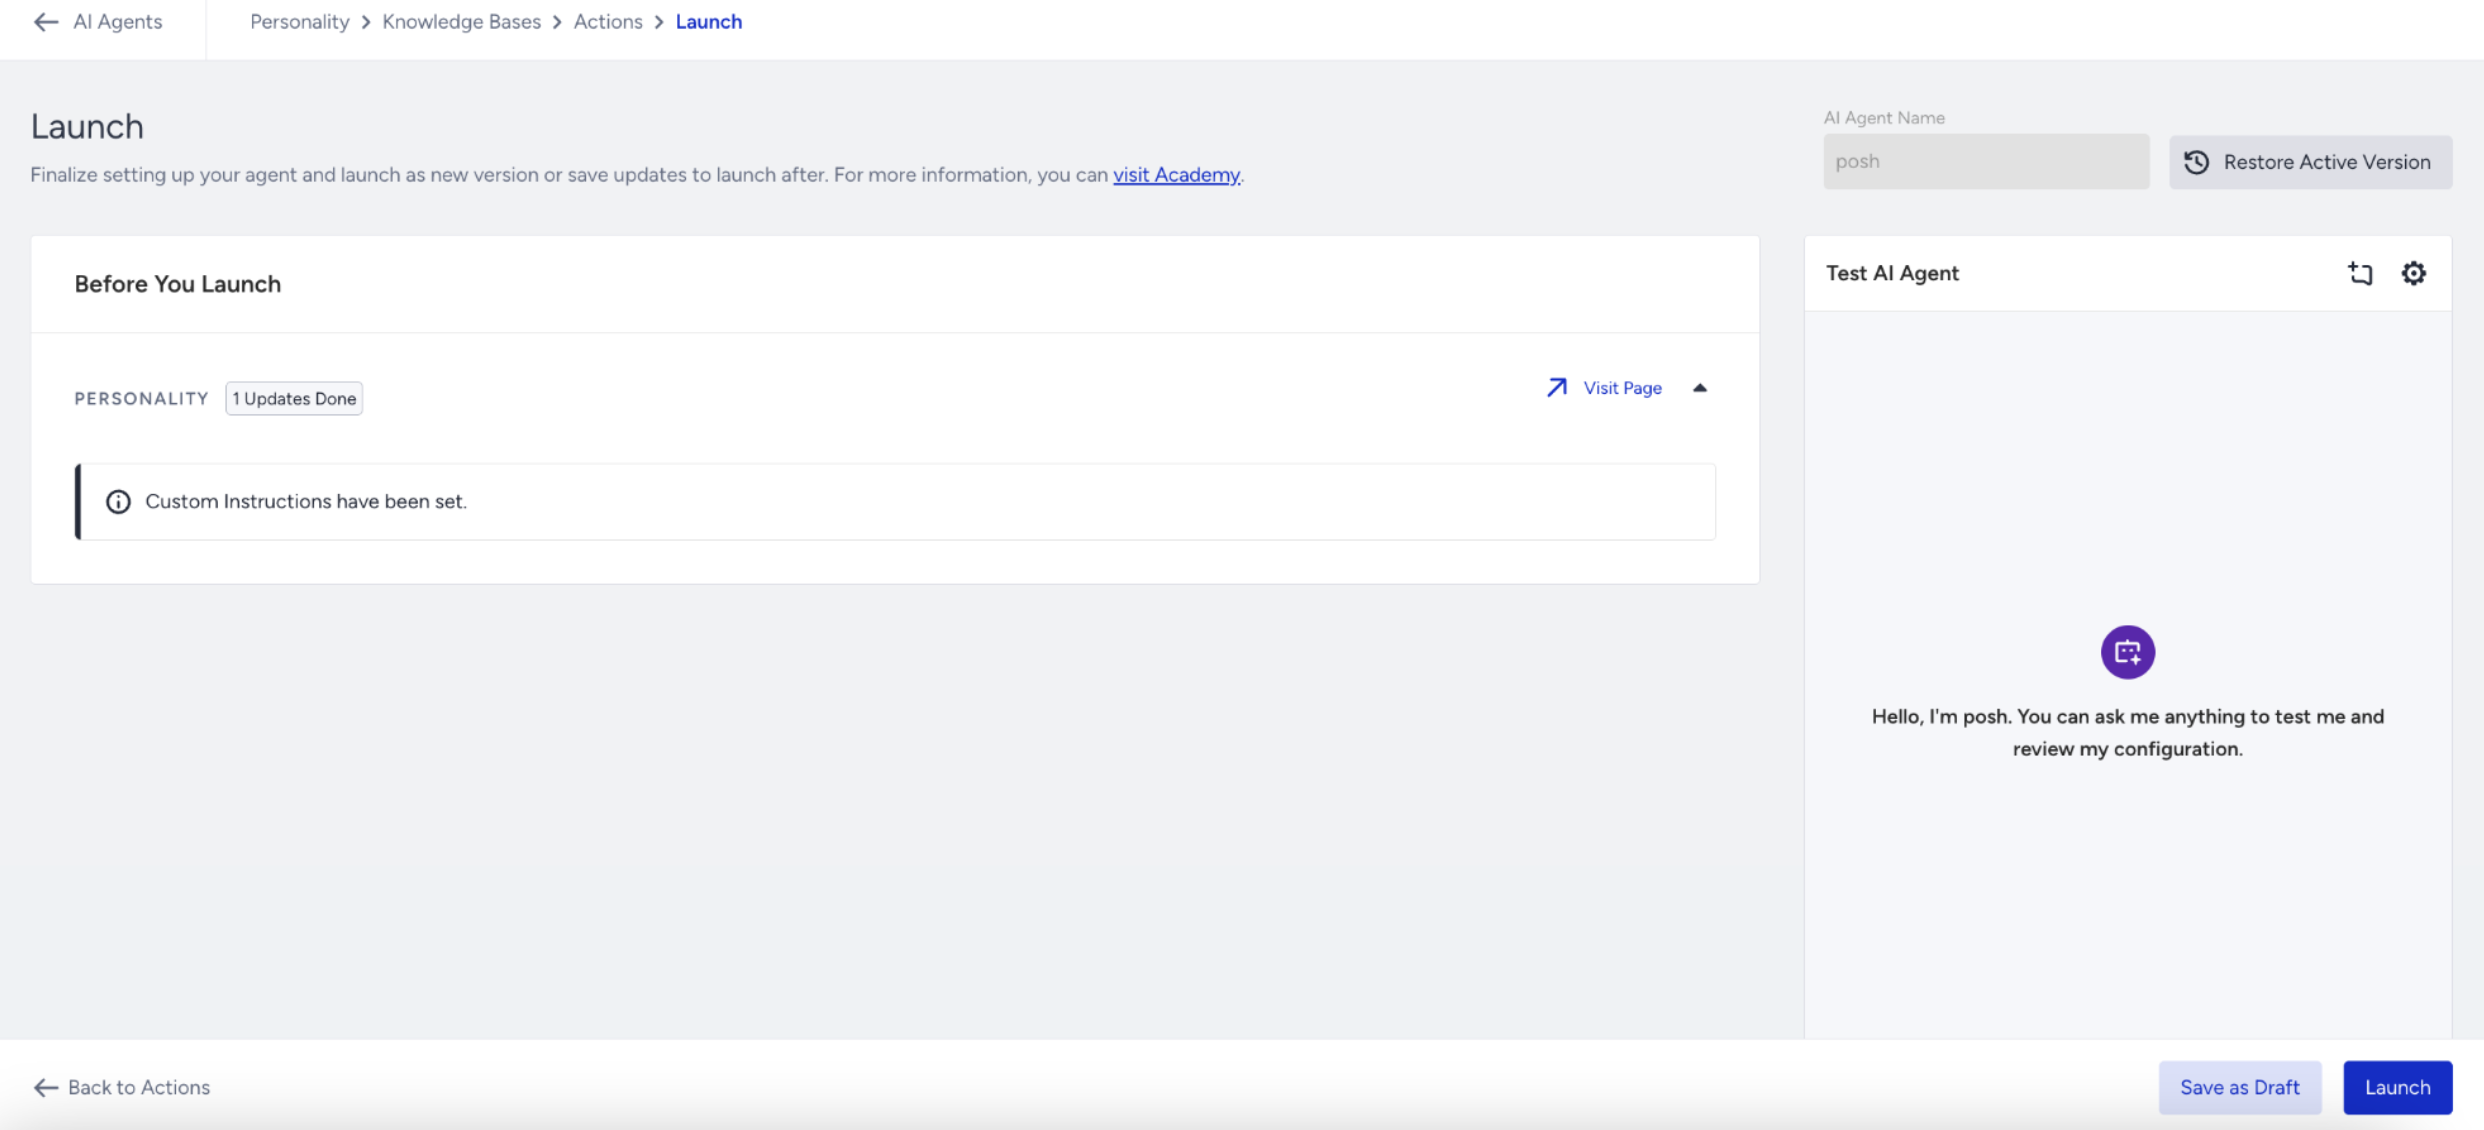
Once you’ve completed all configuration and testing steps for your Shopping Agent, your final stage is to visit the Launch page.
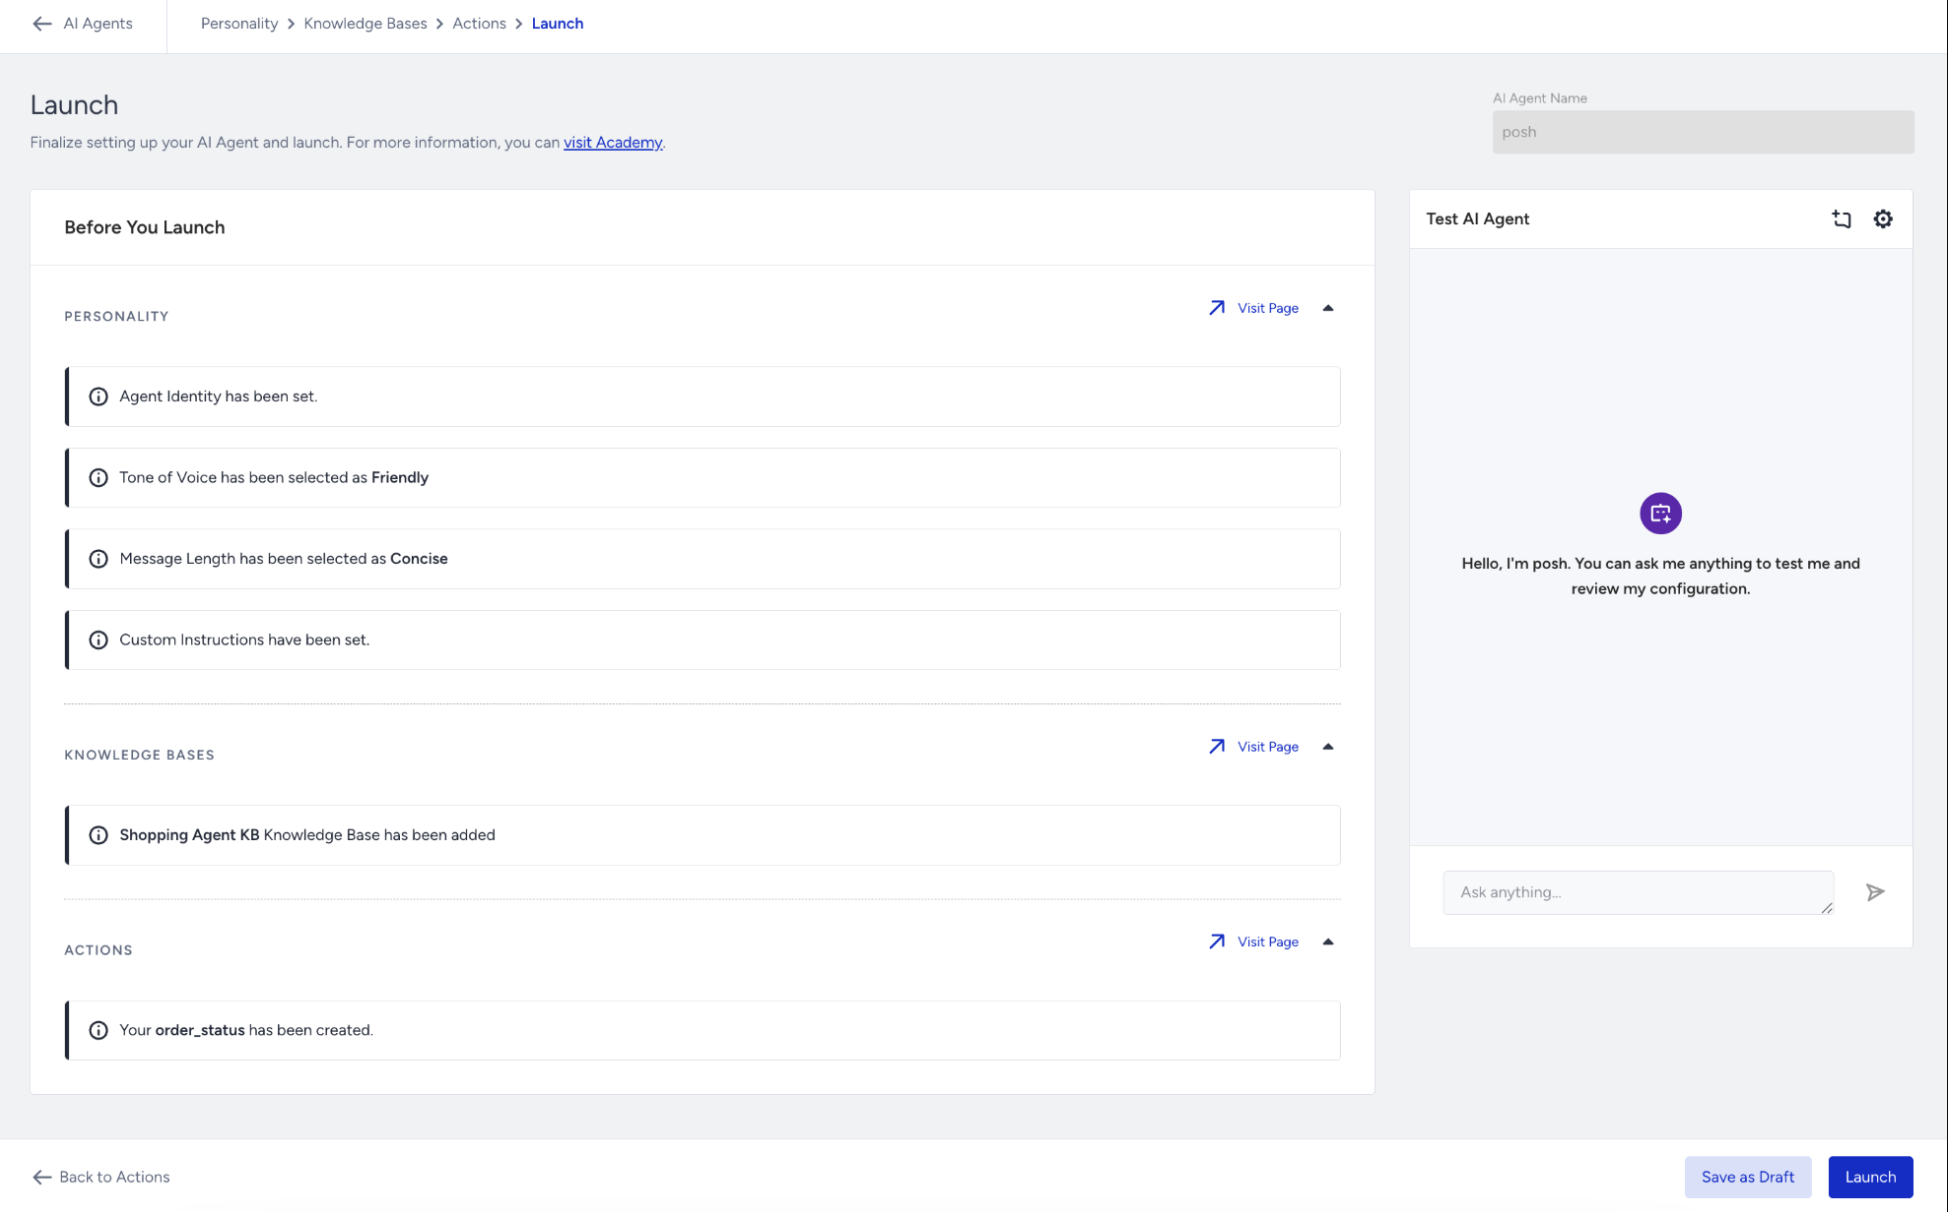
Before clicking the Launch button, you can:
Compare versions: Review the current draft version and the active live version to identify any differences before going live.
Check completeness: Confirm that all required and recommended fields are filled in. Any missing items will be highlighted automatically.
Review readiness: Make sure both functional changes and structure are finalized for deployment.
When you click the Launch button, all changes will go live instantly. This means the Shopping Agent will be updated in every MindBehind chatbot where it’s being used. Note that active conversations will not be affected by the update, but any new conversations started after the launch will reflect the changes.
When you click the Launch button, all changes will go live immediately.
The Shopping Agent will be updated in every MindBehind chatbot where it is used.
Active conversations will continue without interruption.
Any new conversations that start after the launch will use the updated configuration.
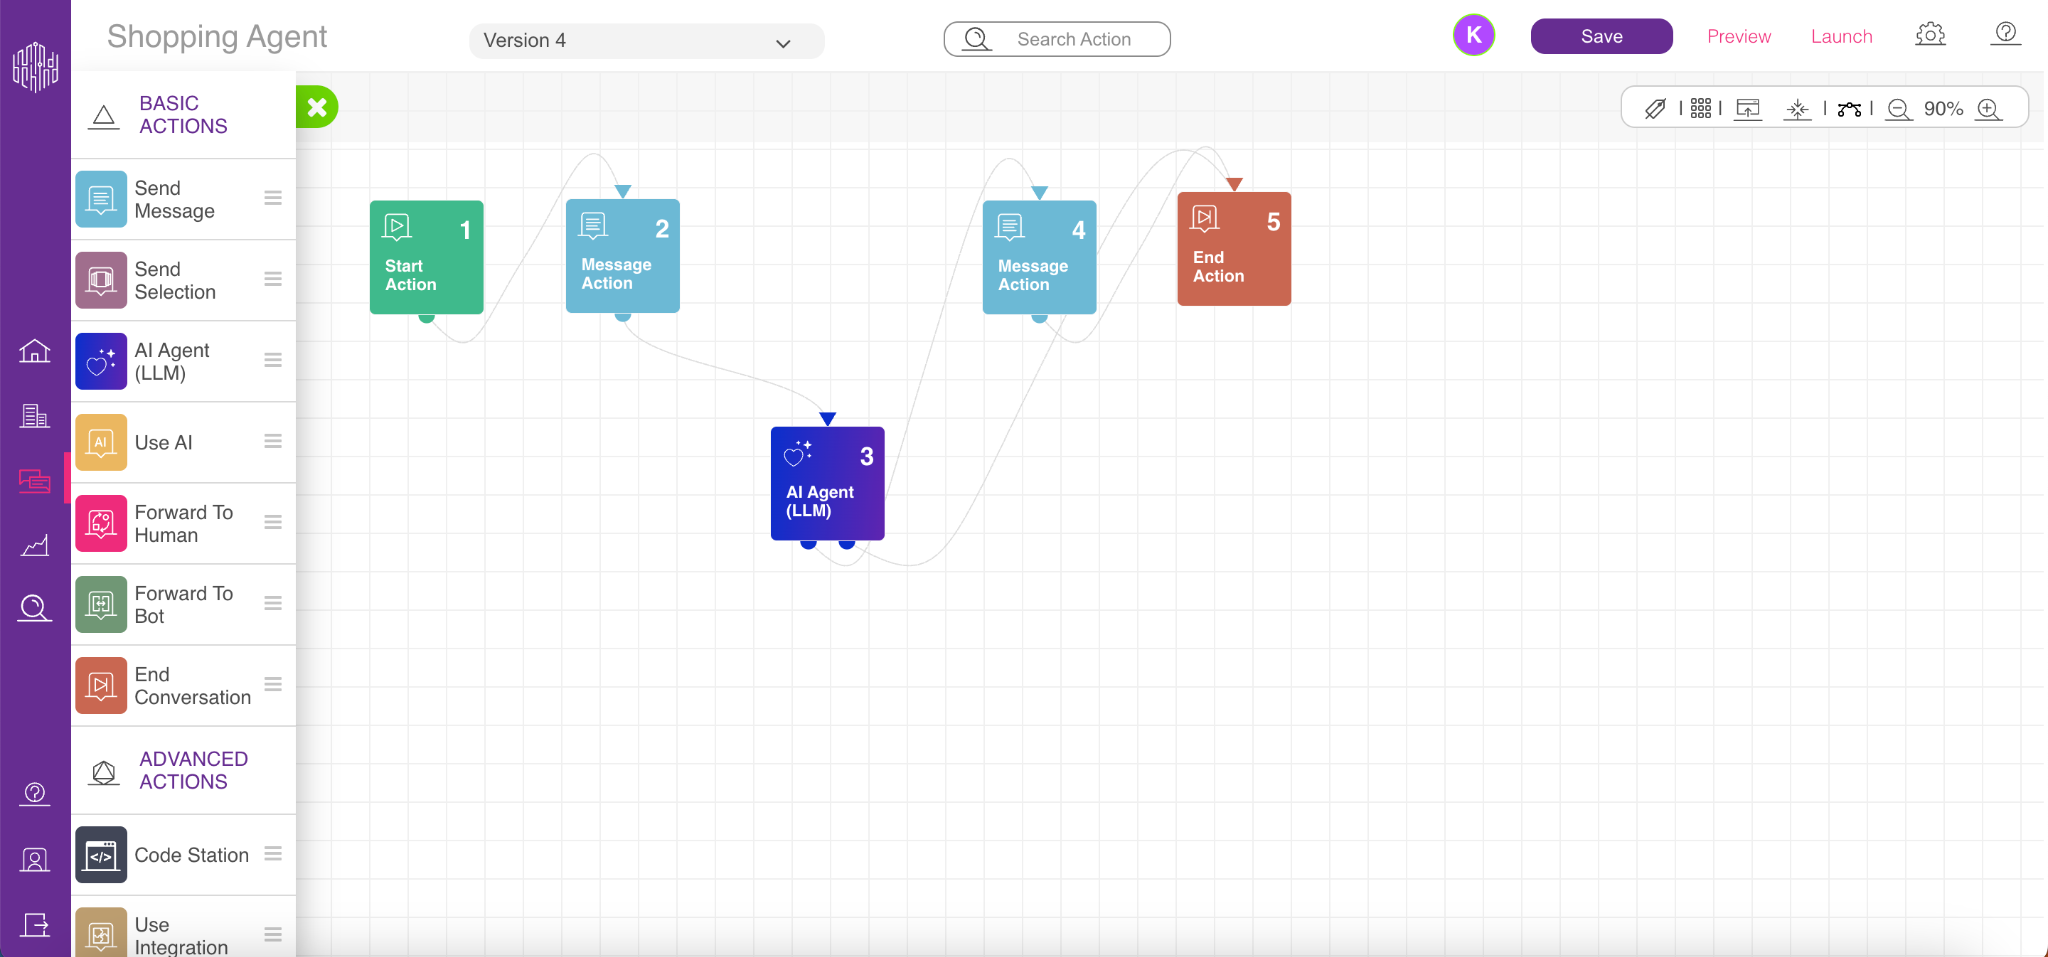
Step 7.2: Use the AI Agent Module
This step takes place in the MindBehind platform. Before starting, make sure you have access to the platform.
The Shopping Agent (LLM) module allows you to integrate a Large Language Model (LLM)-powered support assistant into your conversational flow. It leverages your predefined Shopping Agent configurations, including personality, knowledge base, and actions, to deliver intelligent and contextual responses to user inputs.
Log in to the MindBehind Flow application and select your assistant, who will use a Shopping Agent.
From the left menu, drag and drop the Use Shopping AI Agent (LLM) module onto your flow canvas.
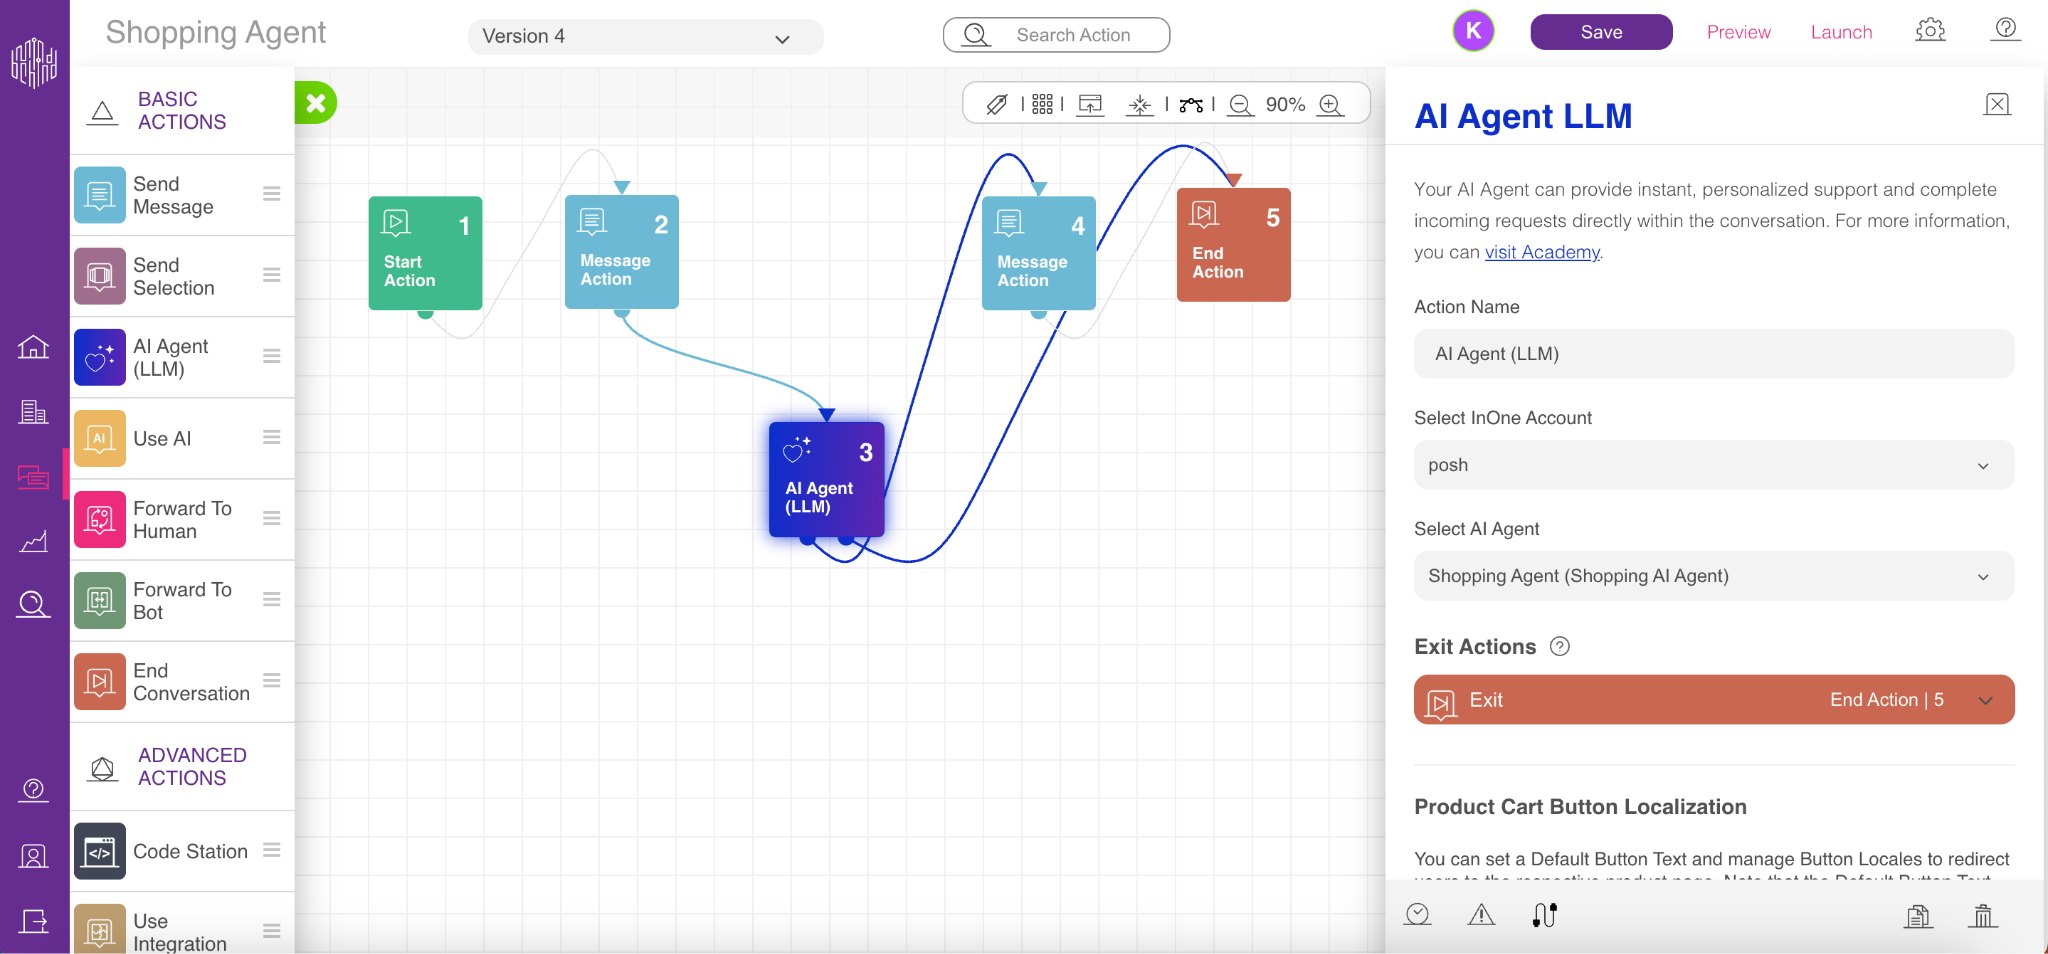
Click the added module and select your InOne Account, which is linked to your company.
After selecting the account, choose a previously created Shopping Agent from the list.
Once your Shopping Agent is selected, you must configure Exit Action connections. Exit Actions represent situations where the agent cannot complete a task independently, such as transferring the user to a live agent or another flow.
For example, if a user asks to speak with a human, you can define an Exit Action called Human Handover and connect it to the relevant live support flow.
Make sure every Exit Action has a valid connection on the canvas.
You must define at least 1 fallback connection for the Shopping Agent module. Without a fallback, the agent cannot recover from unrecognized inputs, and user messages may be routed incorrectly.
The minimum fallback count must be set to 1.
Input Module Placement
Shopping Agents generate responses based on the last input received.
Always insert an Input Module directly before the Shopping Agent module for accurate behavior.
For example, if a user previously clicks a button labeled “Connect to AI Agent,” that action is treated as the last input. The agent might then respond to that phrase instead of a user query. Adding an Input Module ensures the agent receives a proper message to respond to.
Shopping Agent modules always operate on the latest version of your agent.
Any updates to the configuration, such as Knowledge Base, Actions, or Personality, are applied instantly in live environments.
Congratulations! Your Shopping Agent is now fully deployed and ready to interact with users in real time.
If you experience any issues or unexpected behavior, refer to the Troubleshooting section below for quick solutions.
Troubleshooting for the Shopping Agent Module in MindBehind
When setting up the Shopping Agent module in MindBehind, you might encounter issues that affect how the agent performs in live or test environments.
This section lists the most common setup problems and their solutions, helping you quickly identify and fix configuration issues before deployment.
No fallback count defined
When the fallback count is missing in the Shopping Agent module, the system has no limit for handling unrecognized inputs. As a result, every message from the user is immediately routed to the fallback path.
Solution: Set a fallback count of at least 1 in the module settings to define how many failed attempts should be allowed before triggering fallback.
User input not properly captured
If a user’s selection, such as a button click, is treated as the most recent input, the agent might respond in an unintended or irrelevant way.
Solution: Add a clear Input Module just before the Shopping Agent module to capture and define the user’s intent.
Exit actions are not connected
If an exit action configured in the agent module isn’t linked to the next step in the flow, the conversation might end unexpectedly or be routed to fallback.
Solution: Review the canvas and make sure each exit action is connected to the appropriate module or step.
The test flow doesn’t reflect the latest agent changes
When updates are made to the Shopping Agent (e.g., knowledge base, actions, or tone), existing chatbot flows might still reflect outdated behavior.
Solution: After making any changes to the agent, re-test the chatbot flow to ensure everything works as expected.