Architect’s Call an API element lets you connect your journeys to any external system in real time. You can send dynamic, personalized data to external messaging providers like LINE, Viber, and KakaoTalk to deliver messages exactly when your users need them, whether it’s a promotion, reminder, or milestone update.
You can use the Call an API element to:
Send tailored offers or discounts to users based on loyalty tier or recent activity, increasing engagement and conversion rates.
Deliver real-time product suggestions with images or carousel messages, powered by recent browsing or purchase data.
Notify users instantly about important account updates such as membership changes, subscription renewals, or service expirations.
Trigger time-sensitive promotions or special discounts to specific user segments in real time.
Dynamically inform users about recent purchases, shipping status, or delivery confirmations.
Send carousel messages featuring purchased items and ask users for feedback or reviews to boost engagement and social proof.
Announce new products or campaigns with rich media messages including images, lists, or carousels.
Remind users about upcoming events, appointments, or service milestones with personalized messages.
Send tailored suggestions based on inactivity or browsing behavior to encourage re-engagement.
Share seasonal campaigns, flash sales, or exclusive offers with targeted segments to drive urgency and conversions.
Below are examples of how you can bring these channels to life with simple API calls.
Send messages via LINE using Call an API
You can send personalized messages to your users on LINE directly from Architect journeys using the Call an API element. This setup allows you to connect your existing LINE Business Account with Insider and orchestrate LINE messages as part of your customer journeys, just like you would with Email, SMS, or Push.
1.Collect or fetch LINE user IDs
To send messages via LINE, Architect needs to know the LINE user ID for each recipient. To do this, you need to store LINE IDs in Insider’s Unified Customer Database (UCD) (Upsert user data API / Identify API).
Collect userId when users log in via LINE Login or follow your LINE Official Account.
Send this userId to Insider using the Upsert user data API, mapping it as a user attribute.
{
  "iid": "12345",
  "attributes": {
    "line_id": "U4af4980629...",
    "line_name": "Ayaka",
  }
}
Once stored in UCD, you can reference {{line_id}} in any Call an API element downstream.
2.Configure Call an API in your journey
After obtaining the LINE ID, you can send messages through the LINE Messaging API.
2.1. Configure the LINE endpoint via Architect Settings > API Preferences.
URL | https://api.line.me/v2/bot/message/push |
Header | Authorization: [Your access token] |
2.2. Add a Call an API element to your journey.
2.3. Choose the LINE endpoint.
Message payload examples
Below are ready-to-use payload templates you can adapt to your own use cases.
Text message
{
"to": "{{line_id}}",
"messages": [
{
"type": "text",
"text": "🎉 Hi {{name}}! You’ve just reached {{loyalty_tier}} tier. Here’s your exclusive {{COUPON_CODE}}. Shop now and enjoy your new status!"
}
]
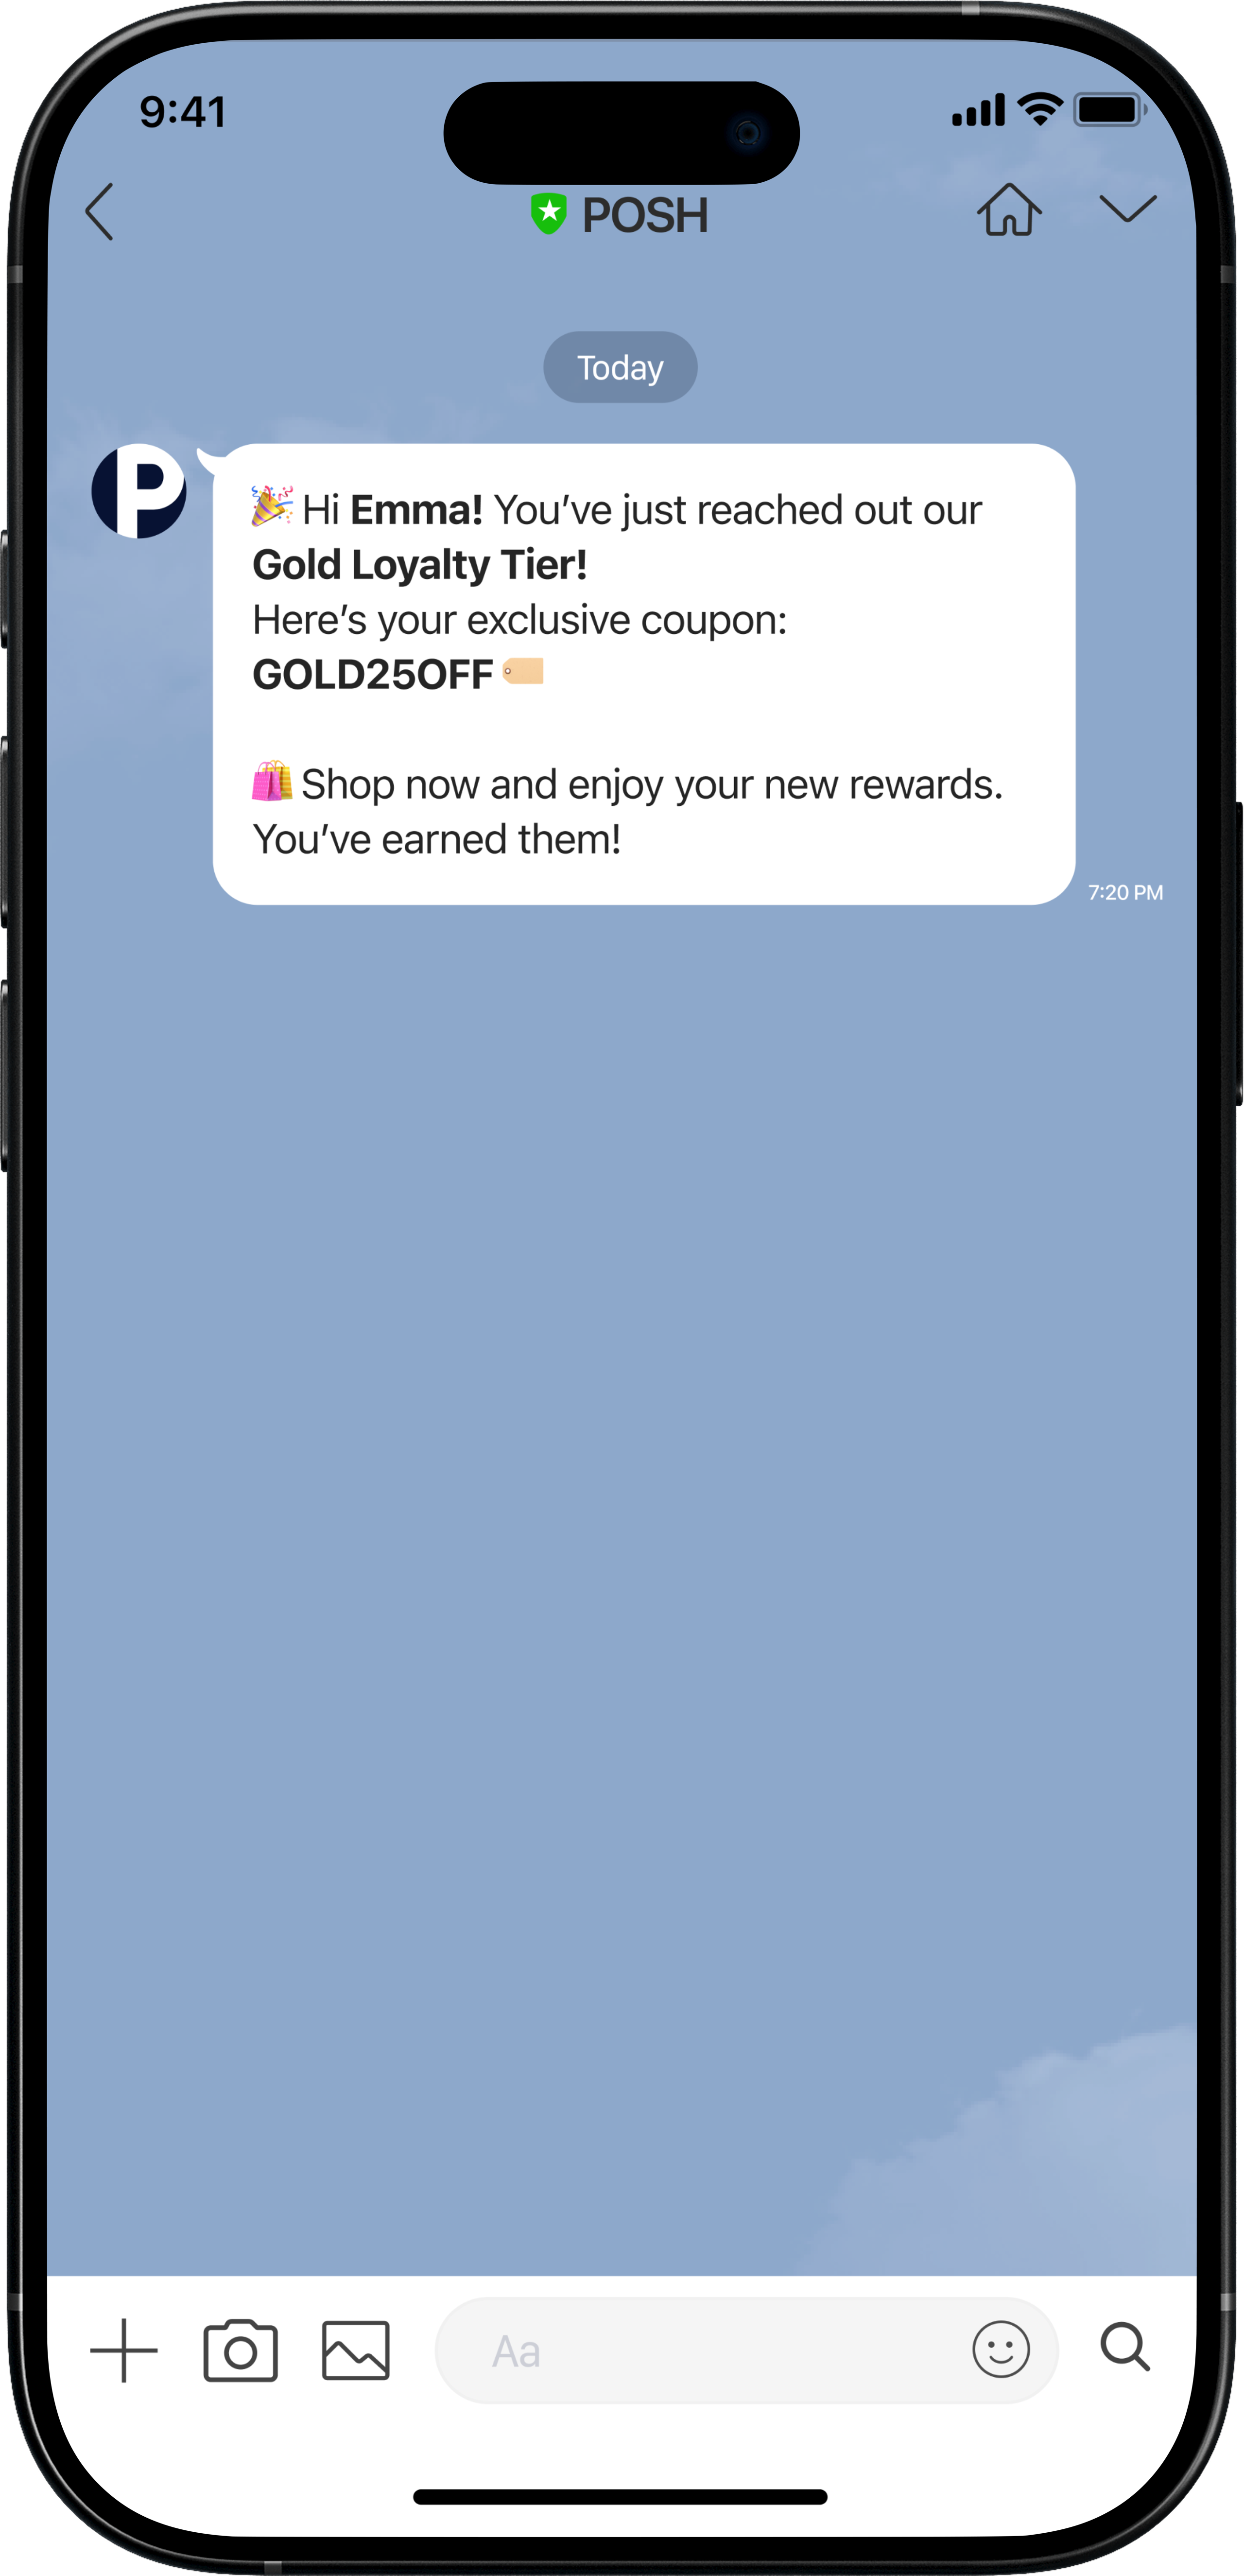
}Use cases: Welcome messages, promotions, loyalty milestone celebration, membership tier upgrade, personalized offers.
Flex (Text+Image+Button) message – Product highlight
{
"to": "{{line_id}}",
"messages": [
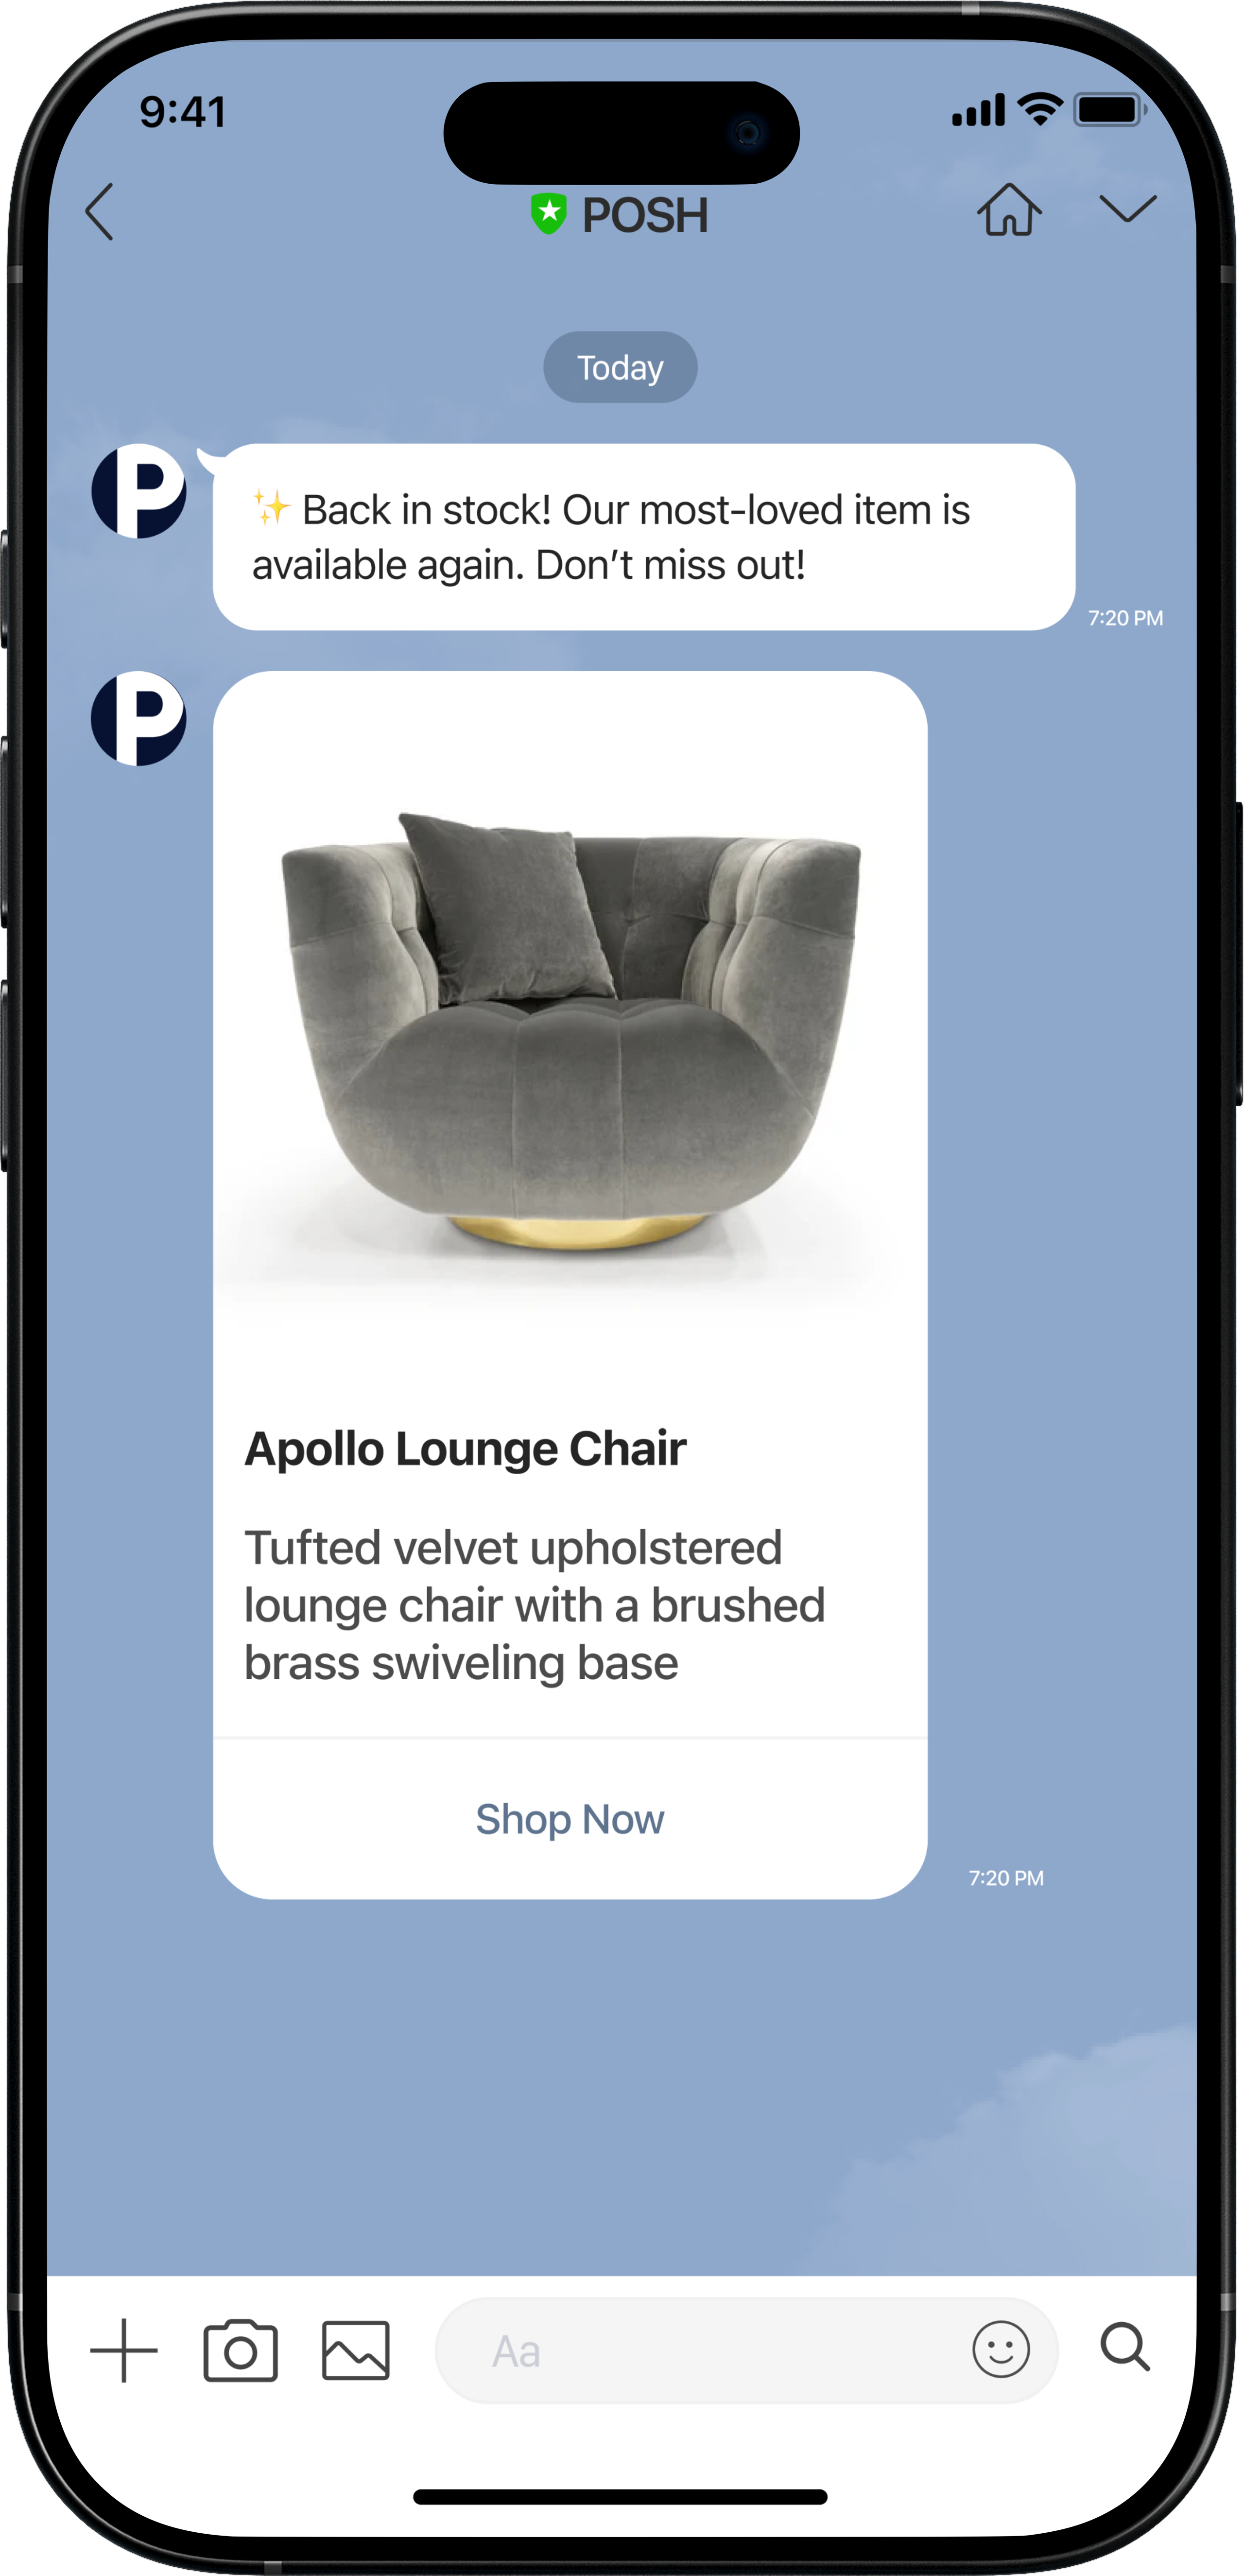
{ "type": "text", "text": "Back in stock! Our most-loved item is avaiable again. Don't miss out!" },
{
"type": "flex",
"altText": "Secure yours before stock runs out!",
"contents": {
"type": "bubble",
"hero": { "type": "image", "url": "{{product_catalog_image_url}}" },
"body": [
{ "text": "{{product_catalog_name}}" },
{ "text": "{{product_attributes.description}}" }
],
"footer": [
{ "type": "button", "action": { "type": "uri", "label": "Shop Now", "uri": "{{product_catalog_url}}" } }
]
}
}
]
}Use cases: Product launches, back-in-stock alerts, featured recommendations
Carousel message – Multi-product promotion
{
"to": "{{line_id}}",
"messages": [
{
"type": "template",
"altText": "You've left items in your cart!",
"template": {
"type": "carousel",
"columns": [
{
"thumbnailImageUrl": "{{cart_item1.product_image}}",
"title": "{{cart_item1.product_name}}",
"text": "{{cart_item1.product_price}}",
"actions": [
{
"type": "uri",
"label": "View",
"uri": "{{cart_item1.product_url}}"
}
]
},
{
"thumbnailImageUrl": "{{cart_item2.product_image}}",
"title": "{{cart_item2.product_name}}",
"text": "{{cart_item2.product_price}}",
"actions": [
{
"type": "uri",
"label": "View",
"uri": "{{cart_item2.product_url}}"
}
]
}
]
}
}
]
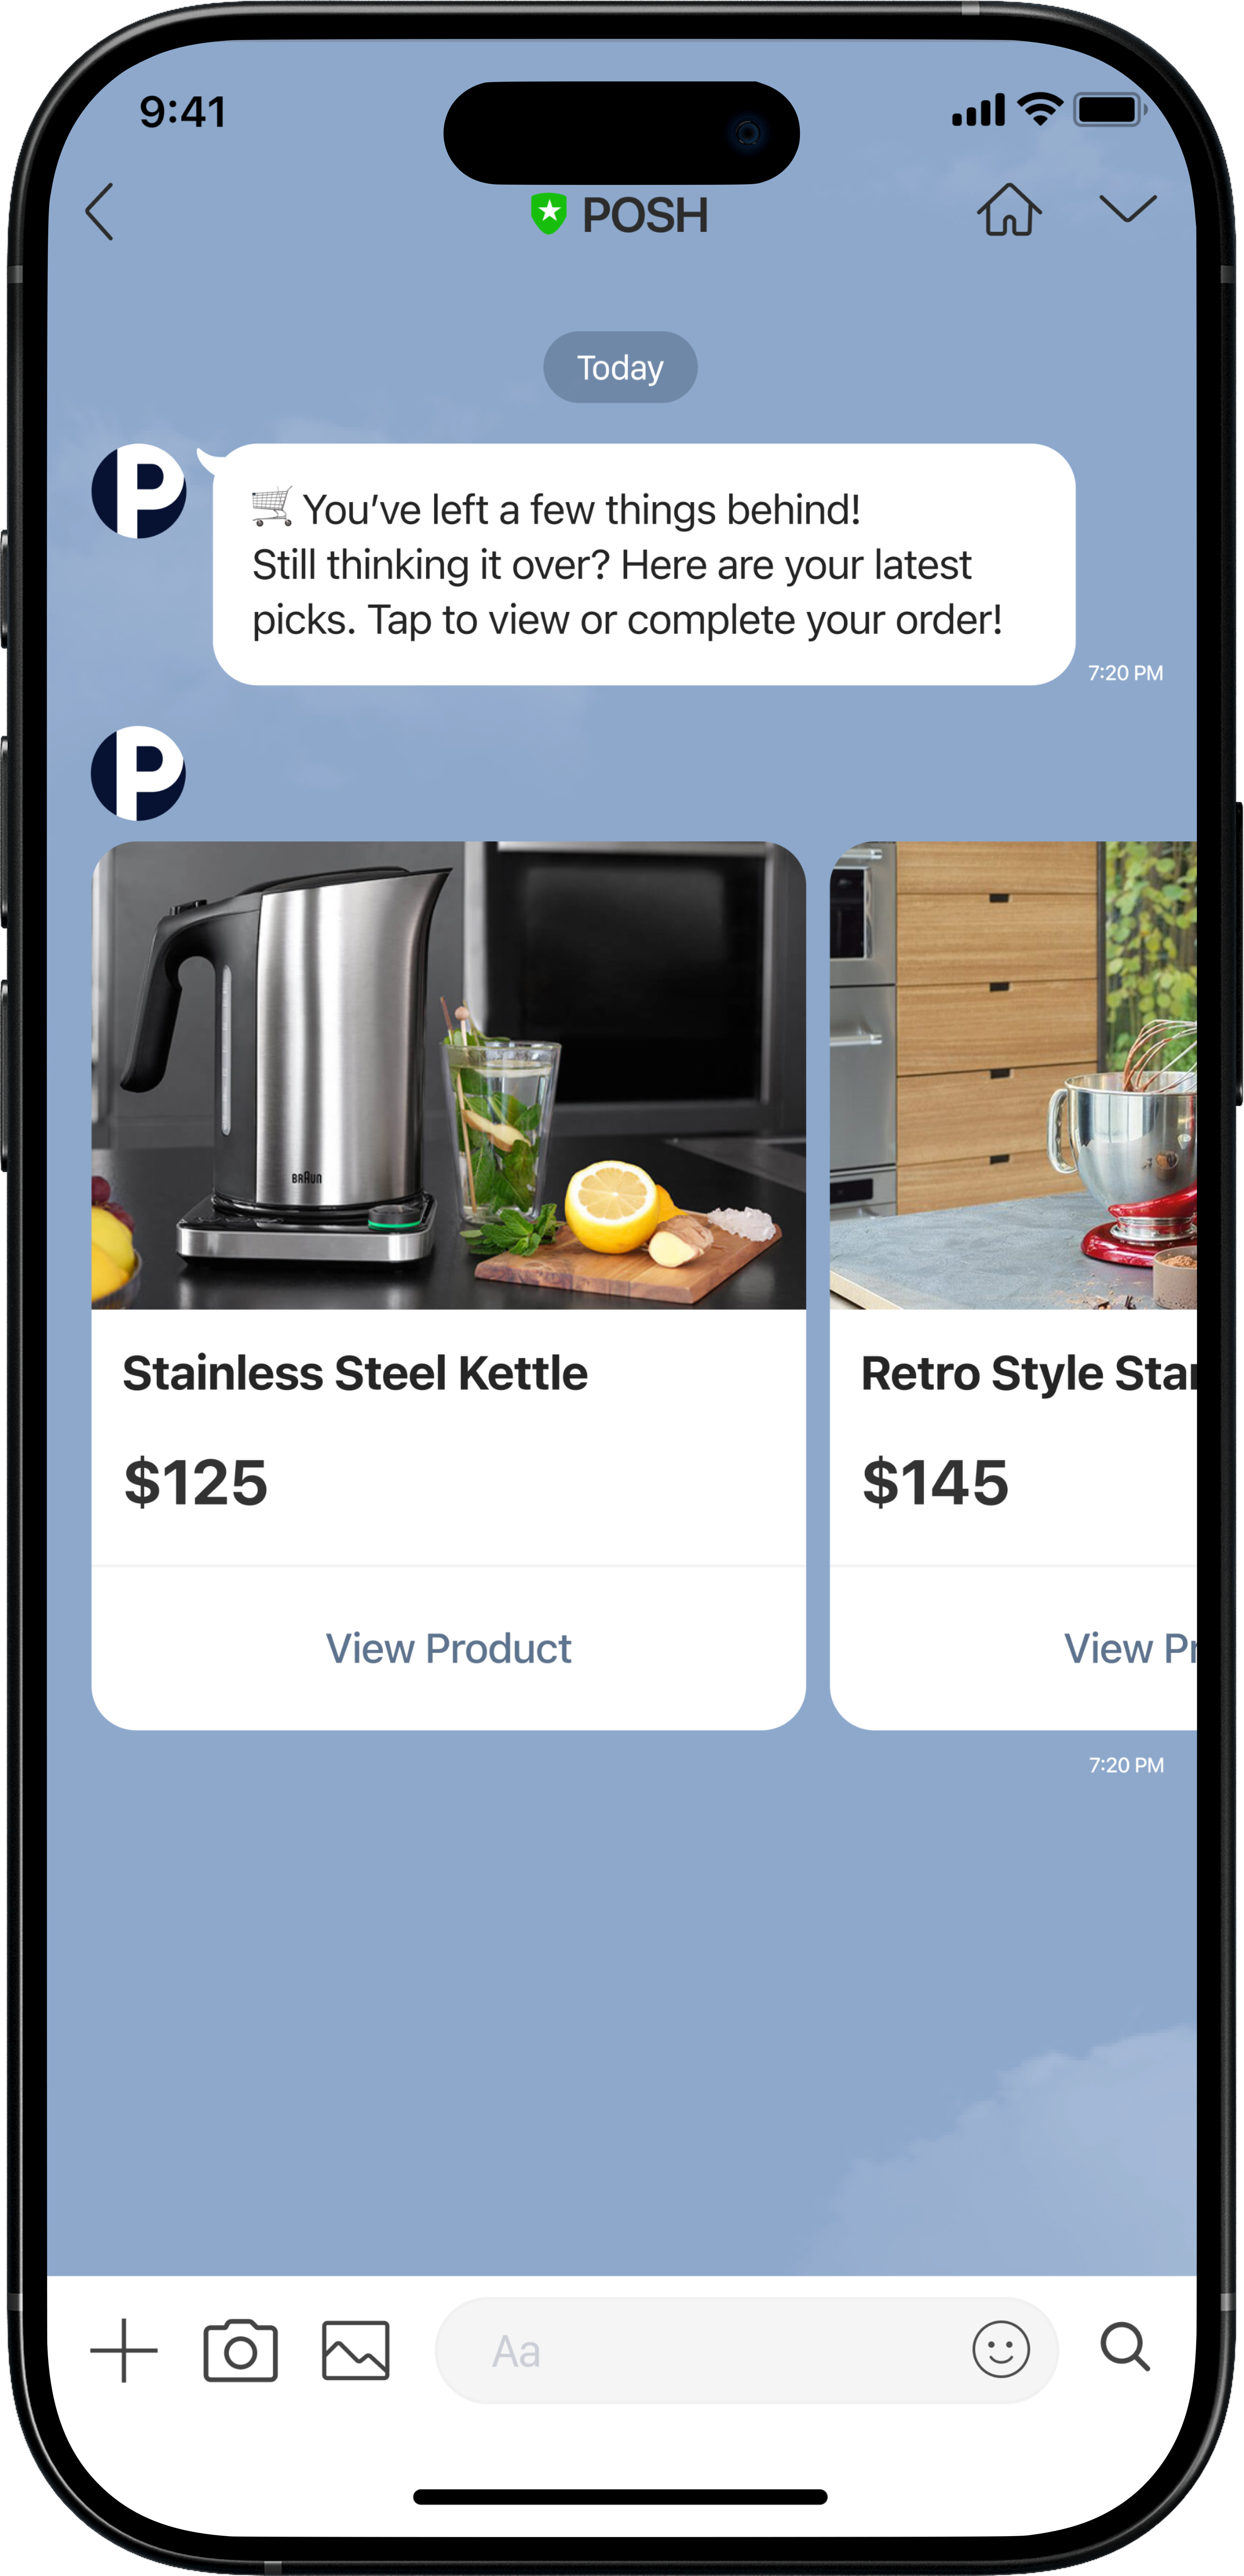
}Use cases: Cart abandonment, browse abandonment, post-purchase, personalized product recommendations, “You might also like” suggestions
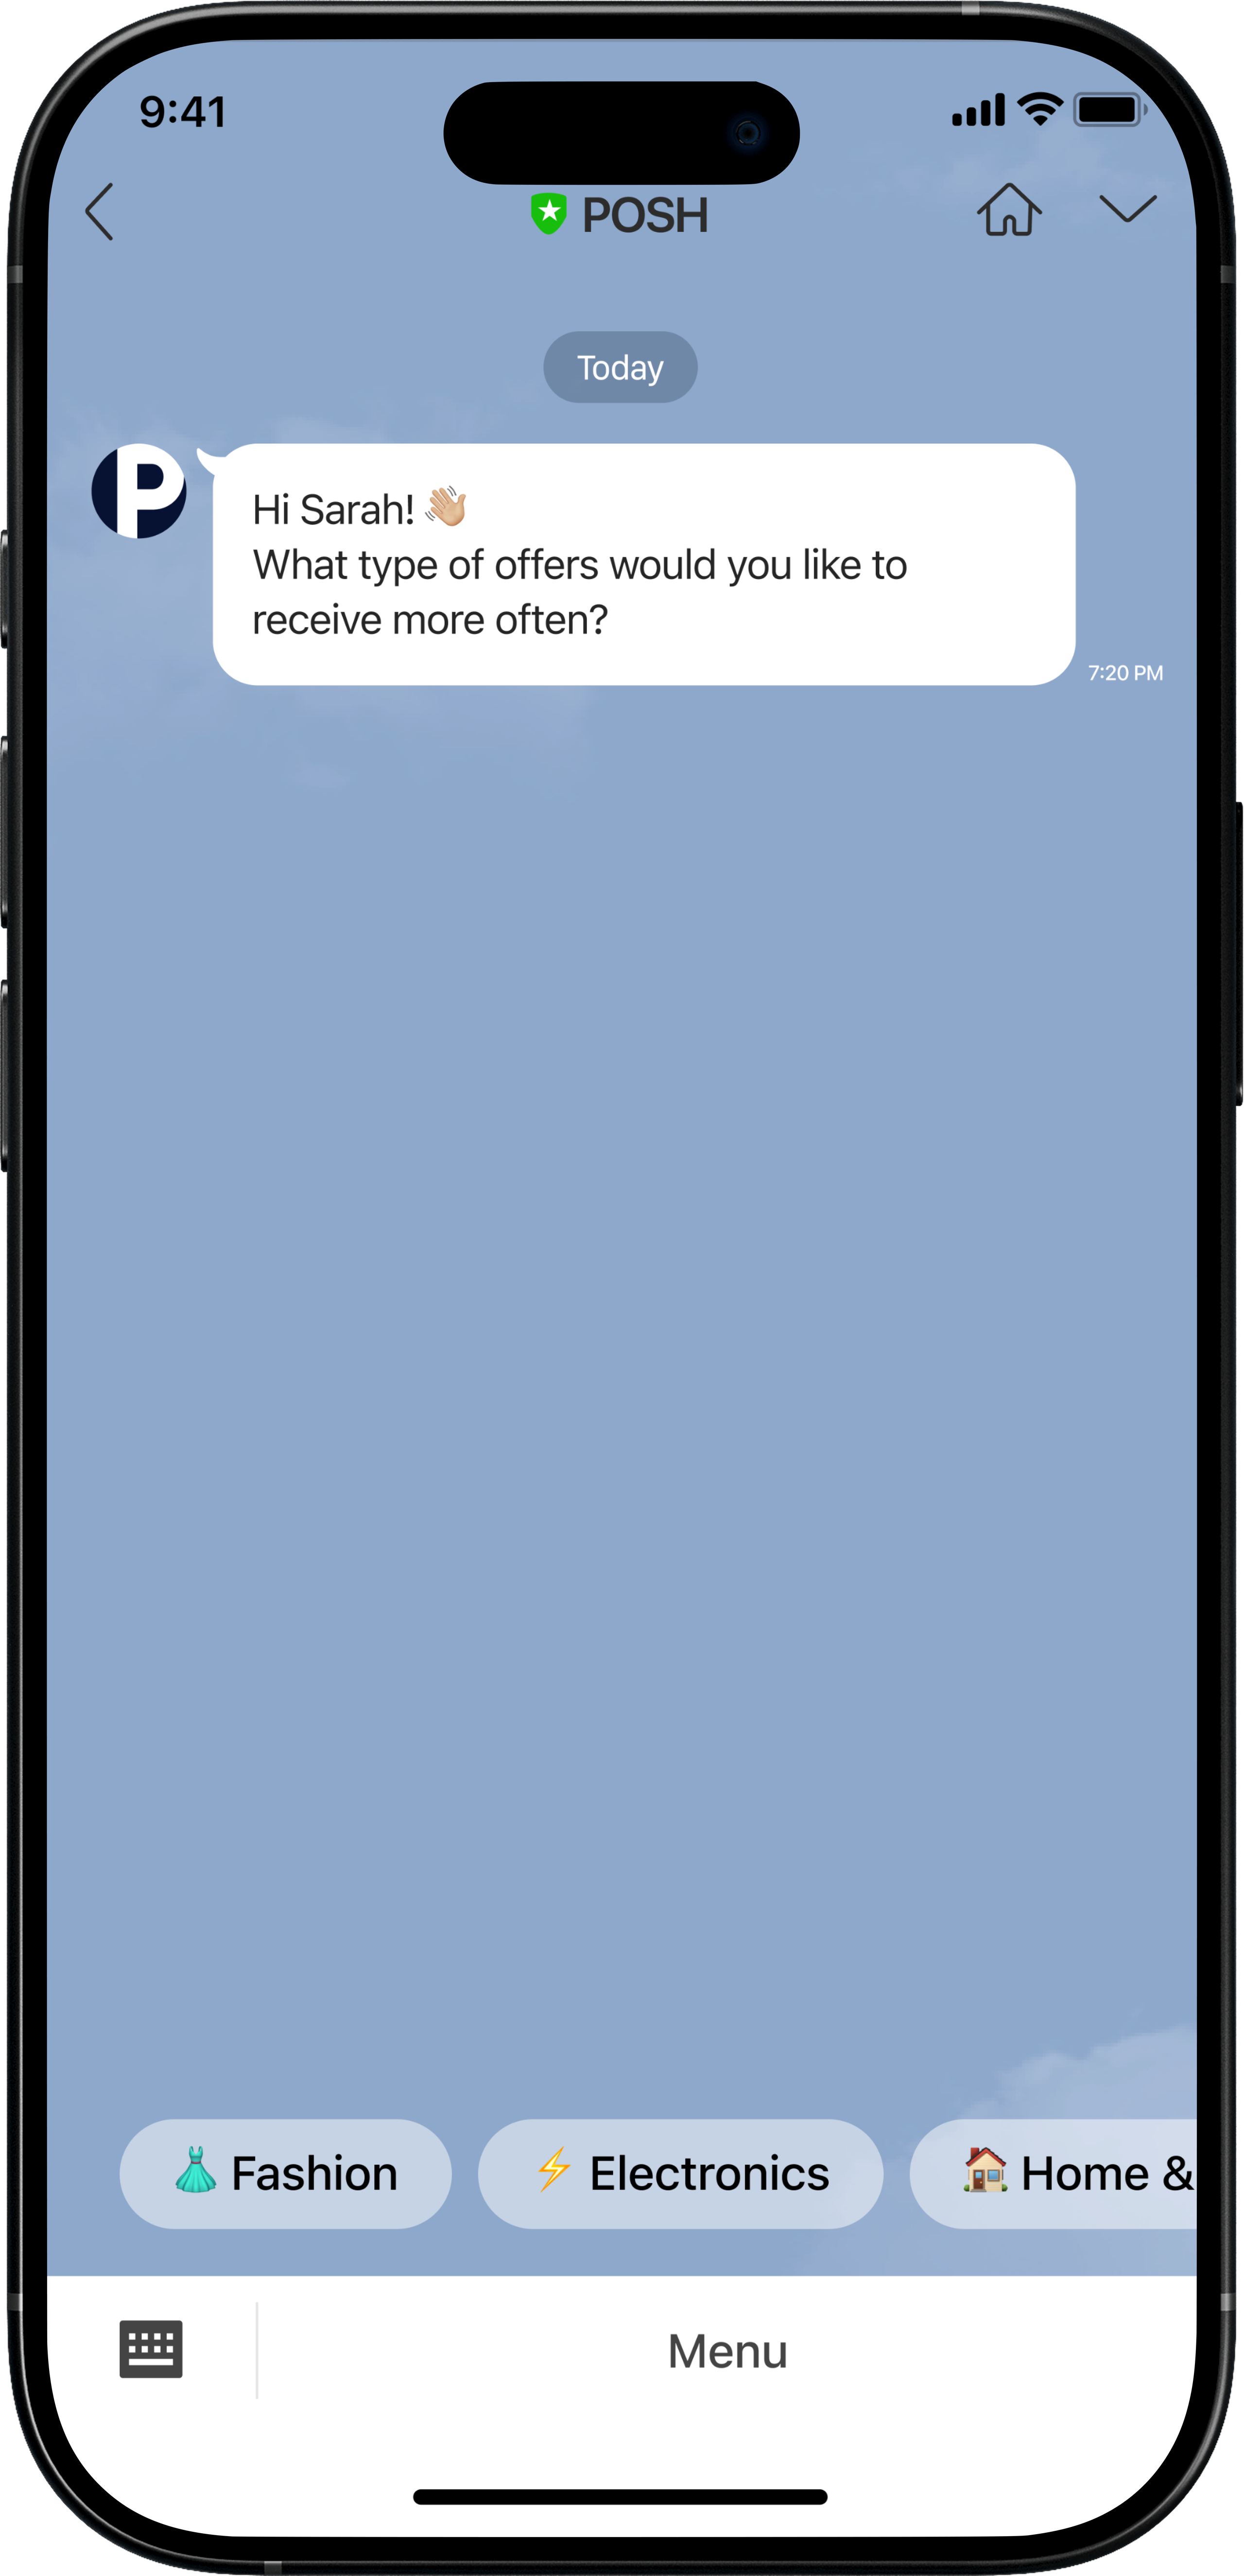
Quick reply message – Collect preferences
{
  "to": "{{line_id}}",
  "messages": [
    {
      "type": "text",
      "text": "Hey {{name}}, what type of offers would you like to receive more often?",
      "quickReply": {
        "items": [
          {
            "type": "action",
            "action": {
              "type": "message",
              "label": "Fashion",
              "text": "Fashion"
            }
          },
          {
            "type": "action",
            "action": {
              "type": "message",
              "label": "Electronics",
              "text": "Electronics"
            }
          }
        ]
      }
    }
  ]
}
Use cases: Interactive preference collection, survey prompts, re-engagement questions
Important tips for sending LINE messages
Validate your requests: Read the LINE API documentation thoroughly to ensure you are sending valid requests to the correct endpoint with the correct headers and access token. Refer to Messaging API reference.
Mind rate limits: LINE enforces a limit of 2,000 messages per second. If you are sending messages directly via the LINE endpoint, configure throttling in Architect under API Preferences for this endpoint.
Use the dynamic content builder: The dynamic content syntax in this document is a placeholder. Always use the Add Dynamic Content button in Architect to insert attributes or event variables.
Send performance metrics back to Architect: You can send delivery or engagement data to Insider’s analytics endpoint for reporting. This requires a middleware service, which can be implemented by your tech team or with support from Insider.
Send messages via Kakaotalk using Call an API
You can send personalized messages to your users on KakaoTalk directly from Architect journeys using the Call an API element.
This setup allows you to connect your KakaoTalk Business Account with Insider and orchestrate KakaoTalk messages as part of your customer journeys, alongside email, SMS, push, and other channels.
1.Collect and store KakaoTalk user IDs in Insider
To send messages via KakaoTalk, Architect needs to know each recipient’s KakaoTalk user ID (also called talk channel user key).
1.1 Collect the KakaoTalk user key when users opt in to your KakaoTalk channel or interact with your brand via KakaoTalk.
1.2. Send the ID to Insider using the Upsert user data API, mapping it as a user attribute.
Example payload for the Upsert user data API:
{
  "iid": "12345",
  "attributes": {
    "kakao_user_id": "abcdef123456",
    "name": "Jisoo",
    "membership_level": "Gold"
  }
}
Once stored in Unified Customer Database (UCD), you can reference {{kakao_user_id}} in any Call an API element downstream.
2.Configure Call an API in your journey
After storing the KakaoTalk ID in UCD, you can send messages through the KakaoTalk AlimTalk API.
2.1. Configure the KakaoTalk endpoint via Architect Settings > API Preferences.
URL: | https://kapi.kakao.com/v1/api/talk/friends/message/default/send |
Header: | Authorization: [Your access token] |
2.2. Add a Call an API element to your journey.
2.3. Choose the KakaoTalk endpoint you configured in the previous step.
2.4. Set the request body with your message payload, using dynamic attributes.
Message payload examples
Below are ready-to-use payload templates for KakaoTalk messages:
Text message – Personalized offer
{
  "receiver_uuids": ["{{kakao_user_id}}"],
  "template_object": {
    "object_type": "text",
    "text": "안녕하세요 {{name}}님! 🎉 Your {{membership_level}} membership qualifies for a special offer: {{COUPON_CODE}}. Check it out now!",
    "link": {
      "web_url": "{{offer_url}}"
    },
    "button_title": "View Offer"
  }
}
Use cases: Personalized promotions, membership updates, or campaign notifications
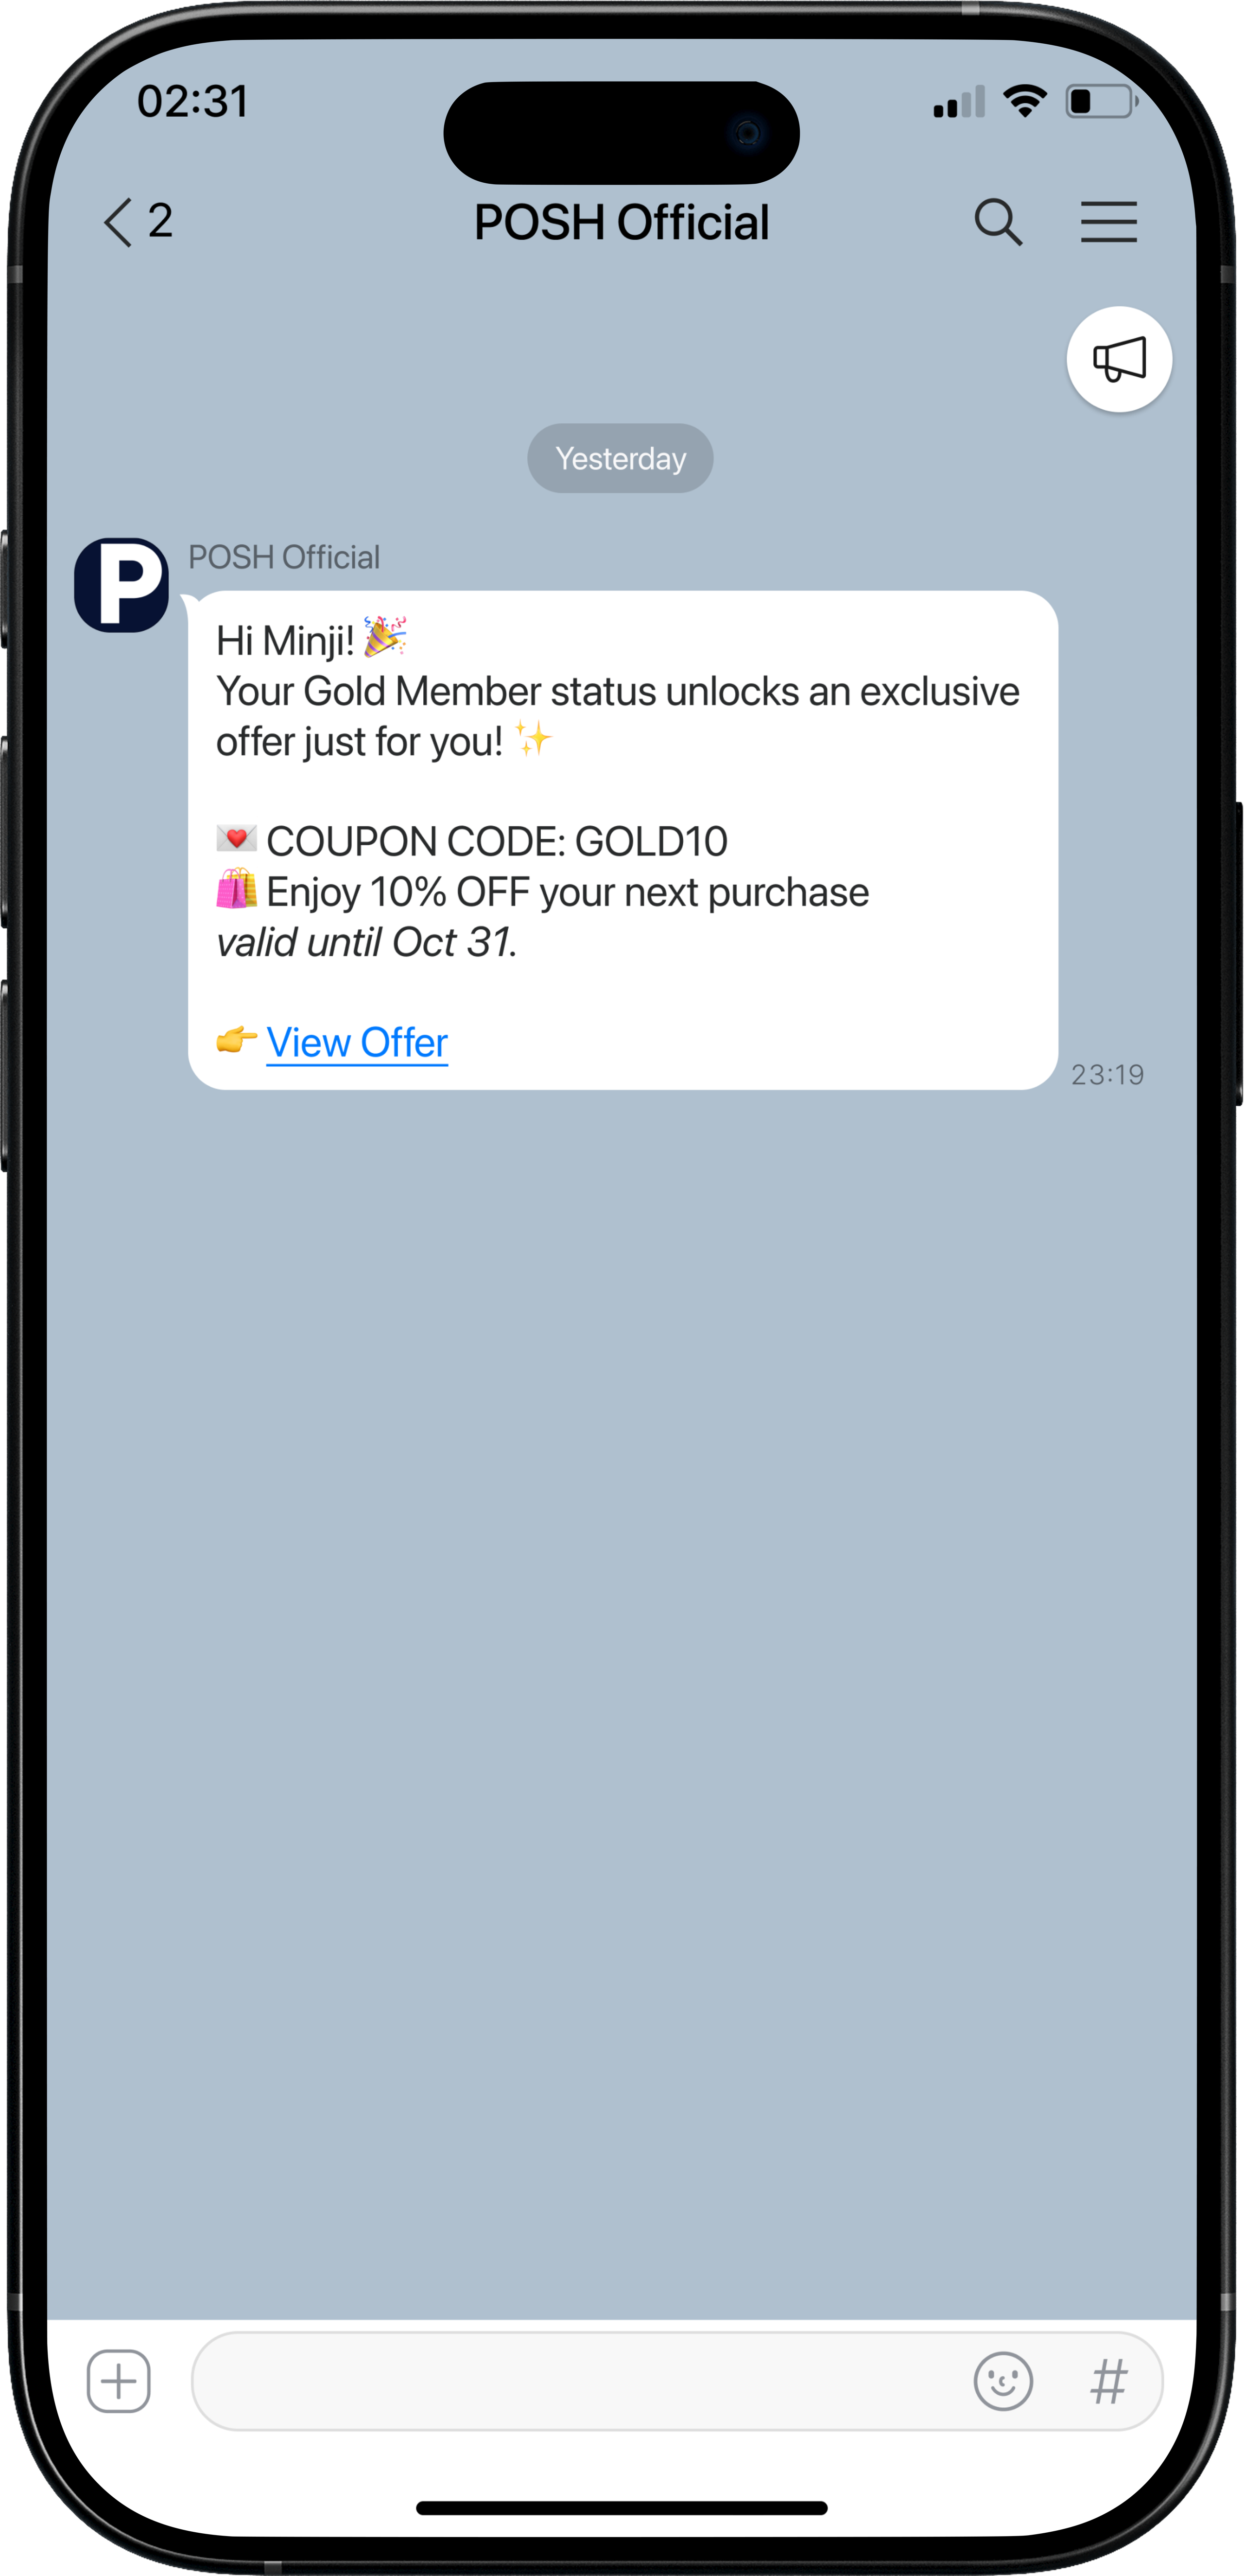
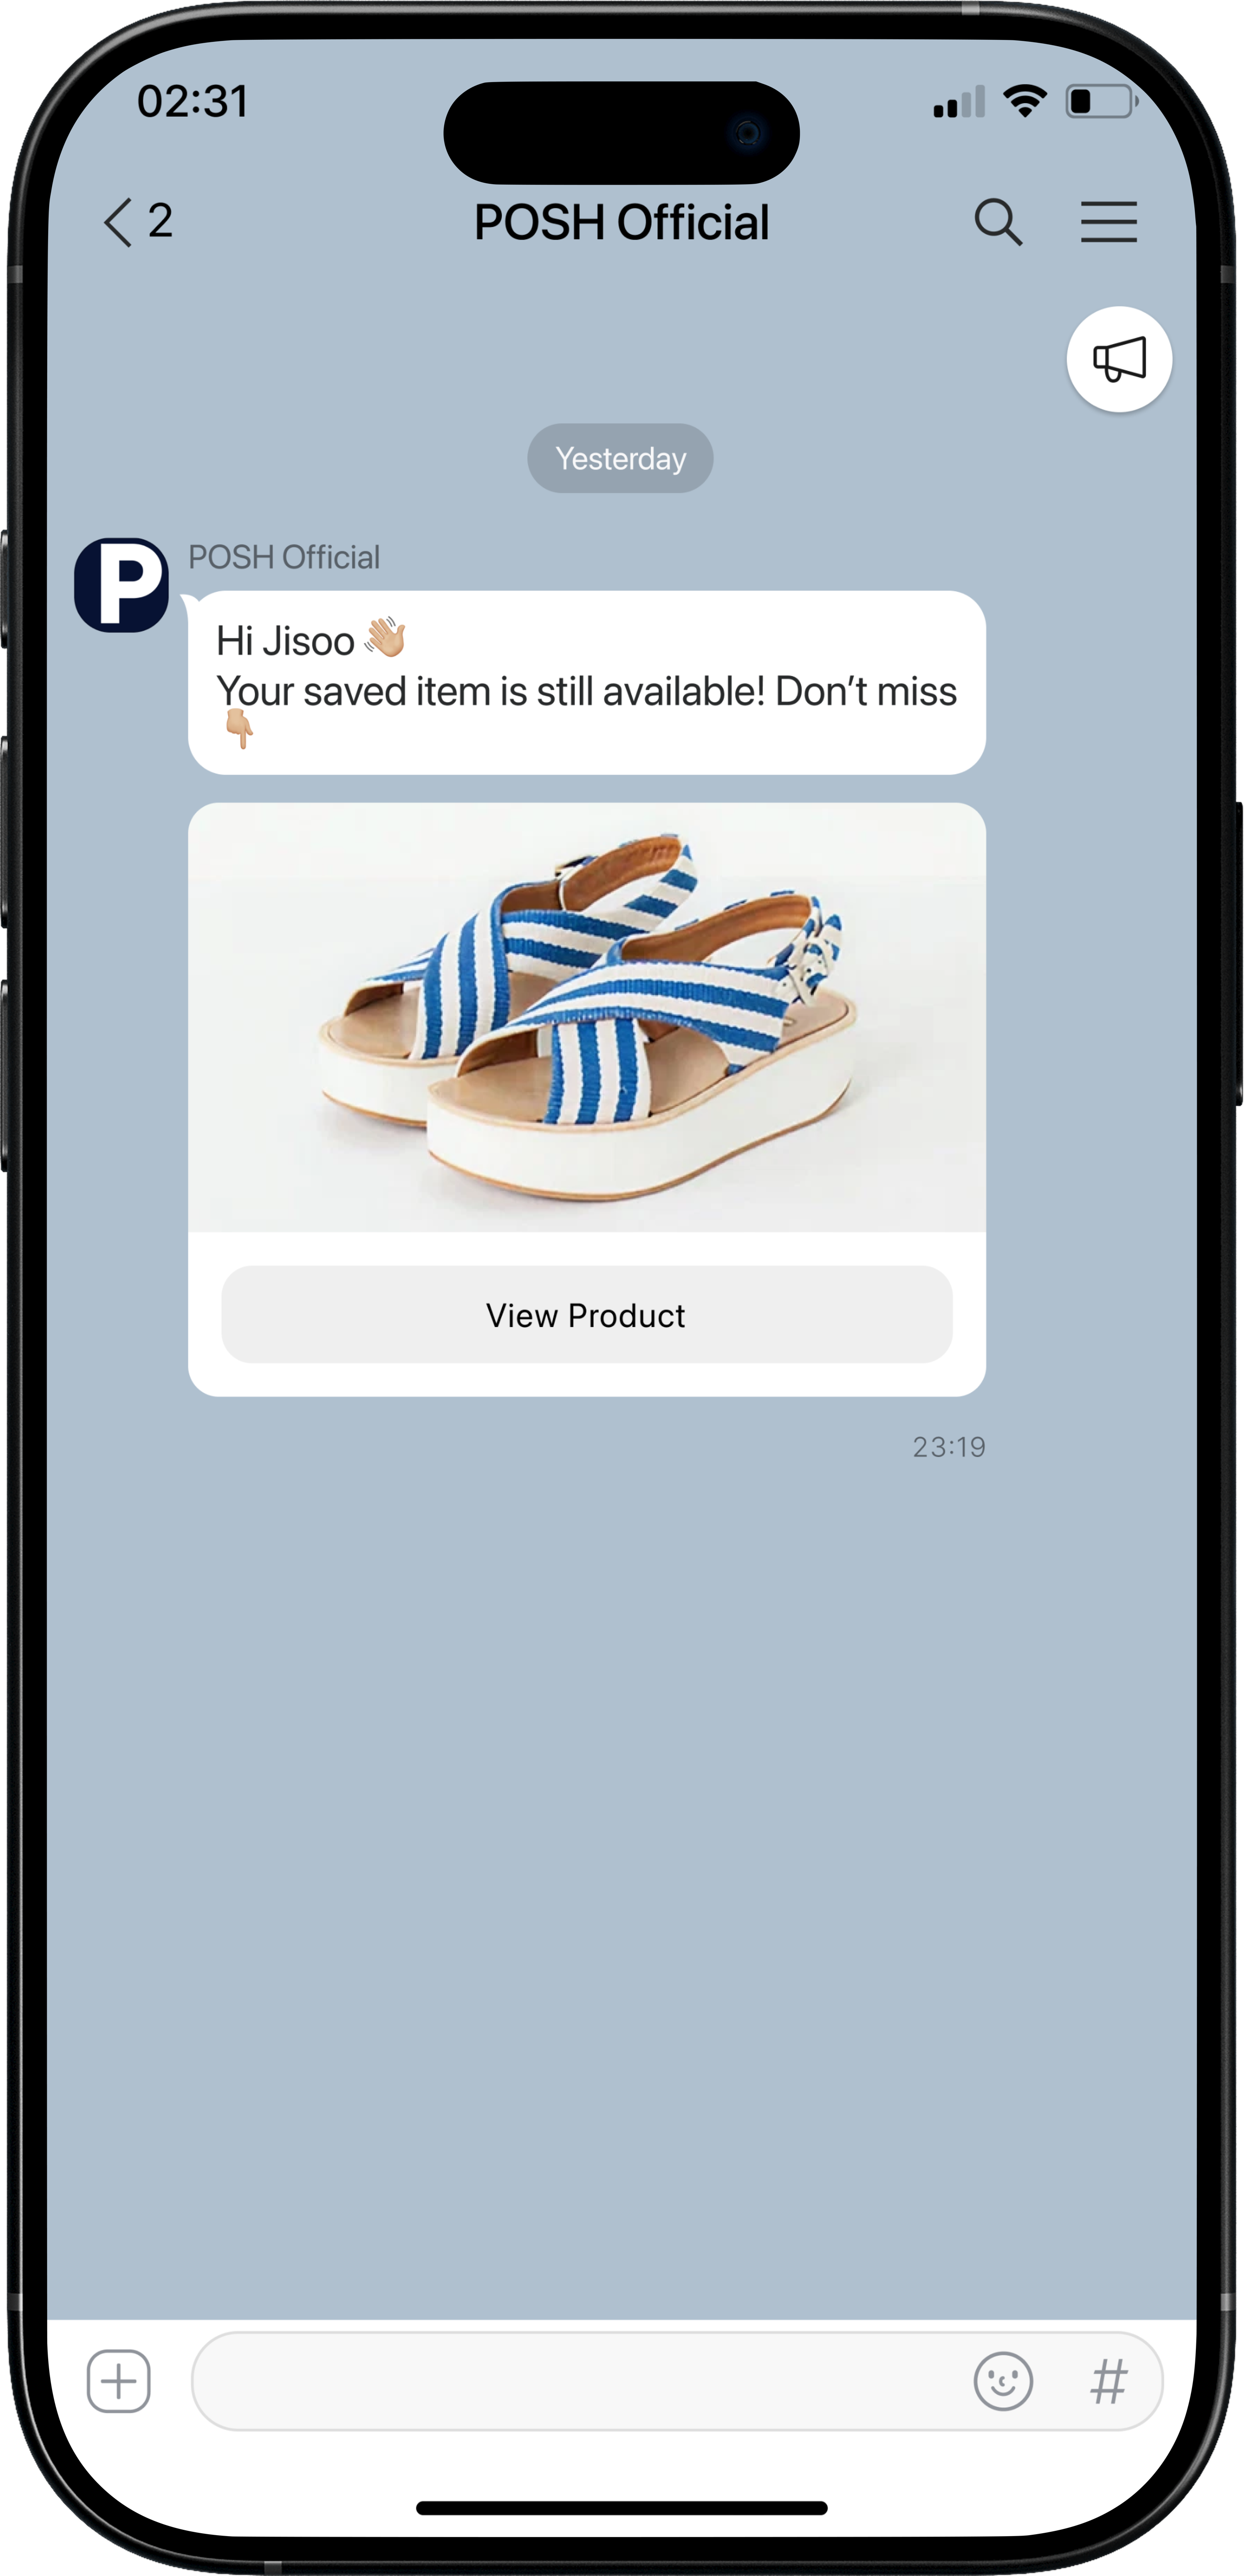
Image message – Product showcase
{
  "receiver_uuids": ["{{kakao_user_id}}"],
  "template_object": {
    "object_type": "feed",
    "content": {
      "title": "{{wishlist_item1.product_name}}",
      "image_url": "{{wishlist_item1.product_image_url}}",
      "link": {
        "web_url": "{{wishlist_item1.product_url}}"
      },
      "description": "{{wishlist_item1.product_price}}"
    }
  }
}
Use cases: Highlight items that are wishlisted but never purchased, limited-time deals, or seasonal items.
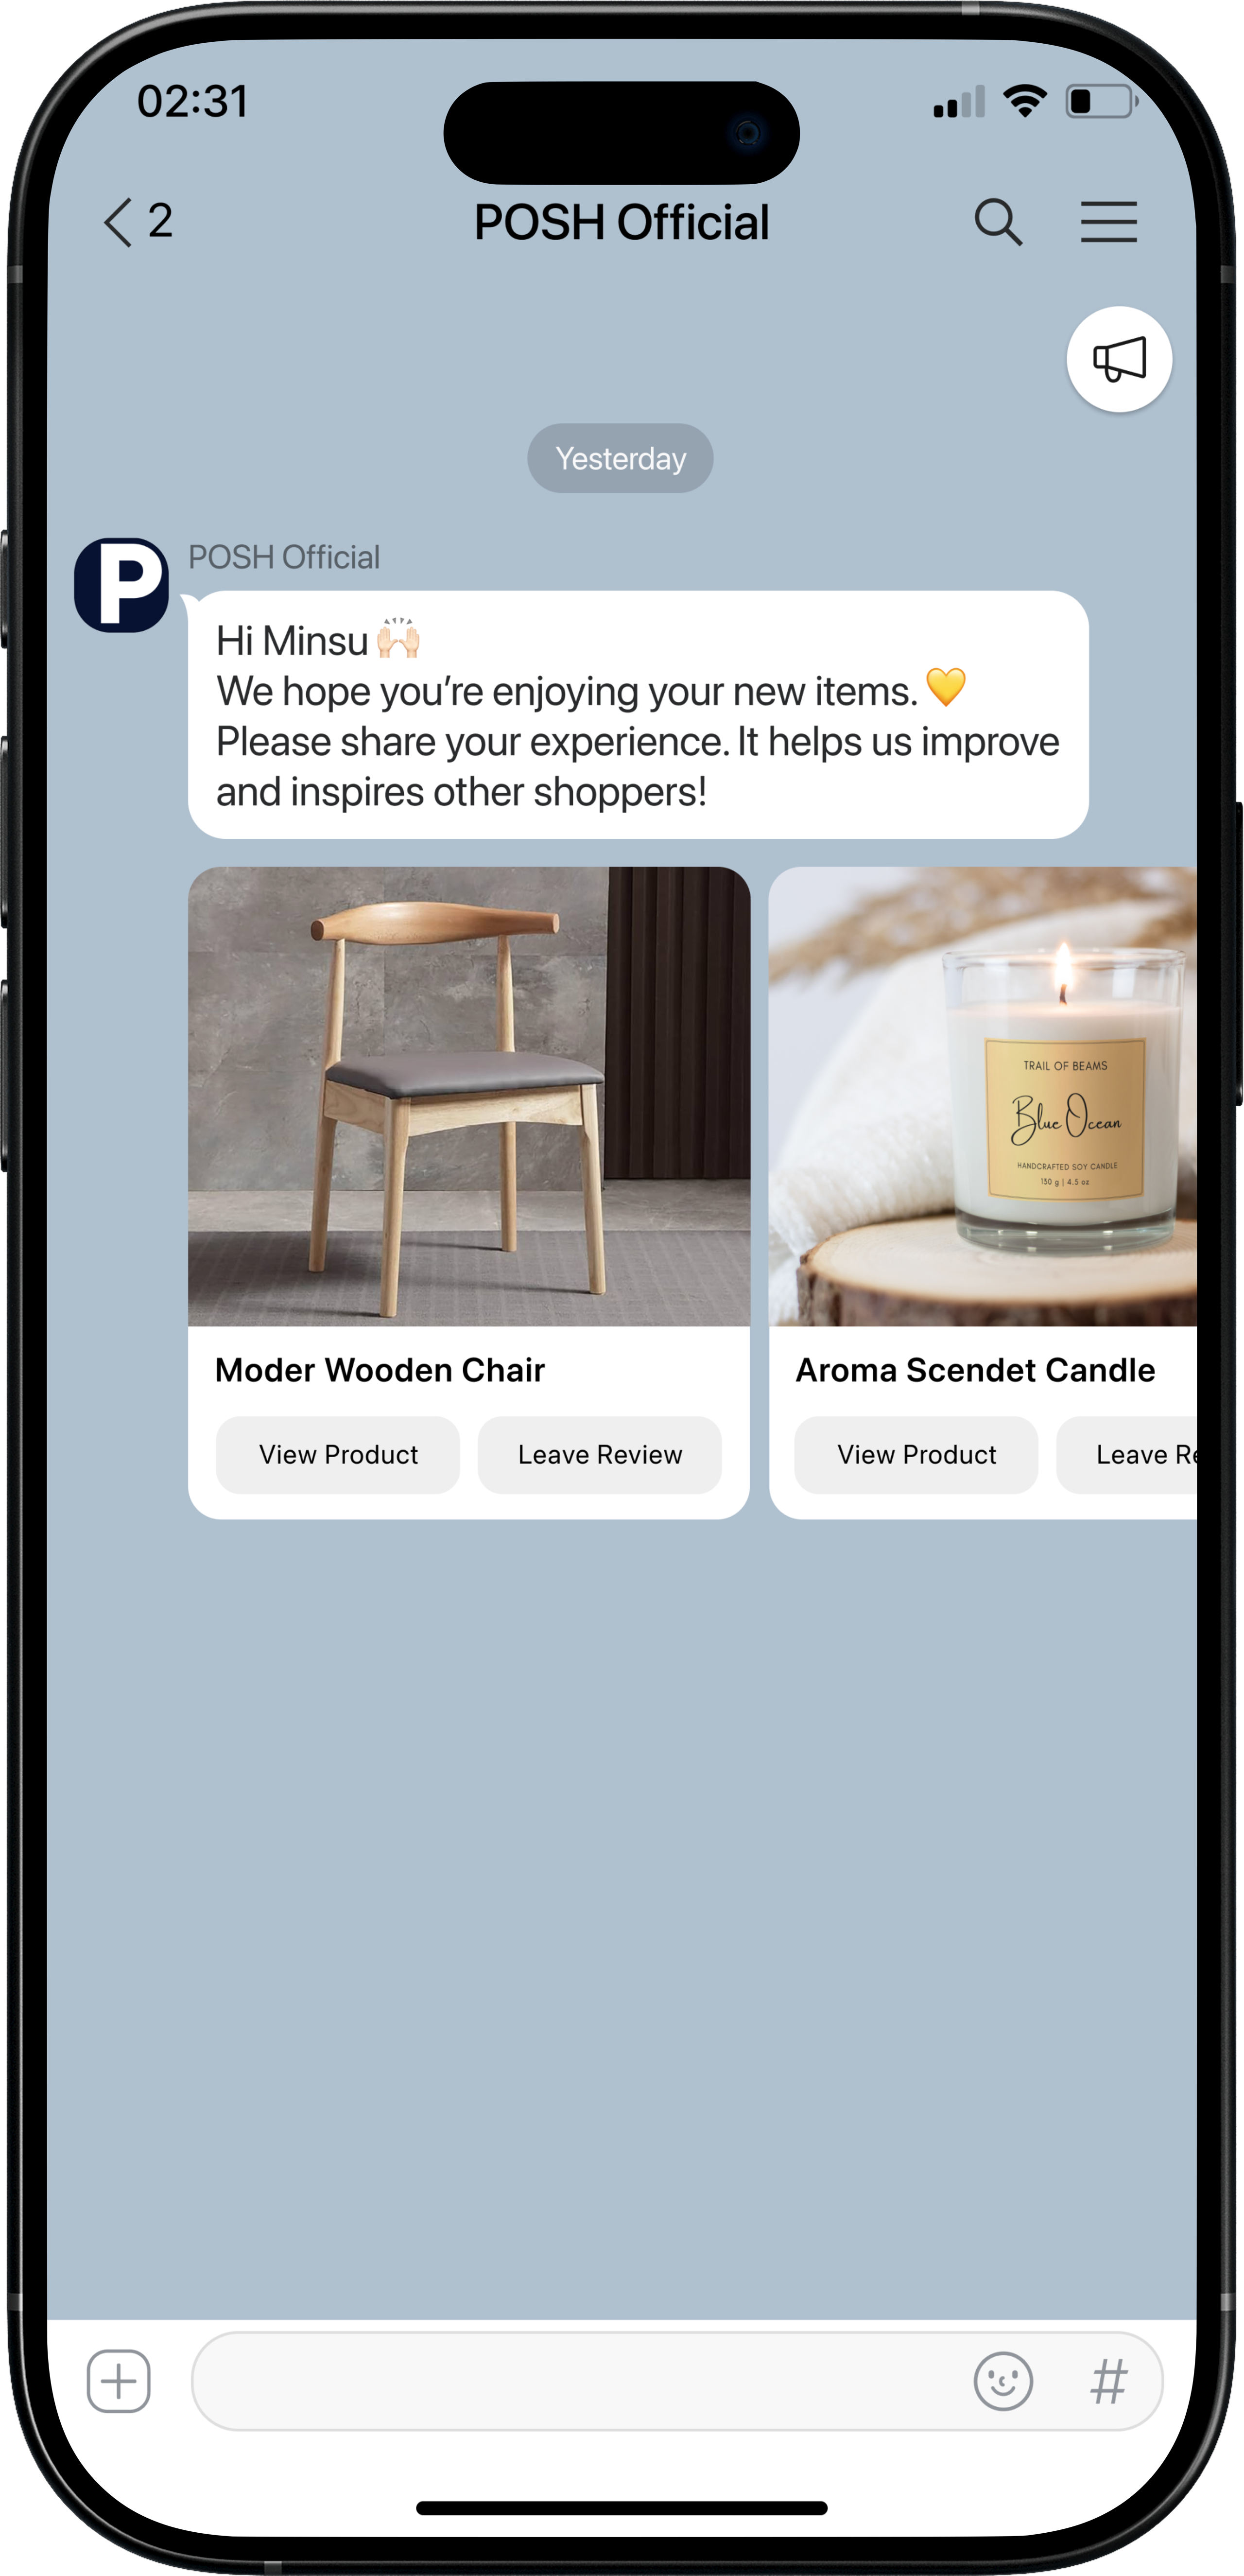
Carousel message – Purchased items (Asking for reviews)
{
  "receiver_uuids": ["{{kakao_user_id}}"],
  "template_object": {
    "object_type": "list",
    "header_title": "Hi {{user_name}} 👋🏻",
    "header_description": "We hope you're enjoying your new items. 💛 Please share your experience!",
    "contents": [
      {
        "title": "{{purchased_item1.name}}",
        "image_url": "{{purchased_item1.image}}",
        "buttons": [
          {
            "title": "View Product",
            "link": { "web_url": "{{purchased_item1.url}}" }
          },
          {
            "title": "Leave Review",
            "link": { "web_url": "{{purchased_item1.review_url}}" }
          }
        ]
      },
      {
        "title": "{{purchased_item2.name}}",
        "image_url": "{{purchased_item2.image}}",
        "buttons": [
          {
            "title": "View Product",
            "link": { "web_url": "{{purchased_item2.url}}" }
          },
          {
            "title": "Leave Review",
            "link": { "web_url": "{{purchased_item2.review_url}}" }
          }
        ]
      }
    ]
  }
}
Use cases: Encourage users to leave reviews for their recently purchased items, increasing engagement and social proof.
Important tips for sending Kakaotalk messages
Validate your requests: Read the Kakaotalk Alimtalk API documentation thoroughly to ensure you are sending valid requests to the correct endpoint with the correct headers and access token. Refer to Kakao Business.
Mind rate limits: Check the rate limits enforced by Kakaotalk if applicable. If you are sending messages directly via the Kakaotalk Alimtalk endpoint, configure throttling in Architect under API Preferences for this endpoint.
Use the dynamic content builder: The dynamic content syntax in this document is a placeholder. Always use the Add Dynamic Content button in Architect to insert attributes or event variables.
Send performance metrics back to Architect: You can send delivery or engagement data to Insider’s statistics endpoint for reporting. This requires a middleware service, which can be implemented by your tech team or with support from Insider.
Use cases by verticals - Powered by personalization through Call an API
Financial services use case 1: Personalized investment offers
Goal: Suggest tailored investment opportunities to users based on their profile or preferences.
Step 1: Fetch user-specific investment recommendations
Let’s say you have an internal API that returns the recommended investment opportunities for a user based on their profile.
This is the sample response for your API as provided to you by your tech team:
{
"recommended_investments": [
{"name": "Green Energy Fund", "risk_level": "Moderate", "link": "https://example.com/investments/green-energy"}
]
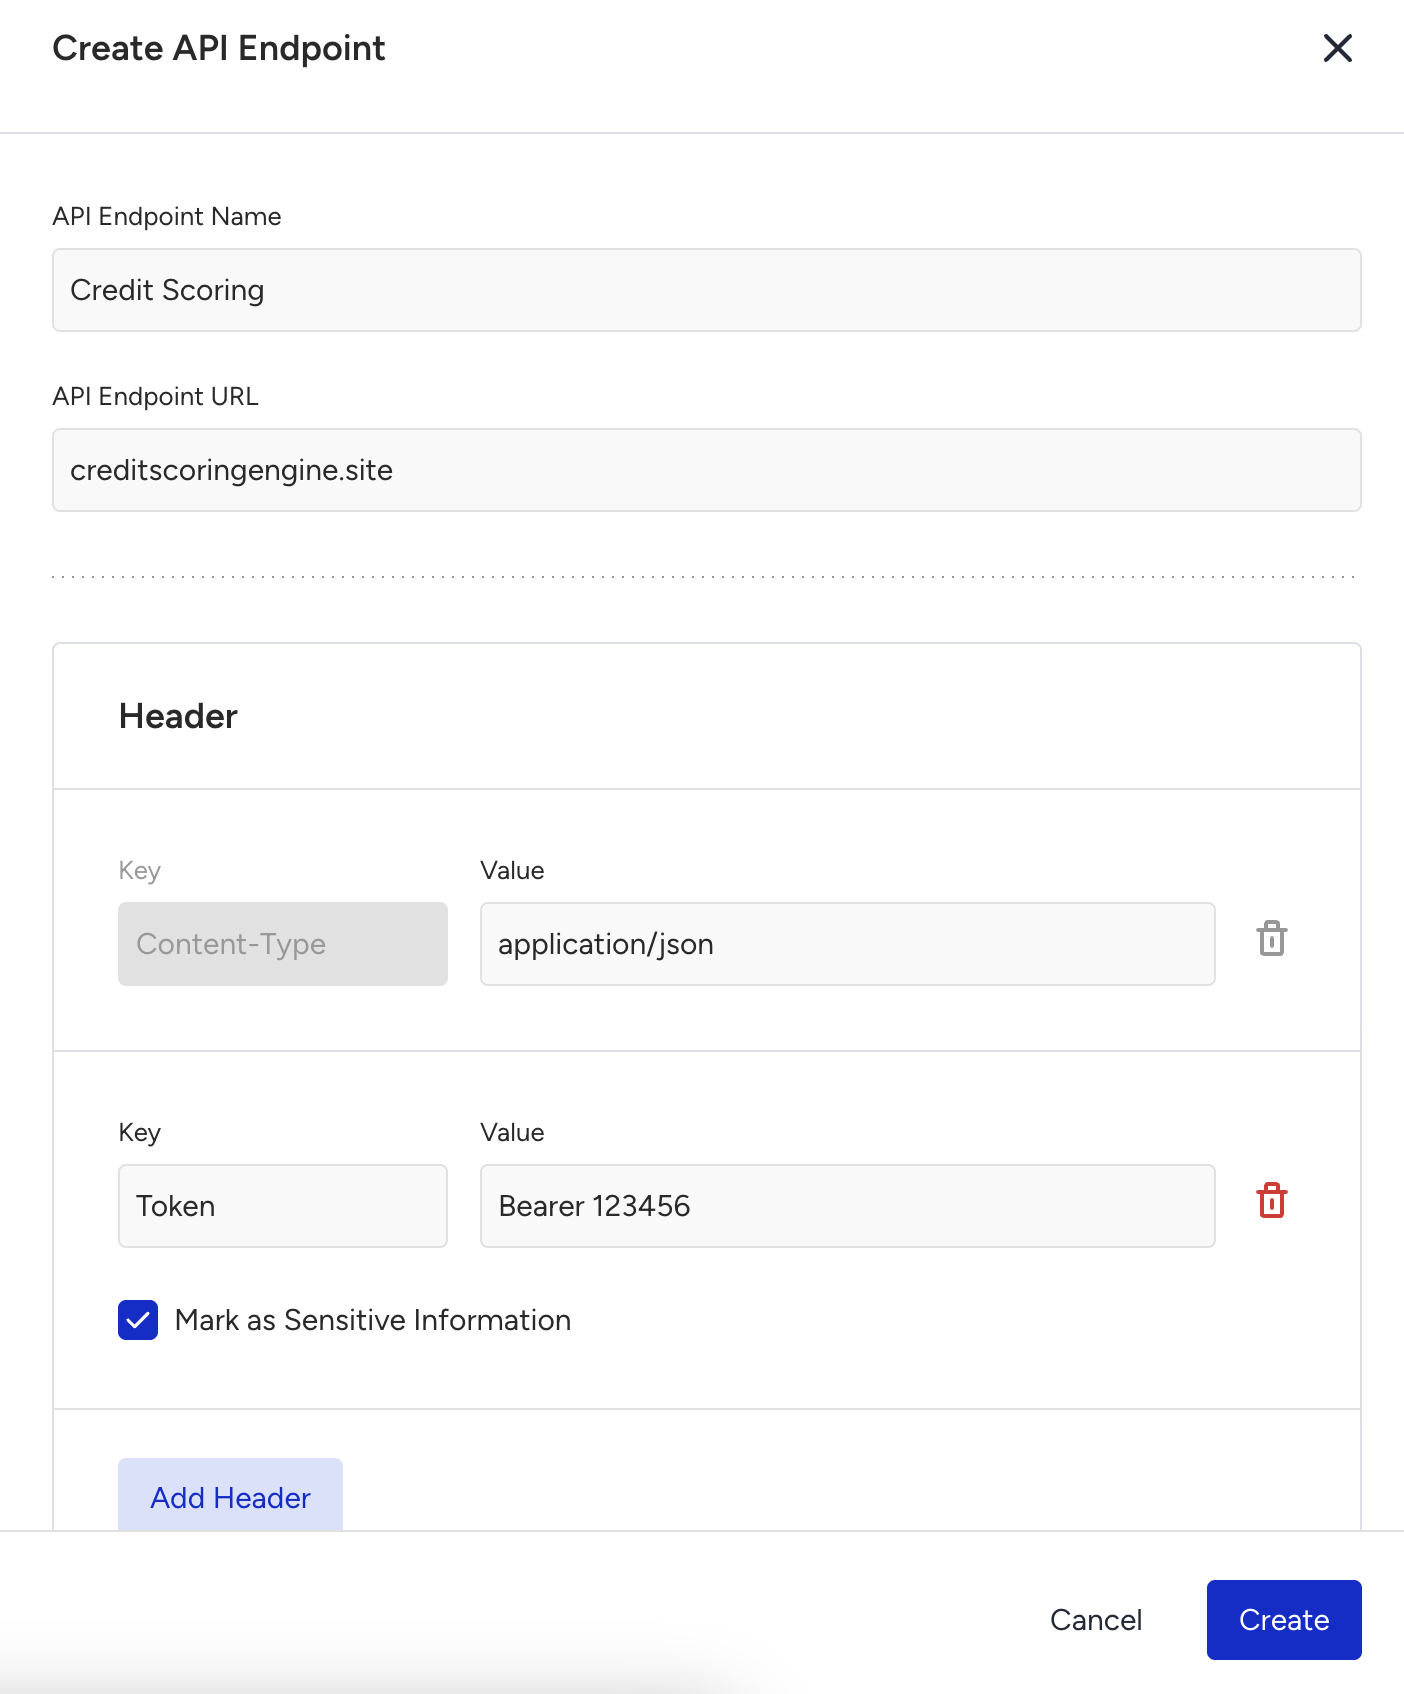
}Enter the information for that API from API Preferences under Architect Settings.
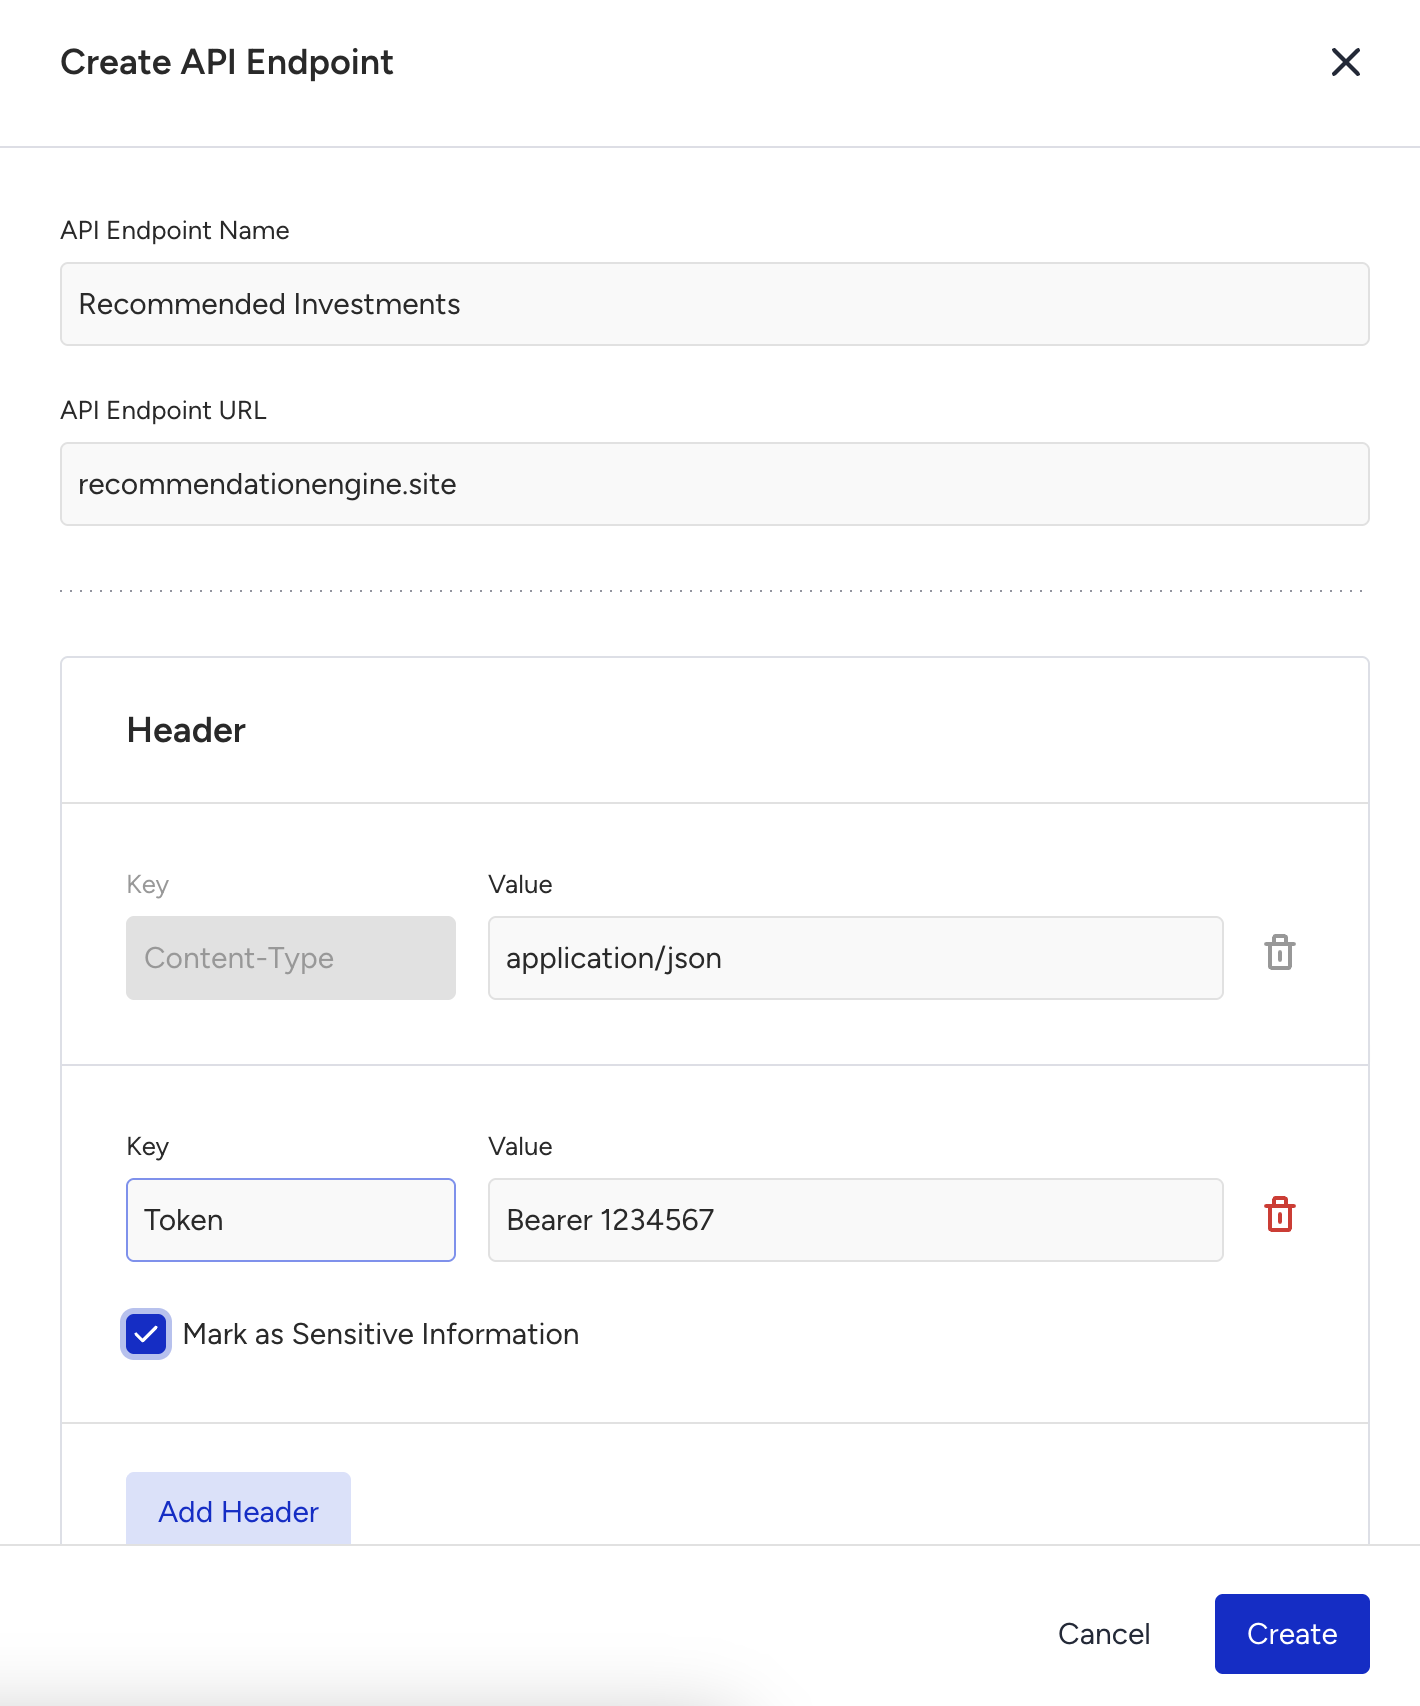
Add a Call an API element at the start of the journey to call your recommendation engine
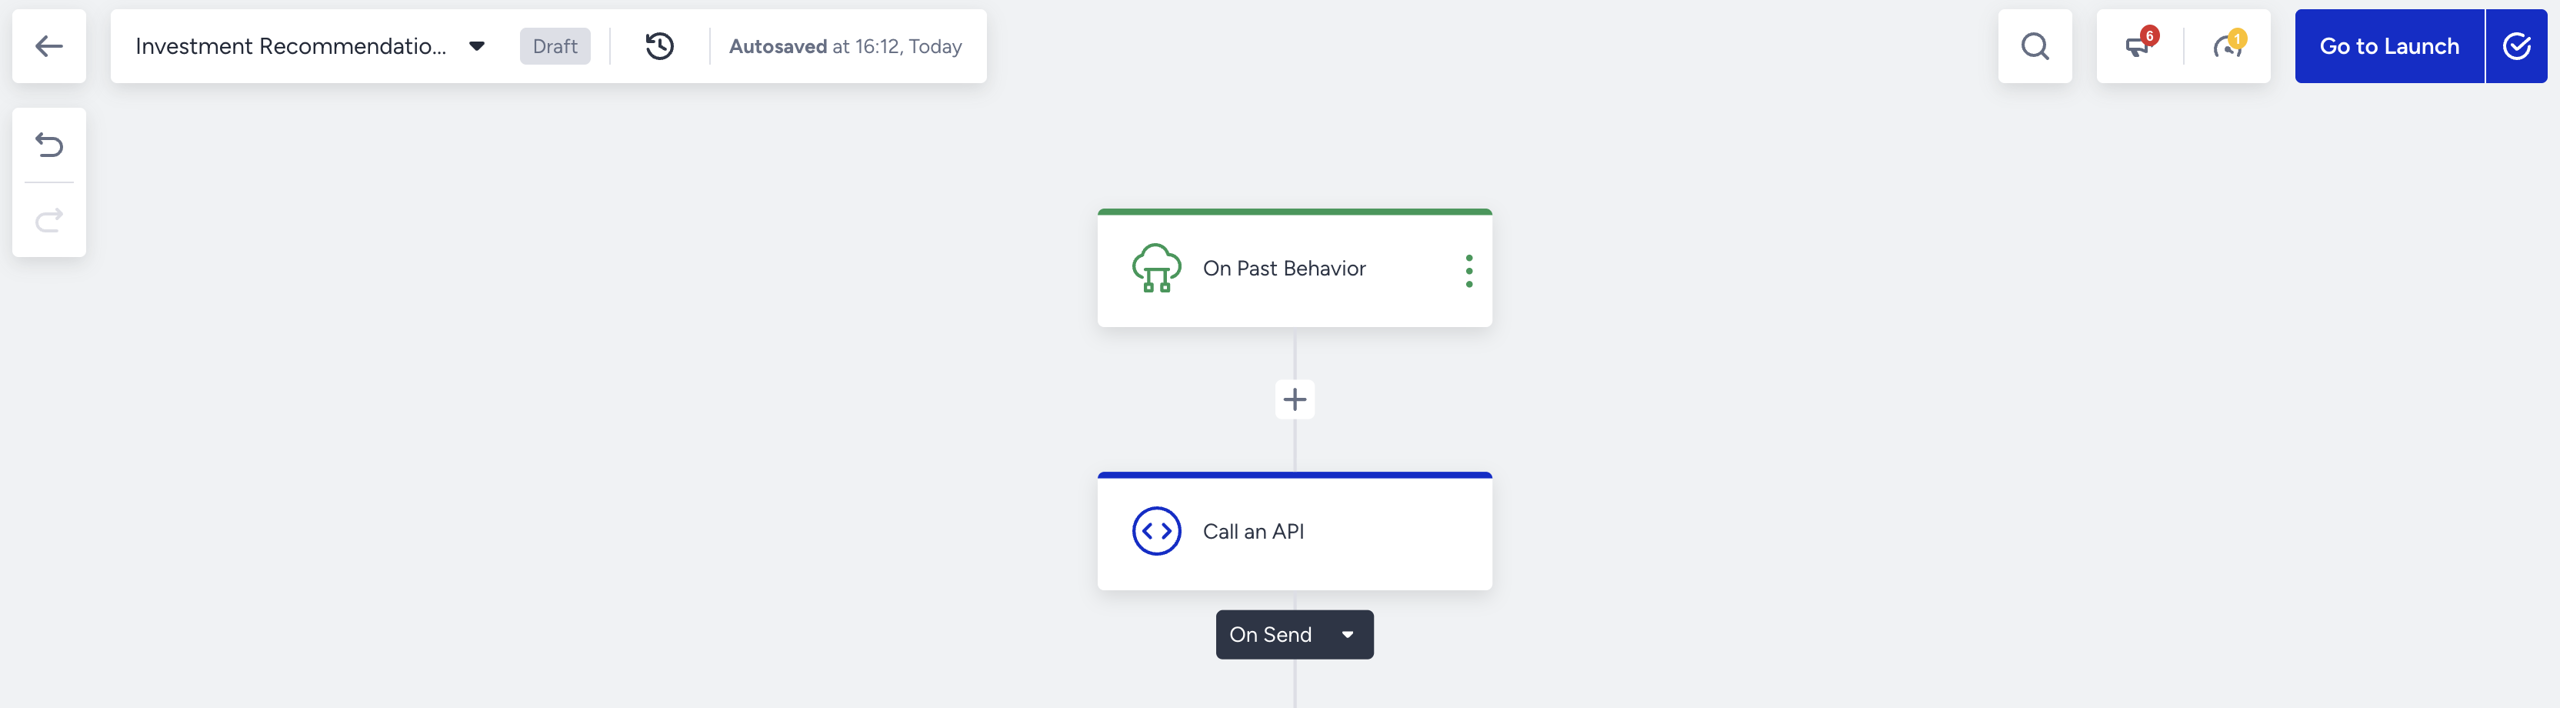
Enter the Call an API element and choose the Recommended Investments endpoint
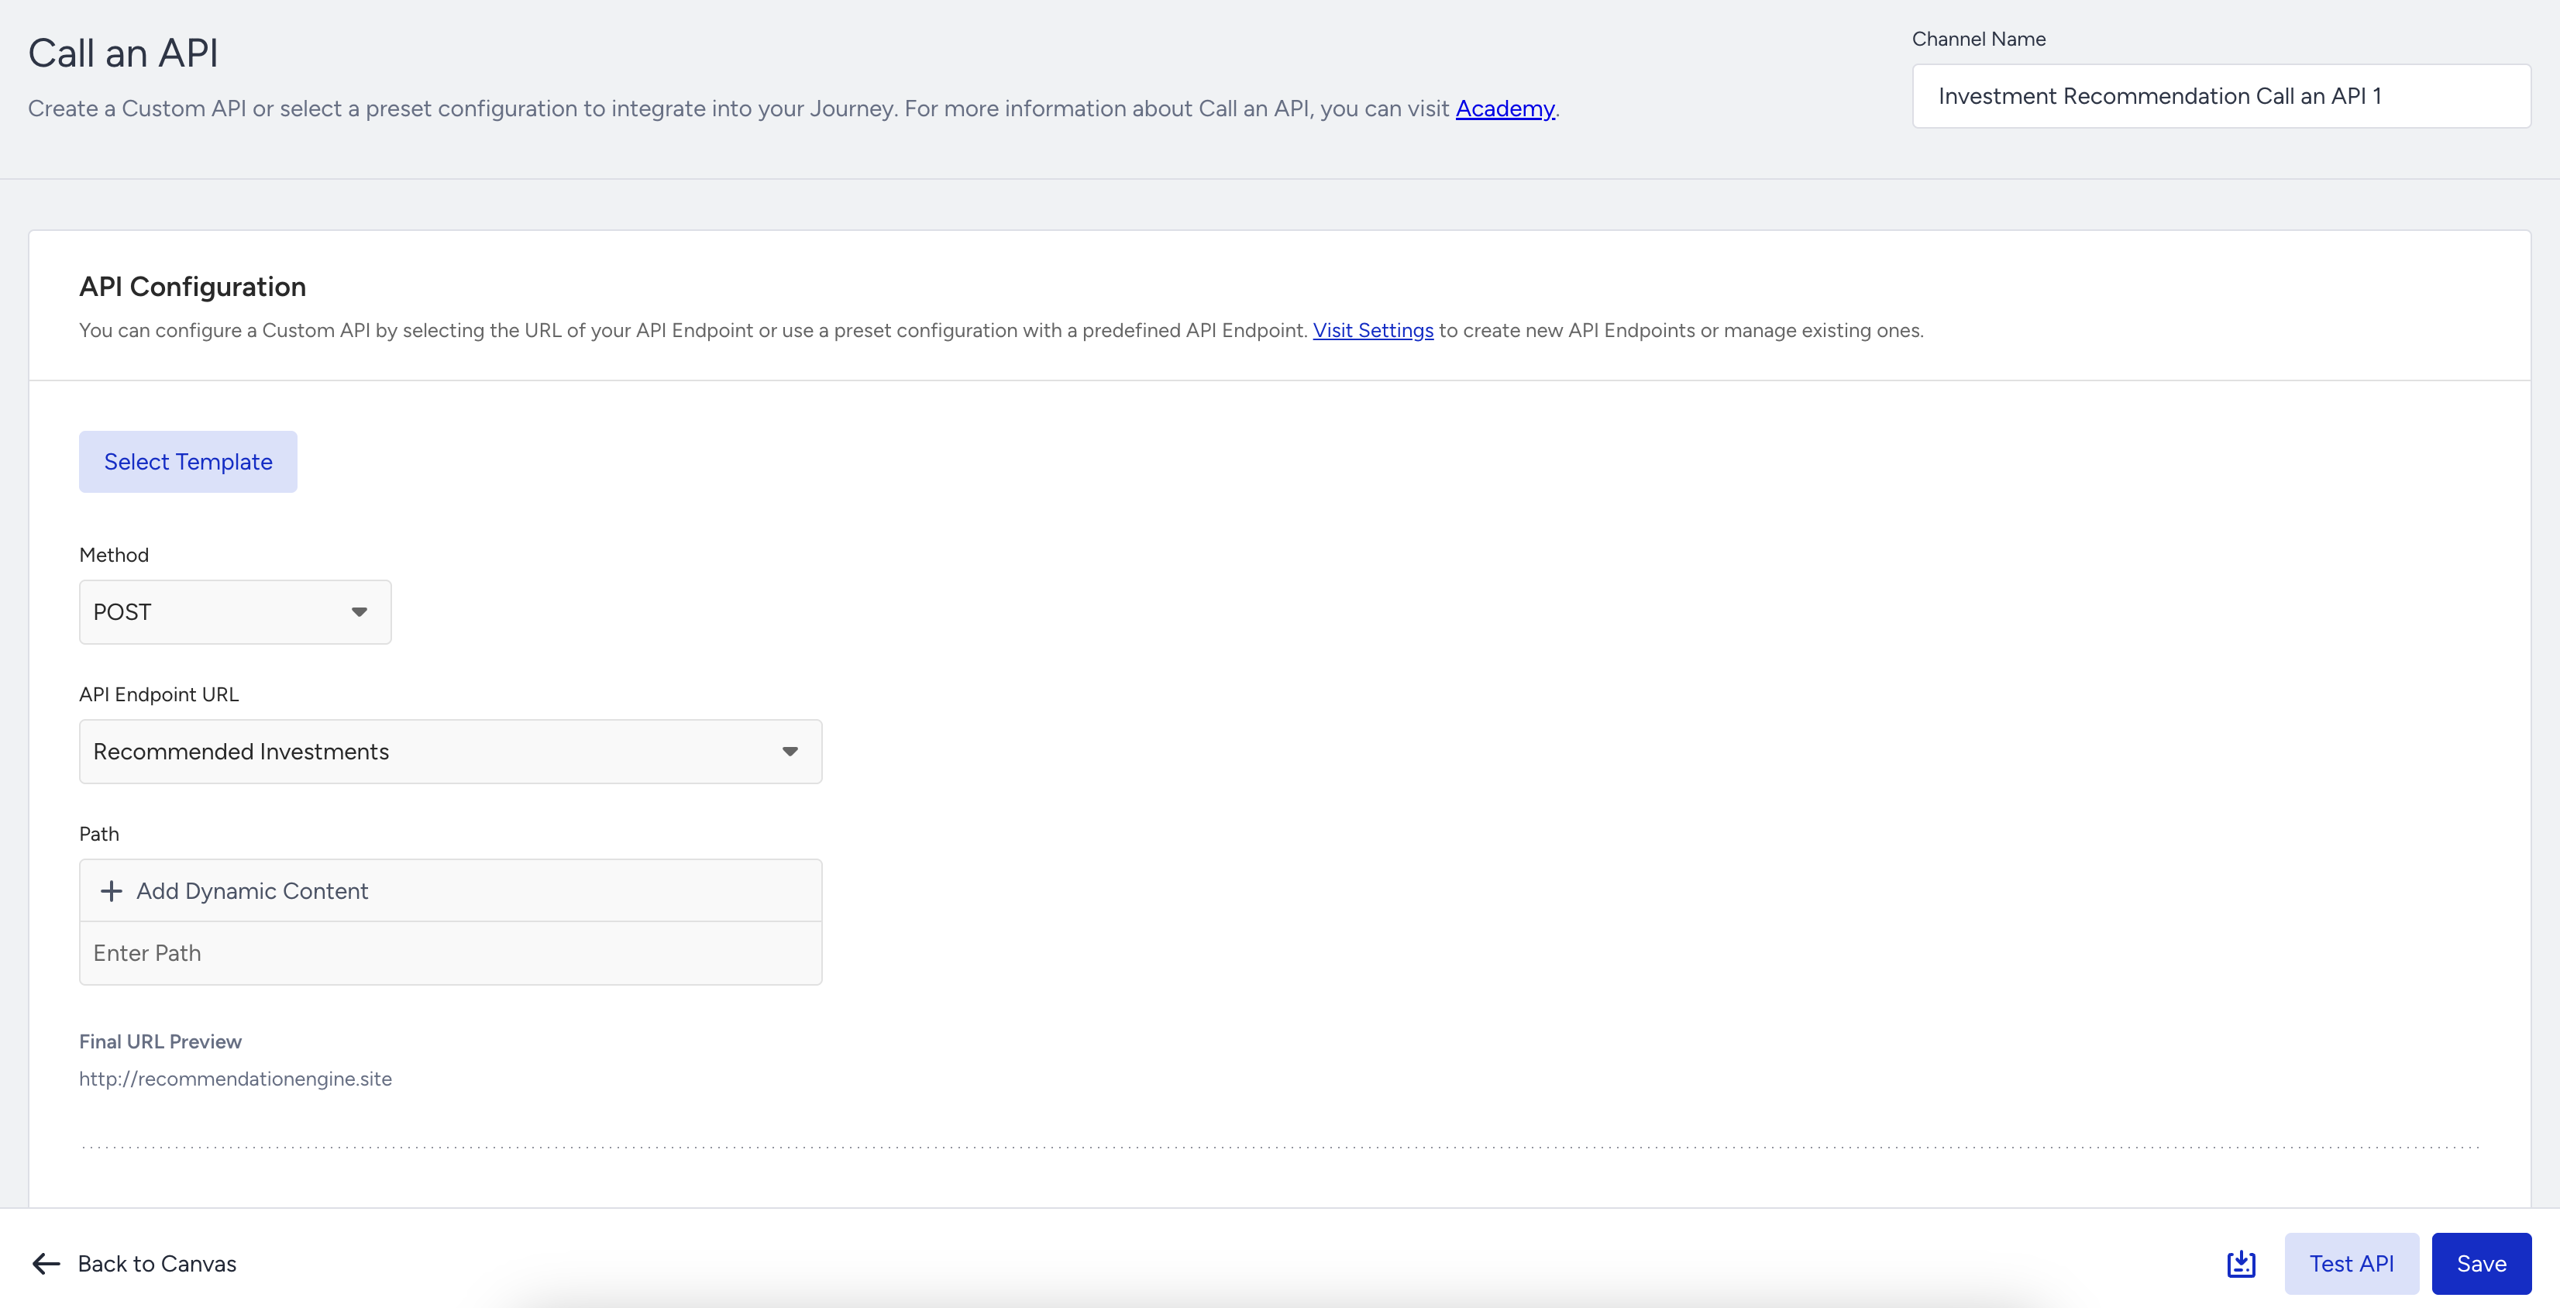
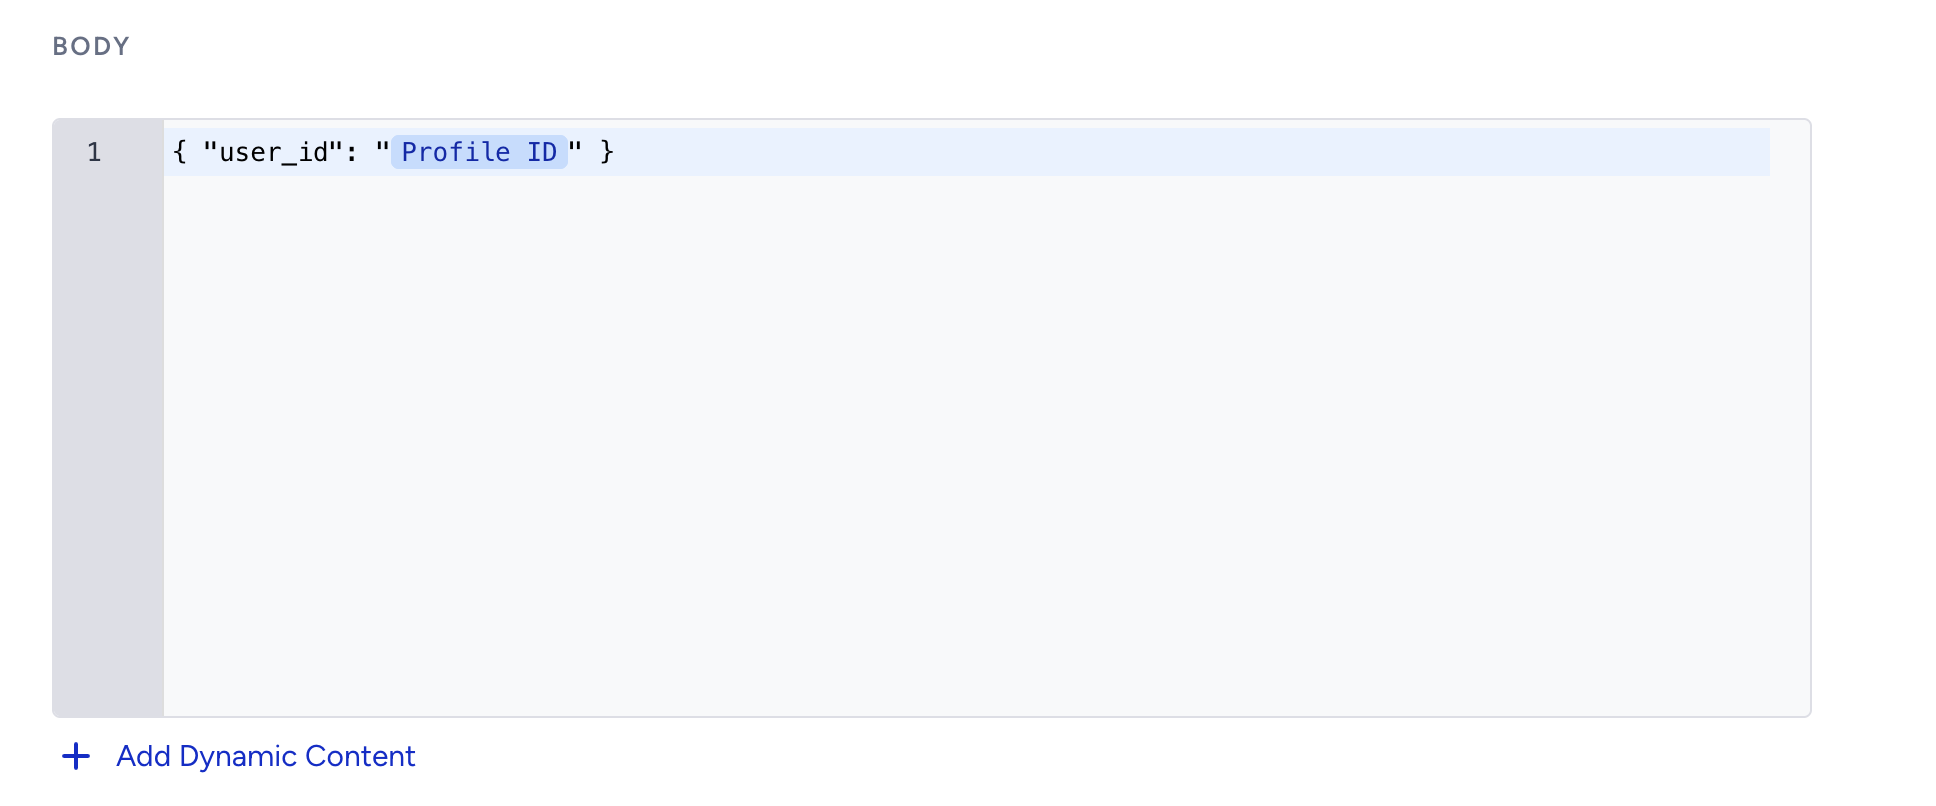
Send the profile ID within the body section (in your payload) so that the recommendation engine can return the investment opportunities for that user.
Check the Enable Call an API Response checkbox. Then map your response variables to see them in further steps in your journey. You will use these names for dynamic content and for branch conditions.
You need to reference their location in the response payload. For the example response payload above, your variables would map like this:
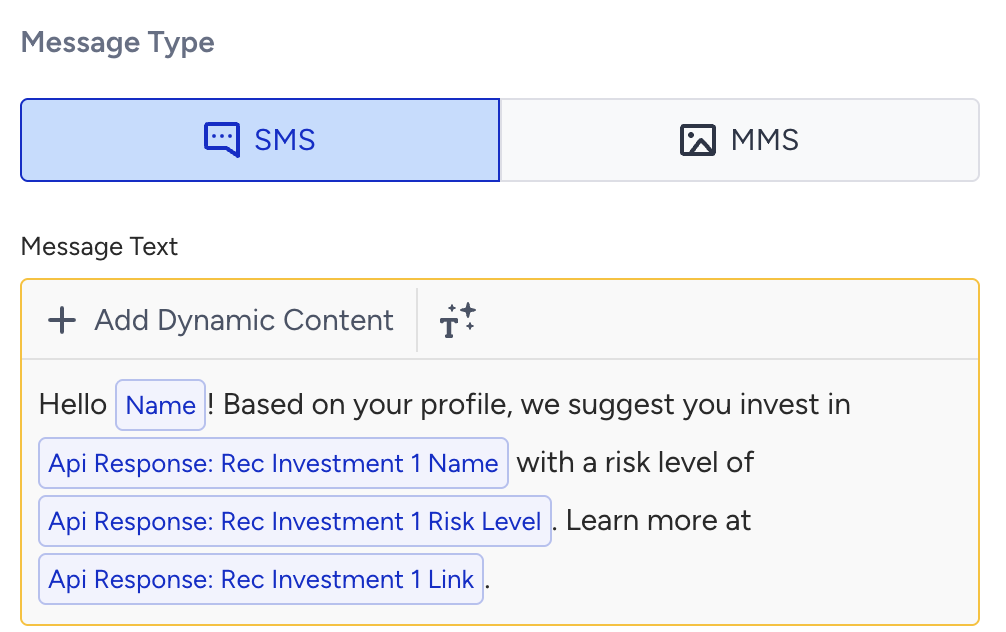
Recommended Investment 1 Name → {{recommended_investments.0.name}}
Recommended Investment 1 Risk Level → {{recommended_investments.0.risk_level}}
Recommended Investment 1 Link → {{recommended_investments.0.link}}

Step 2: Use response variables in journey
Add a message element to send your message. For this example, let’s add the SMS element.
Financial services use case 2: Credit score–based promotional journey
Goal: Deliver personalized promotional messages based on a user’s credit score, using Call an API response variables to orchestrate the journey.
Step 1: Fetch user credit score
Let’s say you have an internal API that returns a user's credit score and segment.
Sample response for your API:
{
  "credit_score": 720
}
Enter the information for that API from API Preferences under Architect Settings.
Add a Call an API element at the start of the journey to call your credit scoring service.
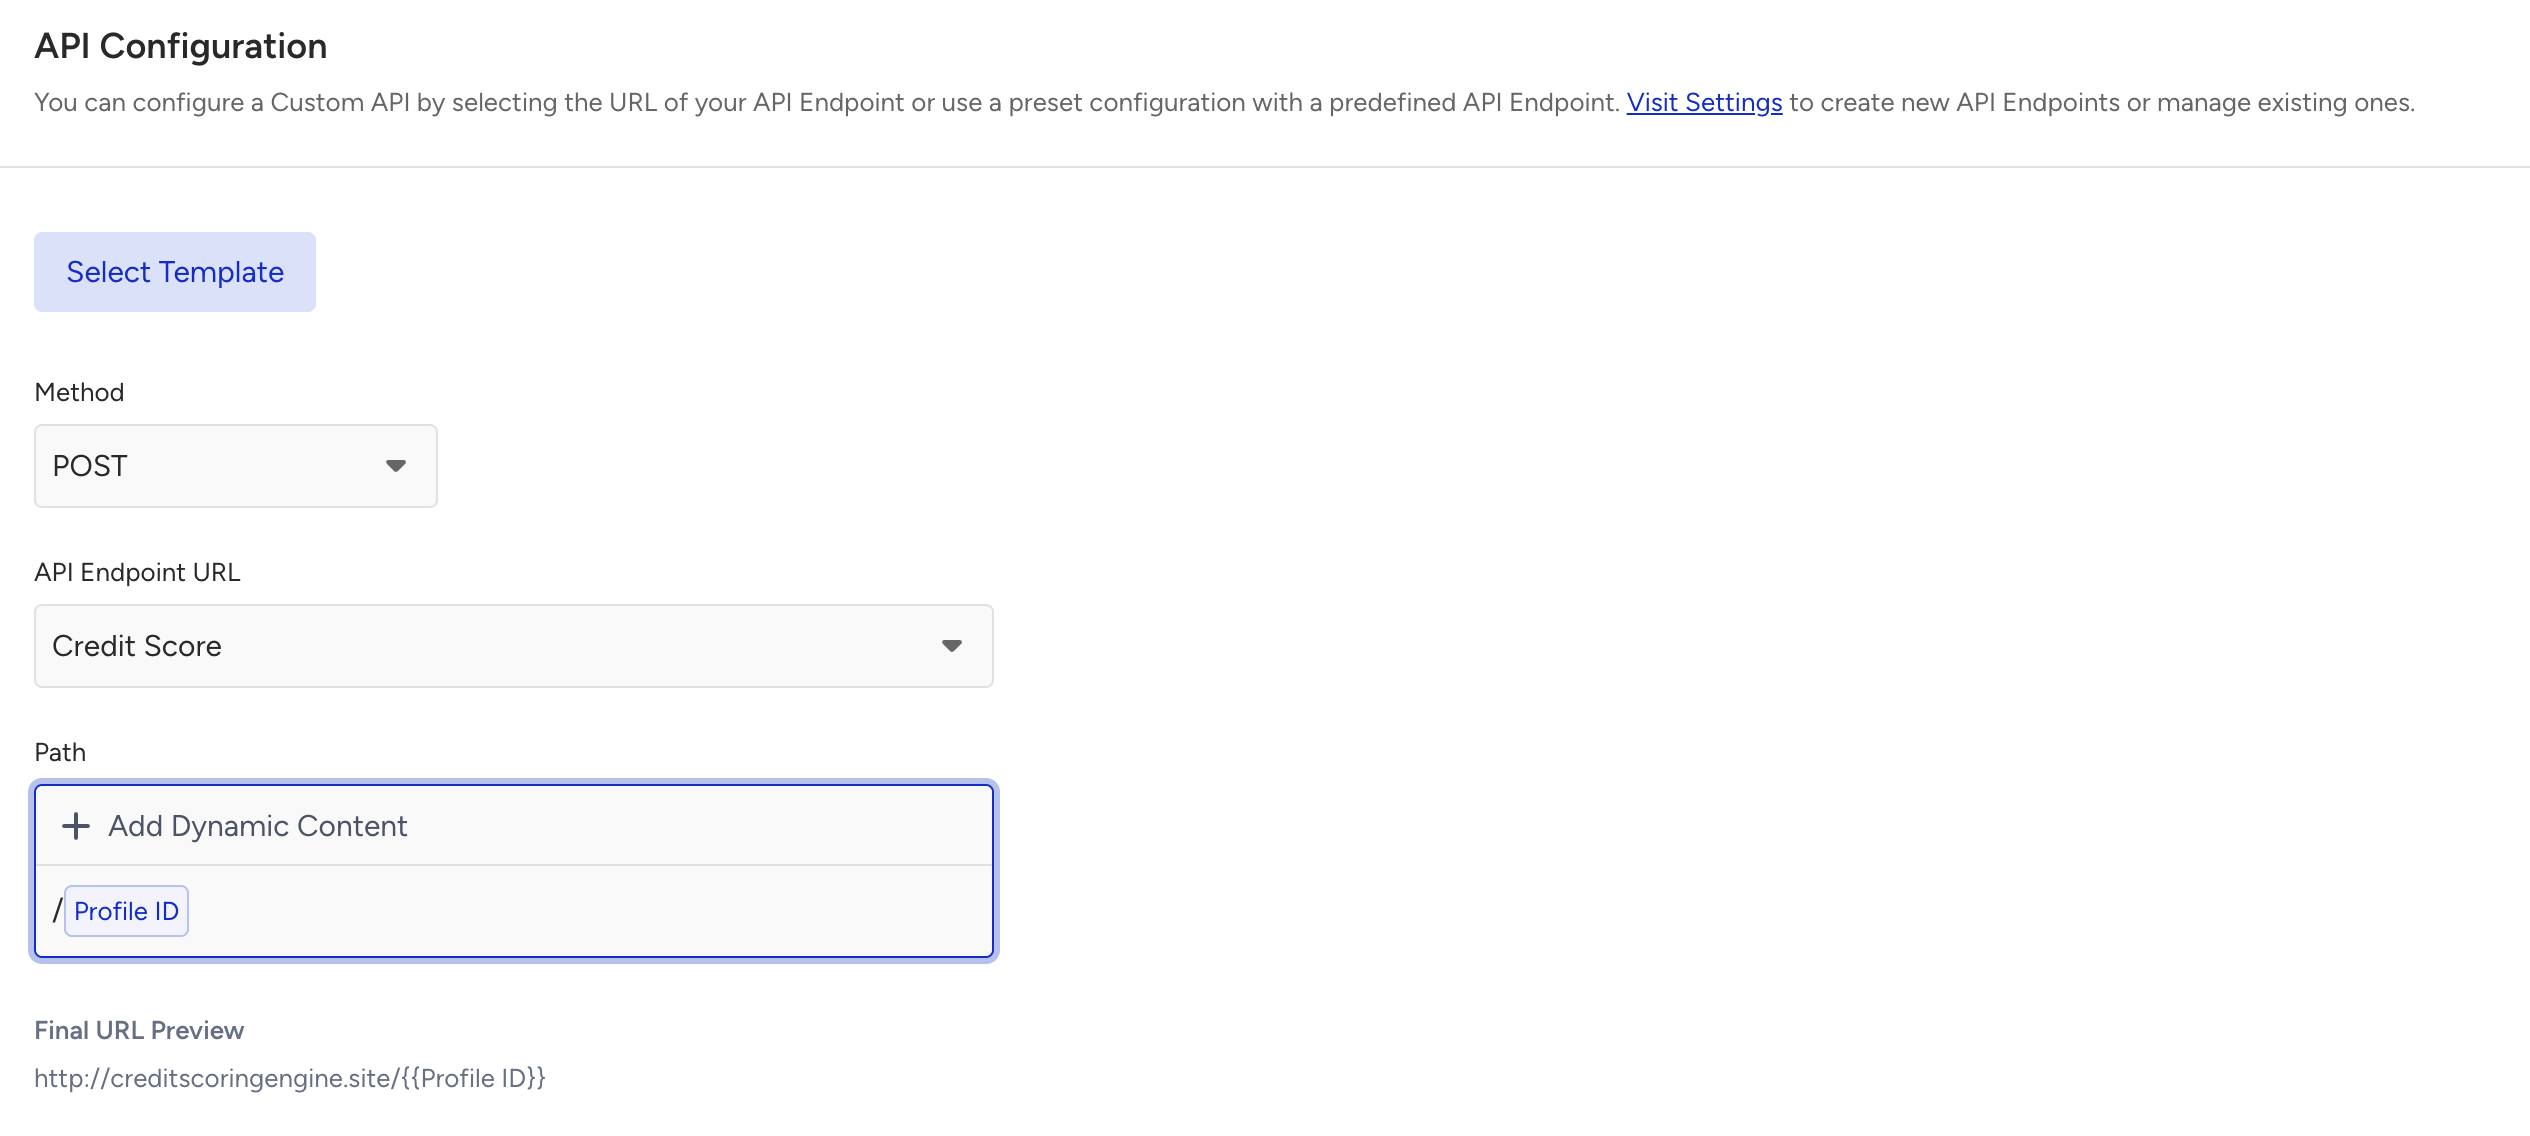
Enter the Call an API element and choose the Credit Score endpoint. Some endpoints might require you to send any parameter through the path. If your endpoints requires so, you can also add profile ID from the dynamic content dropdown in the path field.
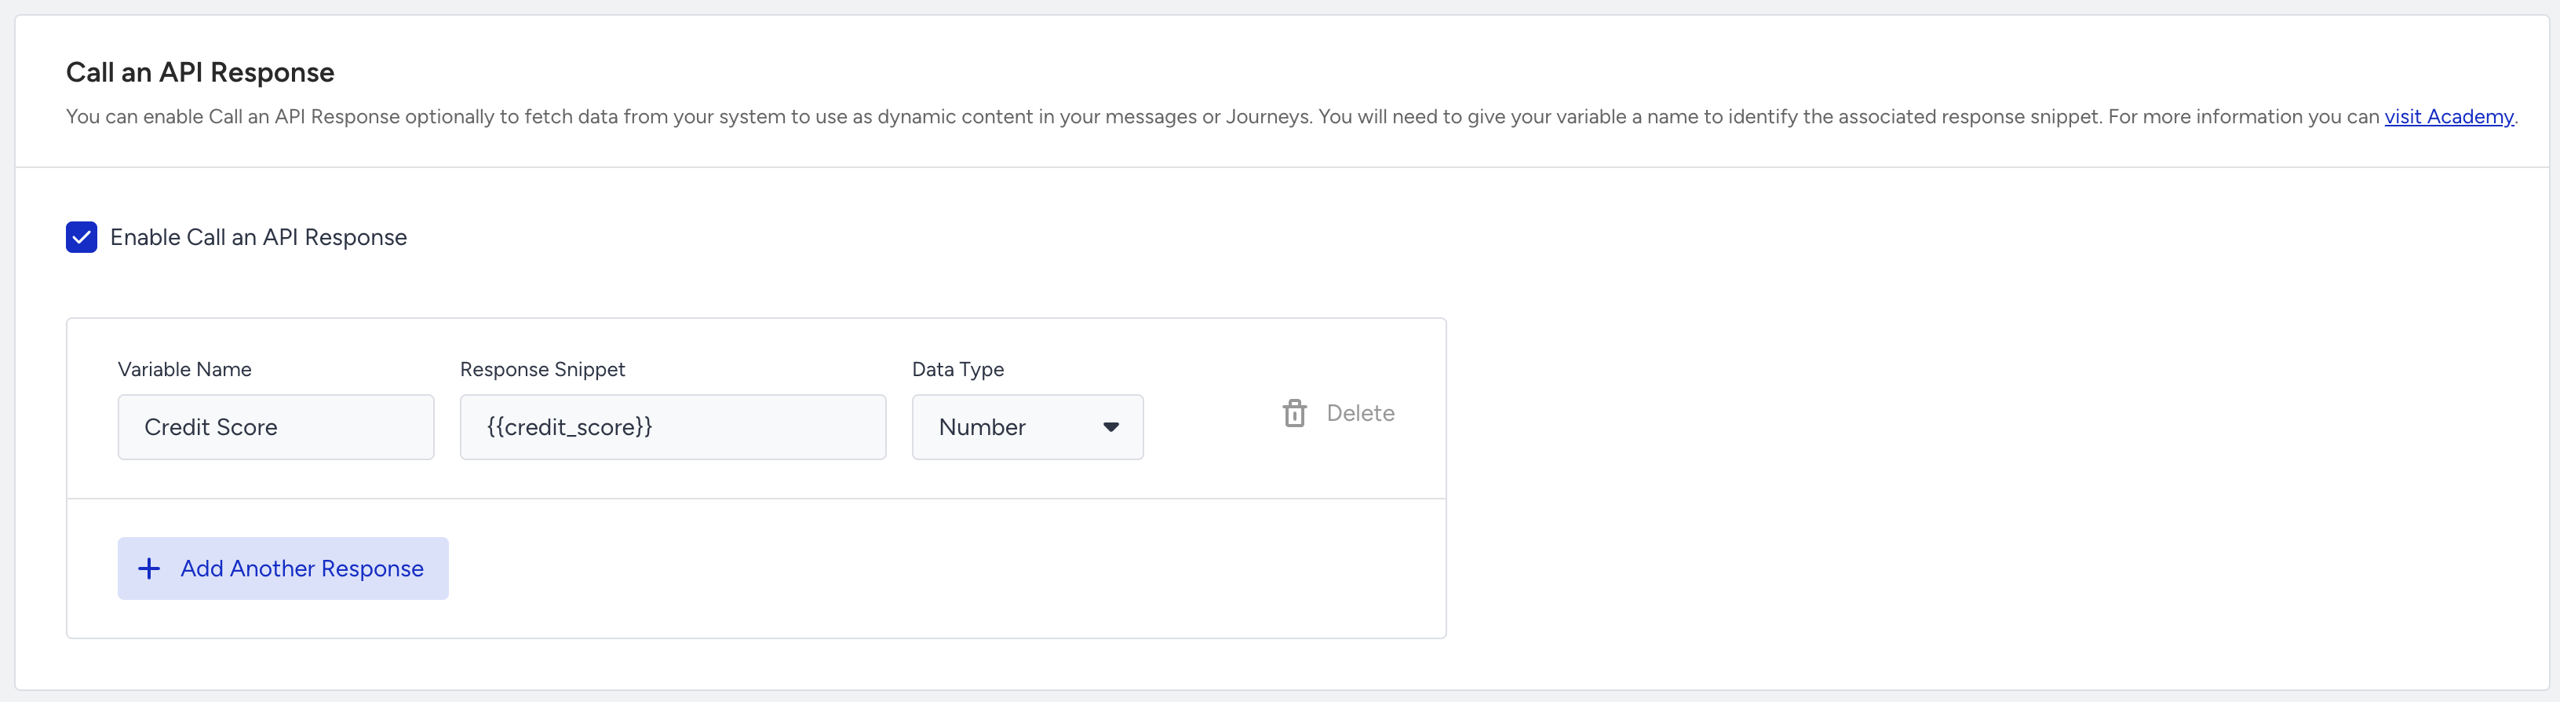
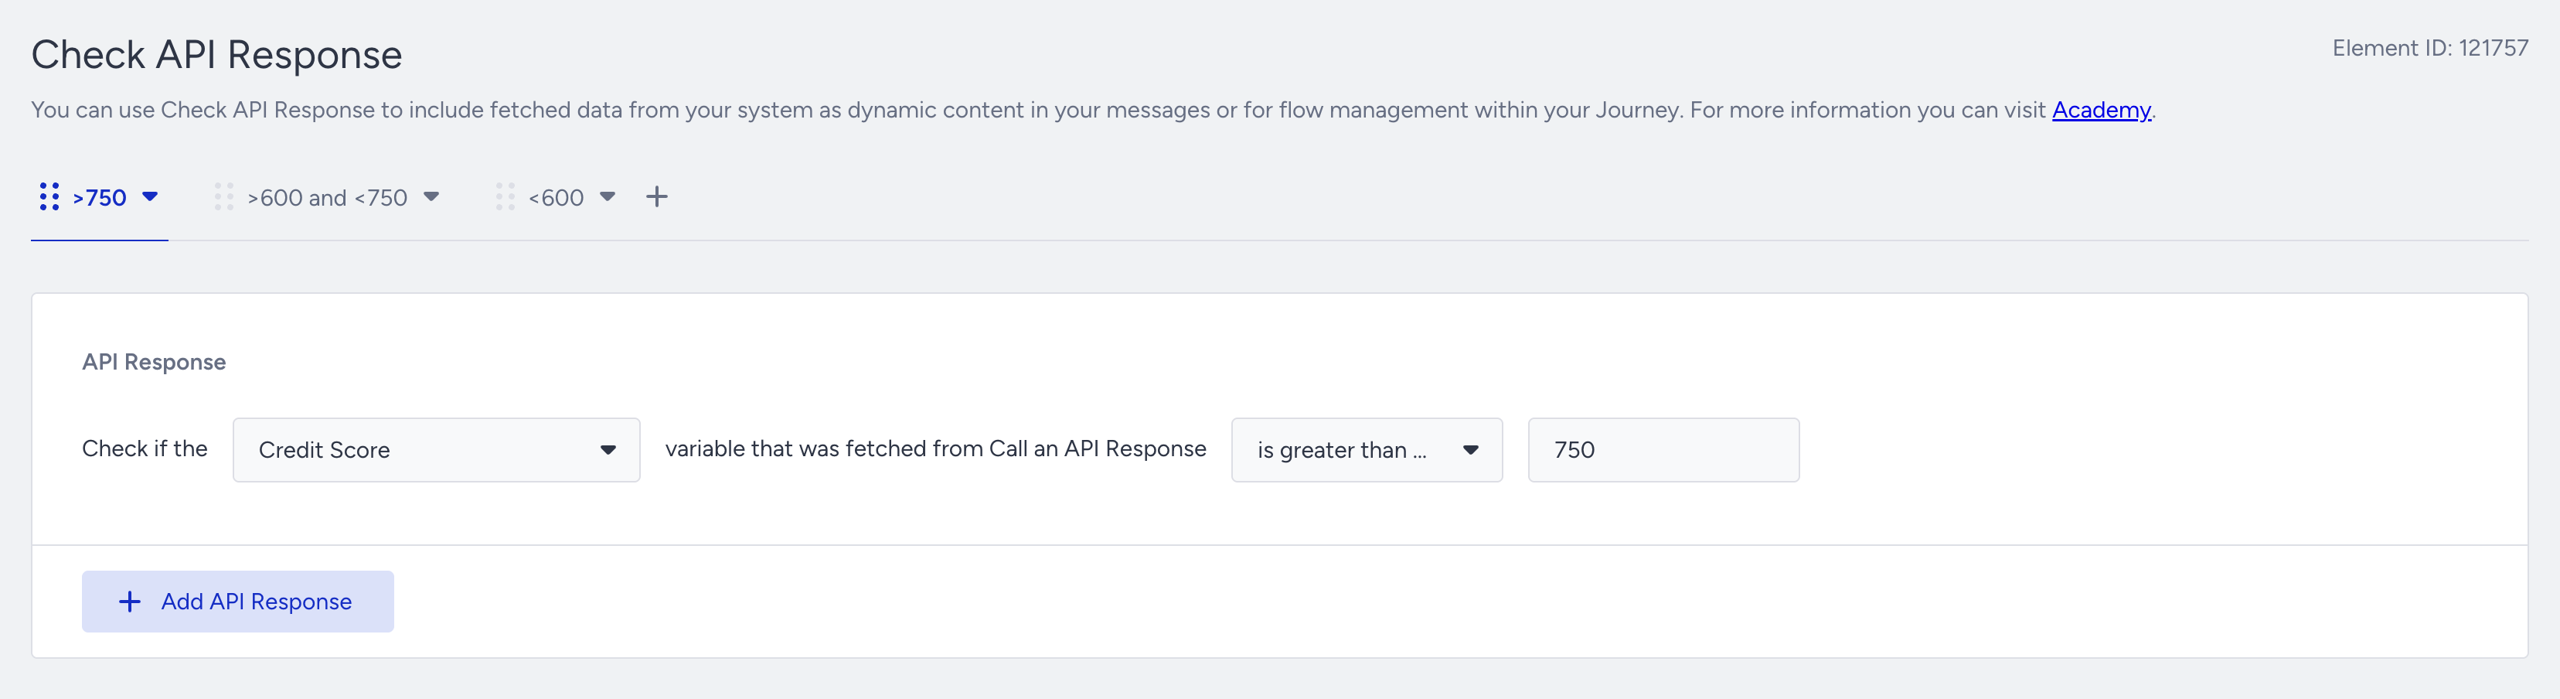
Check the Enable Call an API Response box. Map your response variables to use them as dynamic content and for journey branching. For the sample response above, map as follows:
Credit score → {{credit_score}}
Select data type as Number so that you can use the number-type operators in the Check API Response element.
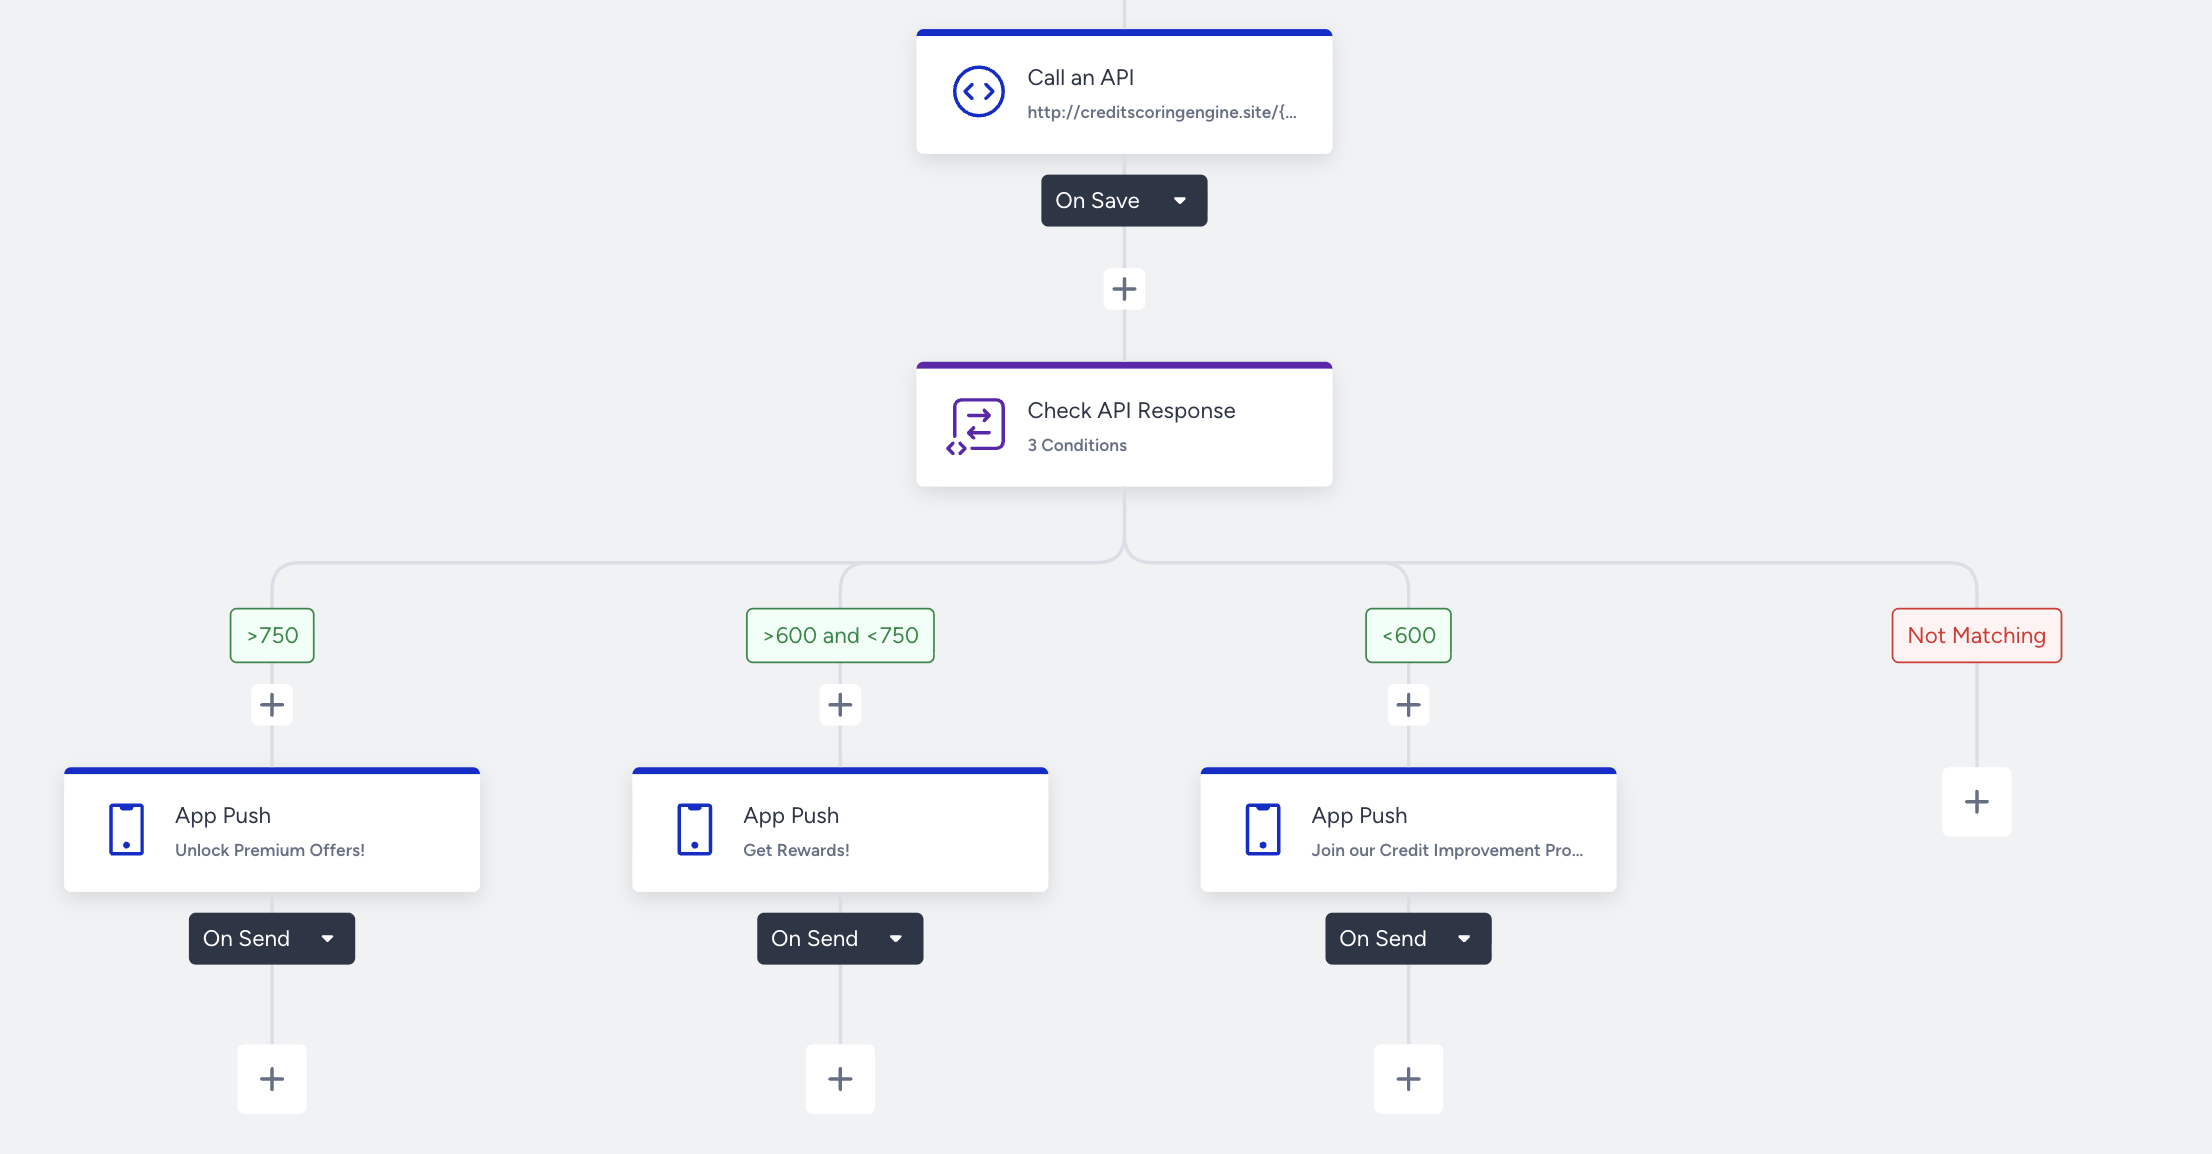
Step 2: Use response variables to branch users
Add a Check API Response element after the Call an API element to branch users based on their risk segment:
Above 750 -> High / Excellent: Send premium offers such as a premium credit card or investment opportunities.
Between 600-750 ->Moderate / Good–Fair: Send standard promotional offers or rewards campaigns.
Below 600 → Low / Poor: Send educational or engagement campaigns like credit improvement tips or financial literacy programs.
Add a message element or another Call an API if you are not using one of the native channels we offer. Under each branch, include the corresponding message for that credit score bracket.
Airlines use case 1: Dynamic fare promotions
Goal: Provide personalized, real-time fare information to passengers based on their search behavior and route.
Step 1: Fetch route-specific fare recommendations
Let’s say you have an external API that returns fare options for a passenger based on the origin and destination from their search event.
This is the sample response for your API as provided by your tech team:
{
  "origin": "IST",
  "destination": "NYC",
  "route_fares": {
    "economy_price": 850,
    "business_price": 2100
  }
}
Enter the information for that API from API Preferences under Architect Settings.
Choose On Event as your starter and Search event as the starter event. Let’s assume the Search event has origin and destination parameters that specify the origin and the destination for the route that was searched.
Add a wait element first so that you leave the user some time to see if they have purchased the route. Then add the Call an API element to call your fare engine.
Enter the Call an API element and choose the Route Fare Recommendations endpoint.
Send the origin and destination from the passenger’s search event within the body section so that the fare engine can return fares for that route. We will also send the currency of the search event so that we can receive the price for the correct currency.
Check the Enable Call an API Response box. Then map your response variables to see them in further steps in your journey. You will use these names for dynamic content and branch conditions.
You need to reference their location in the response payload. For the example response payload above, your variables would map like this:
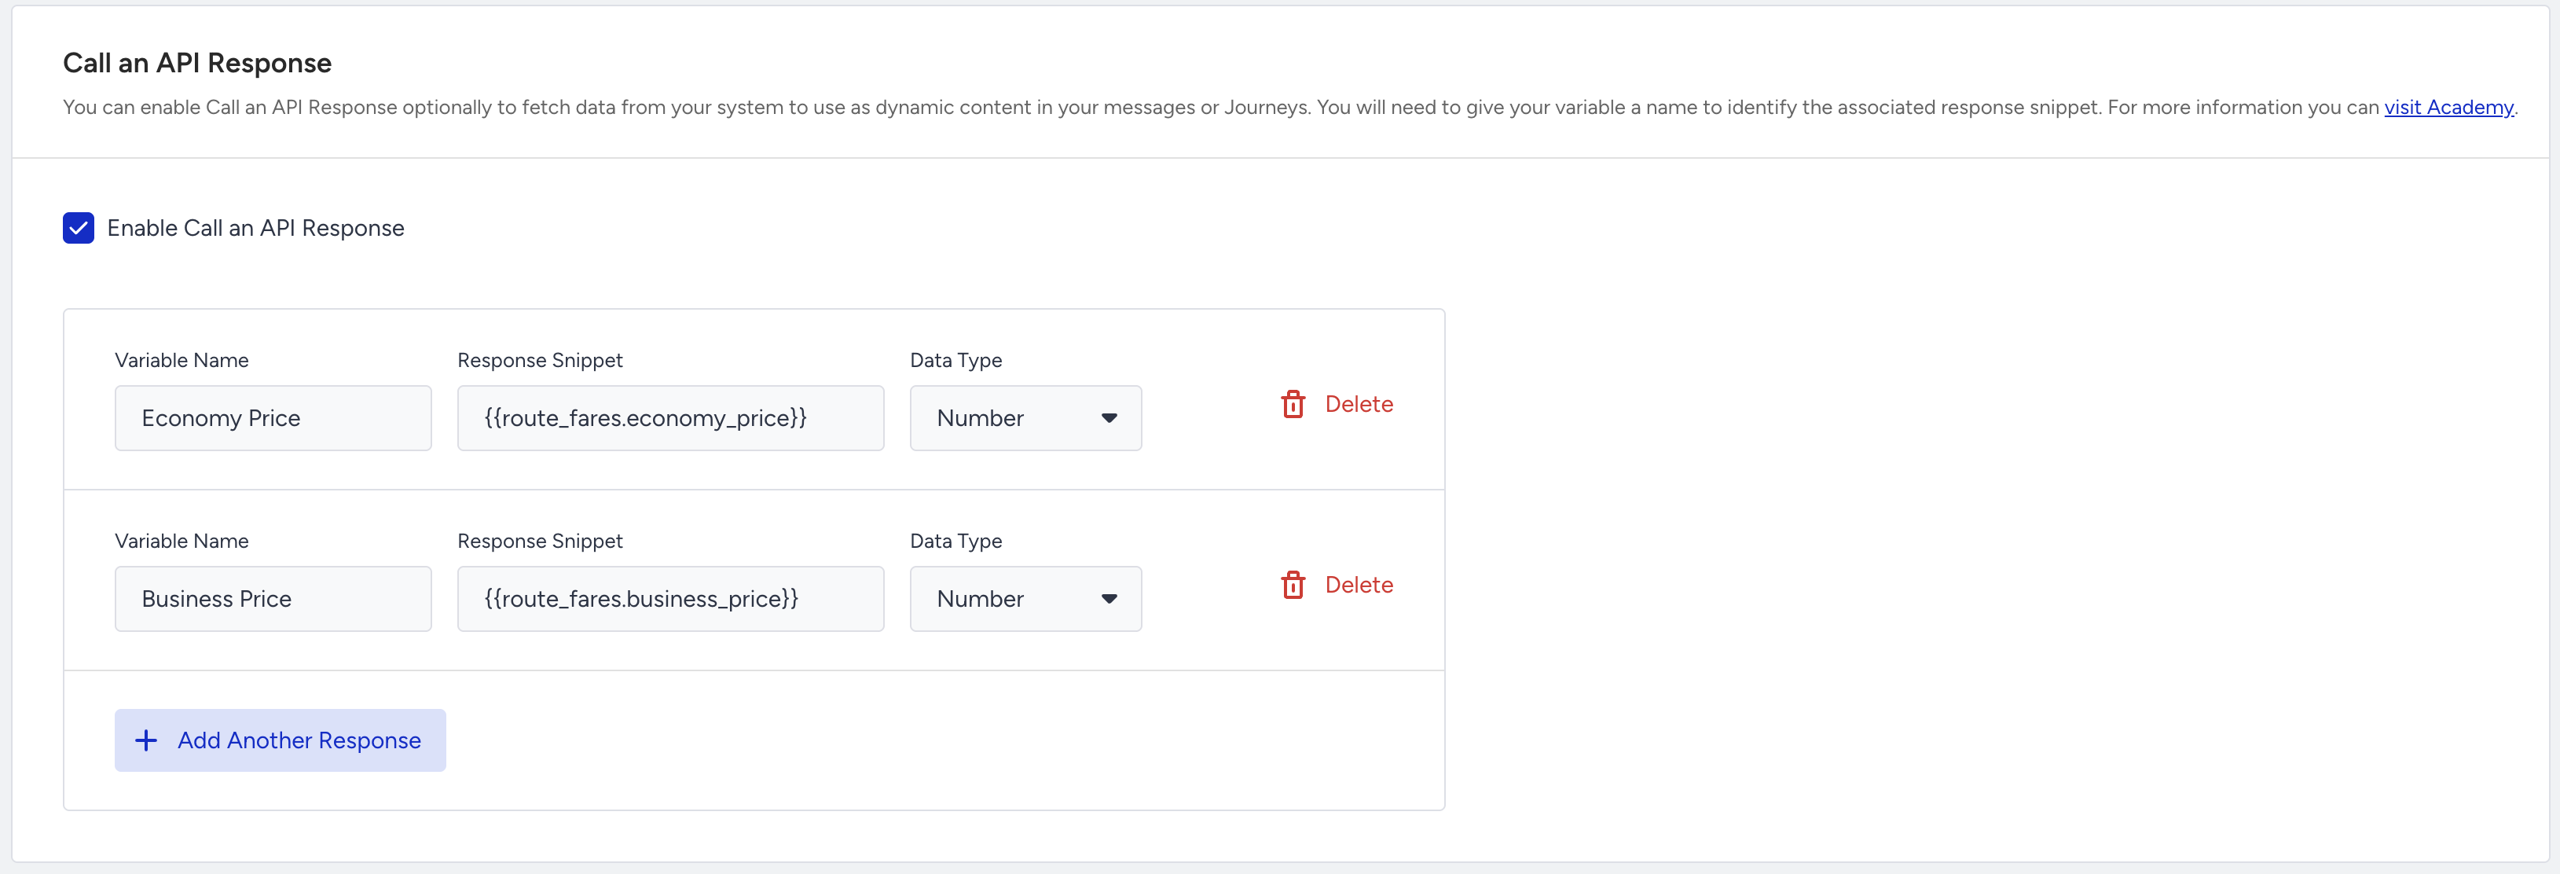
Step 2: Use response variables in journey
Add a message element to send your fare recommendation. For example, you could use an App Push and dynamically populate it with:
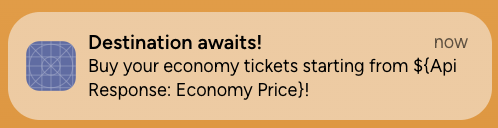
This allows you to show passengers updated and personalized fare options based on their search, without hardcoding any prices.
You can send business prices to the users who have previously purchased a business class ticket in the last 1 year. For your other users, you can send the economy price. To do that, you can put a check conditions element and create two branches beased on their purchase history.
Airlines use case 2: Flight delay lounge offer
Goal: Enhance the passenger experience during flight delays by automatically sending a time-limited airport lounge discount with a personalized QR code via MMS.
Step 1: Fetch lounge offer via API
Let’s say your system has an internal API that, when called, generates a unique lounge discount offer for a delayed passenger.
Here’s a sample response from your API as provided by your tech team:
{
  "lounge_offer": {
    "discount_percentage": 20,
    "valid_until": "2025-10-12T23:59:00Z",
    "qr_code_url": "https://example.com/qrcodes/ABC123.png",
    "lounge_name": "Sky Horizon Lounge",
    "lounge_location": "Istanbul Airport - International Terminal"
  }
}
From Architect Settings > API Preferences, add this endpoint under your Call an API configurations.
In your journey, choose the On Event starter end select the starter event as a Flight Delay Event.
Then, add a Call an API element that calls your Lounge Offer API.
In the Body section (payload), send the data required to generate the lounge offer for the passenger. For example, you can send airport_name, user_id and phone_number.
Enable Call an API Response and map your response variables:
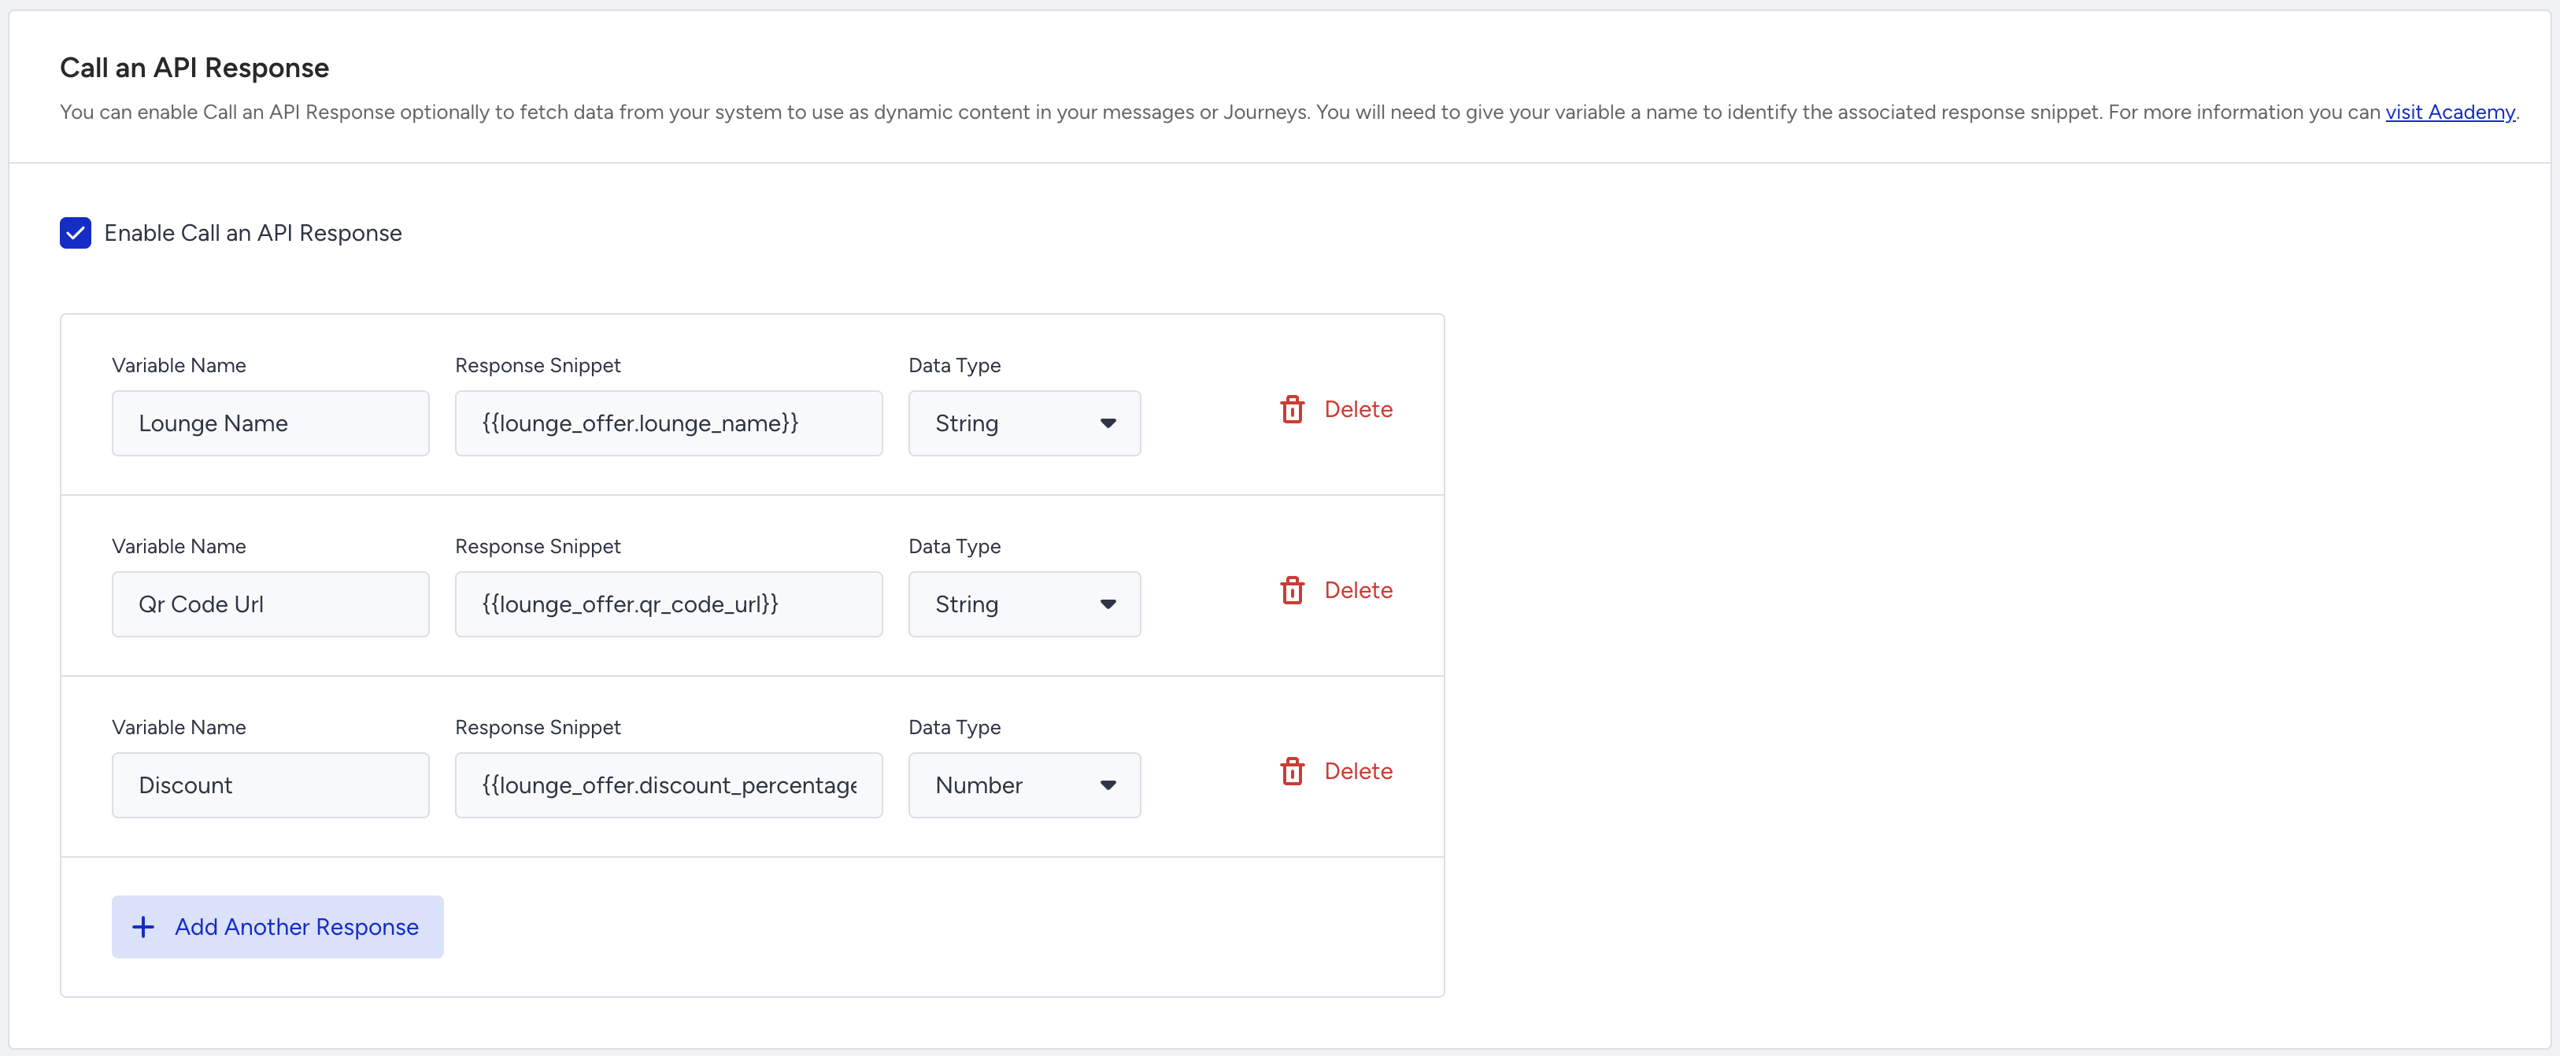
Step 2: Send MMS message
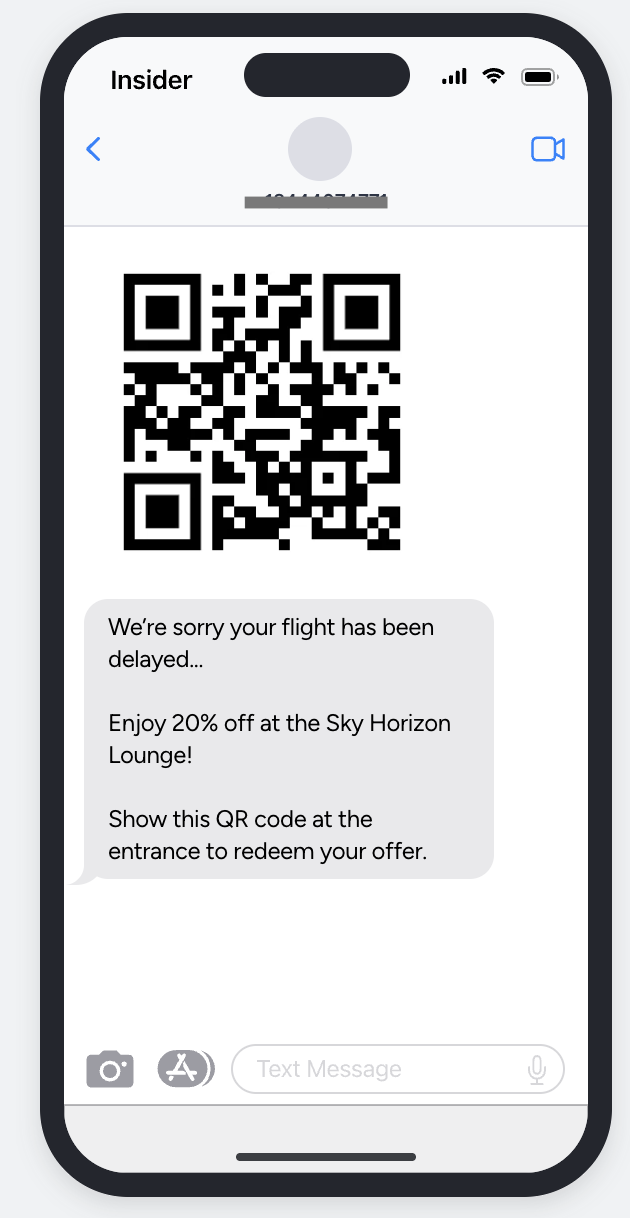
Add an MMS element to send passengers a personalized message with the QR code image from the API response.
Use the QR Code Url as the image in your MMS configuration.
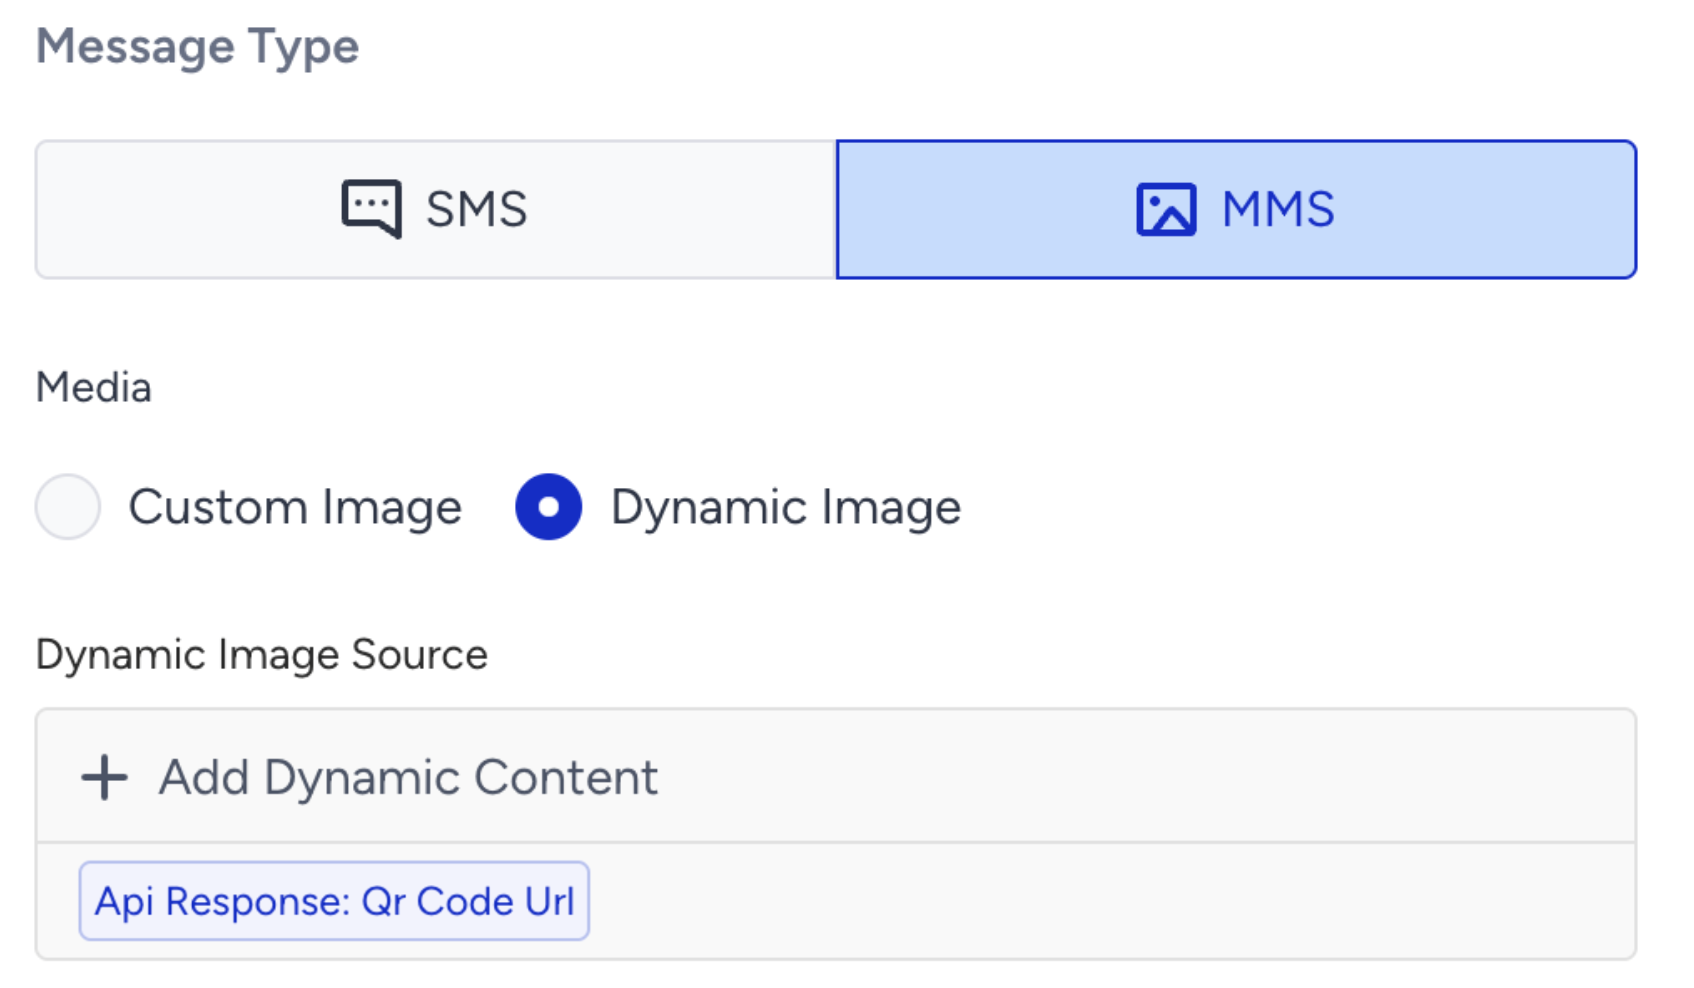
Then use Lounge Name and Discount in the content. The MMS that is received by the user will look like this:
Ecommerce use case 1: Next best offer
Goal: Deliver the most relevant product offer to each user based on their browsing history, purchase behavior, or loyalty data.
Step 1: Fetch user-specific next best offer
Let’s say you have an internal API connected to your personalization or recommendation engine. This API returns the Next Best Offer (NBO) for a given user. For example, a product discount, a complementary item, or a loyalty reward, based on their recent actions or preferences.
This is the sample response for your API as provided to you by your tech team:
{
  "next_best_offer": {
    "product_name": "Wireless Noise-Cancelling Headphones",
    "category": "Electronics",
    "discount_percentage": 15,
    "discount_code": "XYZ123",
    "discounted_price": 149.99,
    "valid_until": "2025-10-20",
    "product_link": "https://example.com/products/headphones"
  }
}
Enter the information for that API from API Preferences under Architect Settings
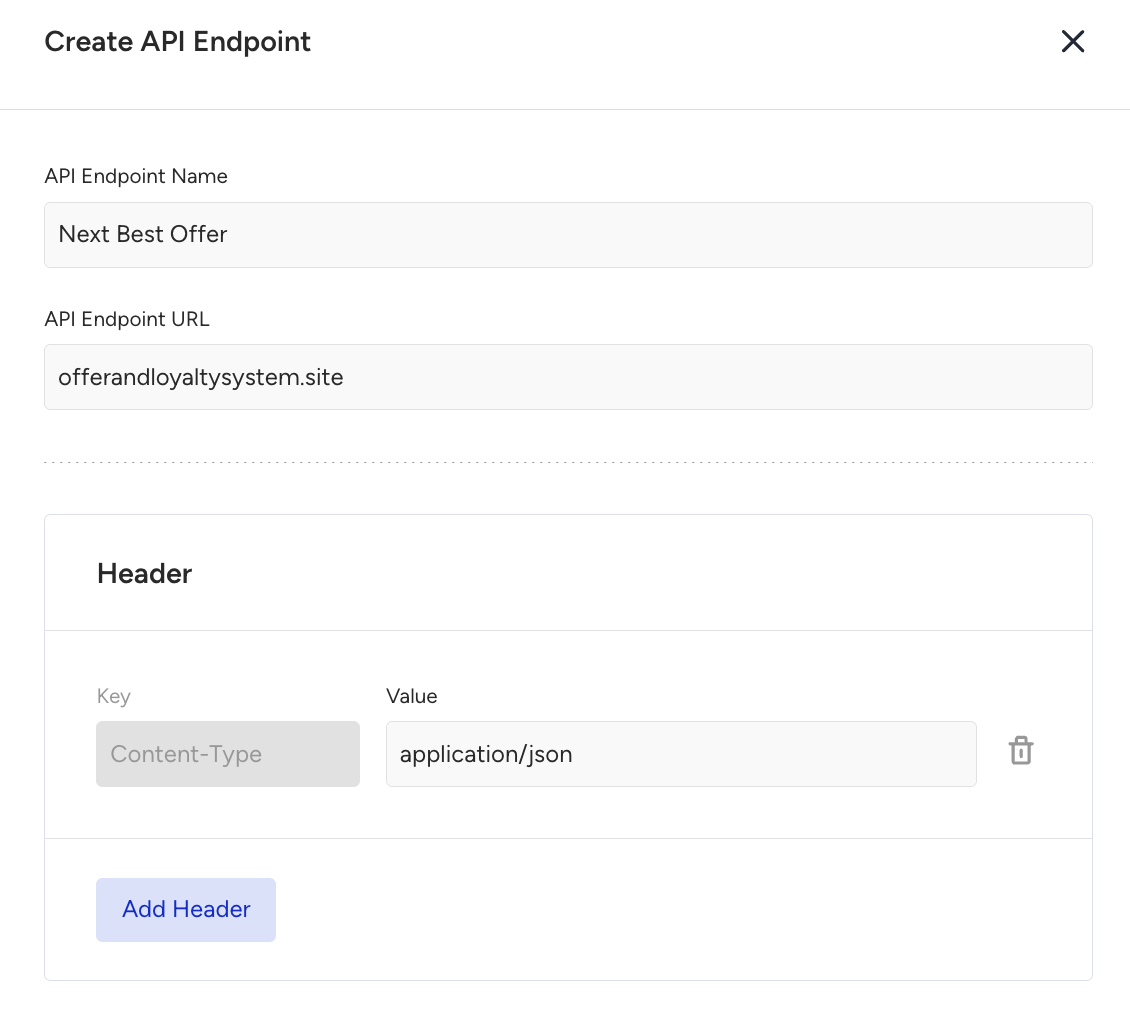
Add a Call an API element at the start of the journey to call your NBO engine.
Enter the Call an API element and choose the Next Best Offer endpoint.
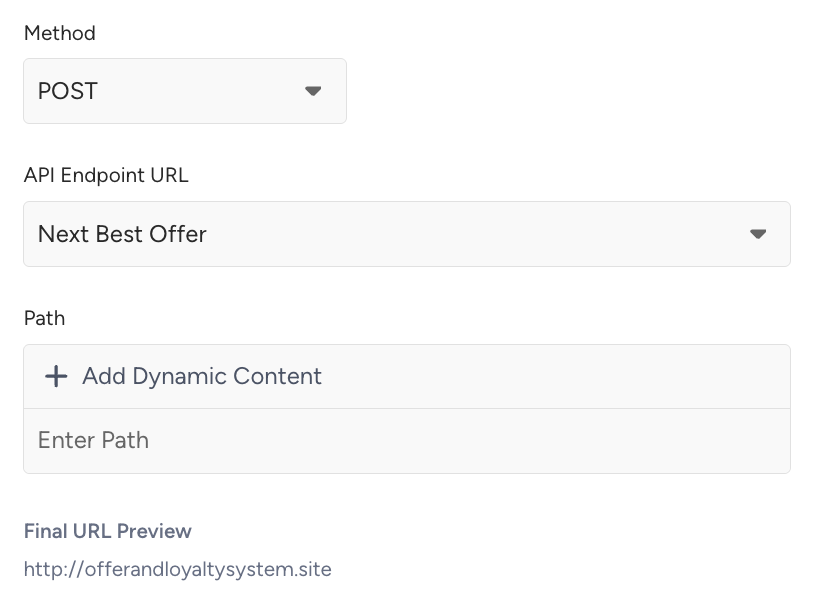
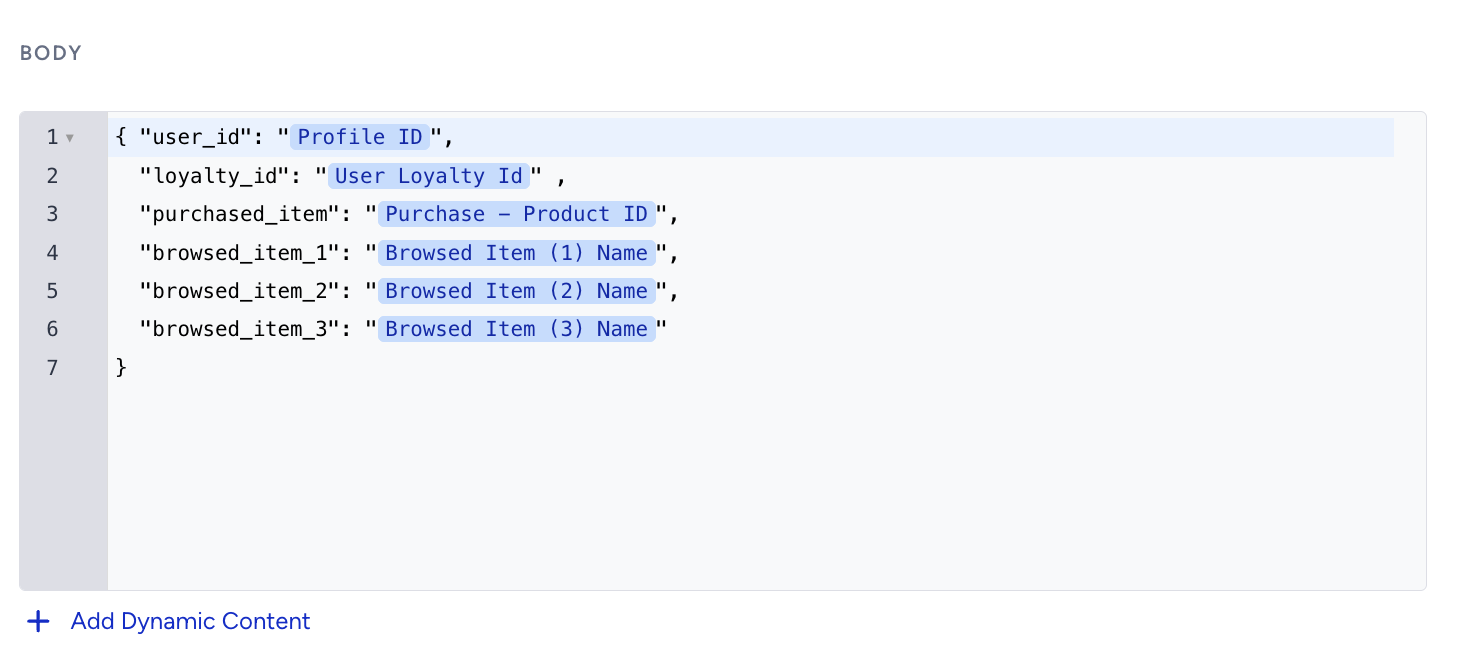
Send the user_id or loyalty_id within the body section (in your payload) so that the NBO system can return the personalized offer for that specific user. Depending on the requirements of the endpoint, you can also send the purchased product’s ID that made the user enter the journey or user’s browsed products. Everything related to user’s browse/cart/purchase history can be found under dynamic content dropdown.
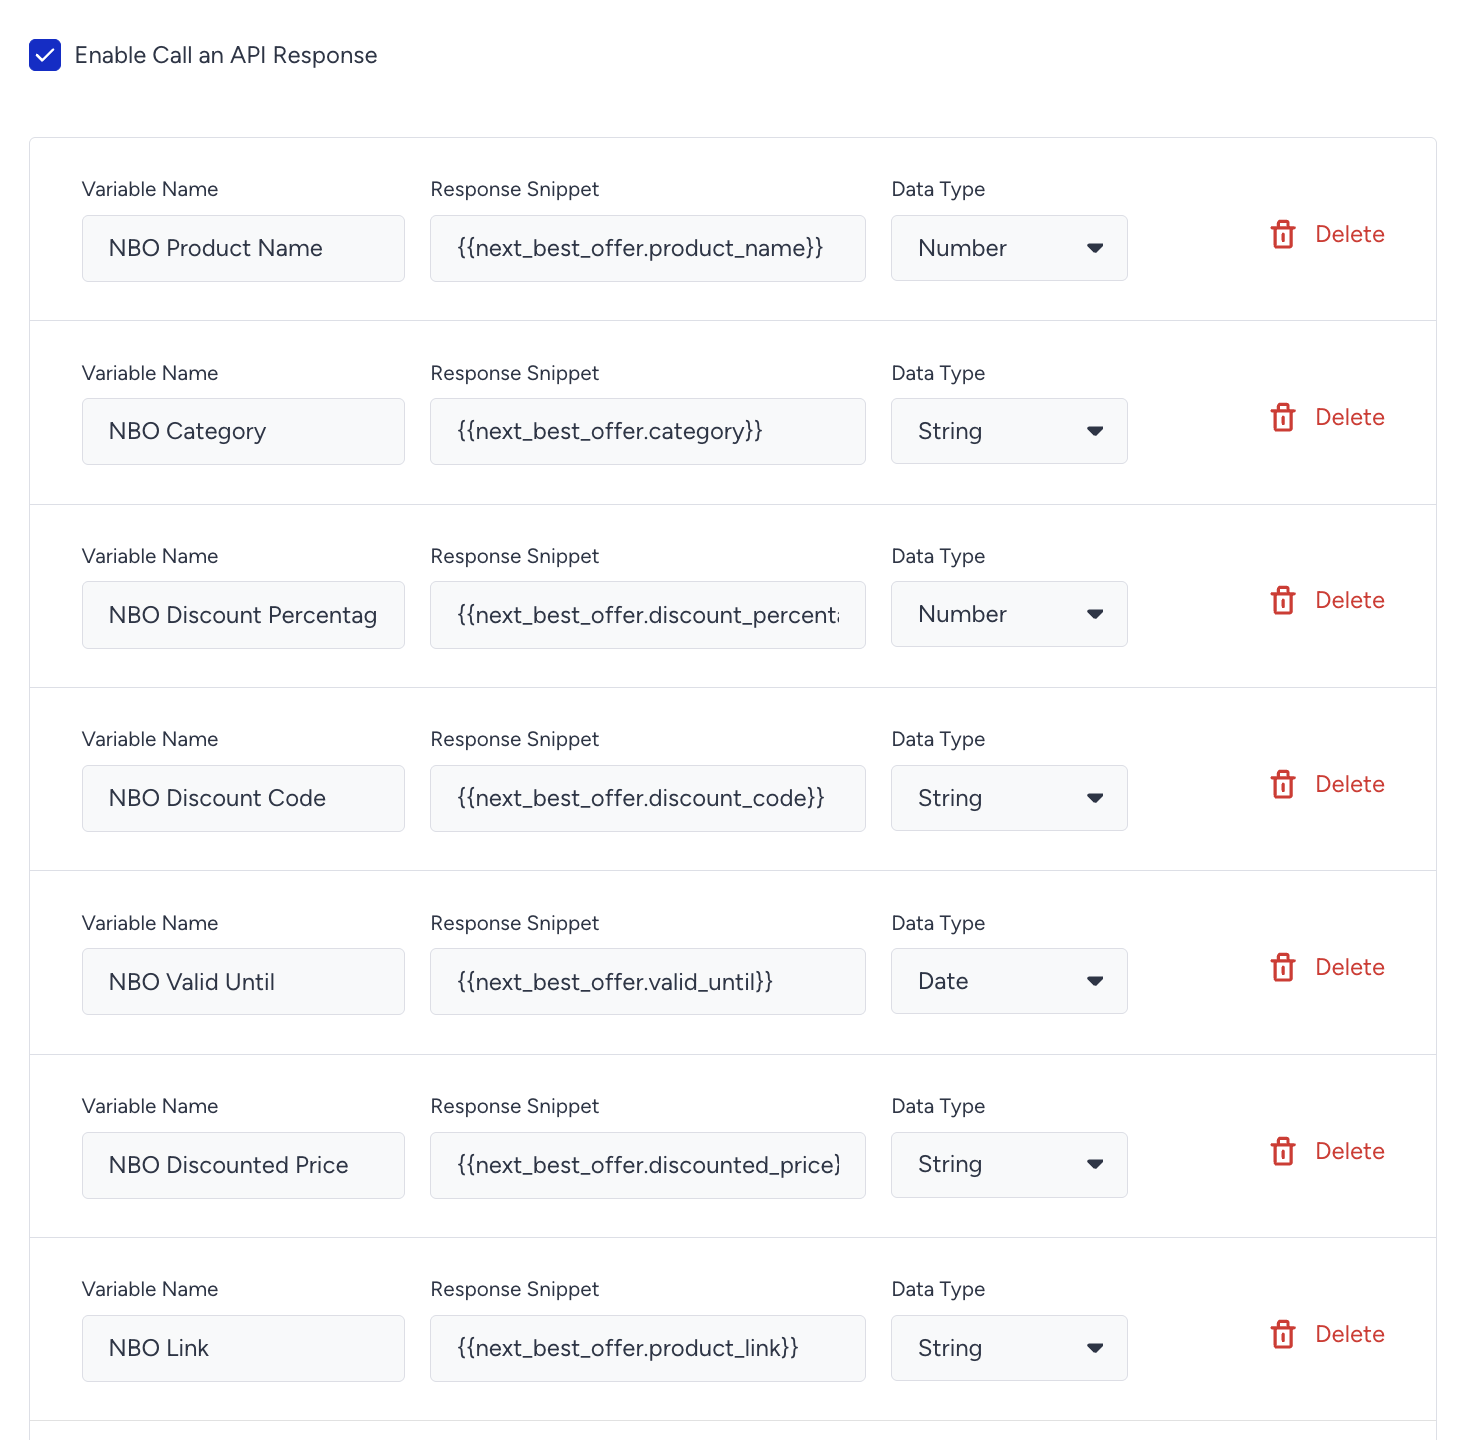
Check the Enable Call an API Response box. Then map your response variables to use them in further steps of your journey. You will use these names for dynamic content and branch conditions.
Step 2: Use response variables in journey
Add a message element to send your message. For this example, let’s add an Email element to promote the personalized offer using your mapped response variables.
Choose your API Response variables from dynamic content dropdown.
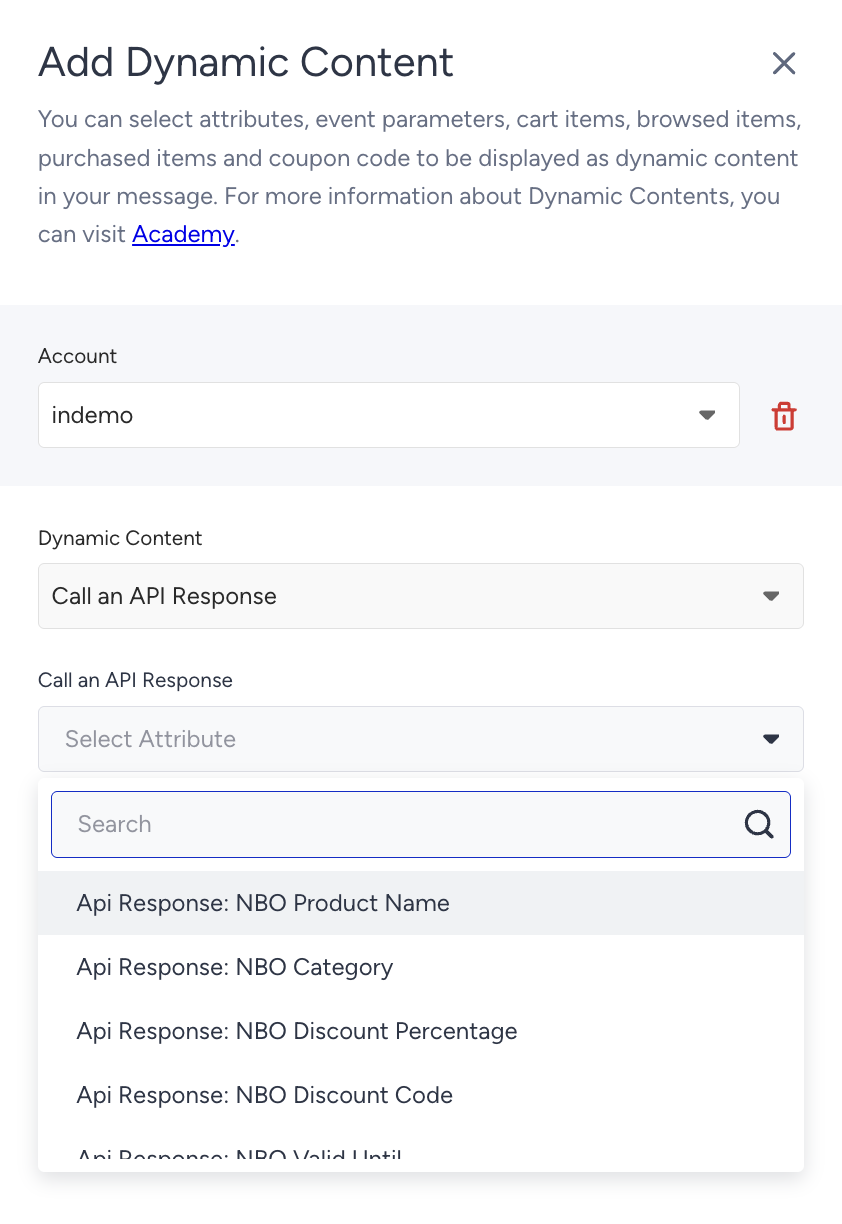
Your finalized message will look like the left image when you add the dynamic content and user will see it as below.


Ecommerce use case 2: Personalized in-store availability via API
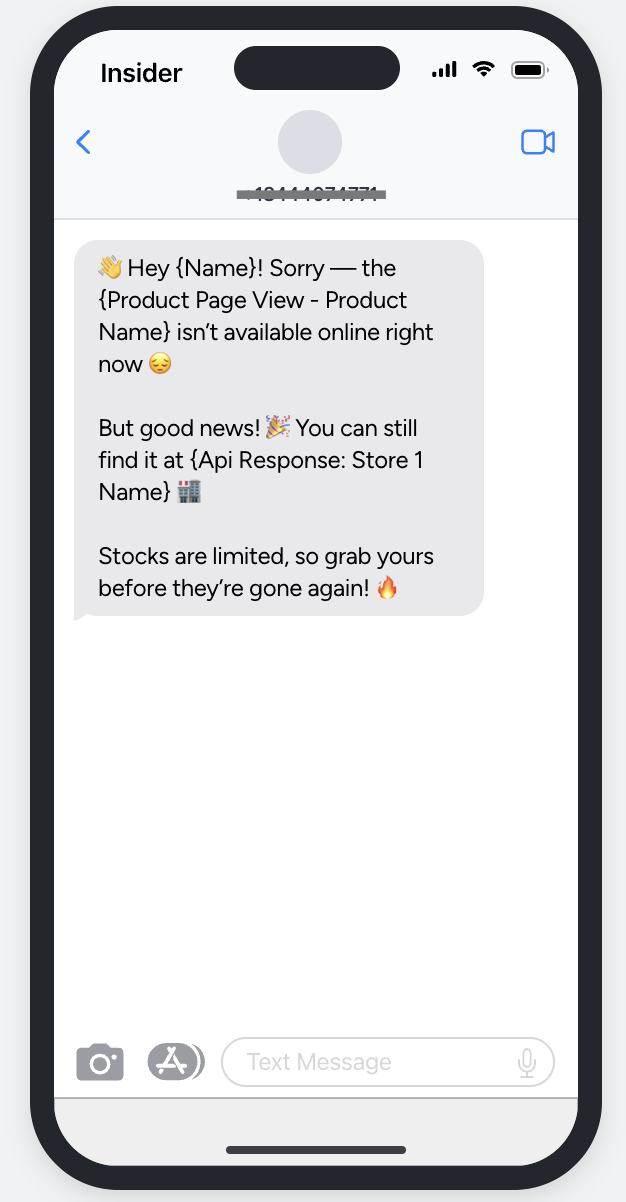
Goal: Notify users when a product they viewed online is available at their nearby stores — even if it’s out of stock online.
Step 1: Fetch store availability
Let’s say your retail system exposes an API that returns the nearby stores with the stock information.
Here’s the sample response for your API as provided by your tech team:
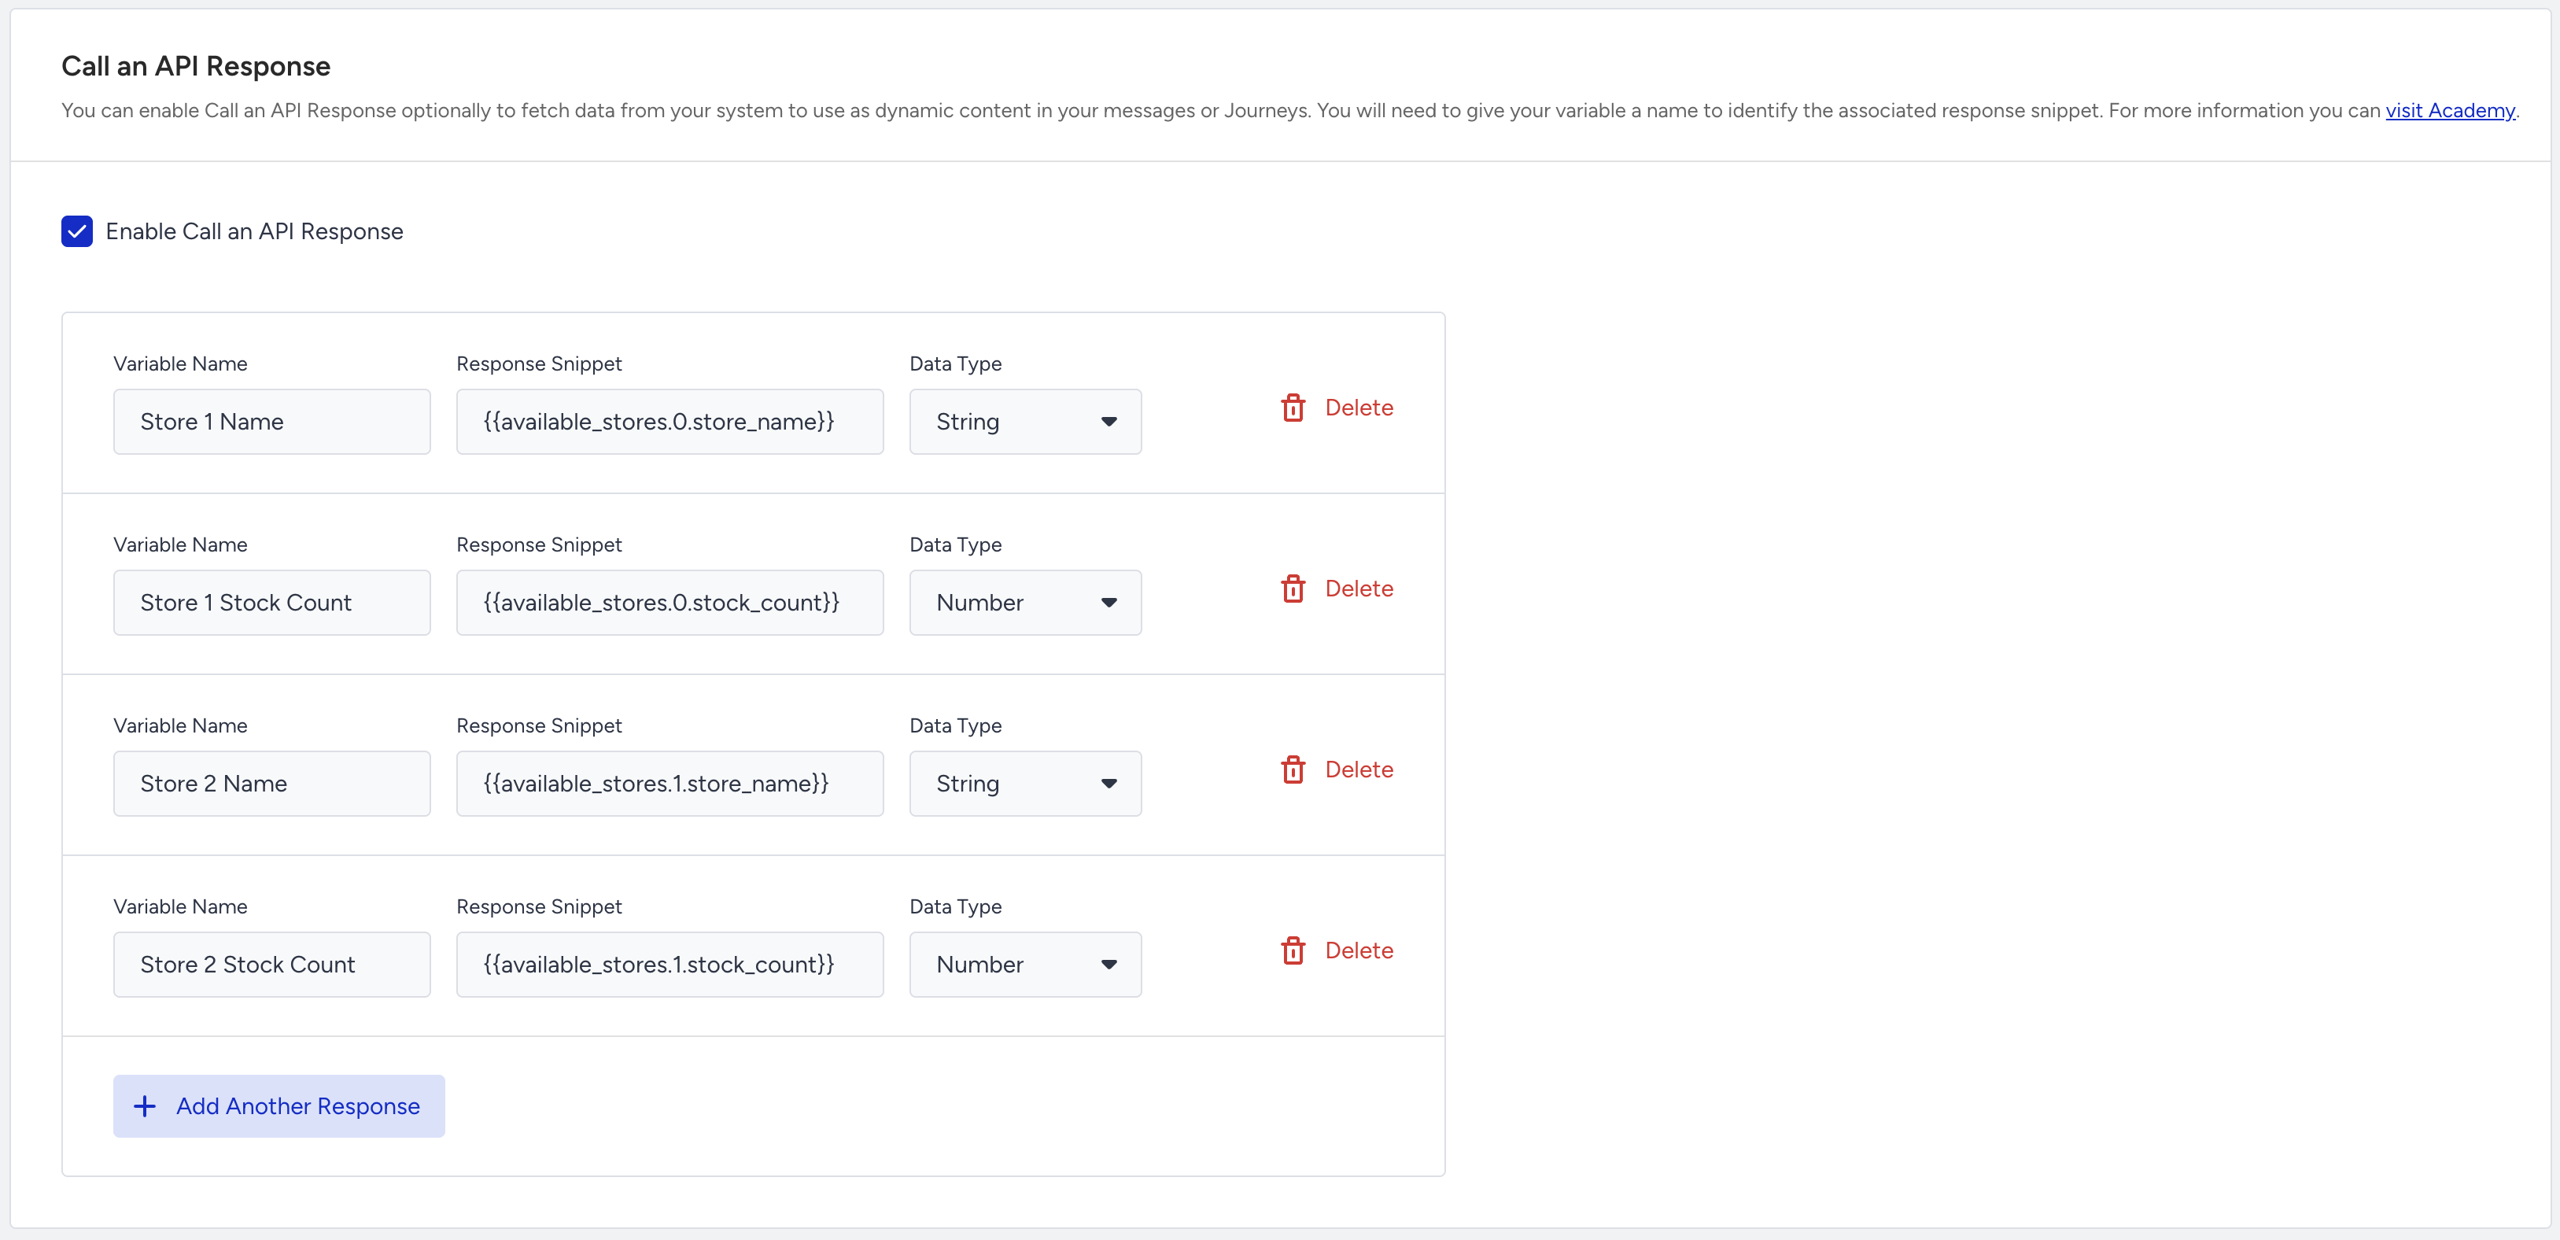
{
  "available_stores": [
    { "store_name": "Mall of the City", "stock_count": 5 },
    { "store_name": "Riverside Shopping Center", "stock_count": 2 }
  ]
}
Via Architect Settings > API Preferences, create an endpoint entry using this API.
In your journey, choose the On Event starter and Product Page View event. Let’s assume that the Product Page View event also has Stock Count event paratemer. You take users into the journey when the stock was 0 when they were viewing the product.
Let’s add Call an API element right after the starter.
In the request body, send the product_id and user_location so your retail system can return the closest stores with stock.
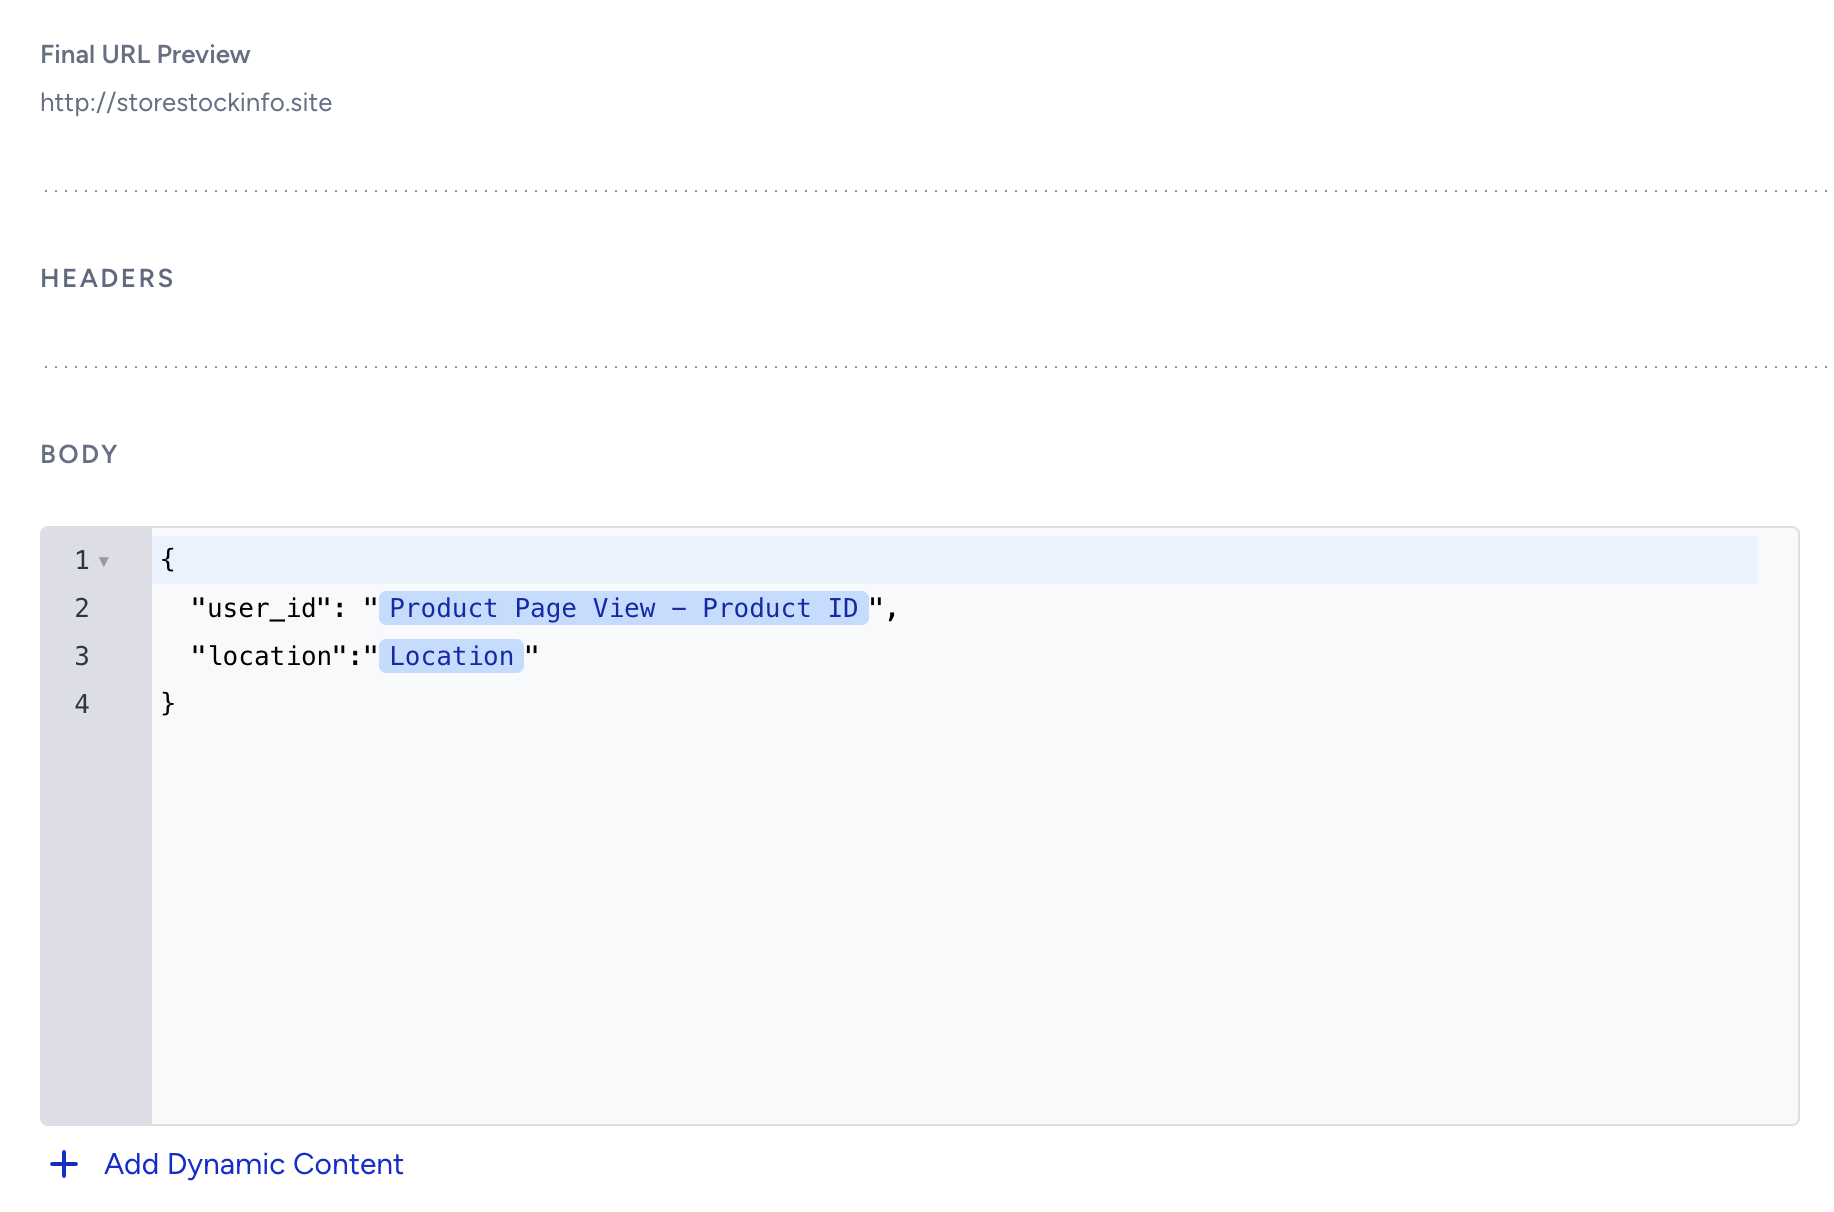
Check the Enable Call an API Response box and map your variables:
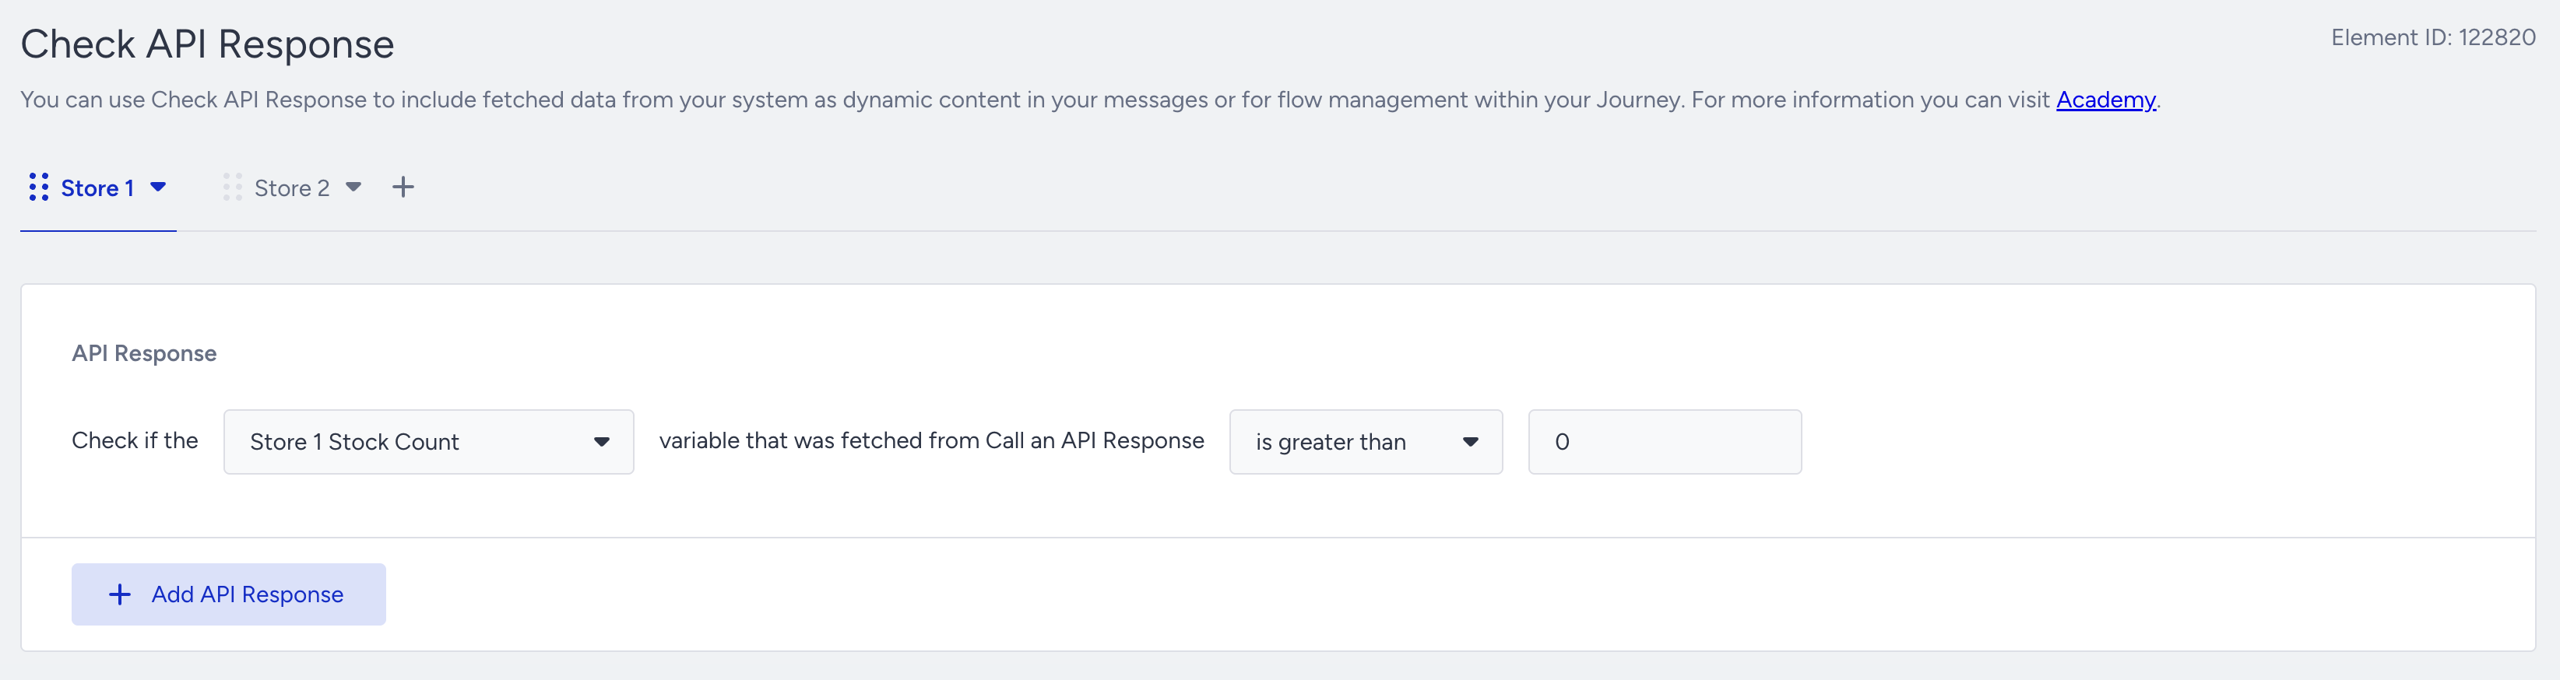
Step 2: Decide which store to mention
Add a Check API Response element to branch your journey based on availability.
Here’s how you can set it up:
Condition 1: If {{available_stores.0.stock_count}} > 0 → Continue with Branch A
Condition 2: If {{available_stores.1.stock_count}} > 0 → Continue with Branch B
Else: No Message
This setup ensures the message will always show the first available store with stock.
Step 3: Send SMS message
Add any messaging element like SMS under each branch and craft a friendly, urgency-driven message using dynamic variables.