The Payment Reminder use case is designed to remind users of upcoming payments before their due dates. These reminders are sent at critical time points, such as 7 days and 3 days before the payment due date, helping users complete their payments on time and preventing late or missed payments.
Payment reminders are applicable to any business model where users have scheduled or recurring financial obligations, such as subscription renewals, installment payments, invoices, postpaid services, insurance premiums, or membership fees. Each of these payment types has a defined due date, making them ideal candidates for reminder journeys.
Instead of waiting for users to remember their payments, you can proactively support them by sending timely, relevant reminders exactly when action is needed. For example, you can remind a user 7 days before their invoice due date and follow up 3 days before the due date to reduce the risk of overdue invoices.
In a Payment Reminder journey, users typically enter the journey in response to a payment-related event (such as invoice creation or payment scheduling). The architect then waits dynamically until the appropriate reminder times and re-engages users with personalized content that includes the due date, amount, and a direct payment link.
How does Payment Reminder help?
Payment reminders play a critical role in revenue protection, customer experience, and operational efficiency.
Users forget due dates
Even motivated users may forget upcoming payments, especially when managing multiple subscriptions or invoices. Timely reminders help prevent unintentional late payments.
Late payments impact revenue and operations
Missed or delayed payments create cash flow issues, increase collection costs, and may require manual follow-ups.
Customer experience matters
Proactively reminding users before due dates feels supportive and transparent, helping maintain trust and satisfaction.
Perfect timing improves completion rates
Reminders sent too early are ignored; reminders sent too late cause frustration. Dynamic timing ensures reminders arrive exactly when they are most effective.
What goals can you achieve via Payment Reminder?
Reduce late payments: Reminding users before the due date significantly lowers the likelihood of overdue payments.
Increase on-time payment rate: Users are more likely to complete payments when reminded close to the deadline with a clear CTA (call-to-action).
Improve cash flow predictability: Consistent, on-time payments make revenue streams more stable and easier to forecast.
Lower support and collection costs: Fewer missed payments reduce customer support inquiries and manual collection efforts.
Improve customer trust and transparency: Clear communication around due dates builds confidence and long-term loyalty.
Technical requirements
Your website or app must have a payment system that allows users to make purchases.
Purchase information must be collected. Once your website is mapped by Insider One during onboarding, It starts collecting this information by default. This does not require any additional integration.
Web SDK Integration must be implemented to track purchased items.
Before using any channel in your journeys, the respective channel integrations should be completed. Depending on the channels you want to use in your journeys, additional integrations might be required.
If you need custom events, create them and send them to Insider One. If you have a mobile app, SDK Integration must be implemented.
For further integration details, refer to the Architect Integration Guide.
Create a Payment Reminder journey
You can create a Payment Reminder journey to remind users of upcoming payments and encourage timely completion. Below is an example scenario for the streaming platform payment industry.
Jane is subscribed to your premium streaming service. Her next billing date is January 20, and her plan renews automatically only if her payment goes through successfully. Sometimes payments fail due to expired cards or insufficient balance. You want to remind Aylin 7 days and 3 days before the due date so she can update her payment method or complete the payment on time.
You can implement a Payment Reminder journey to help Jane complete her renewal payment before the due date.
Wait until due date: After Jane enters the journey with Payment Scheduled, Invoice Created, or any relevant event, use Wait Until Dynamic Time to wait until 7 days remain until the payment due date. This ensures the reminder is delivered at the right time for her billing cycle.
Check whether Jane has already paid: Use Check Conditions (or Constant Starter Event Parameters in Check Conditions) to verify whether Jane’s payment is completed during the waiting period. If paid, remove her from the journey automatically. If not paid, continue.
Send a reminder email: If Jane is reachable via Email, send a reminder that her renewal is coming up. To increase conversions, you can include due date and amount via dynamic content and add an “Update Payment Method” CTA.
Wait until due date: Use another Wait Until Dynamic Time step to wait until there are 3 days left to the payment due date.
Check whether payment is completed: Add another Check Conditions step to verify payment completion. If paid, the user will exit or complete the journey. If not, the user will continue.
Send an urgent reminder: If Jane hasn't paid, send a more urgent reminder via a faster channel, such as WhatsApp or SMS. You can include a payment link and mention the potential impact, like avoiding service interruption.
Step 1: Select the starter
You can create the journey from scratch or customize an existing template. Select On Event starter and choose a payment-related event, such as invoice created, payment scheduled, subscription purchase, subscribe, etc. When the event occurs, users enter the journey.
Step 2: Target the correct segment
After selecting the starter, refine the audience:
Users must have a valid payment due date.
Users must not have completed payment.
If you want to manage different payment types in one journey, do not filter in the starter. Instead, use Check Conditions later to direct users into different paths based on payment type, amount, or plan.
Step 3: Build your journey
3.1.1. Wait before sending a message
After you decide on your user segmentation, add a Wait for Some Time element before sending any reminder. Waiting is critical because payment reminders must be delivered relative to the due date, not immediately after the event.
3.1.2. Dynamic wait & duration support for Payment Reminder journeys
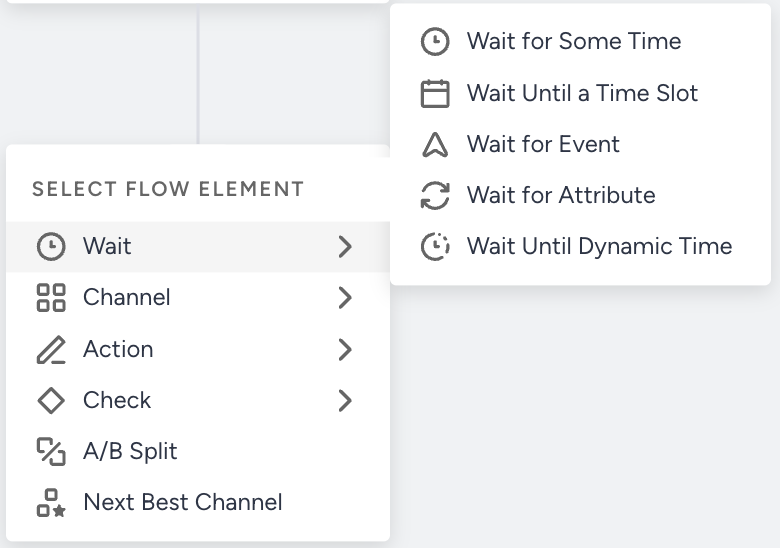
To make payment reminder journeys flexible and personalized, Wait Until Dynamic Time and Wait for Dynamic Duration elements can be used.
These elements allow you to dynamically control the waiting time. Instead of using a fixed duration, you can base the timing on real data parameters collected from events or user attributes.
To use these elements effectively in your replenishment setup, make sure your events include:
Date parameter for Wait Until Dynamic Time
Numeric Parameter for Wait for Dynamic Duration
Examples: days_until_last_payment, usage_days_remaining, or any integer representing the number of days until the next payment should be made.
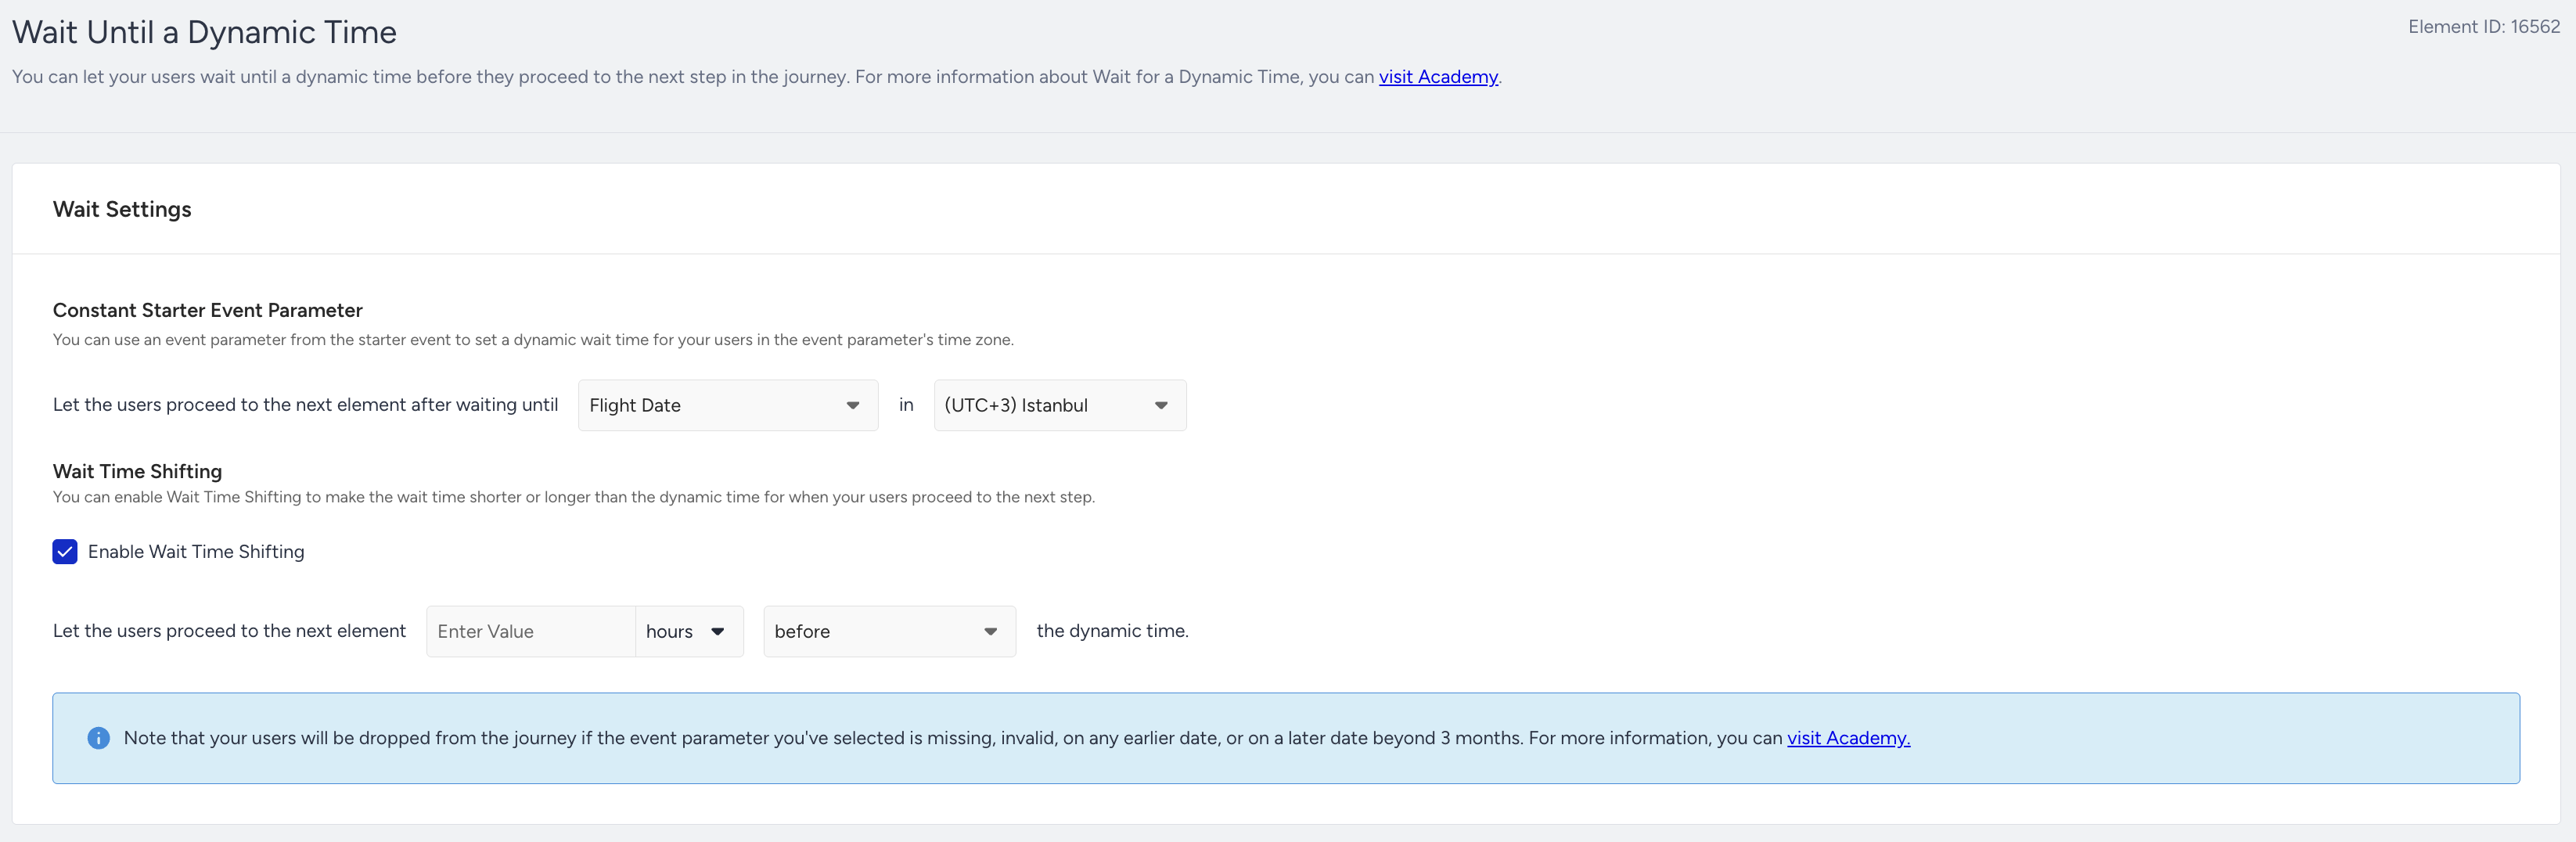
If a date parameter is provided, the system will automatically wait until that specific date before triggering the next step in the journey. If a numeric parameter is provided, the system will wait exactly that many days from the event date.
This means each user's timing becomes unique, ensuring that reminders, emails, or push notifications are sent exactly when the payment should be made, before it is overdue, without creating multiple separate journeys for different timelines.
Architect calculates the reminder timing per user using the due date, like;
Wait until payment_due_date - 7 days
Wait until payment_due_date - 3 days
Each user experiences a unique communication, even though they are in the same journey.
3.2.: Filter your users
You can add the Check Conditions element to filter users for different paths on the journey flow:
Segment users based on whether they made the payment or not
Segment users based on whether they canceled their subscription or booking
Segment users based on their previous purchase history, including frequency, value, and product categories. Segment users based on their language.
Segment users by channel reachability.
Segment users based on any attribute or event parameters you want.
3.2.1.: Filter your users with Constant Starter Event Parameters
You can enhance accuracy using Constant Starter Event Parameters.
While the standard Payment Reminder Journey reminds users who have not completed their required payments within the specific wait duration, Constant Event Parameters allows you to add deeper intelligence and precision by event parameter-specific checks.
This feature ensures that your follow-up messaging is always relevant to the exact product, variant, category, or taxonomy, or any other event parameter the user made, improving accuracy and conversion rates. It automatically and dynamically compares all event parameters from the starter event (purchase) with those in the Check Conditions event.
This ensures that the completed payment is the same required payment that led the user to enter into the journey. Constant starter event parameters dynamically compare against payment completion events.
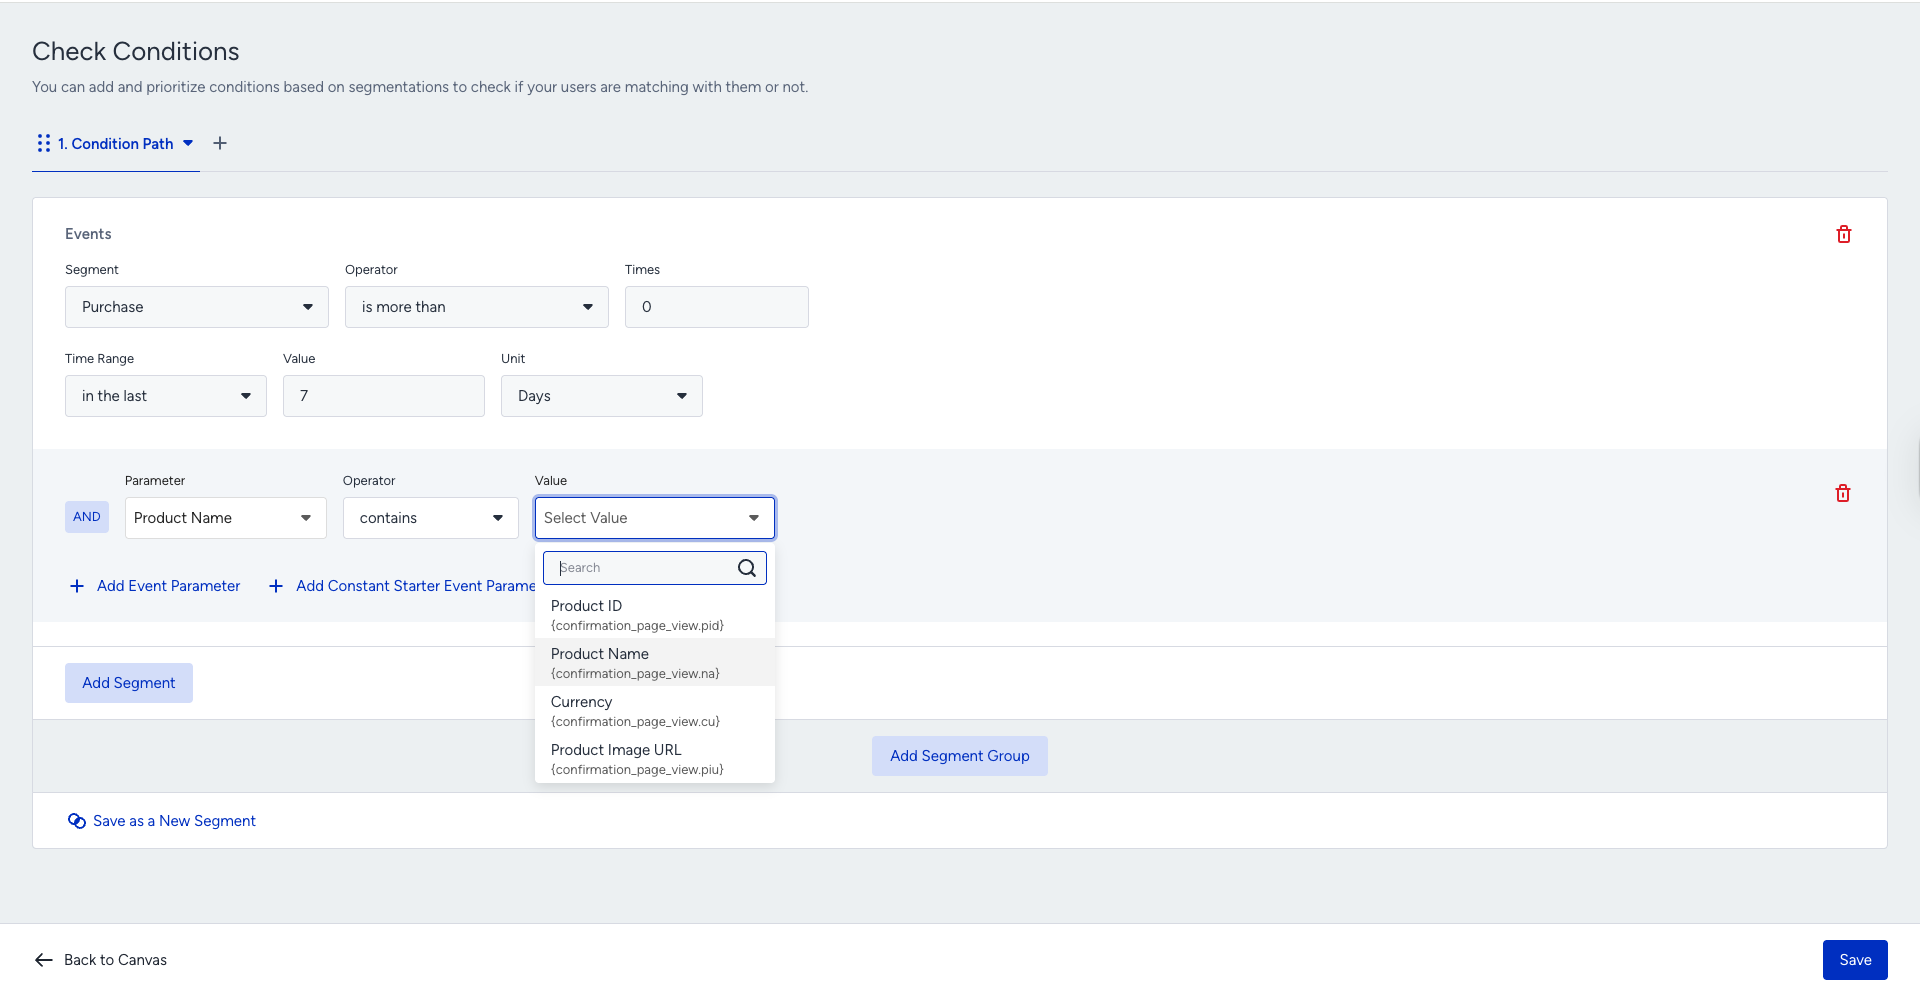
Constant Starter Event Parameters help ensure the starter eventʼs parameters match the event parameters selected in the Check Conditions.
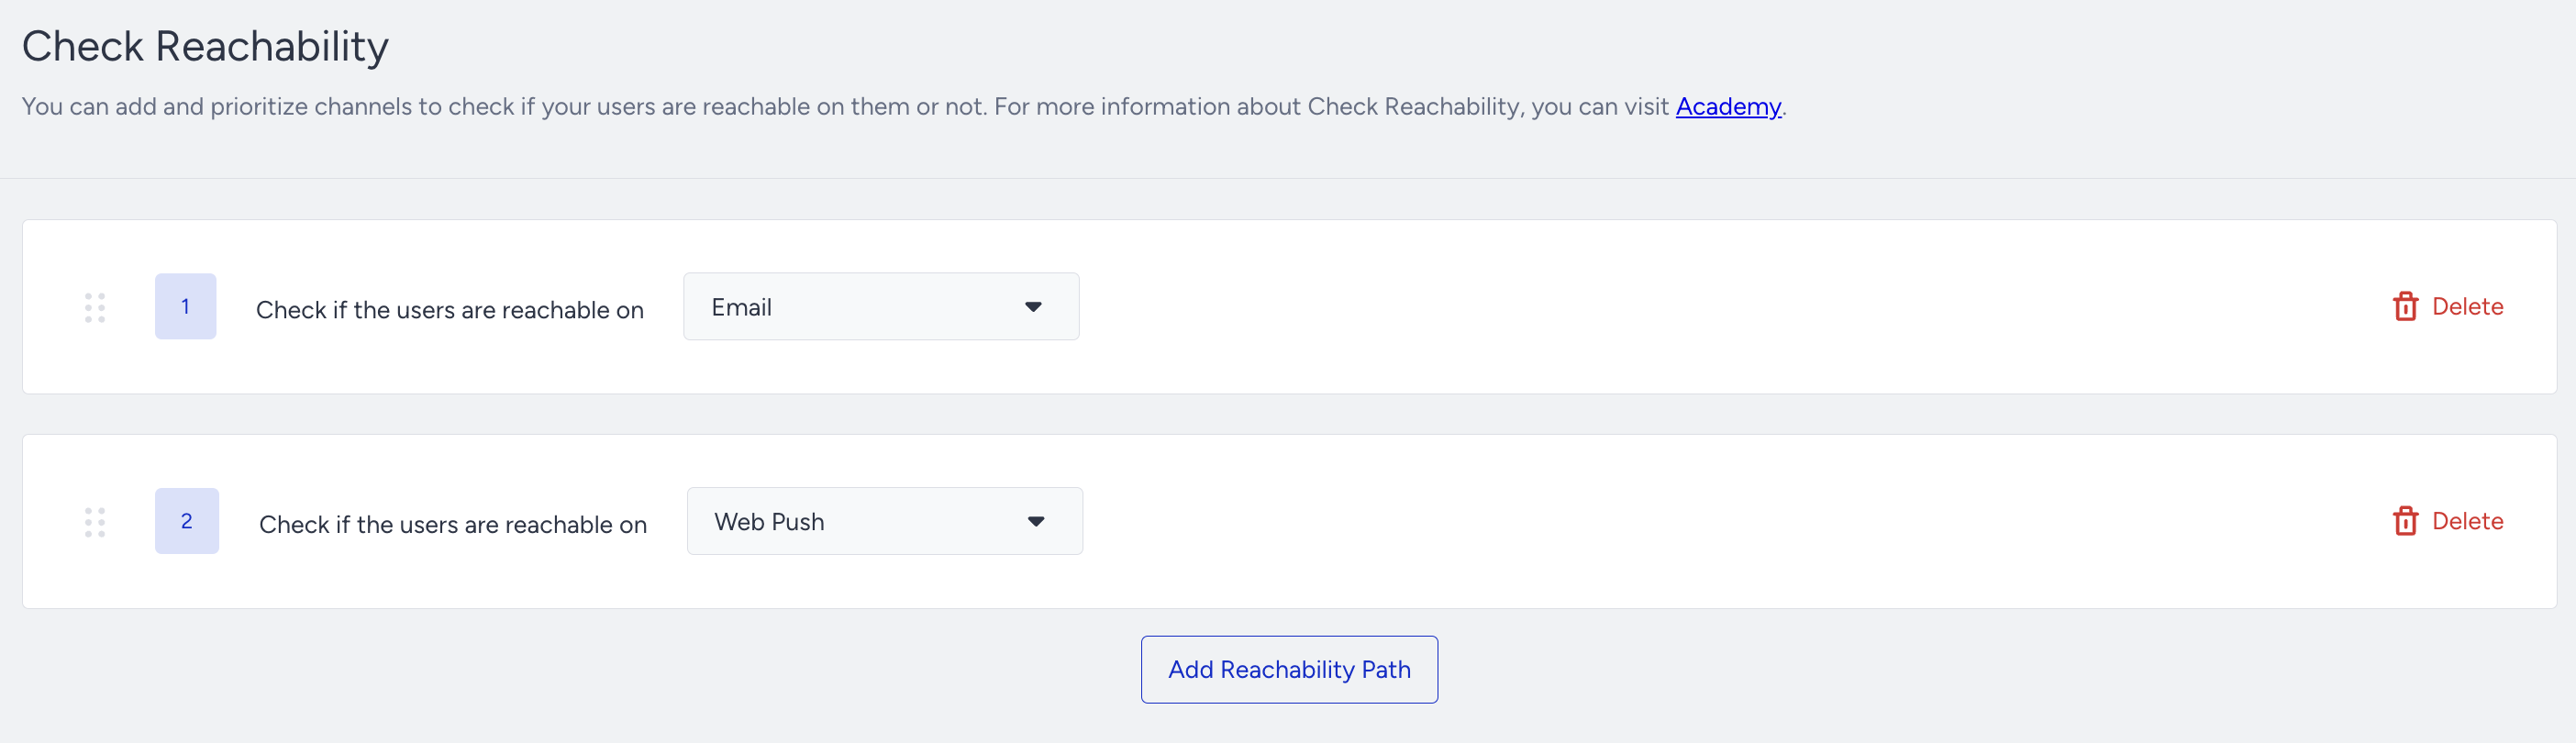
3.3. Check your users' reachability before sending a message
Before sending the initial message, you can check if users are reachable on that channel. If not, you can try another channel on another path of the Check Reachability element. Adding Check Reachability is valuable because:
You can assess users' reachability on selected channels, and they receive your messages from the prioritized channels if they are reachable.
You can prevent users from dropping out of the journey by ensuring that they are directed to the appropriate path based on their reachability.
You can optimize your budget and resources to the correct channels.
3.4. Reach your users via the Best Channel
You can add the Next Best Channel (NBC) element to:
Maximize conversion: Ultimately, the replenishment journey aims to re-engage users and encourage them to make repeat purchases. The NBC element delivers targeted messages via the most effective channels, optimizes re-engagement efforts, and drives higher conversion rates, ultimately increasing revenue for their business.
Personalized communication: Effective re-engagement requires messages that resonate with individual users. You can deliver highly targeted messages via the most appropriate channels, increasing the likelihood of capturing users' interest and prompting them to return to complete their purchase.
Optimizing for reachability: Next Best Channel considers users' reachability across different channels as an additional parameter in its decision-making process. This ensures that messages are delivered via channels where users are most likely to be reachable, increasing the chances of successful delivery and engagement.
Step 3.5: Select your channels
Channel selection is a crucial decision to reach your targets.
User preferences
Different users have varying preferences when it comes to communication channels. Some users may prefer email for receiving promotional messages, while others may prefer push notifications or text messages. This is where Architect steps in to help with Next Best Channel element.
Channel effectiveness
Each communication channel has its own strengths and limitations in terms of reach, engagement, and conversion rates. For example, email may be effective for delivering detailed and personalized messages, while push notifications may be more suitable for time-sensitive reminders.
Audience segmentation
Different user segments may respond differently to messages delivered via various channels.
Reachability
Review your User Reachability data on the Overall Analytics Page. Assess the number of reachable users across individual channels or combinations of channels. You can leverage insights on user reachability and design journeys that capitalize on the best-performing channels, ensuring optimal engagement and outcomes.
.png)
Step 3.6: Create your content and send the initial message
You may add different messages to the journey flow, including App or Web Push Notification, Email, SMS, and WhatsApp. You can customize the message content to include products that would interest users. You may also want to show a banner in the On-Site or In-App channel or use the remarketing opportunity on Facebook.
After deciding how you want to continue with the communication for the payment reminder, you can design your content.
Select Event Parameter on the Add Dynamic Content menu.
Find Constant Event Parameter option in the dropdown, choose the necessary parameter, and the users will have the message with the parameter of the starter event.
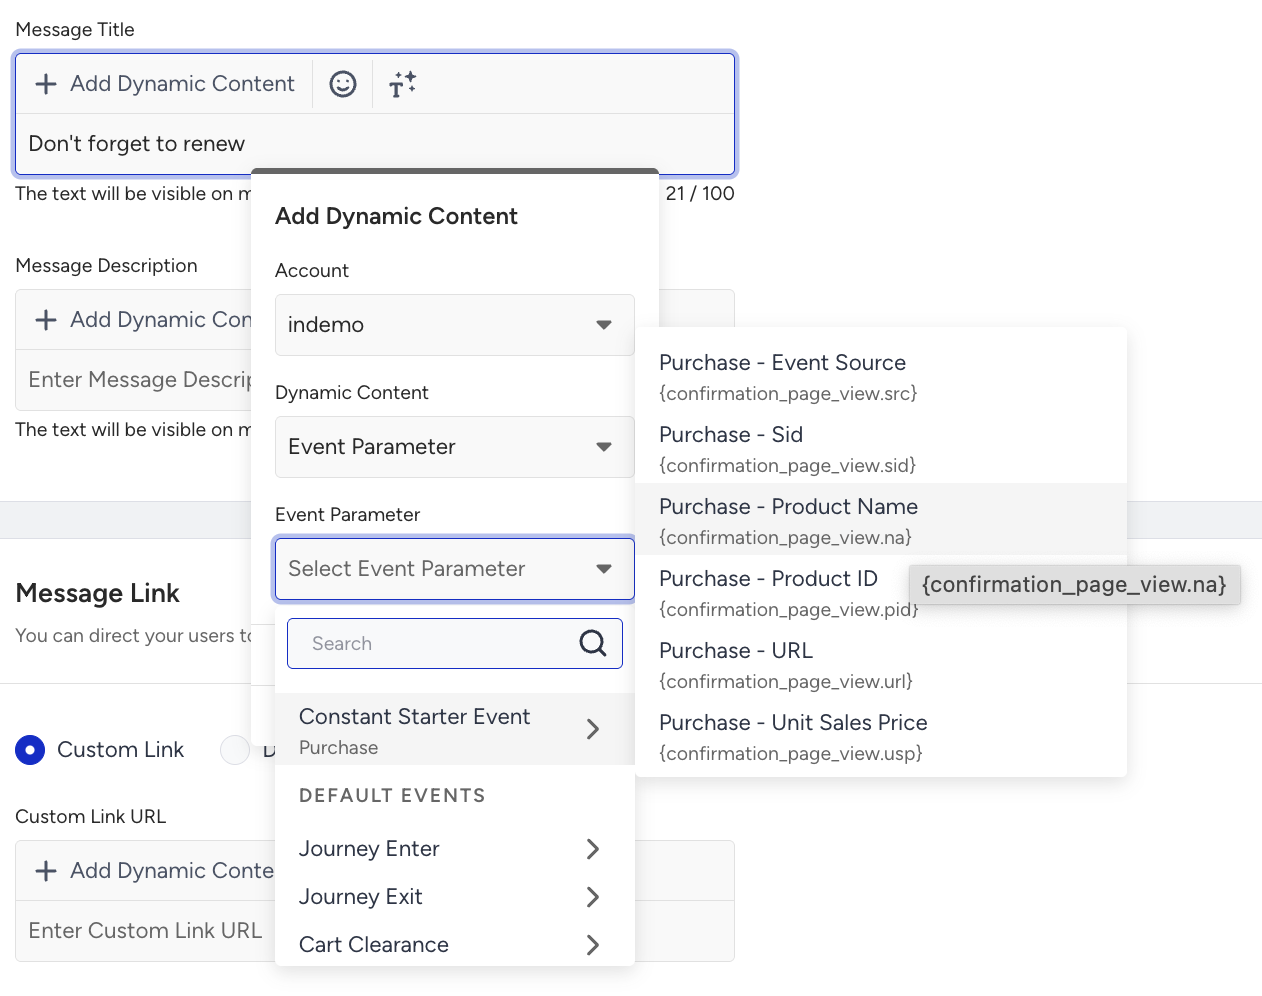 You will be prompted with the respective information at the top of the page. Accordingly, the event parameter(s) you choose will be inserted in the content.
Define a fallback value for your dynamic content.
If you want to use an event parameter again, you can use only the event of the starter.
Web Push
You can add the event parameters to show what users can repay based on their previous subscriptions or renewals.
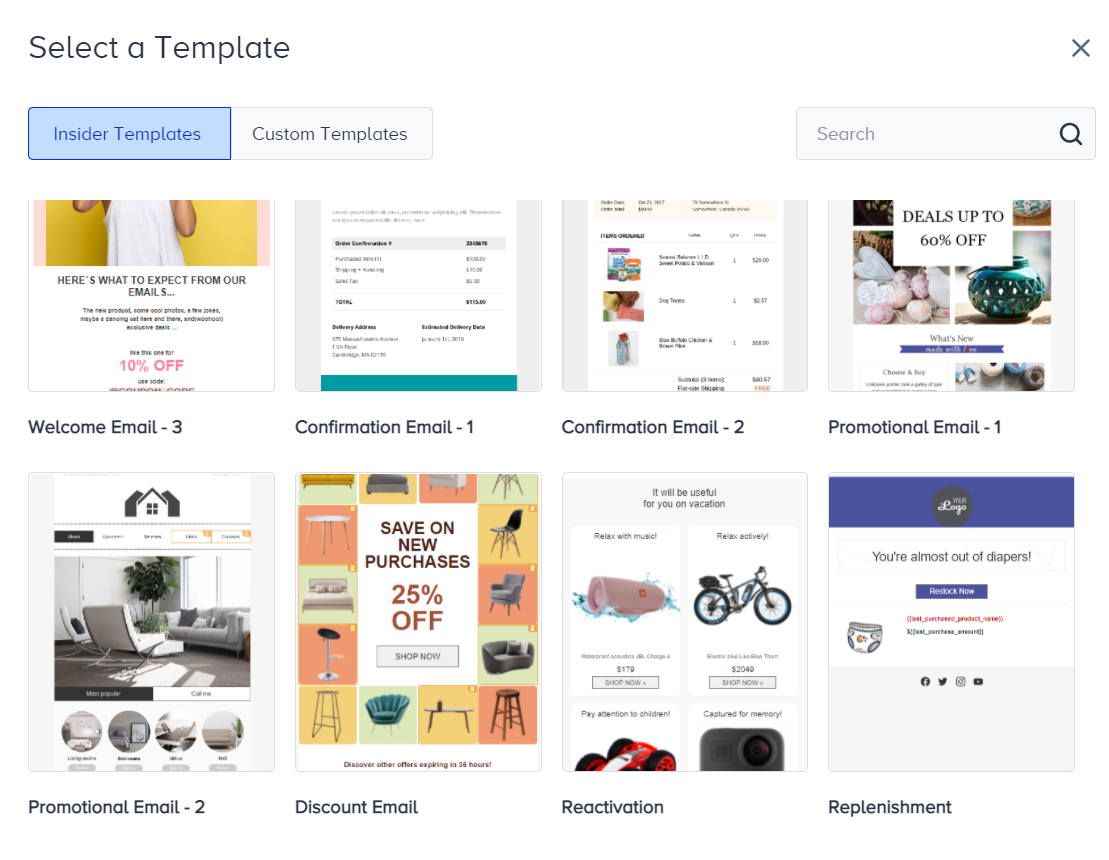
You can utilize and customize premade email templates placed in the Select Templates.
Follow-up messages, tips, and best practices
You can advance your journey by deeply analyzing user behavior and interactions. For example, you can check whether the user's discount affinity is high, and you can include promo codes in the content for users accordingly.
Increase urgency gradually, not abruptly: Start with a friendly reminder (e.g., 7 days before due date) and move to a more action-oriented tone closer to the deadline (e.g., 3 days before), avoiding aggressive or threatening language.
Always stop messaging once payment is completed: Use Constant Starter Event Parameters to exit users from the journey immediately upon detecting a payment success event or paid status, preventing unnecessary follow-ups.
Remove friction with direct actions: Include a clear payment CTA (deep link or payment page link) in every reminder to minimize effort and increase completion rates.
Personalize using payment context: Dynamically insert key details such as amount due, due date, invoice ID, and plan name to make messages feel relevant and trustworthy.
Choose channels based on urgency and reachability: Use Email for early-stage reminders and faster channels like WhatsApp or SMS for last-moment follow-ups, always checking reachability before sending.
Step 4: Launch your journey
Before launching your journey, complete your launch settings:
You can set journey entry capping to not send too many messages to the same users. In this way, you can optimize your messaging frequency.
You can also use the User Eligibility setting to prevent users from entering the Wishlist journey too frequently and receiving the same type of messages.
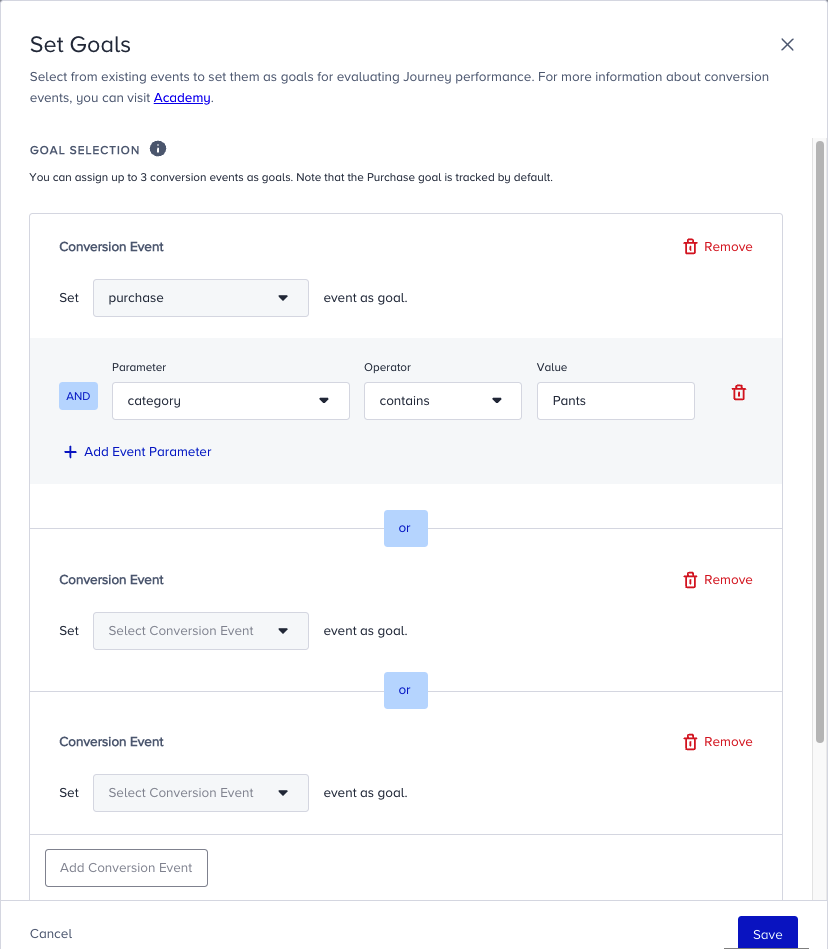
You can set special Goals, in addition to purchase, for users who enter the payment reminder journey. For example, visiting the product page, visiting the cart page, etc. You can create a custom event to set goals, or use default events and their parameters.
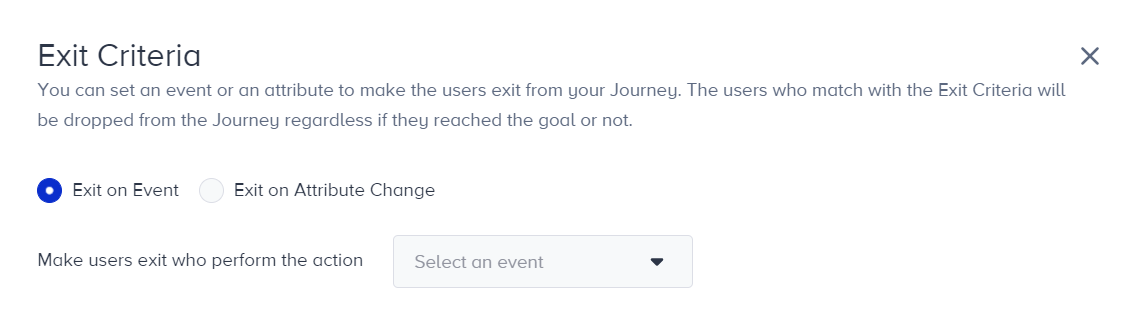
If you donʼt want to send any payment reminder message when users cancel their subscriptions, you can easily set the Exit Criteria for users. E.g., “Make users exit who cancel subscription.” Exit criteria dismiss users from the journey immediately whenever the user performs that action or if their attribute value changes to the desired value.