The SKILL file will be processed by an AI assistant which may occasionally make mistakes. We always recommend you review the generated integration code carefully before deploying to your website.
This guide explains how to use the AI-Assisted Integration file to complete your Insider Web SDK setup. The file contains your pre-configured integration data and step-by-step instructions that an AI coding assistant can follow to generate the correct integration code for your website.
What is the SKILL file?
The SKILL file is a markdown instruction file preloaded with your integration data: your identifiers, user attributes, currency settings, and event parameters. When you provide this file to an AI coding assistant, it serves as a detailed blueprint that guides the AI in generating production-ready Insider Web SDK code tailored to your website.
The file is optimized for Claude Code by Anthropic, but can also be used with other AI coding tools such as Cursor, Windsurf, and GitHub Copilot.
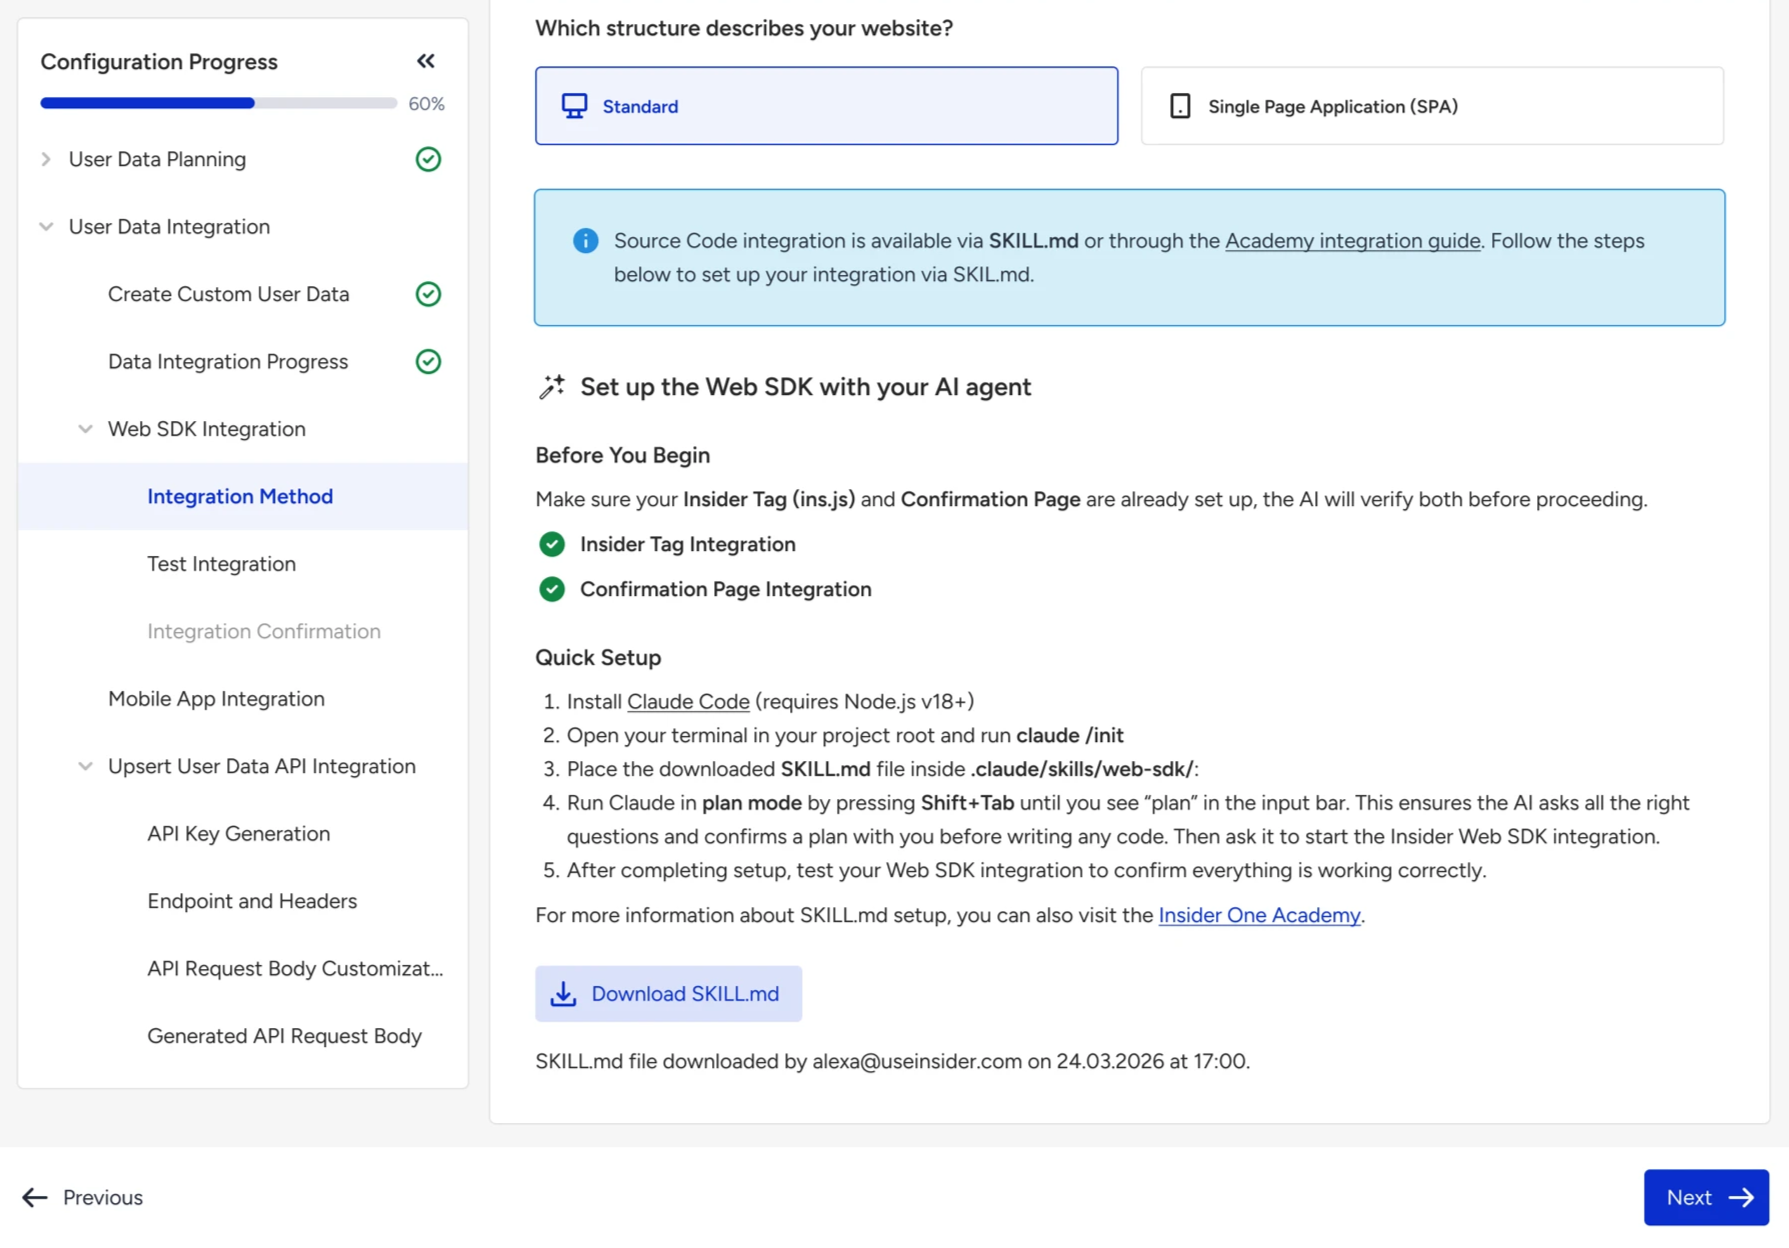
Note that SKILL file is only working for Source Code integration. If you select Source Code method under Web SDK Integration > Integration Method you can either proceed with the Web SDK Integration Guide document or by using the SKILL file.
Download the SKILL file
To download the SKILL file:
Visit Web SDK Integration > Integration Method.
Select Source Code as the integration method.
Below the integration method selection, you will be prompted to choose your website type: Standard or Single-Page Application (SPA).
Once you have selected your website type, you will see the Set Up Web SDK with your AI Agent option. You can download the file by clicking the Download SKILL.md button.
What the SKILL file contains
The SKILL file contains two parts:
Your pre-configured data
This section is automatically populated with your Insider configuration. It includes:
Website architecture: Whether your site is a Single Page Application (SPA) or a standard multi-page website.
Identifiers: Your identity resolution settings, including identifier priority and SDK attribute keys. These ensure users are correctly unified across sessions and devices.
User attributes: All default and custom attributes configured for your account, including which are required, which are identifiers, and critically, whether each attribute is default (placed at the root level of the SDK push) or custom (placed inside the "custom": {} object). Getting this placement wrong causes incorrect data mapping.
Currency: Your supported currencies. If you support multiple currencies, the AI will ensure the currency push is included on every page.
Events and parameters: Every event configured for your integration (page views, add to cart, remove from cart, purchase, custom events) with their exact parameters, data types, required status, and scope (cart-level vs item-level where applicable).
Integration instructions
This section contains the standard instructions for configuring the Web SDK integration. It contains the rules, code templates, error prevention guidelines, and output format that the AI follows when generating your integration code. You do not need to modify this section.
Before you start
Before using the SKILL file, make sure the following are already in place:
Insider Tag (ins.js) is loading on all pages of your website.
Purchase / confirmation page integration is already firing correctly.
The AI will verify both of these before proceeding. If either is missing or broken, the AI will help you fix it first.
What the AI will ask you
Even though your data is pre-loaded, the AI still needs some information that depends on your website's specific setup. It will ask you the following questions in a single message:
GDPR: Whether your website is subject to GDPR. If yes, the gdpr_optin attribute must be included in the user data push on every page.
Currency source: How the active currency is determined on your website (for example, user selection, URL parameter, geo-detection, or a cookie). The AI already knows your supported currencies but needs to know where to read the active value from.
Page type mapping: The AI will present Insider's 6 page types (home, category, product, cart, purchase, other) and ask you to map your website's actual pages or routes to each one. For example, your /collections/* pages might map to the "category" type, and your /products/* pages to the "product" type.
Cart behavior: Whether you have a dedicated cart page or only a mini cart (like a slide-out overlay), and whether cart data should be sent on every page or only on the cart page.
Data source and file paths: Where your user and product data live on your website (JavaScript variables, dataLayer, server-rendered HTML, API responses), and the file paths or templates where the integration code should be placed. If your site is an SPA, the AI will also ask which component or router file handles route changes.
Having this information ready before you start will make the process much faster.
You can configure your AI assistant to Plan mode first, so that the AI assistant can ask you these questions in a structured way.
How to use the SKILL file
Claude Code (recommended)
Claude Code is Anthropic's command-line AI coding tool. It is the recommended way to use the SKILL file.
Install Claude Code by following the instructions at docs.anthropic.com. Claude Code requires Node.js v18 or later.
Open your terminal, navigate to your project's root directory, and initialize Claude Code:
claude /initThis creates a .claude/ directory in your project.
Place the downloaded SKILL file at the following path:
your-project/
├── .claude/
│   └── skills/
│       └── web-sdk/
│           └── SKILL.md   ← place here
├── src/
├── public/
├── package.json
└── ...
Start Claude Code in plan mode by running claude in your terminal, then pressing Shift+Tab until the mode indicator shows "plan". Plan mode ensures the AI asks all the right questions and confirms a plan before writing any code.
Ask the AI to start the integration:
"I need to complete the Insider One Web SDK integration. Please follow the SKILL.md instructions."The AI will verify your existing setup, confirm your preloaded data, ask the remaining questions, and then generate complete integration code for each page type, mapped to the correct files in your project.
Cursor
Cursor supports project-level custom instructions through rule files.
Create a .cursor/rules/ directory in your project root if it doesn't exist.
Copy the contents of the SKILL file into a new file at:
your-project/
├── .cursor/
│   └── rules/
│       └── insider-web-sdk.mdc   ← paste contents here
├── src/
└── ...
Open Cursor's AI chat and ask it to start the integration. Cursor will automatically pick up the rule file.
Windsurf
Windsurf uses a .windsurfrules file in your project root.
Create a file named .windsurfrules in your project root.
Paste the entire contents of the SKILL file into this file.
Open the Windsurf AI assistant and ask it to start the Insider Web SDK integration.
GitHub Copilot
GitHub Copilot supports custom instructions through a markdown file.
Create the file .github/copilot-instructions.md in your project root.
Paste the contents of the SKILL file into this file.
Open Copilot Chat in your editor and ask it to start the integration.
Any other AI assistant
If you're using a different AI coding tool, you can paste the contents of the SKILL file directly into the AI's system prompt, custom instructions, or chat context. The content is model-agnostic; any capable AI assistant can follow the instructions, though results may vary.
After the integration
Once the AI has generated your integration code and you've placed it in the correct files, you need to complete two final steps:
Test your integration
Verify that the integration is working correctly by testing each page type.
Confirm your integration
Once testing is complete, confirm your integration in the Web SDK wizard.