Suggested Readings: Events and Attributes, Data Collection, Data Ingestion
Insider Web SDK enables seamless data collection and real-time personalization by capturing detailed data on user attributes, behaviors, and interactions across your website. Once the integration is complete, you can immediately use this robust and unified data for customer identification, purchase tracking, and revenue analysis. This provides the foundation for personalizing your users’ experience with dynamic content, creating advanced segmentation using attributes, and targeting users effectively across channels such as Email, SMS, WhatsApp, and Facebook Custom Audiences.
This guide aims to provide a complete outline of the following:
When it comes to data collection, Insider One products use two data structures: Events and Attributes.
An event defines all the actions your users perform while interacting with your website, application, campaigns, and/or offline stores (e.g., viewing a page, adding an item to cart, completing a purchase, etc.).
An attribute defines all the details about a user. It helps you understand their preferences such as personal information, last purchased and visited products, etc.
With a complete Insider Web SDK integration, you can:
Set and update attributes,
Keep track of users’ visited products,
Detect the page types and actions taken on these pages,
Track customer behavior and purchase history,
Share consent information with Insider One,
Unify user data across platforms,
Get accurate metrics like conversions, conversion rates, and revenue,
Set initialization rules to trigger data processing where needed.
Integration platforms
You can configure your integration via one of the various methods of your choosing:
Source code integration: This guide primarily focuses on adding scripts directly to your website's source code.
Google Tag Manager (GTM): A comprehensive set of details for GTM integration is provided in a dedicated section. You are required to follow this document along with that specific section. The principles can also be adapted for other tag managers.
Other tag managers: You can consult the Insider One team for tag managers like Tealium Tag Manager or Adobe Launch.
Required implementation flow
This section provides a high-level overview of the integration flow. It introduces the main components of the SDK setup. You can follow the rest of this guide to configure these components.
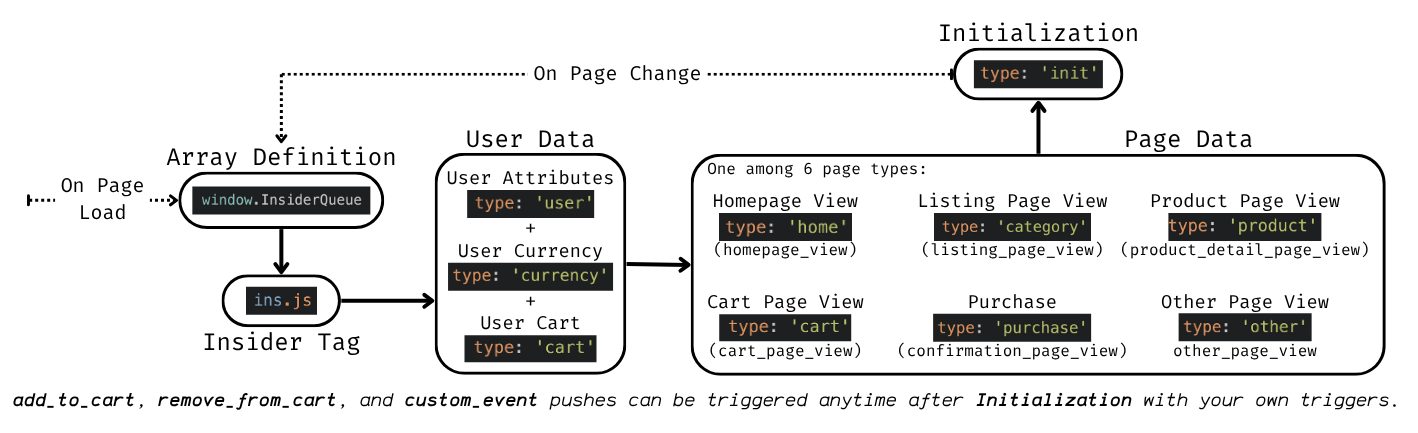
A typical integration follows the order as follows:
The InsiderQueue array must be defined before the Insider Tag loads. This is the queue where all integration data will be pushed.
Then, load the Insider Tag (ins.js).
Push the user data: attributes (type: 'user'), the user’s current currency (type: 'currency') if needed, and items currently in the user's cart if preferred (type: 'cart'). You can push these components in any order.
After the user data, push the correct page type to define the current page context (e.g., type: 'home', type: 'product').
At the end, push type: 'init' to signal Insider Tag that the full data is ready. This triggers a page view event and updates the user profile. This is the most critical push in the Insider Web SDK.
Event pushes such as type: 'add_to_cart', type: 'remove_from_cart', and type: 'custom_event' should be triggered by your site logic as needed, but only after the Insider Tag is loaded.
For optimal performance, we recommend defining the InsiderQueue and Insider Tag in the <head></head> tag of your code. The Insider Tag will wait for the type: 'init' method to be initialized.
The user object is required for the data in the other objects to be assigned to the respective user.
Important: Remove the legacy Insider Object implementation
When migrating an existing website to Insider Web SDK, remove the website code that manually defines or populates window.insider_object. Do not run the legacy Insider Object implementation together with the new InsiderQueue integration.
Integration
You can follow these steps to configure the integration.
Insider Queue array
The InsiderQueue is a JavaScript array you define on your website. Its purpose is to collect all user attributes, page details, and events before the Insider Tag processes them.
To implement it, you must add the following line of code to every page where you will use the SDK. You must place this script before the Insider Tag (ins.js).
window.InsiderQueue = window.InsiderQueue || [];
The InsiderQueue array must be set once on each page where you plan to utilize it. If the InsiderQueue is not defined, the Insider Tag will still work, but you won’t be able to push data into the array.
The InsiderQueue shouldn’t be empty. If it is defined, you should at least define the page type and push the type: 'init' method.
If you don’t want to preserve InsiderQueue between pages, you can define it as window.InsiderQueue = []; as well, but it is optional.
As for single-page applications, since the InsiderQueue will be preserved along with the single-page application, you are required to define it just once in each application load.
Insider Tag (ins.js)
Insider Tag integration is the core script that tracks user behavior, such as purchase and visit history, processes the data from the InsiderQueue, and enables all Insider One functionalities on your website. Below, you can find the example script for Insider Tag.
<script async src="//{partnerName}.api.useinsider.com/ins.js?id={partnerId}"></script>
To configure the InsiderQueue, the Insider Tag (ins.js) is required to track user behavior and actions.
Make sure you add the Insider Tag (ins.js) to all pages on your website without any modification in the <head></head> tag after the InsiderQueue array definition.
This script loads asynchronously by default and does not block any other script on your website or the rendering of your web pages.
As for single-page applications, since the Insider Tag will be preserved along with the single-page application, you are required to define it just once in each application load.
Both http and https protocols are accepted as values for any URL property.
User data - Attributes
With the type: 'user' method, you define your user's default and custom attributes. This allows Insider One to identify, unify, and track users correctly based on your Identity Resolution Management settings.
It is highly recommended to push all available user information every time you send a type: 'user' push. This practice ensures data consistency across all user identification and unification scenarios.
When defining your user’s attributes, follow the data table below for data types and requirements.
Attribute | Description | Data Type | Sample Value | Required |
|---|---|---|---|---|
gender | Gender of the user | String | M | No |
birthday | Birthday of the user | Datetime | 2000-01-20T00:00:00Z | No |
name | Name of the user | String | John | No |
surname | Surname of the user | String | Doe | No |
age | Age of the user | Number | 33 | No |
Email address of the user | String | jdoe@useinsider.com | No* | |
email_optin | Indicates if the user has opted in for emails | Boolean | true | No |
phone_number | Phone number of the user in E.164 format | String | +120394879878 | No* |
sms_optin | Indicates if the user has opted in for SMS | Boolean | true | No |
language | Language of the user | String | en_US | No** |
city | City of the user | String | Jakarta | No |
country | Country of the user in ISO-3166 alpha-2 format | String | ID | No |
uuid | Unique user ID of the user | String | INS123 | No* |
gdpr_optin | Indicates if the user has allowed for cookies | Boolean | true | No*** |
whatsapp_optin | Indicates if the user has opted in for WhatsApp messages | Boolean | false | No |
custom | Object for custom user attributes | Object | {"membership": "Silver"} | No |
type: 'user' is not necessarily required for the Web SDK except for the cases below. However, the user data is crucial for better use cases, so we strongly recommend utilizing it as much as possible.
*No identifier is marked required in the table above, including Insider One’s default identifier set: uuid, email, and phone_number. If you are using any default or custom attributes as identifiers, you must define them in this push for a correct unification and identification process.
**The language attribute is required for many cases. For example, if you want to show your campaigns to users based on their language, this attribute is required. It is advisable to set the user’s language on all pages to avoid any difficulties.
***The gdpr_optin is required for customers who are subject to the GDPR Laws. When it is defined as false, campaigns (except cookieless cases) will not be displayed, and Insider One messages will not be sent. If it is not defined, it will be accepted as true.
****For the country attribute, other formats, such as ‘Indonesia’, are also accepted; however, ‘ID’ is recommended for optional use of segmentation and Architect.
Below, you can find the example script for the type: 'user' method of Insider Web SDK.
window.InsiderQueue.push({
    type: 'user',
    value: {
        "uuid": "INS123",
        "gender": "M",
        "birthday": "2000-01-20T00:00:00Z",
        "gdpr_optin": true,
        "name": "John",
        "surname": "Doe",
        "username": "jdoe",
        "age": 33,
        "email": "jdoe@useinsider.com",
        "email_optin": true,
        "phone_number": "+120394879878",
        "sms_optin": true,
        "language": "en_US",
        "city": "Jakarta",
        "country": "ID",
        "whatsapp_optin": true,
        "custom": {
            "user_lifetime": 23,
            "membership_type": "Silver"
        }
    }
});
User data - Currency
With the type: 'currency' method, you define the currency that is currently used by the user to view your website. This method is essential for customers supporting multiple currencies. It is used when converting price information in InsiderQueue events and when displaying a campaign with price information in the correct currency.
Below, you can find the example script for the type: 'currency' method of Insider Web SDK.
window.InsiderQueue.push({
    type: 'currency',
    value: 'USD'
});
You can contact the Insider One team to skip the type: 'currency' method if you only allow a single currency on your website.
User data - Cart (optional)
The type: 'cart' method is used to define the page type as a cart page and update the user’s cart information for Insider One. This means your user’s data will already be updated in every cart page view. However, if you are sensitive about the up-to-dateness of your cart data, you can use this method on every page to update the user’s cart information. This way, Insider One will be up to date about the user’s cart regardless of page type. If not, you can skip this section and use the type: 'cart' method for defining the cart page type and sending the cart page view.
When defining your user’s cart items, follow the data table below for data types and requirements.
Property | Description | Data Type | Sample Value | Required |
|---|---|---|---|---|
total | Total price of the cart item(s) including shipping fees and taxes | Float | 273.99 | Yes |
items | The list of cart items | Array | [{"id": "abc1234", "name": "Blue Dress", "taxonomy": ["Dresses", "Night Dresses", "Long Sleeve"]}] | Yes |
id (for ‘items’) | Unique product ID of the product | String | abc1234 | Yes |
name (for ‘items’) | Product name | String | Blue Dress | Yes |
taxonomy (for ‘items’) | Category tree of the product | Array | ["Dresses", "Night Dresses", "Long Sleeve"] | Yes |
unit_price (for ‘items’) | Price of the purchased product without any discount(s) | Float | 100.00 | Yes |
unit_sale_price (for ‘items’) | Unit price of the product | Float | 95.20 | Yes |
quantity (for ‘items’) | Number of items | Number | 2 | Yes |
product_image_url (for ‘items’) | URL address of the product image | String | https://posh.useinsider.com/blue-dress.png | Yes |
url (for ‘items’) | URL address of the product | String | https://posh.useinsider.com/blue-dress | Yes |
stock (for ‘items’) | Stock information of the product that shows the number of products left in stock | Number | 11 | No |
color (for ‘items’) | Color of the product selected by the user | String | Blue | No |
size (for ‘items’) | Size of the product selected by the user | String | S | No |
shipping_cost | Shipping cost of the item(s) in the cart | Float | 7.99 | No |
custom (for ‘items’) | Custom object that includes custom properties to be collected to Insider One database as custom event parameters | Object | {"merchandiser": "store123"} | No |
This method also sets the page type as cart page, as well as updating the user’s cart data. You will also update the page type before the type: 'init' method.
Below, you can find the example script for the type: 'cart' method of Insider Web SDK.
window.InsiderQueue.push({
    type: 'cart',
    value: {
        "total": 200.39,
        "items": [{
            "id": "abc1234",
            "name": "Blue Dress",
            "taxonomy": [
                "Dresses",
                "Night Dresses",
                "Long Sleeve"
            ],
            "unit_price": 90.00,
            "unit_sale_price": 75,
            "quantity": 2,
             "product_image_url": "https://posh.useinsider.com/blue-dress.png",
            "url": "https://posh.useinsider.com/blue-dress",
            "stock": 11,
            "color": "Blue",
            "size": "S",
            "custom": {
                "merchandiser": "store123"
            }
        }, {
            "id": "zxc5678",
            "name": "Yellow T-Shirt",
            "taxonomy": [
                "T-Shirts",
                "Oversize"
            ],
            "unit_price": 60.00,
            "unit_sale_price": 50.39,
            "quantity": 1,
            "product_image_url": "https://posh.useinsider.com/yellow-tshirt.png",
            "url": "https://posh.useinsider.com/yellow-tshirt/",
            "stock": 11,
            "color": "Yellow",
            "size": "L",
            "shipping_cost": 7.99
        }]
    }
});
Page data - Home
The type: 'home' method defines the page type as home. With the type: 'init' method, it sends a Home Page View (home_page_view) event, which you can see on the User Profiles. You can define only one product per product page.
For this push to work, type: 'init' must be pushed once per page afterward.
Below, you can find the example script for the type: 'home' method of Insider Web SDK. Since the default parameters of Homepage View are sent automatically, you can only define custom parameters for this page type.
window.InsiderQueue.push({
    type: 'home',
    value: {
      "custom": {
        "home_page_version": "version1",
        "daily_count": 14
      }
    }
});
Page data - Category
The type: 'category' method defines the page type as category/listing. With the type: 'init' method, it sends a Listing Page View (listing_page_view) event, which you can see on the User Profiles.
The breadcrumb parameter is required for many use cases. It must be an array with a structure like ["Dresses", "Night Dresses", "Long Sleeve"].
For this push to work, type: 'init' must be pushed once per page afterward.
Below, you can find the example script for the type: 'category' method of Insider Web SDK.
window.InsiderQueue.push({
    type: 'category',
    value: {
        breadcrumb: ['Dresses', 'Night Dresses'],
    },
});
If you want to push products in type:'category', reach out to the Insider One team to enable the data flow for your panel. Otherwise, the products cannot be sent successfully via Web SDK.
Page data - Product
The type: 'product' method defines the page type as product. With the type: 'init' method, it sends a Product Page View (product_detail_page_view) event, which you can observe on the User Profiles. You can define only one product per product page.
You can also utilize this method if you are using Insider One's Product Catalog Management, provided you are using Clickstream. With the data you define with the type: ‘product’ method, the system also updates that specific product's data in the product catalog. It is suggested to define as much information as you need in your use cases. This is why many of the properties in the data table below are marked as “Required”.
This is also why this method includes additional optional product attributes/event parameters. They are not listed in the generic data table or example script, but you can implement them just like others in compliance with the data type provided below:
groupcode property as string
description property as string
gtin property as string
sku property as string
brand property as string
identifier_exists property as string
locale property as string
google_title property as string
gender property as string
omnibus_price property as string
When defining the product page data, follow the data table below for data types and requirements.
Property | Description | Data Type | Sample Value | Required |
|---|---|---|---|---|
id | Unique product ID of the product | String | abc1234 | Yes |
name | Product name | String | Blue Dress | Yes |
taxonomy | Category tree of the product | Array | ["Dresses", "Night Dresses", "Long Sleeve"] | Yes |
unit_price | Price of the purchased product without any discount(s) | Float | 100.00 | Yes |
unit_sale_price | Unit price of the product | Float | 95.20 | Yes |
url | URL address of the product | String | https://posh.useinsider.com/blue-dress | Yes |
product_image_url | URL address of the product image | String | https://posh.useinsider.com/blue-dress.png | Yes |
stock | Stock information of the product that shows the number of products left in stock | Number | 11 | No |
color | Color of the product selected by the user | String | Blue | No |
size | Size of the product selected by the user | String | S | No |
groupcode | Used to group product variants | String | abc5678 | No |
custom | Custom object that includes custom properties to be collected to Insider One database as custom event parameters | Object | {"merchandiser": "store123"} | No |
Your products can be unified if you use the same ID for products with different data. In this case, we recommend differentiating the products' IDs depending on your use cases or contacting the Insider One team.
For this push to work, type: 'init' must be pushed once per page afterward
Below, you can find the example script for the type: 'product' method of Insider Web SDK.
window.InsiderQueue.push({
    type: 'product',
    value: {
        "id": "abc1234",
        "name": "Blue Dress",
        "taxonomy": [
            "Dresses",
            "Night Dresses",
            "Long Sleeve"
        ],
        "unit_price": 100.00,
        "unit_sale_price": 95.20,
        "url": "https://posh.useinsider.com/blue-dress",
        "product_image_url": "https://posh.useinsider.com/blue-dress.png",
        "stock": 11,
        "color": "Blue",
        "size": "S",
        "groupcode": "abd5678",
        "custom": {
            "merchandiser": "store123"
        }
    }
});
Page data - Cart
The type: 'cart' method sets the page type to cart and updates the user’s cart information for Insider One. With the type: 'init' method, it sends a Cart Page View (cart_page_view) event, which you can observe on the User Profiles.
The User data - Cart method is used to update the user’s cart information for Insider One. Since it also defines the page type as cart, you just need to push/fire the type: 'cart' method once on your cart page. If you already added (or fired) this method on your cart page to update the user’s cart information, you can skip this section of the integration because the page type is already defined as cart.
When defining cart page data, follow the data table below for data types and requirements.
Property | Description | Data Type | Sample Value | Required |
|---|---|---|---|---|
total | Total price of the cart item(s) including shipping fees and taxes | Float | 273.99 | Yes |
items | The list of cart items | Array | [{"id": "abc1234", "name": "Blue Dress", "taxonomy": ["Dresses", "Night Dresses", "Long Sleeve"]}] | Yes |
id (for ‘items’) | Unique product ID of the product | String | abc1234 | Yes |
name (for ‘items’) | Product name | String | Blue Dress | Yes |
taxonomy (for ‘items’) | Category tree of the product | Array | ["Dresses", "Night Dresses", "Long Sleeve"] | Yes |
unit_price (for ‘items’) | Price of the purchased product without any discount(s) | Float | 100.00 | Yes |
unit_sale_price (for ‘items’) | Unit price of the product | Float | 95.20 | Yes |
quantity (for ‘items’) | Number of items | Number | 2 | Yes |
url (for ‘items’) | URL address of the product | String | https://posh.useinsider.com/blue-dress | Yes |
product_image_url (for ‘items’) | URL address of the product image | String | https://posh.useinsider.com/blue-dress.png | Yes |
stock (for ‘items’) | Stock information of the product that shows the number of products left in stock | Number | 11 | No |
color (for ‘items’) | Color of the product selected by the user | String | Blue | No |
size (for ‘items’) | Size of the product selected by the user | String | S | No |
shipping_cost | Shipping cost of the item(s) in the cart | Float | 7.99 | No |
custom (for ‘items’) | Custom object that includes custom properties to be collected to Insider One database as custom event parameters | Object | {"merchandiser": "store123"} | No |
For this push to work, type: 'init' must be pushed once per page afterward. If you have already pushed type: 'init' for the user’s cart information, you can skip this one for the cart page. You do not need to push the method twice.
Below, you can find the example script for the type: 'cart' method of Insider Web SDK.
window.InsiderQueue.push({
    type: 'cart',
    value: {
        "total": 200.39,
        "items": [{
            "id": "abc1234",
            "name": "Blue Dress",
            "taxonomy": [
                "Dresses",
                "Night Dresses",
                "Long Sleeve"
            ],
            "unit_price": 90.00,
            "unit_sale_price": 75,
            "quantity": 2,
            "url": "https://posh.useinsider.com/blue-dress",
            "product_image_url": "https://posh.useinsider.com/blue-dress.png",
            "stock": 11,
            "color": "Blue",
            "size": "S",
            "custom": {
                "merchandiser": "store123"
            }
        }, {
            "id": "zxc5678",
            "name": "Yellow T-Shirt",
            "taxonomy": [
                "T-Shirts",
                "Oversize"
            ],
            "unit_price": 60.00,
            "unit_sale_price": 50.39,
            "quantity": 1,
            "url": "https://posh.useinsider.com/yellow-tshirt/",
            "product_image_url": "https://posh.useinsider.com/yellow-tshirt.png",
            "stock": 11,
            "color": "Yellow",
            "size": "L"
        }],
        "shipping_cost": 7.99
    }
});
If you have a mini cart page appended to any page, you will follow a very similar approach:
Imagine you have a mini cart page in a single-page structure appended to a product page.
You will define InsiderQueue, user data, and page data when a user comes to this product page, then push type: 'init' and load the Insider Tag. If your user visits the mini cart, you will push the type: 'cart' method to define the page type as cart (also to define the cart items), then you will follow it up with type: 'init' to trigger the page view with the last page data definition. You don’t need to load the Insider Tag again since it is already loaded (and if your mini cart is appended as a single page structure).
If you don’t send type: 'cart', the system will assume it is a product page for your campaign rules.
If you don’t send type: 'init', the page type will be cart, but it will not send the Cart Page View event.When your user closes the mini cart page and returns, push type: 'product' to set the page type back to product page, and push type: 'init' to send the Product Page View event.
You can also use custom attributes/parameters to differentiate a mini cart page view from other default cart page views.
Page data - Purchase
The type: 'purchase' method defines the page type as purchase and updates the user’s cart information for Insider One. With the type: 'init' method, it sends a Purchase (confirmation_page_view) event, which you can observe on the User Profiles. This method is highly crucial for Insider One functions.
When defining the purchase page data, follow the data table below for data types and requirements.
Key | Description | Data Type | Sample Value | Required |
|---|---|---|---|---|
order_id | Order ID of the transaction | String | INS2468 | Yes |
total | Total price of the transaction including shipping fees and taxes | Float | 273.39 | Yes |
items | The list of purchased items | Array | [{"id": "abc1234", "name": "Blue Dress", "taxonomy": ["Dresses", "Night Dresses", "Long Sleeve"]}] | Yes |
id (for 'items') | Unique product ID of the purchased product | String | abc1234 | Yes |
name (for 'items') | Name of the purchased product | String | Blue Dress | Yes |
taxonomy (for 'items') | Category tree of the product | Array | ["Dresses", "Night Dresses", "Long Sleeve"] | Yes |
unit_price (for 'items') | Price of the purchased product without any discount(s) | Float | 100.00 | Yes |
unit_sale_price (for 'items') | Unit price of the purchased product | Float | 95.20 | Yes |
url (for 'items') | URL address of the purchased product | String | https://push.useinsider.com/dresses/blue-dress-abc1234 | Yes |
product_image_url (for 'items') | URL address of the product image | String | https://posh.useinsider.com/blue-dress-image | Yes |
quantity (for 'items') | Number of products | Number | 2 | Yes |
stock (for 'items') | Stock information of the product that shows the number of products left in stock | Number | 11 | No |
color (for 'items') | Color of the product selected by the user | String | Blue | No |
size (for 'items') | Size of the product selected by the user | String | S | No |
shipping_cost | Shipping cost of the item(s) in the cart | Float | 7.99 | No |
custom (for 'items') | Custom object that includes custom properties to be collected to Insider One database as custom event parameters | Object | {"season": "winter"} | No |
We advise you to define as much information as possible for your purchase event to enhance your experience in your campaigns.
For this push to work, type: 'init' must be pushed once per page afterward.
Below, you can find the example script for the type: 'purchase' method of Insider Web SDK.
window.InsiderQueue.push({
    type: 'purchase',
    value: {
        "order_id": "INS2468",
        "total": 200.39,
        "items": [{
            "id": "abc1234",
            "name": "Blue Dress",
            "taxonomy": [
                "Dresses",
                "Night Dresses",
                "Long Sleeve"
            ],
            "unit_price": 90.00,
            "unit_sale_price": 75.00,
            "quantity": 2,
            "url": "https://push.useinsider.com/dresses/blue-dress-abc1234",
            "product_image_url": "https://posh.useinsider.com/blue-dress-image",
            "stock": 11,
            "color": "Blue",
            "size": "S",
            "custom": {
                "merchandiser": "store123"
            }
        }, {
            "id": "zxc5678",
            "name": "Yellow T-Shirt",
            "taxonomy": [
                "T-Shirts",
                "Oversize"
            ],
            "unit_price": 60.00,
            "unit_sale_price": 50.39,
            "quantity": 1,
            "url": "https://posh.useinsider.com/yellow-tshirt/",
            "product_image_url": "https://posh.useinsider.com/yellow-tshirt.png",
            "stock": 11,
            "color": "Yellow",
            "size": "L",
            "custom": {
                "merchandiser": "store456"
            }
        }],
      "shipping_cost": 7.00
    }
});
Page data - Other
The type: 'other' method defines the page type as other. With the type: 'init' method, it sends an Other Page View (other_page_view) event, which you can observe on the User Profiles. You can use this method to label any kind of page.
Only the name parameter is used to label the other pages with a string data type. This parameter is not required and will be displayed in the User Profiles entries for Other Page View events. You can also use custom event parameters.
For this push to work, type: 'init' must be pushed once per page afterward.
Below, you can find the example script for the type: 'other' method of Insider Web SDK.
window.InsiderQueue.push({
    type: 'other',
    value: {
      "name": "landing page v.2",
      "custom": {
        "landed_previously": false,
        "traffic_source": "facebook"
      }
    }
});
Initialization push — A critical step
type: 'init' is the most critical yet basic method in the Web SDK integration. It acts as the trigger that tells the Insider Tag to pass the user and page data you have defined to Insider.
Every time you push this method to InsiderQueue:
It tells the Insider Tag to initialize if it hasn’t already.
User data from the last successful type: 'user' push will be sent to Insider One.
Page view event, according to the last successful page definition you made, will be sent to Insider One.
It will check which “Rules” (and some other settings) are satisfied to display correct campaigns to correct users.
If you have defined InsiderQueue along with some data and loaded the Insider Tag without the type: 'init' method, the Insider Tag will not work. It is critical to push the initialization method with correct timing. It must be fired once on every page with the InsiderQueue array after user and page data.
The custom_event, add_to_cart, or remove_from_cart events do not require the type: 'init' method to be pushed afterward.
Below, you can find the example script for the type: 'init' method of Insider Web SDK.
window.InsiderQueue.push({
    type: 'init'
});
In a single-page application branch, the type: 'init' method will still work as a page change trigger even though the page is not technically changing. You need to push at least the page type and initialization method in every virtual page change so that the correct page type is set and the page view event is sent.
Your user data (attributes, currency, cart) will be preserved along with the branch, and you can update it at any time. However, we advise you to use the user data alongside other data to keep the integration simple.
Add to cart and remove from cart
The type: 'add_to_cart' and type: 'remove_from_cart' methods update the user's cart information based on the user’s action and send the corresponding event to Insider One: add to cart (item_added_to_cart) or remove from cart (item_removed_from_cart).
While pushing these two events, you must follow the data table below for data types and requirements.
Key | Description | Data Type | Sample Value | Required |
|---|---|---|---|---|
id | Unique product ID of the purchased product | String | abc1234 | Yes |
name | Name of the purchased product | String | Blue Dress | Yes |
taxonomy | Category tree of the product | Array | ["Dresses", "Night Dresses", "Long Sleeve"] | Yes |
unit_price | Price of the purchased product without any discount(s) | Float | 100.00 | Yes |
unit_sale_price | Unit price of the purchased product | Float | 95.20 | Yes |
url | URL address of the purchased product | String | https://push.useinsider.com/dresses/blue-dress-abc1234 | Yes |
product_image_url | URL address of the product image | String | https://posh.useinsider.com/blue-dress-image | Yes |
quantity | Number of products | Number | 2 | Yes |
stock | Stock information of the product that shows the number of products left in stock | Number | 11 | No |
color | Color of the product selected by the user | String | Blue | No |
size | Size of the product selected by the user | String | S | No |
custom | Custom object that includes custom properties to be collected to Insider One database as custom event parameters | Object | {"season": "winter"} | No |
Since these two methods are not used for defining user or page data, you do not need to push them before the type: 'init' method. These two methods need to be pushed with your own trigger, but after the Insider Tag (ins.js), which is pushed after the initialization method.
Below, you can find the example script for these two Insider Web SDK methods.
window.InsiderQueue.push({
    type: "add_to_cart",   // OR  type: "remove_from_cart",
    value: {
        "id": "abc1234",
        "name": "Blue Dress",
        "taxonomy": [
            "Dresses",
            "Night Dresses",
            "Long Sleeve"
        ],
        "unit_price": 100.00,
        "unit_sale_price": 95.20,
        "quantity": 2,
        "url": "https://posh.useinsider.com/blue-dress",
        "product_image_url": "https://posh.useinsider.com/blue-dress.png",
        "stock": 11,
        "color": "Blue",
        "size": "S",
        "custom": {
            "merchandiser": "store123",
            "item_finish_date": "2021-01-20T00:00:00Z"
        }
    }
});
Custom events
The type: 'custom_event' method lets you push custom events to Insider One with selected parameters. With this method, you can address nearly all segmenting and targeting use cases for your business needs that are not covered by default methods.
When pushing these two events, you must match the data types of your default custom parameters as defined on the Attributes and Events page.
Below is the example script for the custom event method of the Insider Web SDK. No parameter ID is required except for event_name.
Like add to cart and remove from cart events, the custom event method doesn’t need to be pushed before the type: 'init' method, since it is not used for defining user or page data. This method needs to be pushed with your own trigger, but after the Insider Tag (ins.js), which is pushed after the initialization method.
window.InsiderQueue.push({
    type: 'custom_event',
    value: [{
        event_name: 'name_of_your_custom_event', // as you defined
        event_parameters: {
            "quantity": 3, // number-typed default parameter,
            "custom": {
                "domain_group_id": 123, // number-typed custom parameter example
                "action_taken": "abc12", // string-typed custom parameter example
                "isRepeated": "true", // boolean-typed custom parameter example
                "user_acq_time": "2021-01-20T00:00:00Z" // in  datetime-typed custom parameter example
            }
        }
    }]
});
Configuration for Google Tag Manager
This section provides detailed guidelines for integrating the Insider Web SDK using Google Tag Manager. The principles can be adapted for other tag management systems, as well.
The information in this section completes the information given in the Integration section. We recommend that you understand the previous sections clearly before proceeding. You must also follow the guidelines and rules provided in the Integration section.
In the table below, you can find all the tags to be created and the settings for correct firing.
Tag name | Purpose | Included methods/scripts | Triggering (GTM) | Tag sequencing (GTM) |
|---|---|---|---|---|
Insider - Queue & Core Tag | InsiderQueue array and Insider Tag definition | InsiderQueue and ins.js scripts | All page views | Fire Insider - User Informationafter this tag |
Insider - User information | Attribute, currency, and cart items definition | type: 'user', type: 'currency', type: 'cart' | All page views | Fire Insider - Queue & Core Tagbefore this tag |
Insider - Home Page | Page type definition | type: 'home' | Home page view |
|
Insider - Category Page | Page type definition | type: 'category' | Category page view |
|
Insider - Product Page | Page type definition | type: 'product' | Product page view |
|
Insider - Cart Page* (not required for tag managers) | Page type definition | type: 'cart' | Cart page view |
|
Insider - Purchase Page | Page type definition | type: 'purchase' | Purchase page view |
|
Insider - Other Page | Page type definition | type: 'other' | Other page view |
|
Insider - Initialization | Data initialization | type: 'init' | None | None |
Insider - Add to cart | Sends add to cart event | type: 'add_to_cart' | Your trigger | Fire Insider - Initializationbefore this tag |
Insider - Remove from cart | Sends remove from cart event | type: 'remove_from_cart' | Your trigger | Fire Insider - Initializationbefore this tag |
Insider - Custom Event (for each custom event) | Sends custom event | type: 'custom_event' | Your trigger | Fire Insider - Initializationbefore this tag |
You can integrate the Web SDK through Google Tag Manager following the Insider Onboarding Center.
(5).png)
The Insider - Cart Page tag is not necessarily needed for the Web SDK integration except in some cases (single page applications, mini cart pages, etc.) since the cart page type is already defined with the type: 'cart' (optional) method.
The user’s cart in the Insider - User Information tag is defined, and the page view will be sent in the Insider - Initialization tag unless another page type is defined before.
If you use the type: 'cart' method in the Insider - User Information tag and don’t want to use the Insider - Cart Page tag, you can skip it. In this case, the Insider - Initialization tag will need a Cart Page Viewtrigger and to be fired after the Insider - User Information tag.