You can set up the Call an API element by following these step-by-step instructions:
1. Add Call an API element
- Add a new Call an API element to the selected Journey or Canvas.

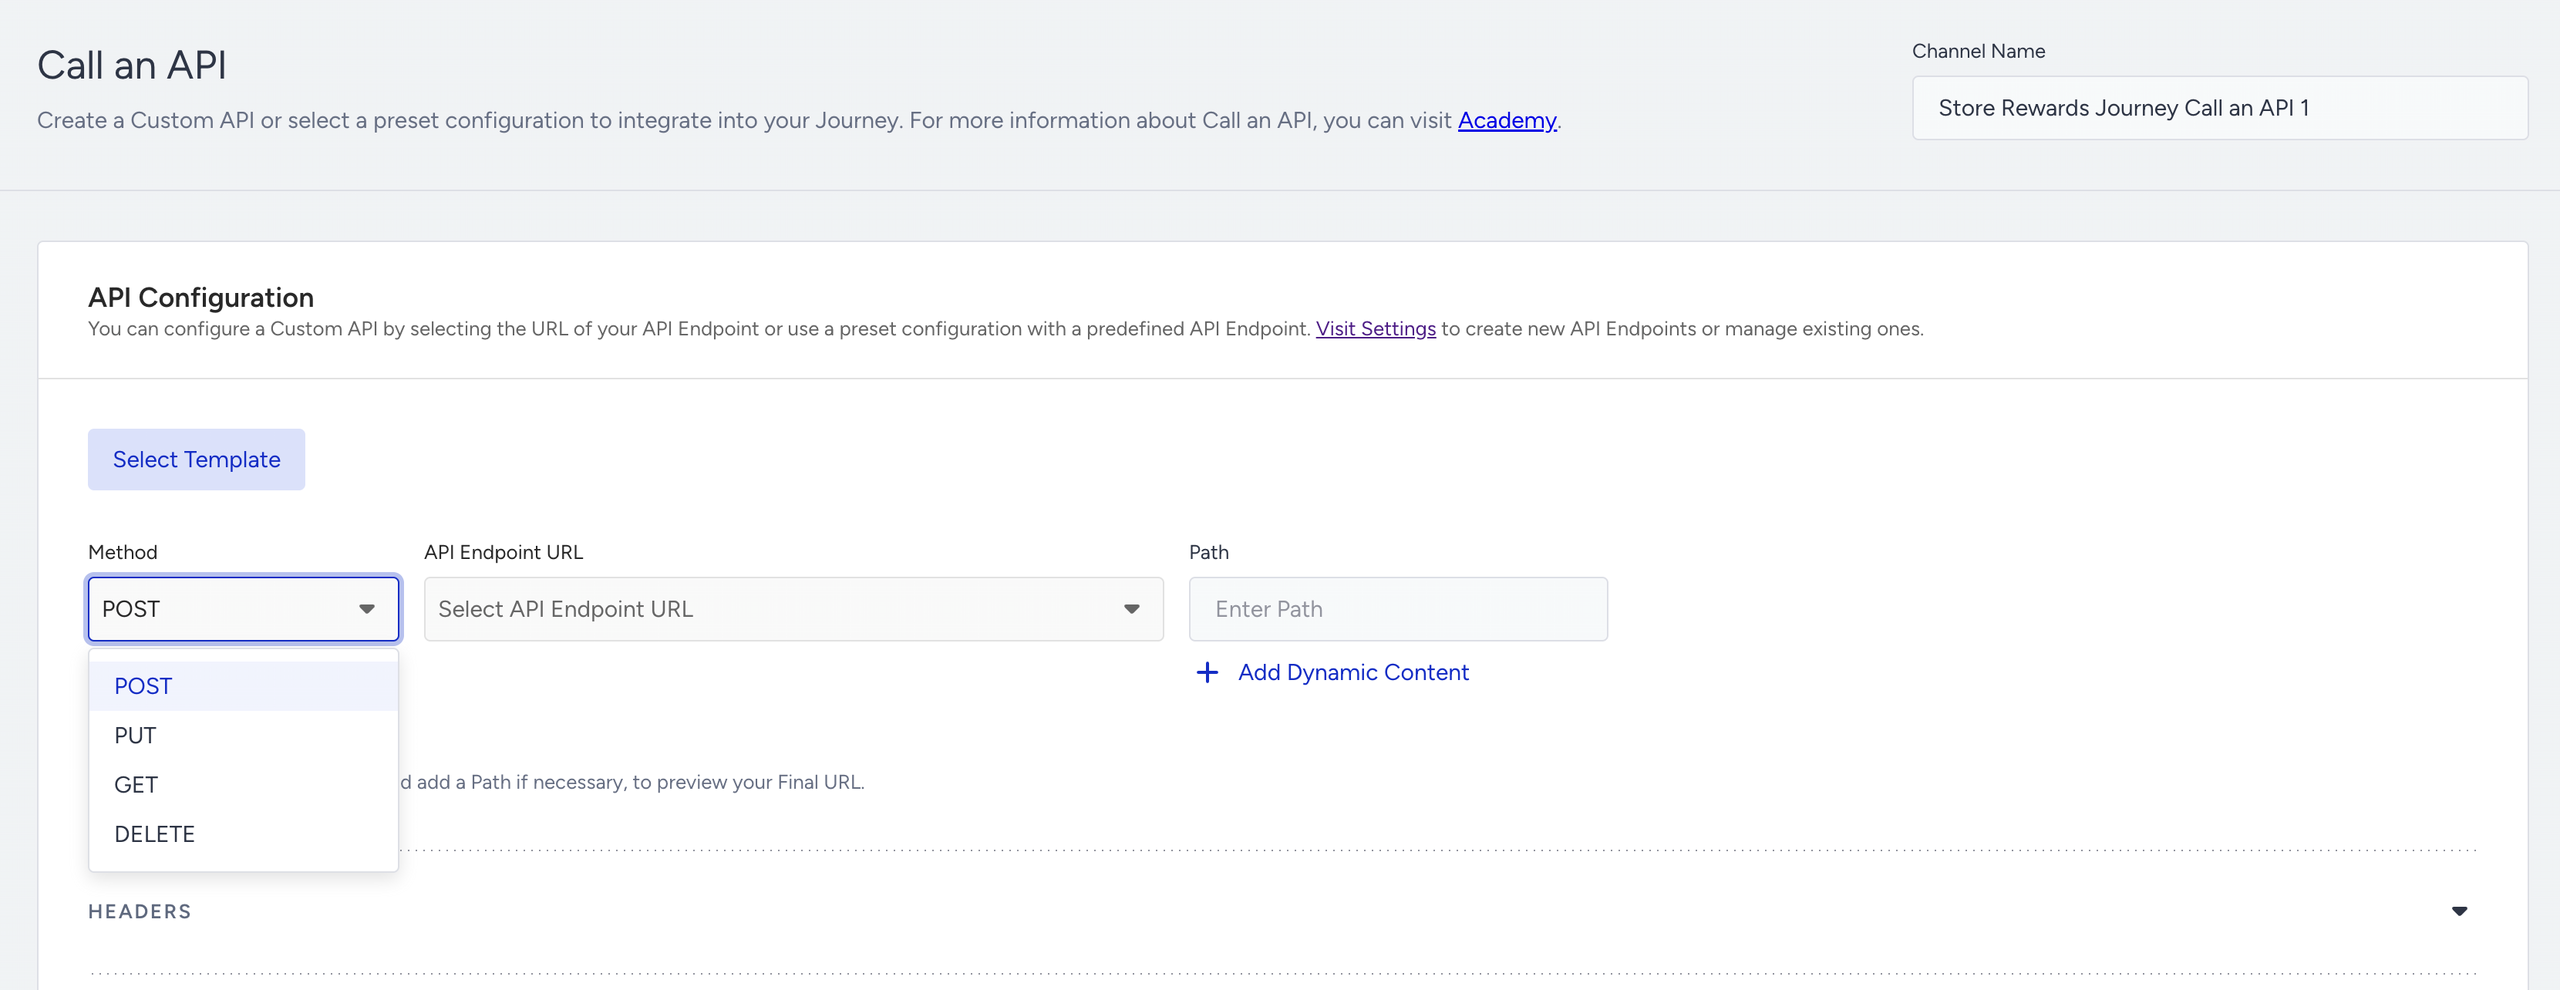
2. Select the method and enter the endpoint
Request method
The request method that you should use will vary based on the endpoint to which you are planning to send information. The majority of the time, you’ll be using POST.
See the other request methods that you can use in your Call an API element below:
- POST - an HTTP method designed to send significant amounts of data to a server from a specified resource.
- GET - a method used to request data from a specified resource and should have no other effect.
- PUT - an idempotent method whose responses are not cacheable.
- DELETE - a method used to remove a resource from the collection of resources.
Call an API can take data from outsourced tools not only by the GET method but also by other methods as long as the response is ready.
Endpoint (URL)
When an API interacts with another system, the touchpoints in such a communication are considered endpoint URLs.
Base URL: In this dropdown, you can choose from the listed predefined endpoints.
.png)
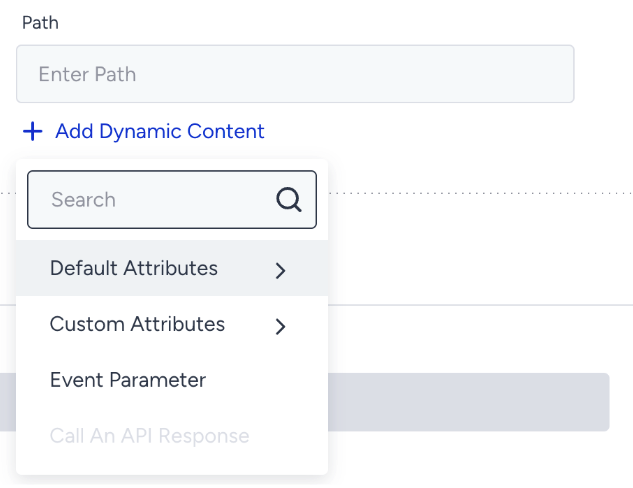
Path: You can use dynamic content inside the path field. The dynamic content added in the path is autoencoded by converting the text into a percent-encoded string.
For example, if you want to pass any phone number information in the URL, you should add “phone number” as dynamic content. When a user is passing through the Call an API element, the dynamic content is replaced with user’s phone number value. Since the phone number includes the country code starting with +, the + sign is converted to a percent-encoded string. In this case, +655551234567 becomes %2B655551234567.
3. Set headers
Certain endpoints (URLs) may require that you include headers in your request. You can add as many headers as you like. Common use cases for request headers include a content-type specification and authorization headers that contain your credentials along with your vendor or system. Content-type specifications have the key ‘Content-Type’ and the default value as application/json.
The header section includes two settings:
- Enter Key: An API key is a token that a client provides when making API calls.
- Enter a value: Each API Key should have a value. For example, you can add a token as an API key and enter its value.
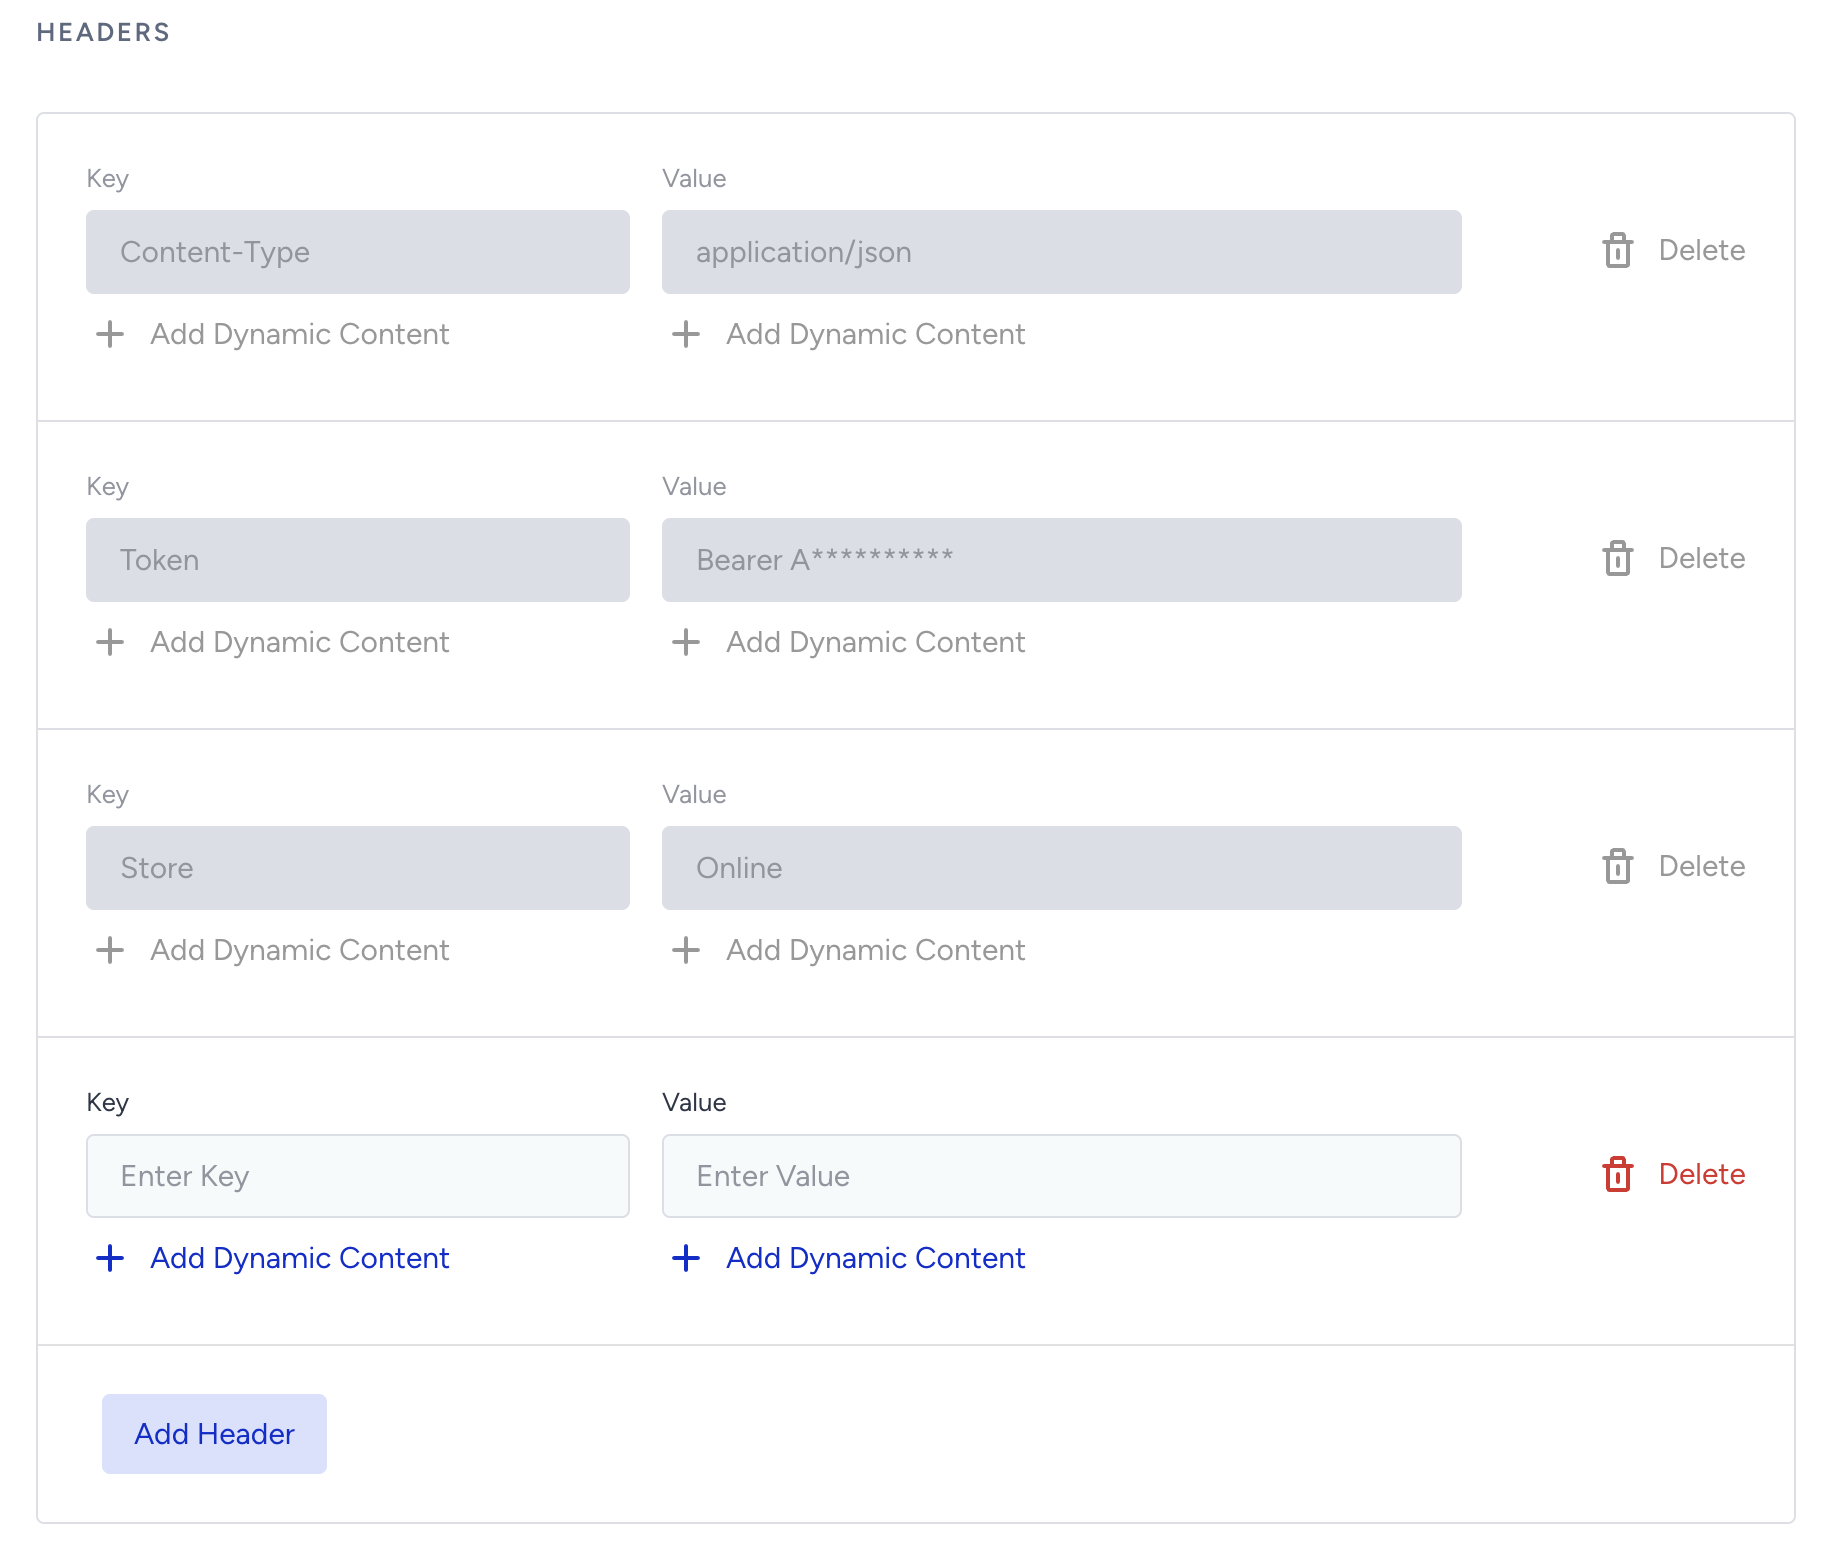
You can click the Add Header button at the bottom section to add multiple headers.
To add any dynamic content, click the Add Dynamic Content button to select an attribute.
4. Configure the body
Body is the information that the request will send to the URL that you specified. The ‘body’ is also known as payload. It should be in JSON format.
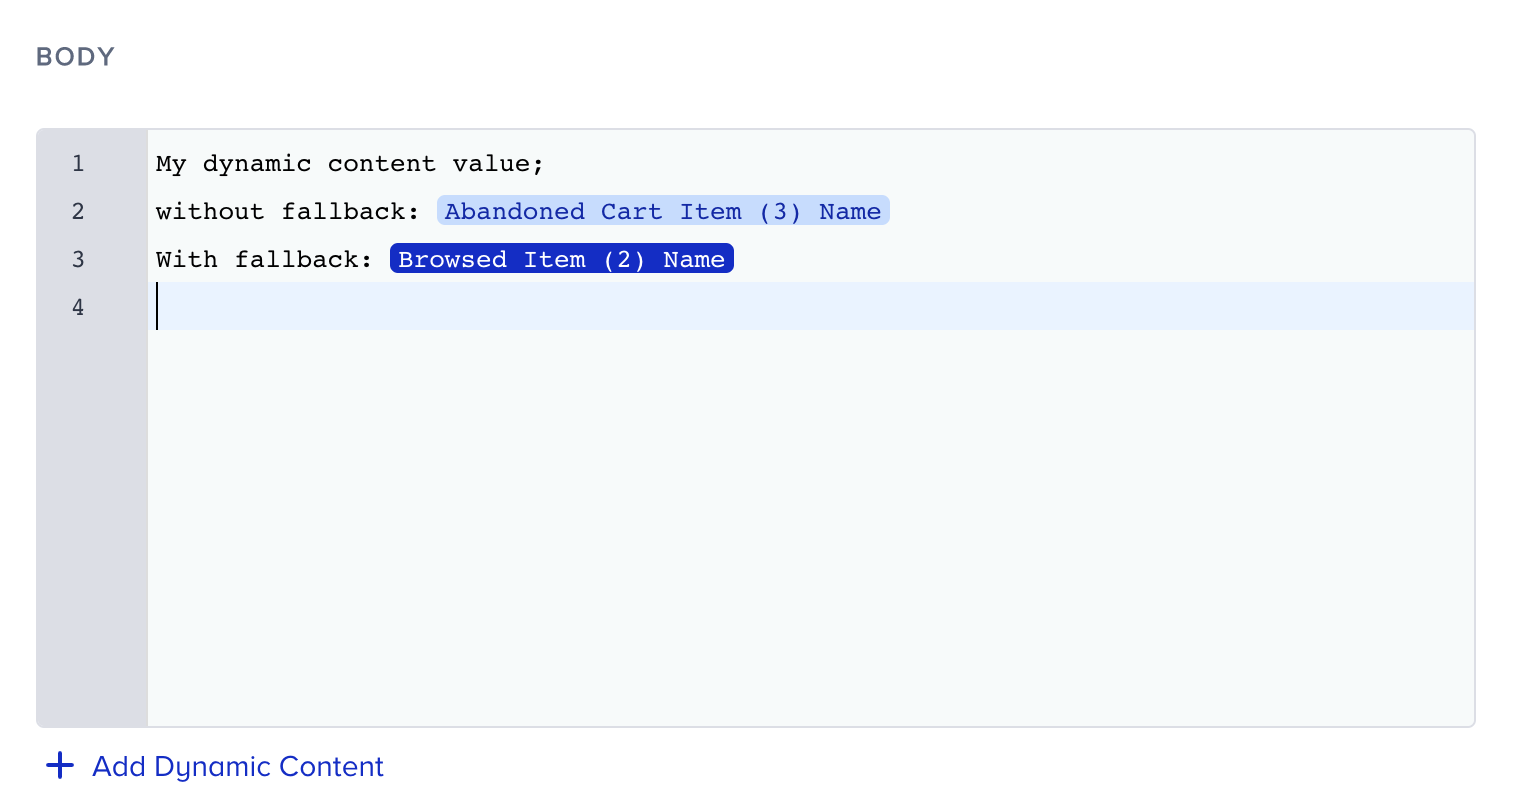
You can click the Add Dynamic Content button to add default and custom user attributes, and event parameters as well as cart, browsed, and purchased items. The attribute will be added to the body where your cursor is. Read more on dynamic content.
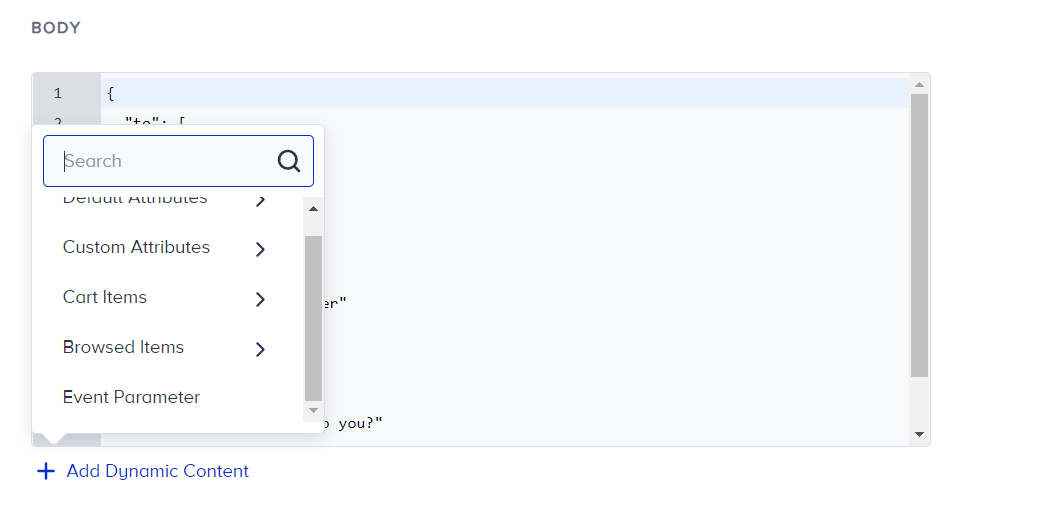
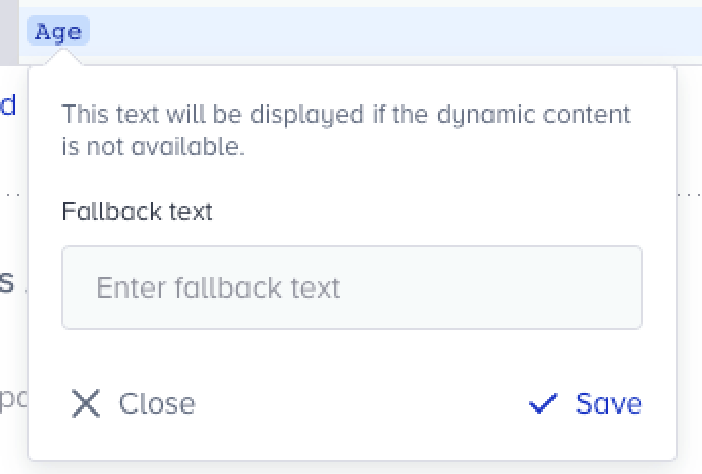
You can also add a fallback value for your dynamic content so that the corresponding value will be filled with it when there is no value to be shown. You can know that the dynamic content has a fallback value if it has the dark blue coloring on it.
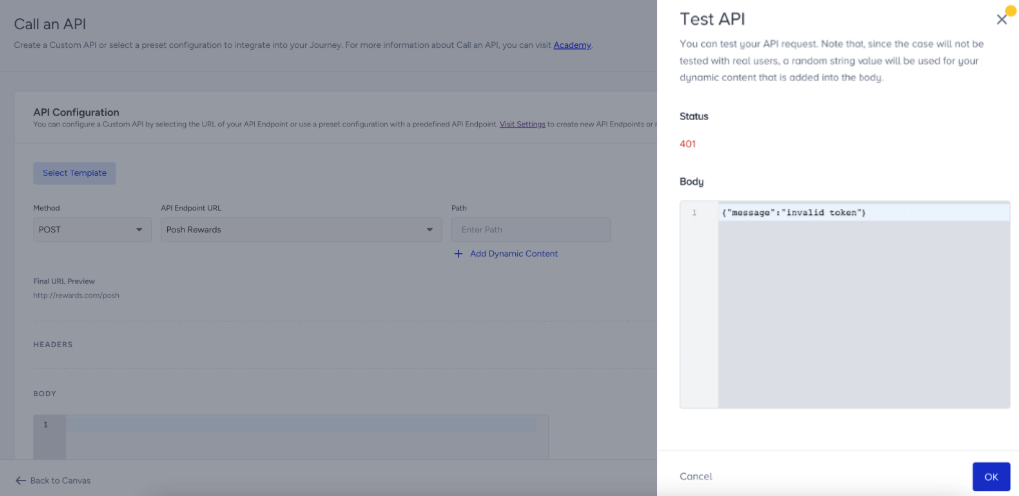
5. Test your API request
Before launching your journey, you may want to test the Call an API element to make sure that the request is formatted properly. You can click the Test API button on the bottom-right corner. Your test might give one of the following responses:
- 2XX - Success
- 4XX - Fail
You can also see the reason for the status below the results. These reasons can help you troubleshoot the fail responses and take actions accordingly, such as checking the endpoint URL, request method, endpoint path, body format, etc.
When testing, all dynamic content in the text fields is replaced by random values which might result in a false fail response. For example, you might be using dynamic content in the URL field where that value is normally a number. During the test, since we replace it with a random value that involves letters, the response might be a failure. But when you actually run the journey, this will be a number and, therefore the responses will be successful. To prevent this, you can follow two options:
- You can remove the dynamic content, add your own placeholder values, and test the API.
- You can keep the dynamic content but test the entire journey using test journey methods.
Retry timeout requests
The request times out if no response is received from the endpoint within 20 seconds. This includes scenarios where the endpoint returns the 429, 503, or 504 (Timeout) error codes due to temporary issues. A retry mechanism is triggered, with the request retried up to 5 times at randomized intervals between 3 and 6 minutes. If the request still times out after 5 retries, it is recorded as a failure and can be seen in both the channel stats and in the Call an API channel analytics. The user then proceeds to the next element in the journey.
6. Save as template
You can save your Call an API settings, including Method, Headers, and Body as a template.
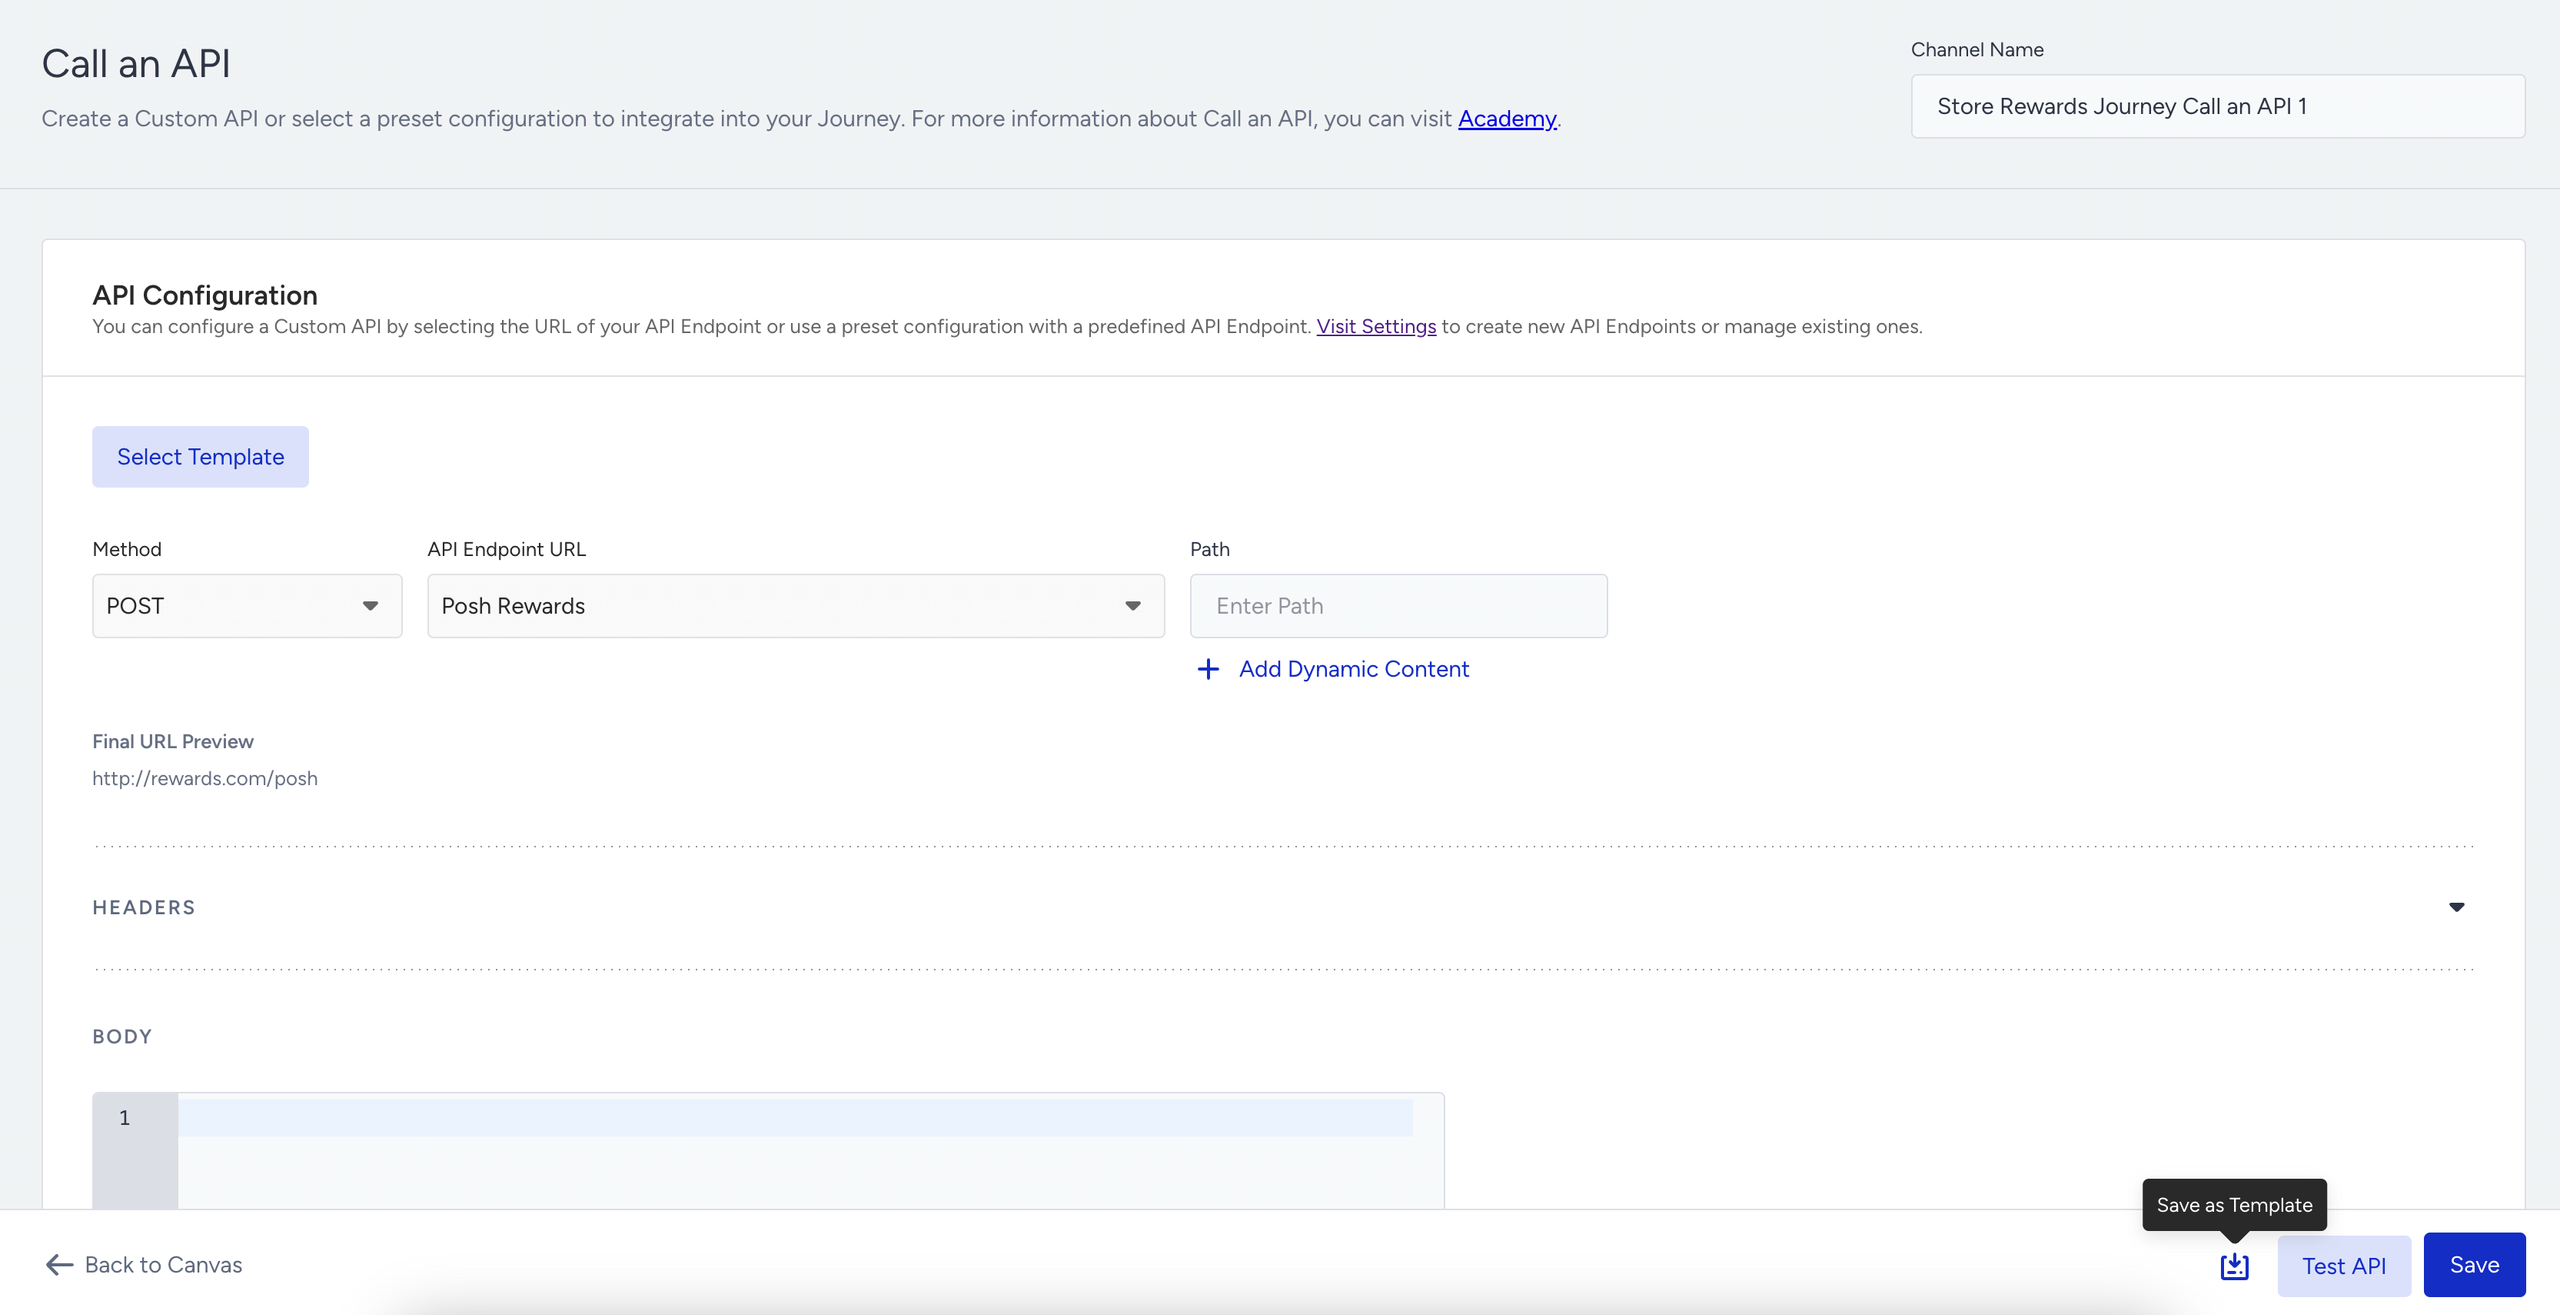
After saving Call an API settings as a template, you can reach your templates via the Select Template button. You can re-use, edit and delete your templates from the template store.

7. Rename channel name
Channel Name is generated by default based on journey name and channel type. You can rename it at the top right corner if you want to give it a different name.

8. Save Call an API element
After configuring Call an API settings, you can save the page. Make sure to click the Save button as there is no autosaving on this page. Autosaving functions only on the canvas page.
9. Set throttling (Optional)
The Call an API element processes requests without any limit on the number of requests per second. For example, if 5k users arrive at the Call an API element, all requests will be sent immediately, and your endpoint will receive 5k requests at the same time.
In some cases, endpoints for some services cannot handle this many requests and may not be able to receive and process them. For security reasons, you may also want to keep the number of requests coming to your endpoint from different services at a reasonable level.
Using the Request Throttling function, you can limit the number of requests coming to your endpoint per second. This feature is useful if your endpoint can handle only a certain number of requests.
Define and manage endpoints
To use any endpoint in a Call an API element, you must first define it through Architect Settings > API Preferences. If you have any previously created endpoints, you can also use them.
All user roles can access this page, but only administrator and editor with PII access roles can define, edit and delete endpoints.
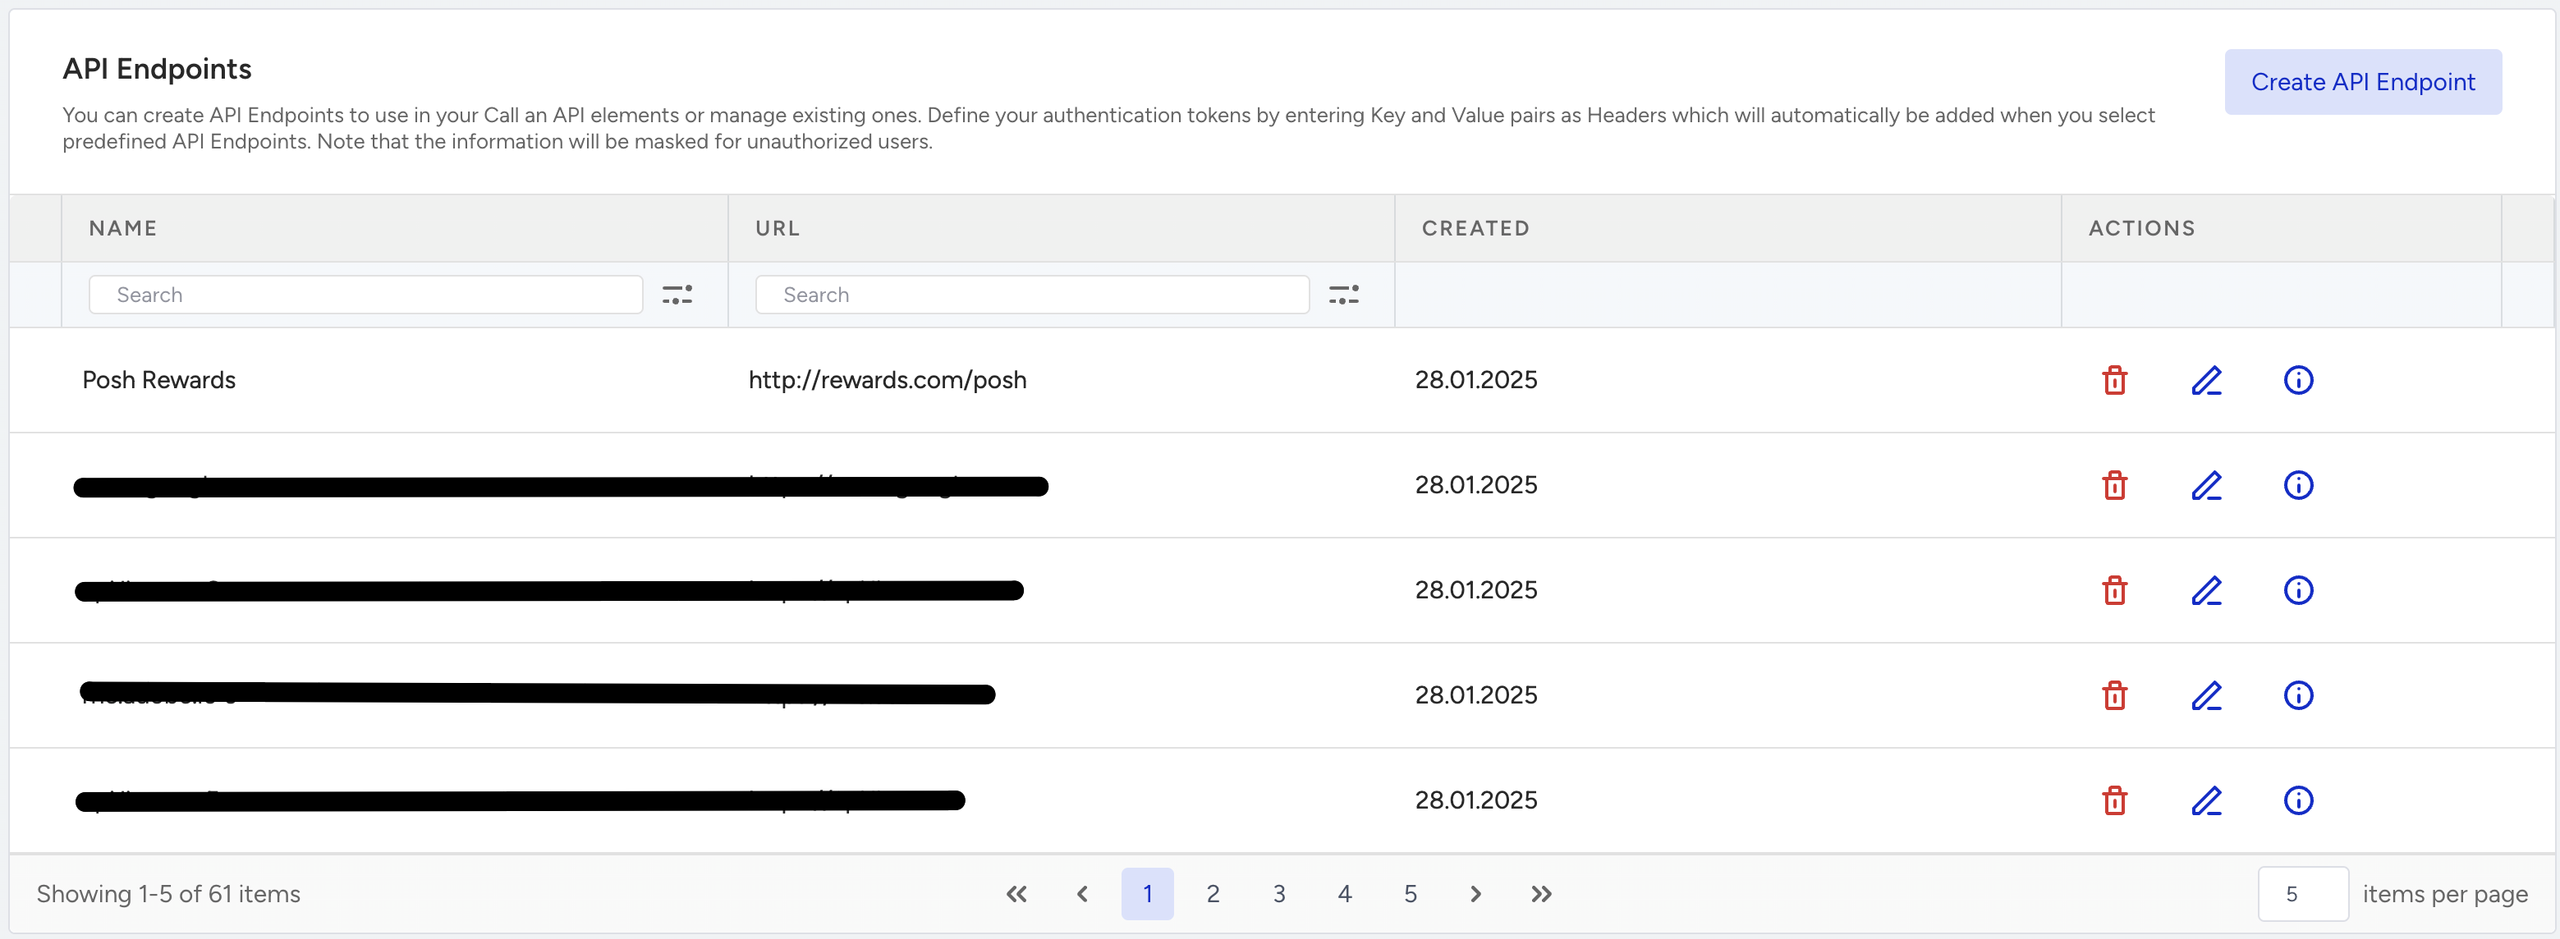
Create endpoints
1. Go to the API Preferences page and click the Create API Endpoint button.

- Name: Give a name to your endpoint which ideally is an explanatory title as you will see this name under the dropdown on the Call an API inner page.
- Endpoint: Enter the URL of the endpoint. This is ideally just the base URL as you can also define the path on the inner page. In this field, you cannot enter dynamic content. If your endpoint requires dynamic content, that part can again be entered on the Call an API inner page.
- Headers: Enter your key-value pairs as headers. If you check the Mark as Sensitive Information box under each pair, the value will be masked on the Call an API inner page as well as the details section of the endpoint. This way, the token will not be visible as you and other user roles operate through Architect.

2. Click the Save button to see the endpoint on the listing page of API Preferences.
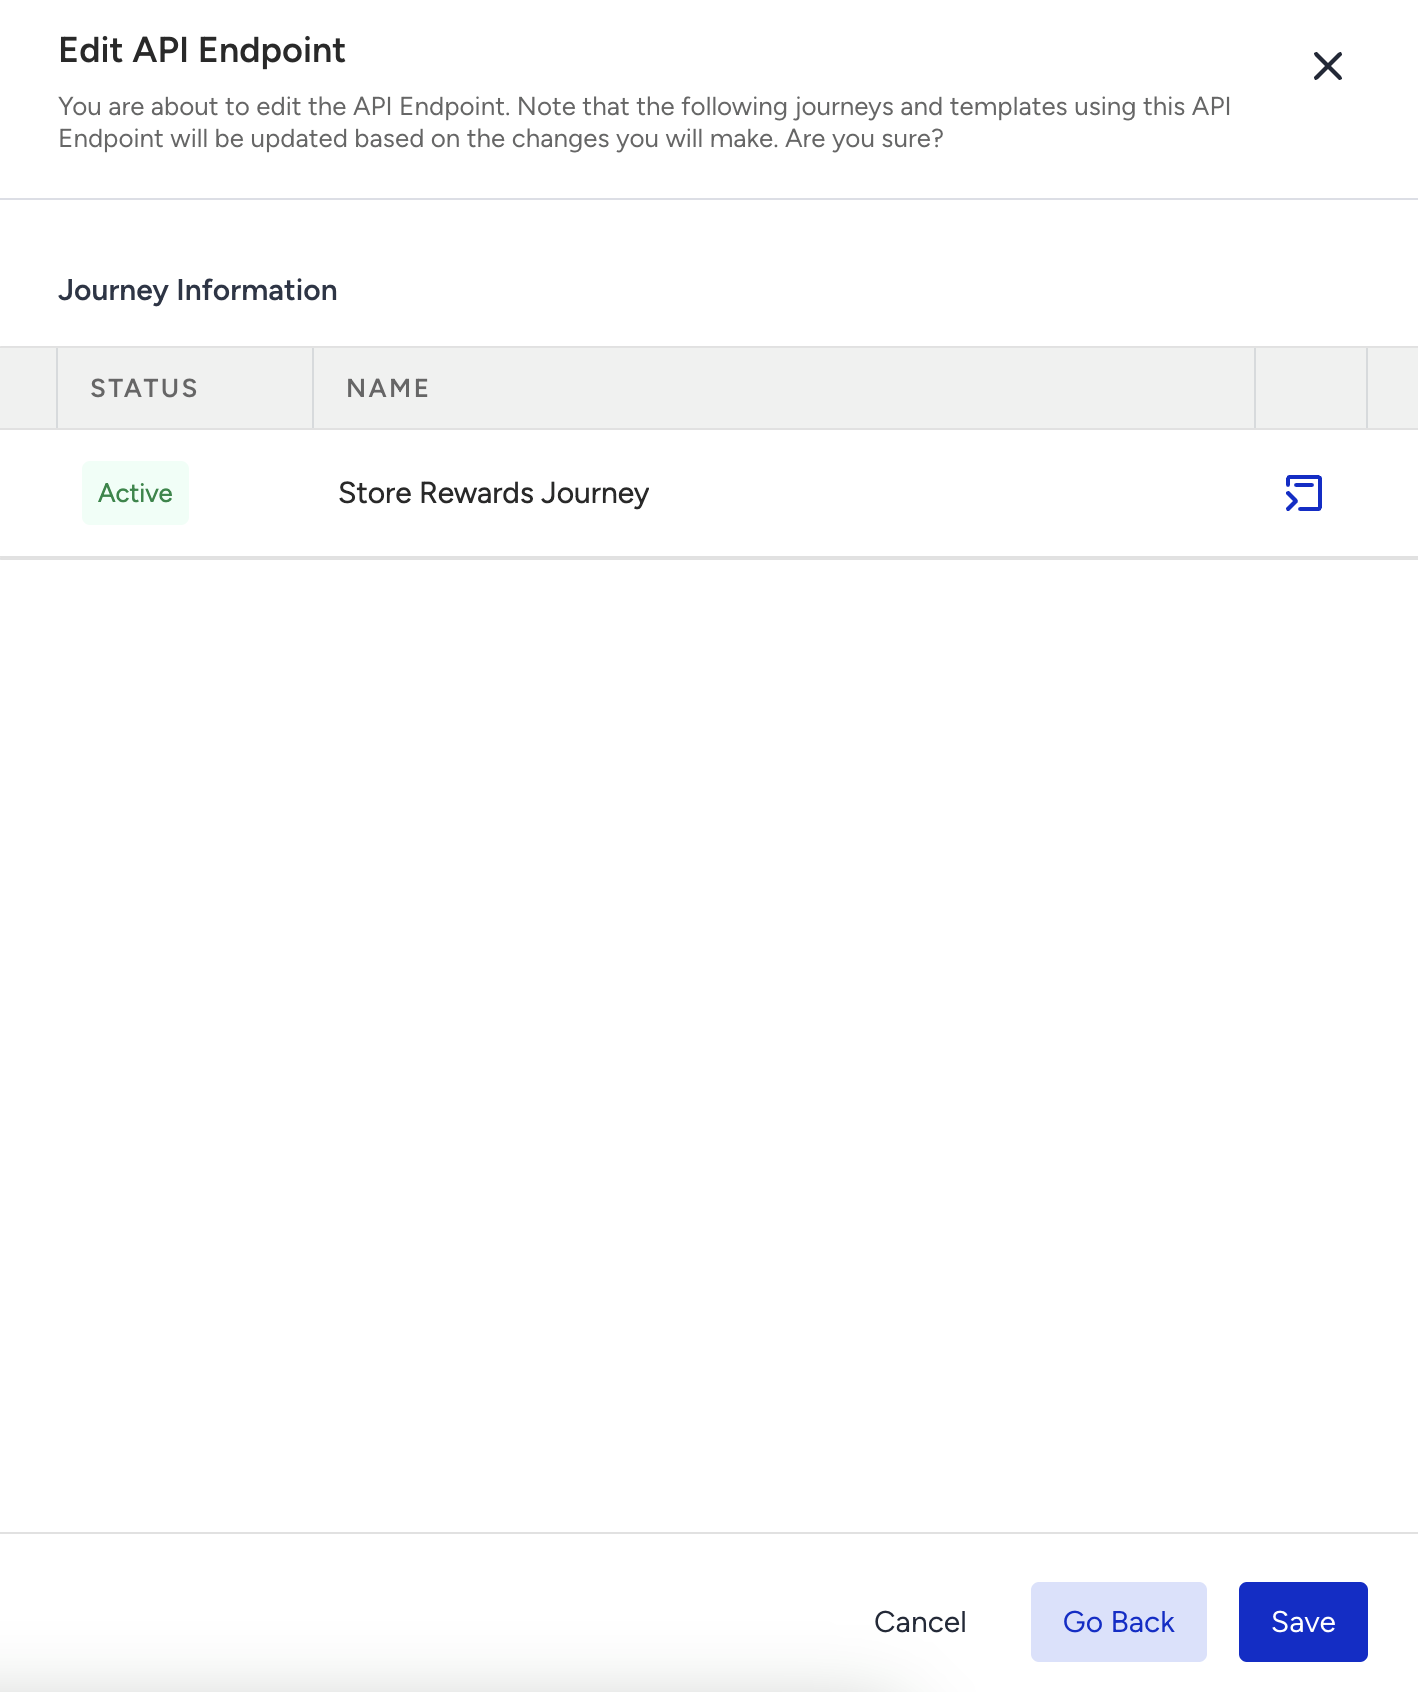
Edit endpoints
You can edit the name, URL, and headers of any endpoint. Once you click the Save button, you will see all of the journeys and templates that use this endpoint, and the edited fields in those journeys will be updated. No other action will be taken regarding those journeys, and the active ones will stay as active.
The editing function is useful, especially for token expirations, as you can update the endpoint with a new token, and the change will automatically be applied to all journeys.
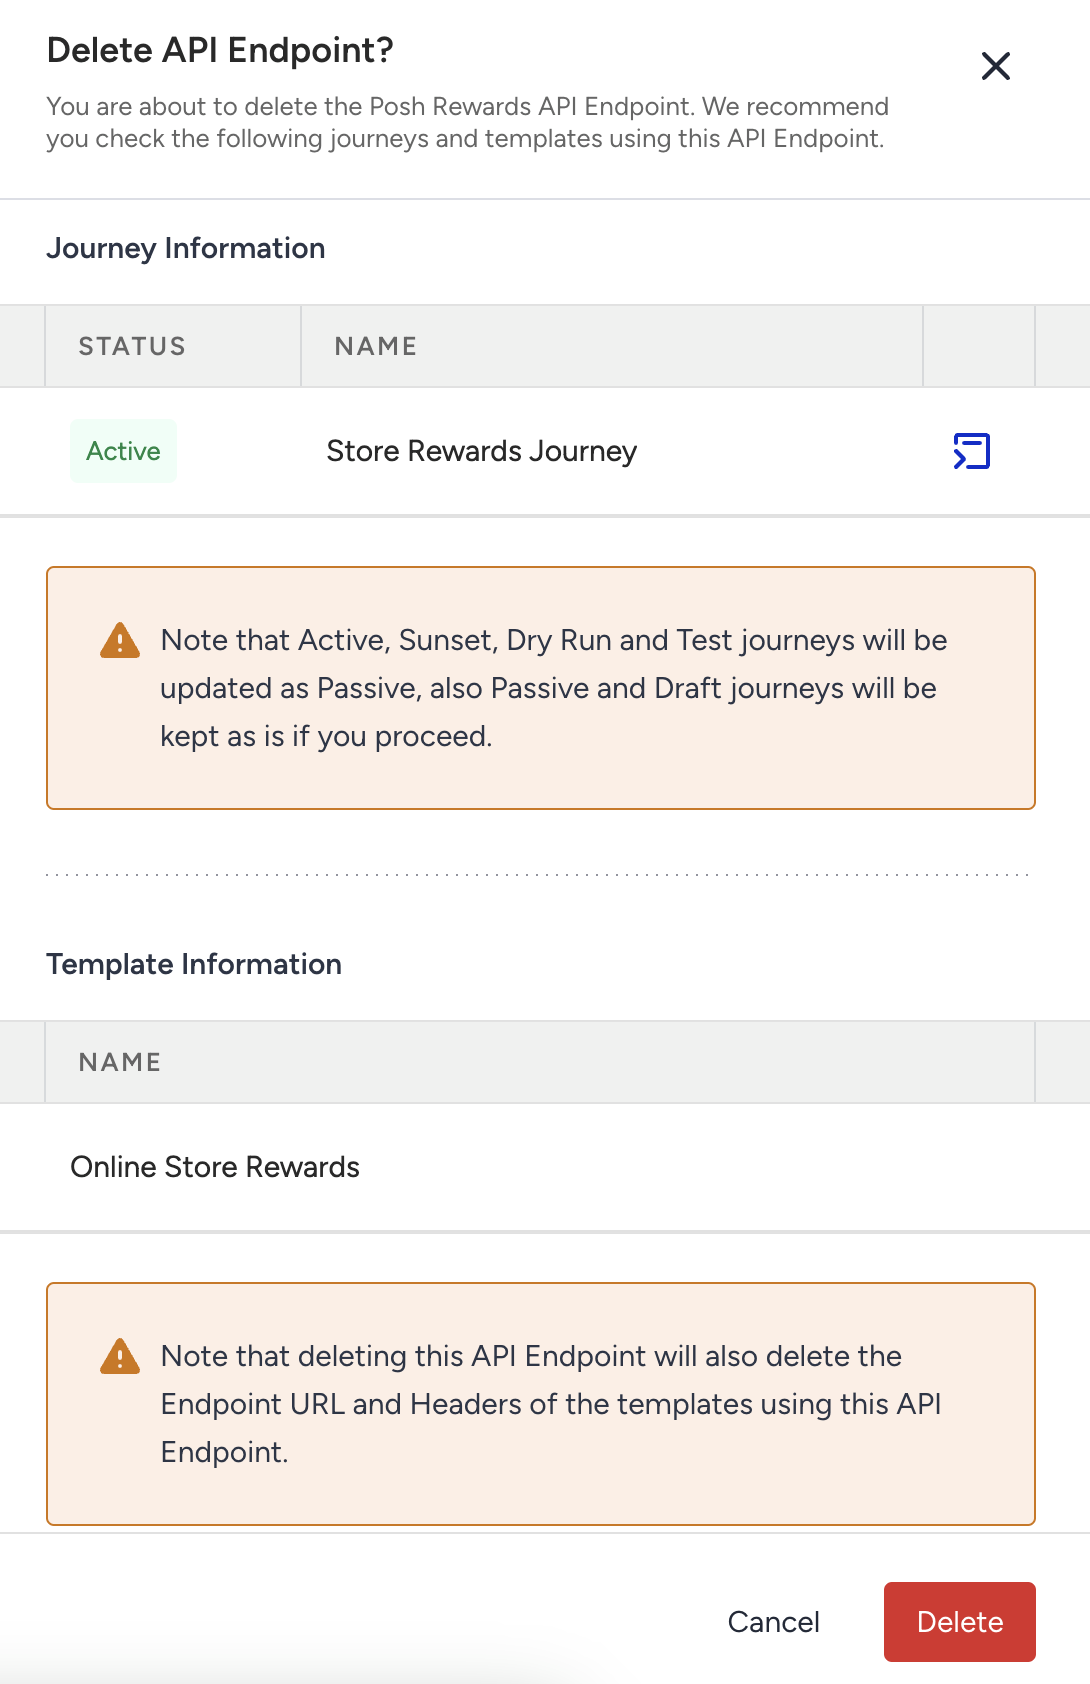
Delete endpoints
You can delete the endpoints if you will not use them anymore. When you click the delete icon, you will see a list of journeys and templates that use the respective endpoint. Upon clicking the Delete button, all of the running journeys (active, sunset, dry run and test) will be updated to the Passive status. If you have an important journey that runs with the respective endpoint, you can take actions accordingly.
View endpoint details
You can click the information (i) icon to view the details of the endpoint such as URL and headers. This information is viewable by all user roles. The information marked as sensitive will be masked.

Example Payloads
Here are some examples of Call an API Elements for various third-party integrations.
Insider does not guarantee the accuracy, completeness, or correct sequencing of the required properties in the payloads for the vendors displayed below.
All vendors, including the ones mentioned below, should provide you with the details required for filling out the fields in Call an API.
Should you fill in the required fields with the details provided by the respective vendor, run a test with the Test function on the Call an API step, and receive an unsuccessful response, please kindly contact the respective vendor.
Line
You can use Call an API for any current API you have, provided that you fulfill the conditions of a JSON POST request as specified in the Call an API steps above.
Below you can see an example for LINE which is one of the existing payloads in Call an API along with other payload examples.
{
  "to": [
	"{{d_phone_number}}"
  ],
  "messages": [
	{
  	"type": "text",
  	"text": "Hello, user"
	},
	{
  	"type": "text",
  	"text": "May I help you?"
	}
 ]
}
See Line for further details.
Zendesk
{
  "ticket": {
	"subject": "<user.company_name> has cancelled their account",
	"comment": {
  	"body": "<event.feedback>"
	},
	"requester": {
  	"name": "{{user.firstname}} {{user.lastname}}",
  	"email": "{{user.email}}"
	}
  }
}
See Zendesk for further details.
Viber
{
   "receiver":"01234567890A=",
   "min_api_version":1,
   "sender":{
      "name":"Jane Doe",
  	"avatar":"http://avatar.example.com"
   },
   "tracking_data":"tracking data",
   "type":"video",
   "media":"http://www.images.com/video.mp4",
   "thumbnail":"http://www.images.com/thumb.jpg",
   "size":10000,
   "duration":10
}
See Viber for further details.