You can use the Integration Action when you want to call an HTTP integration endpoint to achieve some custom business needs. You can process the parameters saved during the life cycle of the assistant and either store them in some other system for later use or push some messages or cards after that action, modify the flow of the assistant, or force it to fall back.
This guide aims to provide answers to the questions below:
Add Integration Action
To use Integration Action in your flow, follow the steps below:
1. To add the Integration Action to your flow, either drag and drop the Integration Action to your assistant design canvas or click on it from the Basic Actions menu. 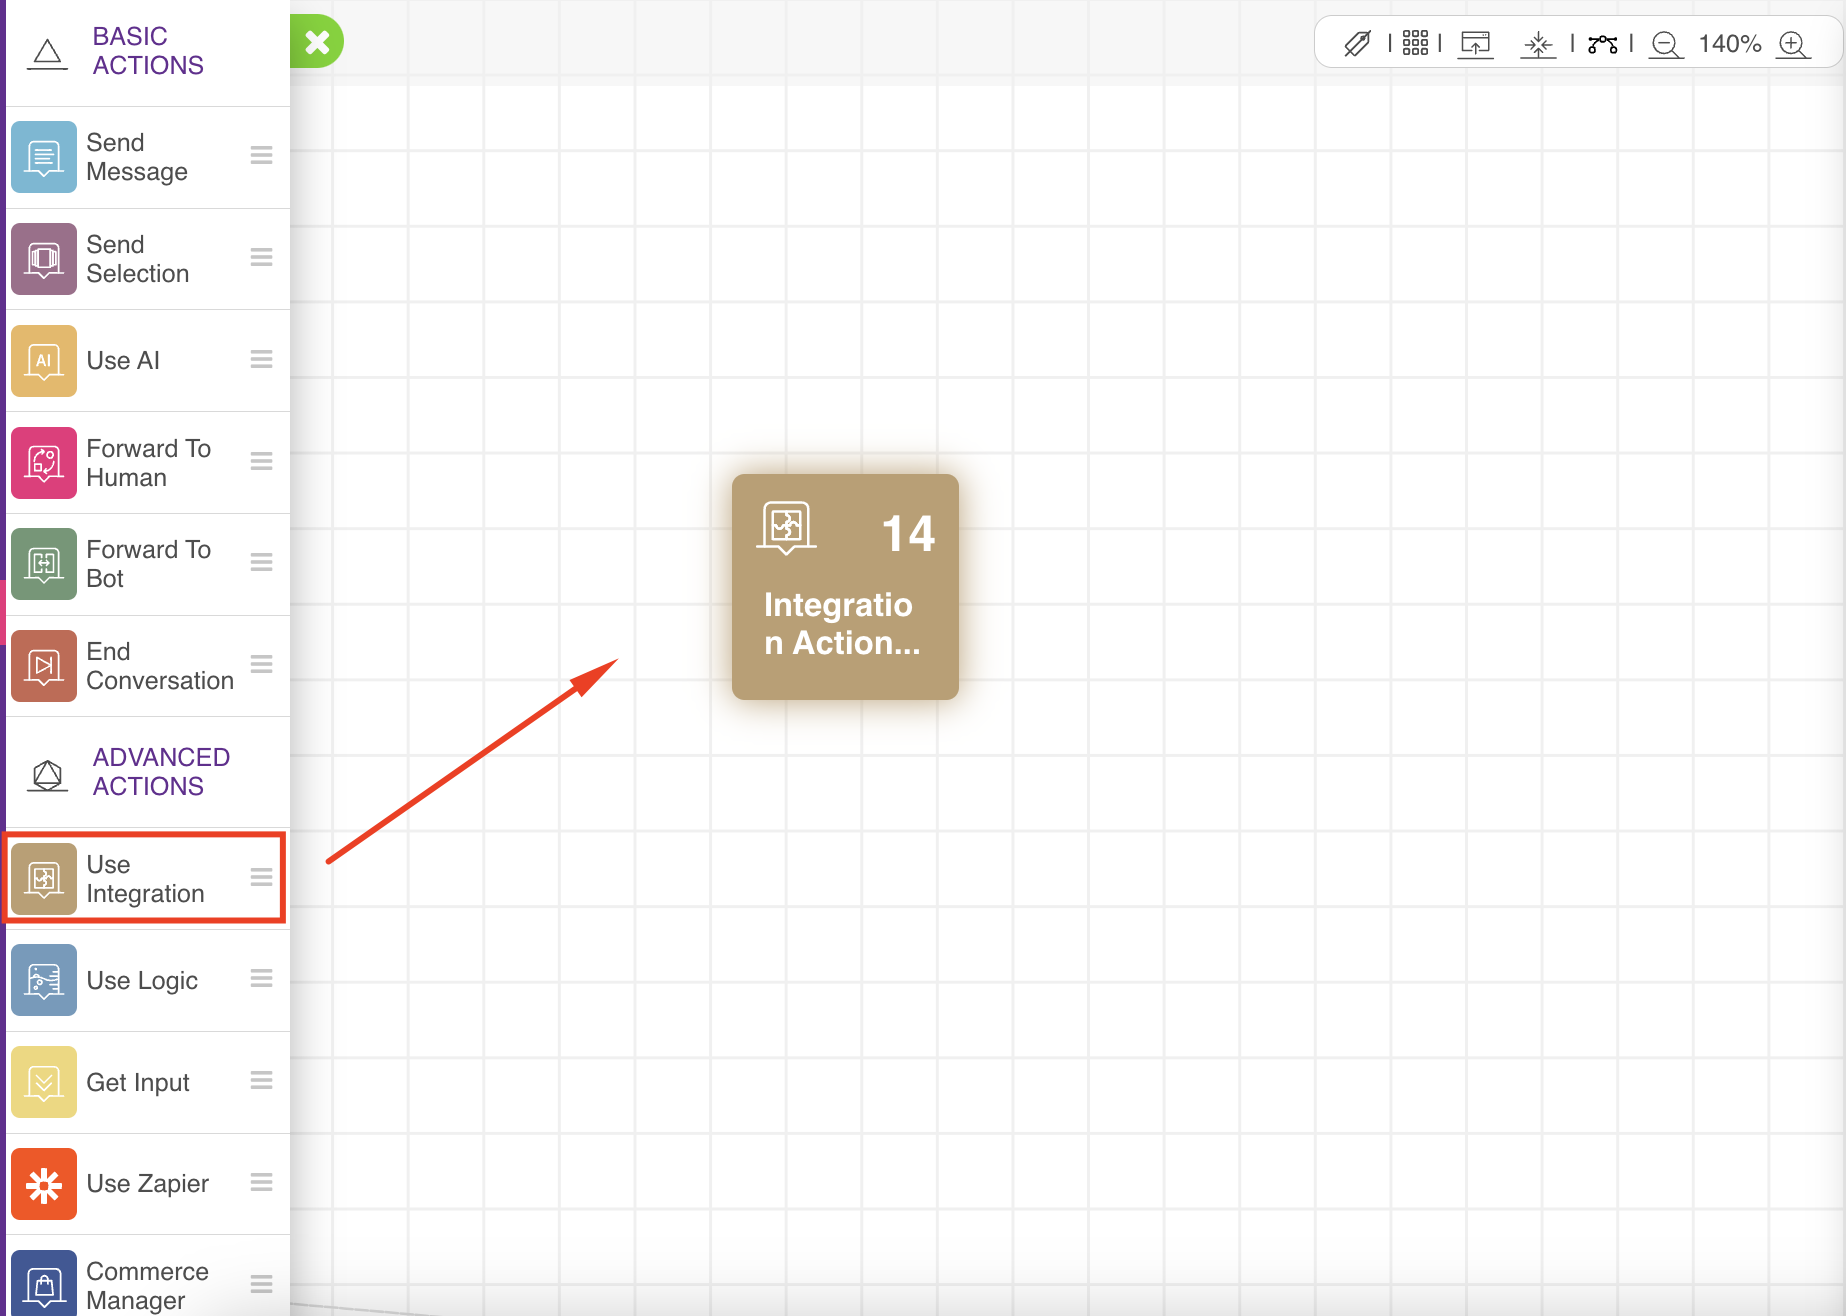 2. When you add this action, you will see a settings menu on the right where you can configure the action parameters. You can configure the URL of your integration endpoint, the connection of the next action, and the fallback action. You can name your action as an option, choose the request method, choose the authorization type, choose the parameters that will be read from the response, and add some comments for your action.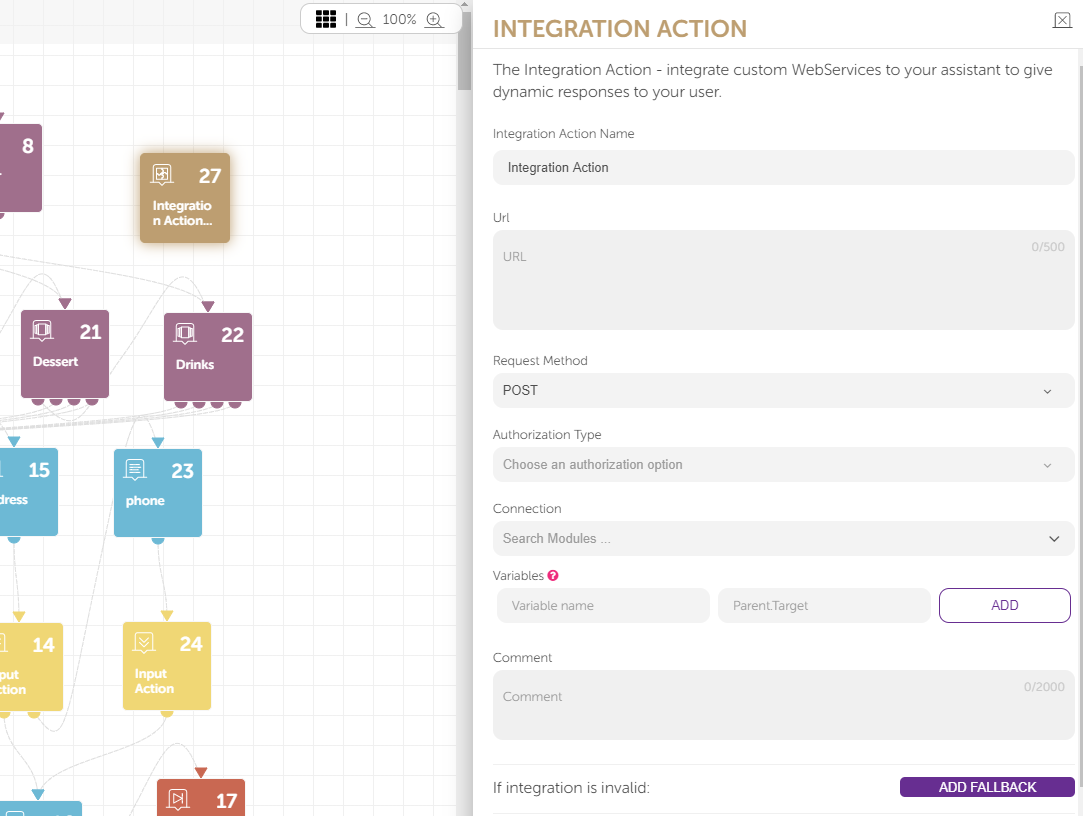
To better understand, you can take a look at a small scenario with that action. Your assistant will ask for a product name from the user, and it will fetch all comments related to that product. If you use an Amazon AWS Lambda function to implement the integration endpoint, the assistant will look like below: 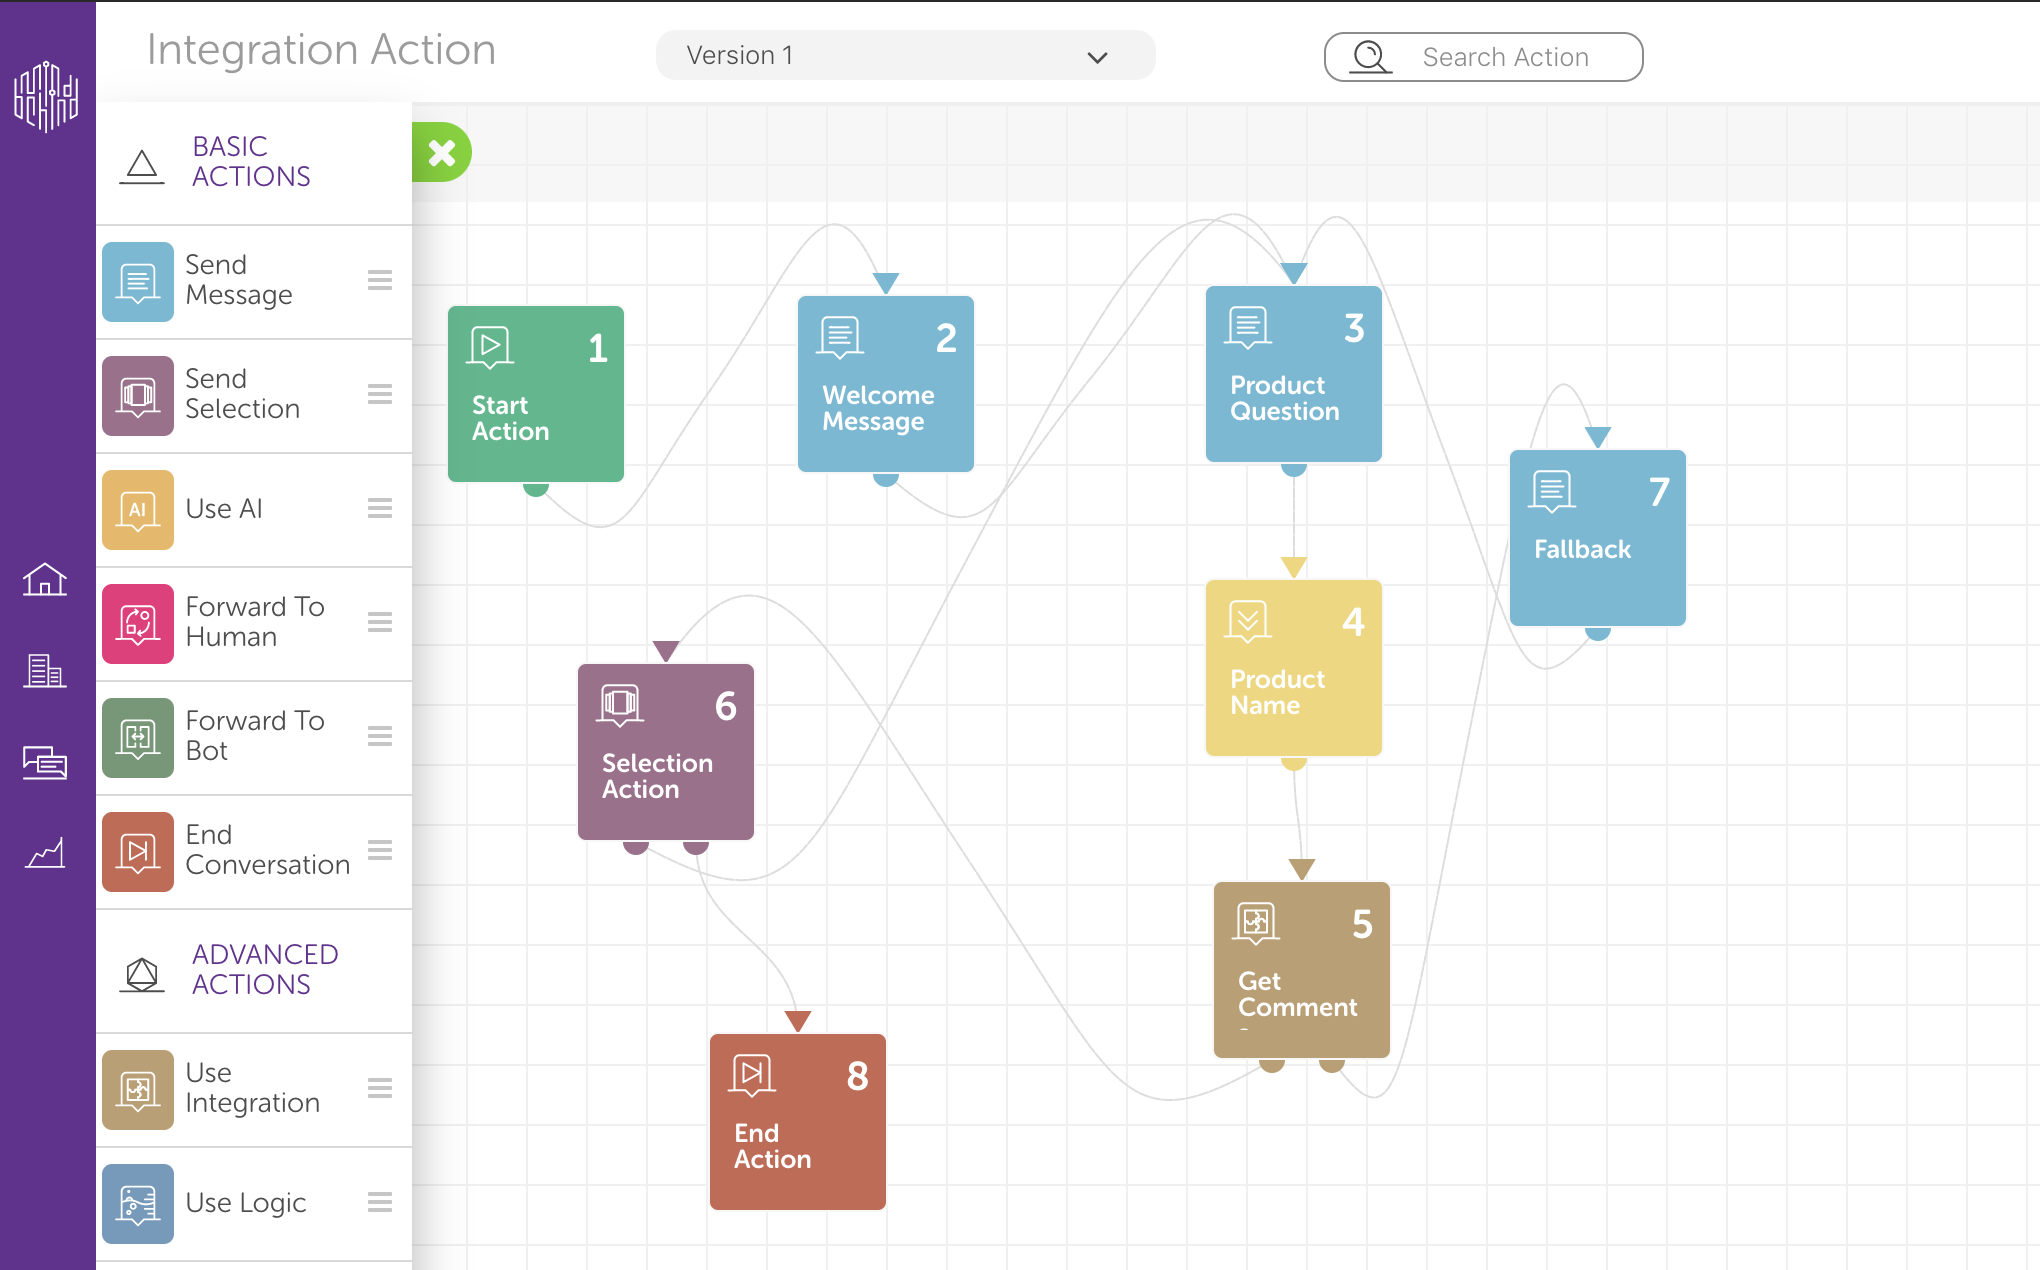
The assistant starts with a welcome message and then asks the user to enter the product name for which they want to fetch its comments.
The input action gets the product name from the user and stores it inside a parameter. While all the parameters are sent with the Integration Action to your endpoint, you can use that product name to query for its comments. You can write a Lambda function as below:
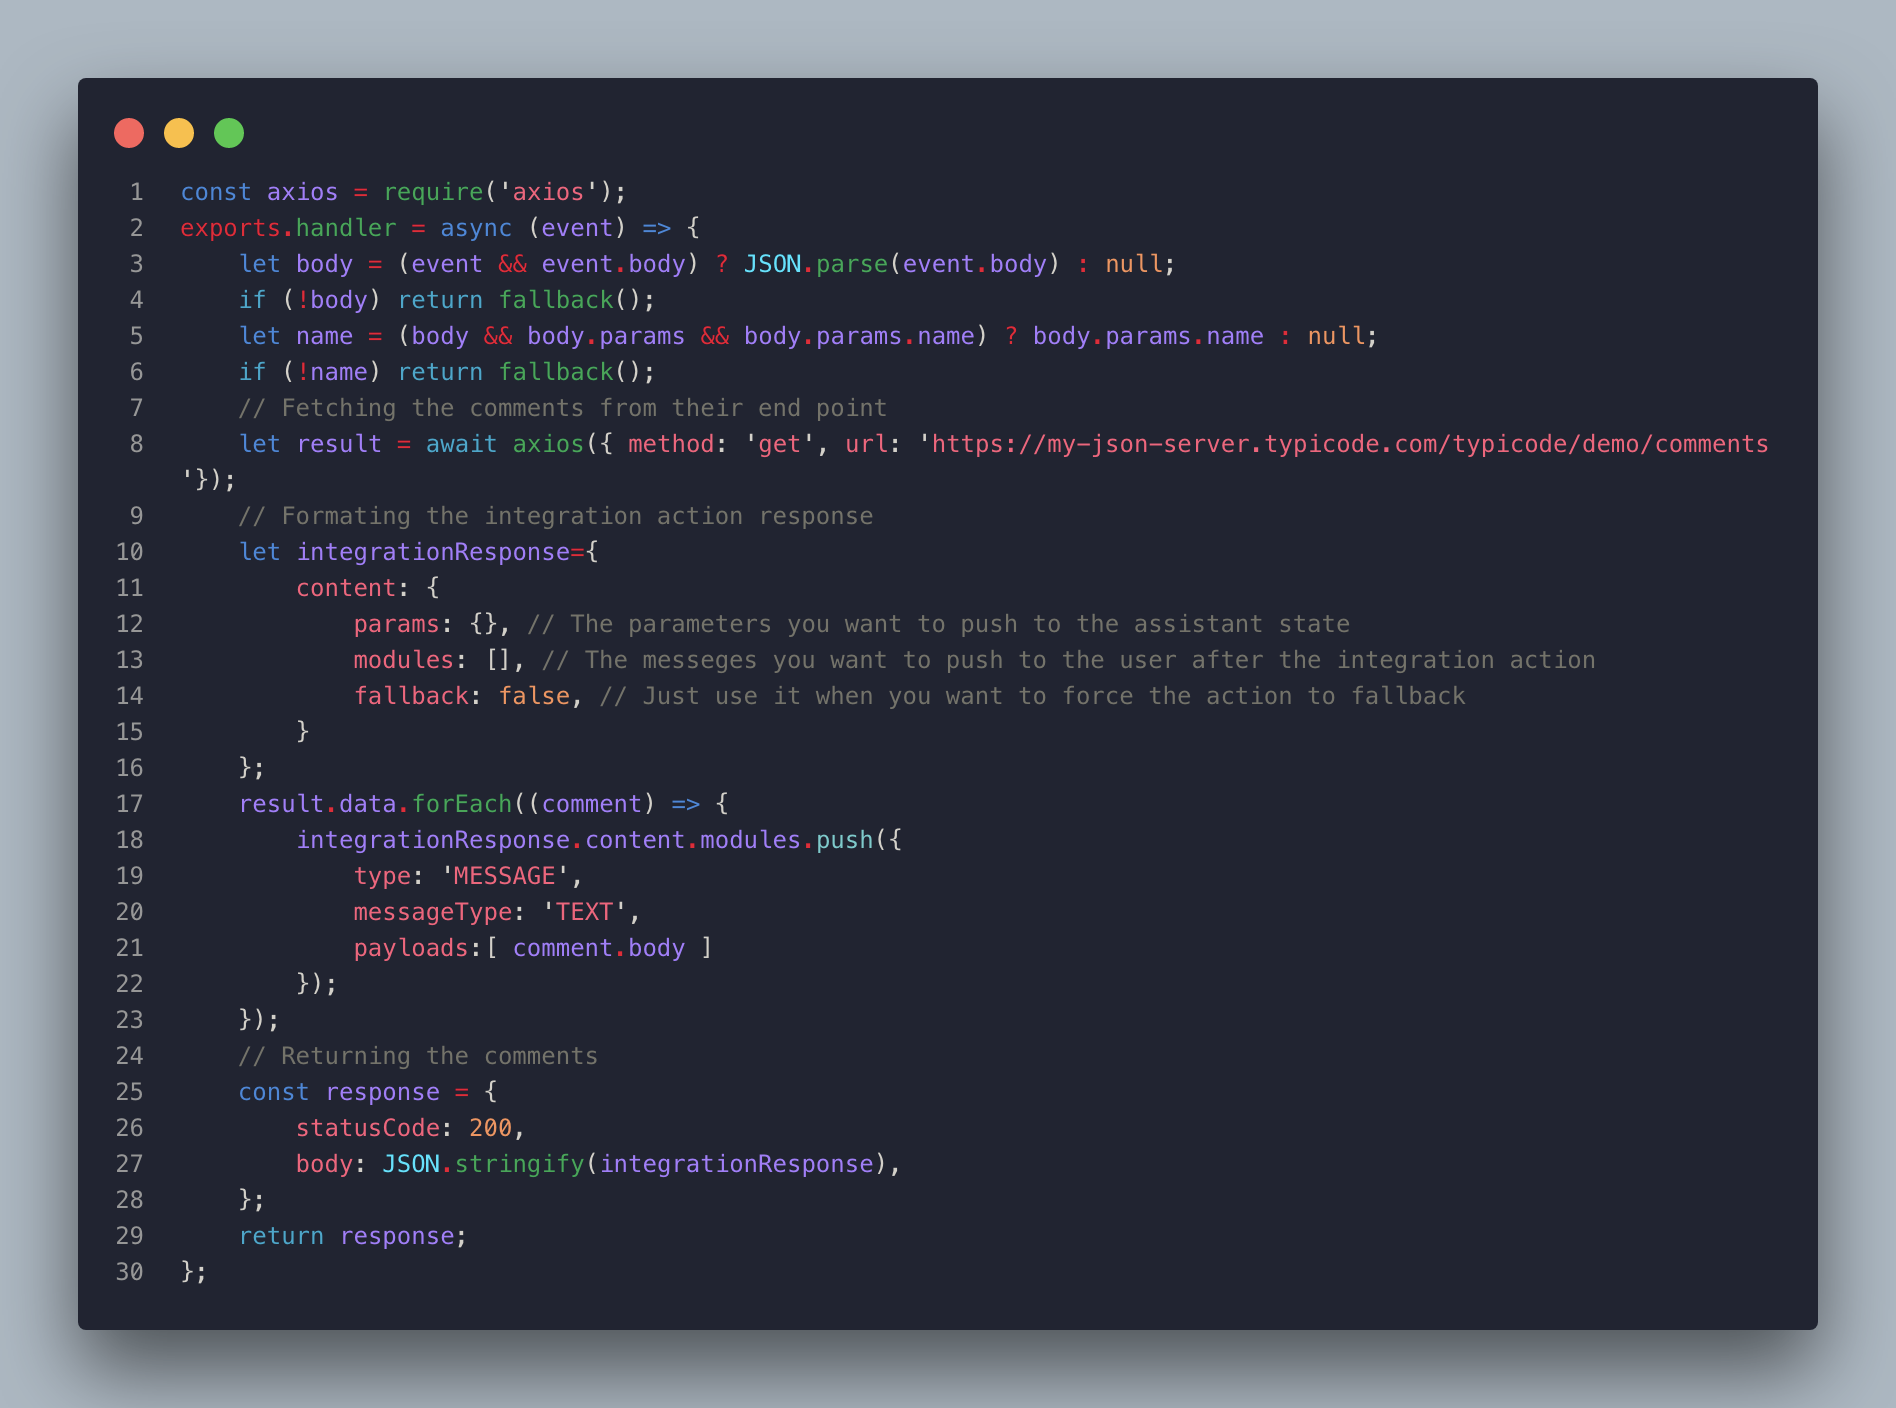
The Lambda function will start by validating the data coming from the assistant, making a call to an endpoint that returns the comments, and then formatting the response that suits the integration action in this part of the code:
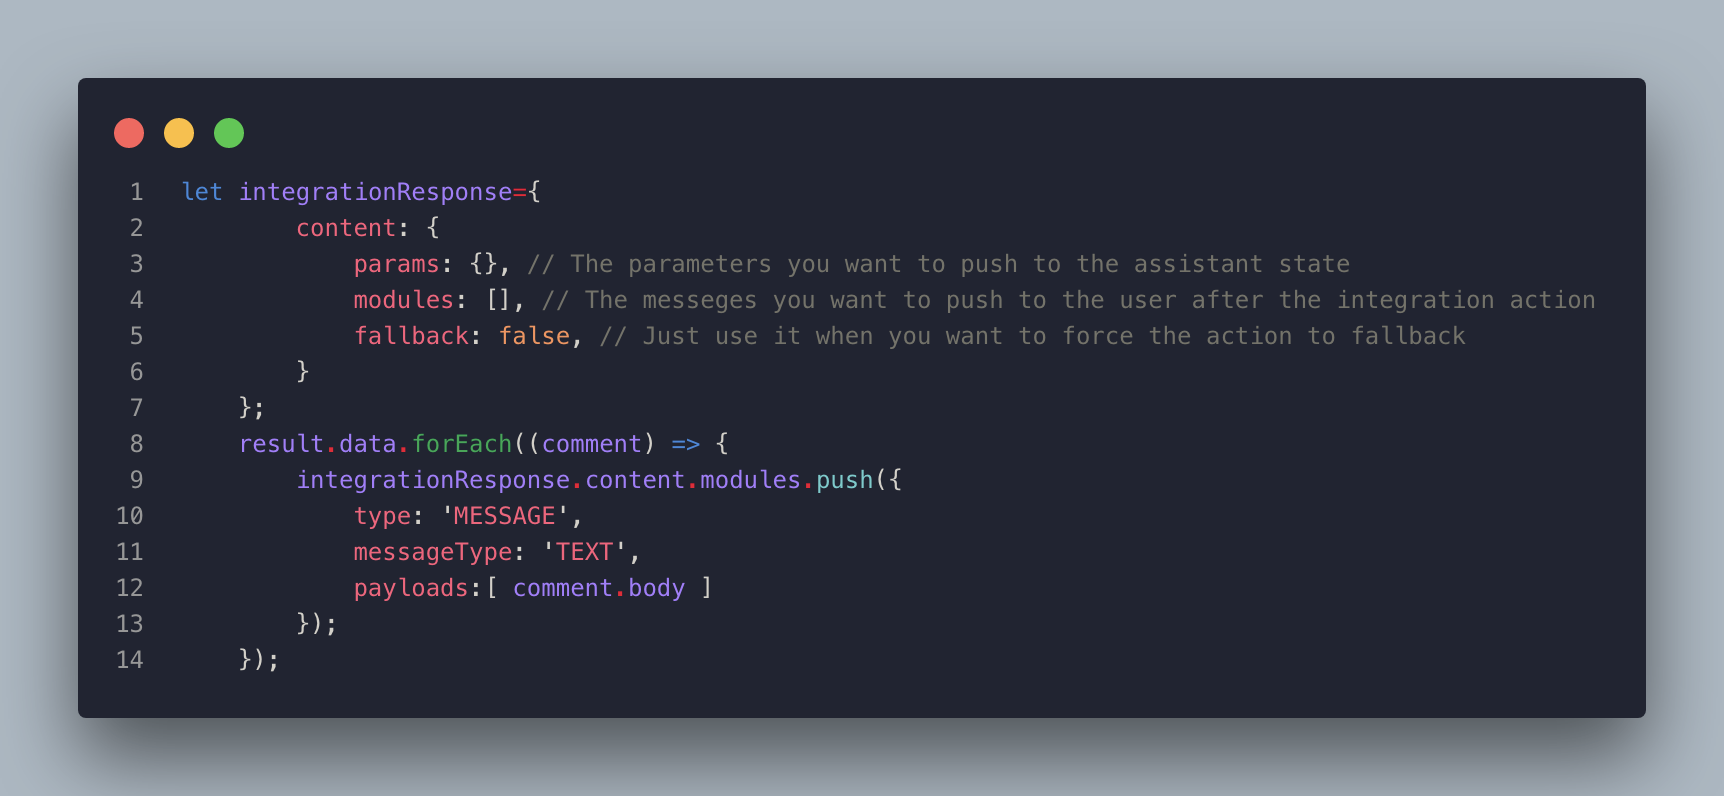
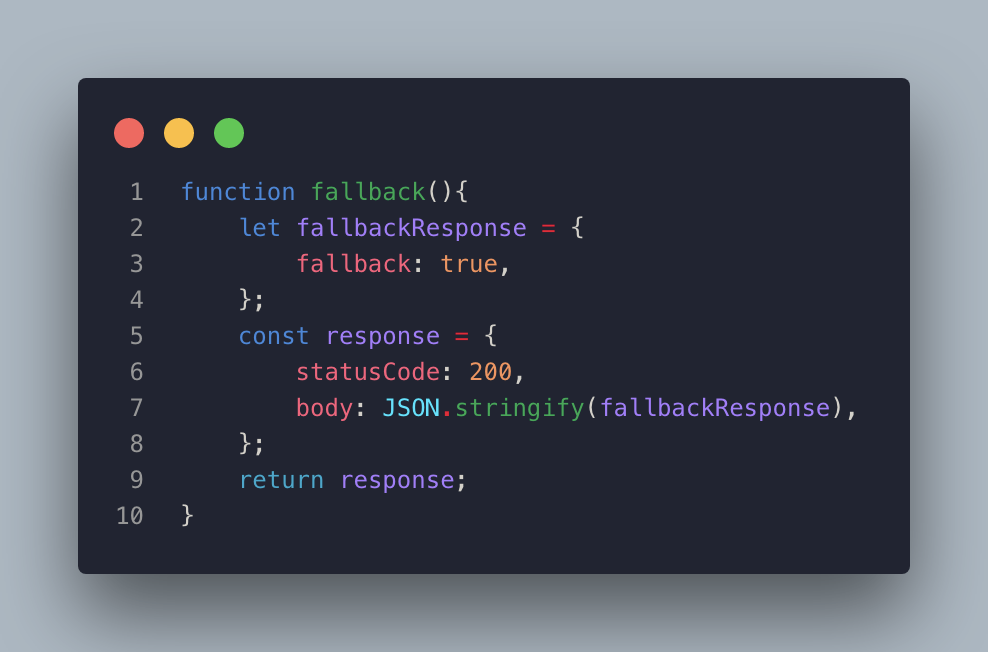
In case of a fallback, the Lambda function will call the fallback function, which is defined next to tell the Integration Action to fall back.
The Integration Action pushes the messages returned by the Lambda function to the assistant, so the user will see a list of product comment messages that appeared after they put the name of the product:
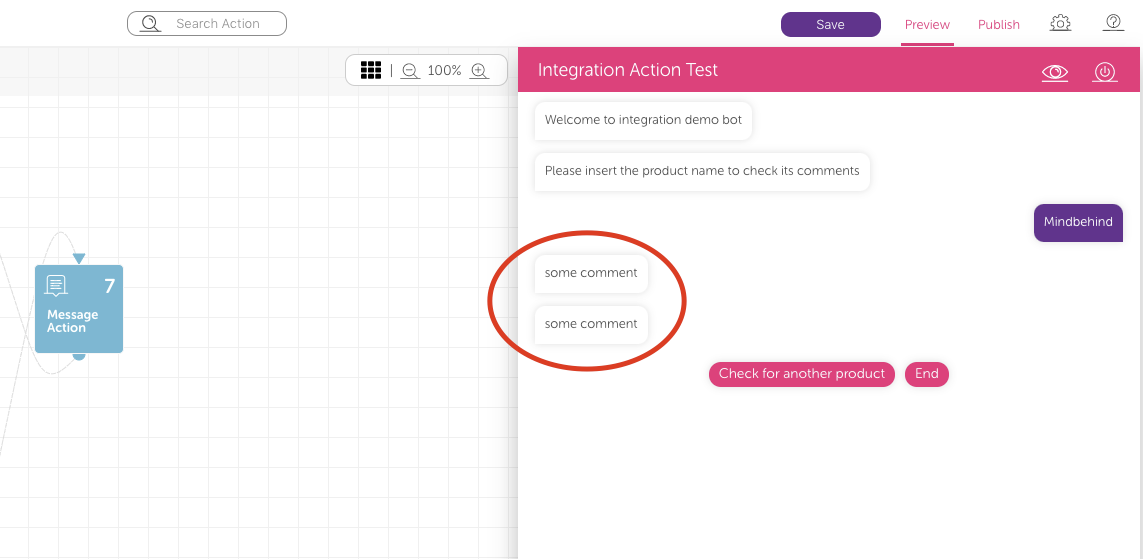
Finally, the assistant asks the user to repeat the query or end the conversation.
This is a very simple scenario that shows how you can deal with an integration service, but the door is open for any business logic you can think of or need. Also, you can use any integration point, whether it is a container backend point, code in a VM, or any serverless function. At the same time, it supports the HTTP POST method and returns the result in the "application/json" content type.
Authorization
Some endpoints support a specific type of authorization layer. In this action, Mindbehind supports some common ways for authorization to authorize the call to these endpoints. You can see them below:
Basic: It involves sending a verified username and password with your request. So, the action passes the API a Base64-encoded string representing your username and password values. After selecting this option, you will see two fields to enter the username and password you want to use.
Bearer Token: Bearer tokens allow requests to authenticate using an access key, such as a JSON Web Token (JWT). The token is a text string, included in the request header. After selecting this option, you will see a field to enter your token.
OAuth2: You first retrieve an access token for the API, then use that token to authenticate future requests. But of course, this token should not expire, or it might not be logical to use it here. After selecting this option, you can enter your token and the header prefix that should be used.
Receive parameters from a response
In some scenarios, if the endpoint doesn't return the format MindBehind expects, you can access response variables using the "Variables" section and convert them into bot parameters. You can access any deep variable using dot operations or even items inside an array using indexes. You can see an example below: 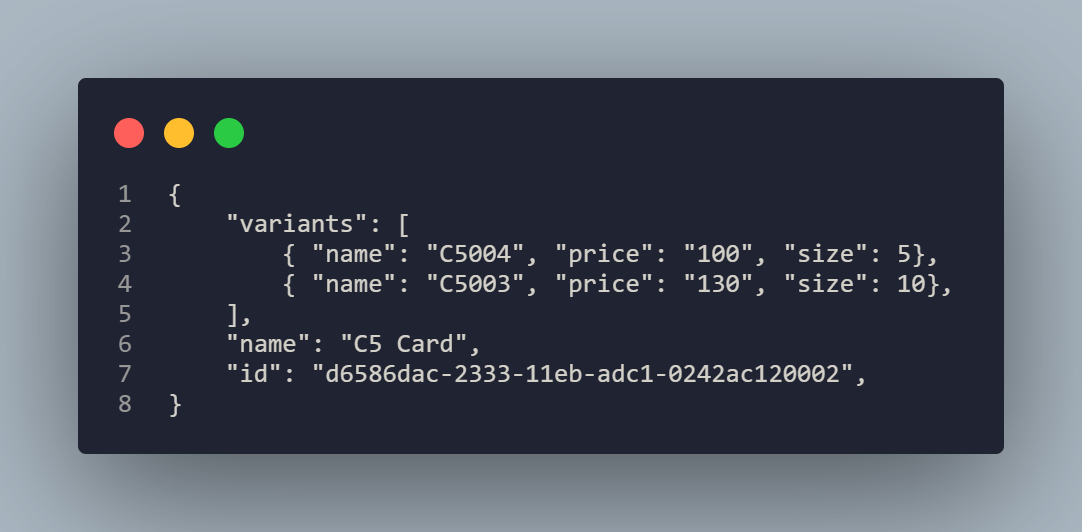
So, MindBehind has an endpoint that returns variants of a product. Let's say you need to save the product ID and the cheapest variant price in bot parameters:
PRODUCT_ID: You use it to store the product ID, so you need to put "PRODUCT_ID" in the variable name field and "id" in the other field to access that ID coming in the response.
PRICE_ID: You use it to store the price of the first variant, so you need to put "PRICE_ID" in the variable name field and "variants.0.price" in the other field to access the price of the first variant coming in the response.
This feature supports only the JSON response type.
How does the Integration Action behave?
The Integration action calls an integration endpoint using the HTTP POST method. When the action's body option is set to Automatically, the request body includes the following fields:
node: The ID of the integration action in the assistant design canvas.
message: The outer payload received with the incoming message, parsed as JSON. If the payload is not valid JSON, this field contains a plain-text notice instead of an object.
params: The current state parameters.
lastIntent: The last intent predicted by the AI for the user input.
clientInfo: Information about the person in the conversation, including
clientName,clientSurname,clientPhone,clientID,channelType,channelClientID, andoid.mbMessage: Information about the message that triggered the action, including
messageID,messageType,inputMessage, andchannelID.mbConvID: The ID of the conversation.
If you configure the request body manually, you can define its structure and the values it contains.
The integration endpoint can return the following optional parameters in its response:
params: New parameters to add to the current state. Provide them as a JavaScript map of key-value pairs, such as
{key1: value1, key2: value2}.modules: Messages to send to the user after the integration action. Provide them as an array of message objects, as described later in this guide.
fallback: When set to
true, the integration action follows its fallback connection.
The flow continues through the integration action's standard connection unless the integration endpoint returns a NULL result or returns fallback as true. In either case, the action follows its fallback connection.
Configure a fallback connection for the action to handle these cases. Without a fallback connection, the assistant stops responding if the action is forced to fall back or the integration endpoint fails and returns an error.
The Integration action does not respond to connect messages received from channels.
If you configure a delay for the Integration action, the call to the integration endpoint is also delayed. This can delay the messages that follow the action.
Push messages programmatically
Integration action supports pushing dynamic messages programmatically, which will be returned in the "modules" parameter in the integration endpoint response.
The "modules" parameter is an array that can contain different message objects.
Refer to Messages Format for further details on messages format and their properties.