This guide outlines the technical steps required to integrate Smart Recommender using the Integrate via JavaScript SDK campaign type. This approach is recommended when your frontend team requires full control over HTML and CSS rendering to achieve precise visual alignment with your application’s design system.
With this method, Smart Recommender is responsible for recommendation logic and data selection through its event-driven architecture. Your implementation focuses on listening for the relevant SDK events and rendering the recommendations on the frontend according to your requirements.
Technical benefits of the JavaScript SDK method
The JavaScript SDK integration offers several advantages for complex and performance-sensitive environments, particularly in B2B applications:
Decoupled Architecture
Recommendation logic and data processing are fully separated from the presentation layer. This reduces coupling with your site’s rendering pipeline and simplifies frontend maintenance.
Guaranteed Customization
Because rendering is handled entirely by your code, you retain complete control over DOM structure and styling. This enables true pixel-perfect integration without constraints imposed by visual widget frameworks.
Fine-Grained Control
The SDK supports advanced frontend behaviors, such as custom client-side caching strategies, conditional rendering, and asynchronous loading patterns, which are critical for high-performance and enterprise-grade applications.
This approach ensures flexibility, scalability, and precise control while leveraging Smart Recommender’s personalization capabilities.
Integration flow: Two tracks for implementation
Integration can be completed through two distinct tracks. Track 1 is mandatory for displaying recommendations, while Track 2 is optional and required only to enable Smart Recommender Campaign Analytics (Impressions, Clicks, and Revenue).
In Track 1, you fetch the recommendation data from Smart Recommender and render it on your site using your own HTML and CSS. You have full freedom over the design and layout, and you can display the data in any structure that fits your application.
In Track 2, you must follow the required element hierarchy and include the necessary data attributes in your markup. While the structural requirements must be met, you still retain full flexibility over styling and any additional frontend logic.
Track 1: Basic data fetching and display (Mandatory)
Track 1 focuses solely on listening for the successful campaign load event to fetch the raw JSON product data and display it in your custom container. No specific Smart Recommender attributes are added to the final HTML.
Prerequisites and Event Listener
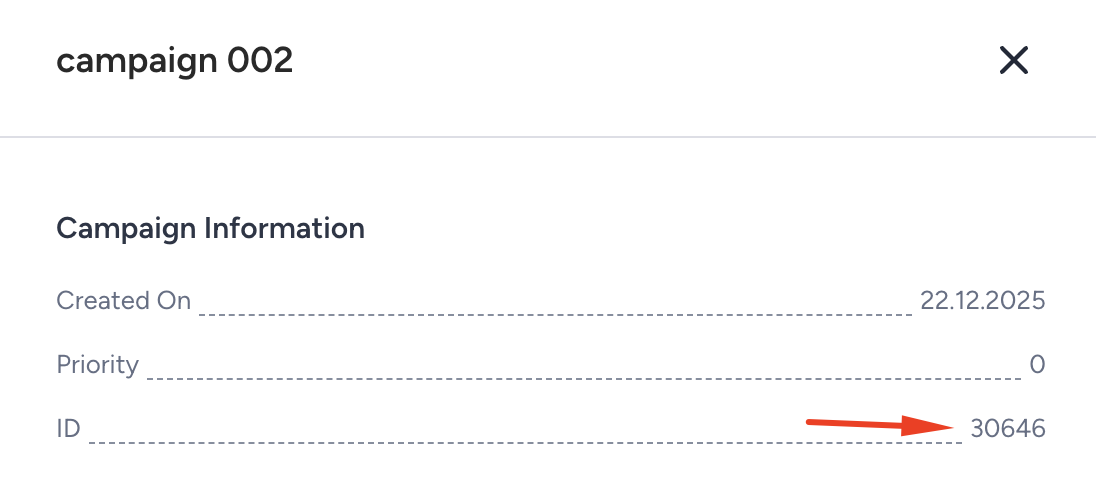
Obtain Campaign Parameters: Receive the unique Campaign ID from the modal, which is triggered from the Smart Recommender Campaigns page by clicking the information icon in your campaign row in the table.

Insert the Base Script: Before proceeding, ensure that Insider Tag (ins.js) is already implemented on your website. This must load before the Smart Recommender SDK event.
Define the Target Container: Create a simple placeholder <div> positioned in the place that you want to show your carousel (e.g., <div id="smart-recommender-carousel-container"></div>).
Check the Recommendation Data Loading: To verify that the JavaScript SDK is fetching recommendations correctly, follow these steps:
Open your website in Google Chrome.
If any Javascript SDK-based Smart Recommender campaign is launched on a specific page, navigate to the page.
Open the Developer Console:
Right-click anywhere on the page and select Inspect.
Go to the Console tab.
Execute the recommendation request by pasting the following JavaScript code in the console and press Enter:
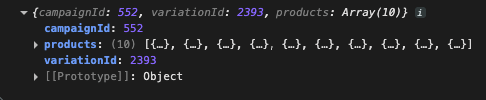
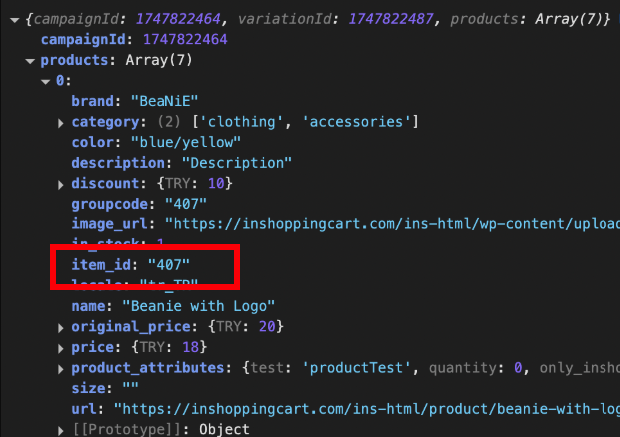
// Example SDK call for basic data fetching
                        Insider.eventManager.once('ins-sr:only-api-campaign:load', function (event, data) {
                        // Replace 123456 with the actual Campaign ID
                        if (data && data.campaignId === 123456) {
                        handleRecoResponse(data);
                        }
                        });
Refresh the page and visualize an object containing the campaignId, variationId, and a list of recommended products.
Implementation of the Widget
Implement the Recommendation Event Integrations: For each page that you have an active Javascript SDK-based Smart Recommender campaign, attach a one-time event listener to wait for the campaign(s)' data to load. Use the Campaign ID to ensure the listener only processes data for this specific campaign. You can create separate handlers for each campaign by filtering by campaign ID.
// Example SDK event integration for multi campaign page.
Replace 123456 and 234567 with the actual Campaign IDs

Insider.eventManager.on('ins-sr:only-api-campaign:load', function (event, data) {

    // Safety check to ensure data and campaignId exist
    if (!data || !data.campaignId) {
        return;
    }

    // Distinguish and pass data to the correct rendering function
    if (data.campaignId === 123456) {
        // Example: Campaign 1 is for the Top Banner
        handleTopBannerRecoResponse(data);
    }
    else if (data.campaignId === 234567) {
        // Example: Campaign 2 is for Cross Sell Product Page
        handleCrossSellProductsRecoResponse(data);
    }
    else {
        // Handle any other unexpected campaigns that load
        console.log("Smart Recommender data loaded for unassigned campaign:", data.campaignId);
    }
});
Design your widget as you want: Implement your handle functions, like handleTopBannerRecoResponse and handleCrossSellProductsRecoResponse, to design your HTML and style, and place your widget in the right place on your web page.
Track 2: Analytics enabled integration (Optional reporting)
Track 2 includes all steps from Track 1 but adds specific data attributes and structure required for the Smart Recommender to accurately track Impressions and Clicks for reporting all metrics in the Smart Recommender Analytics dashboard.
Required changes for analytics tracking other than Track 1
Container ID: The wrapper <div> of the entire widget must contain a specific variant id tied to the Campaign ID.
Item IDs, Categories: Each individual product card in the loop must contain attributes that link it back to the unique product recommended by the engine, including the item_id and product category.
Build your HTML Structure as Specified and Render
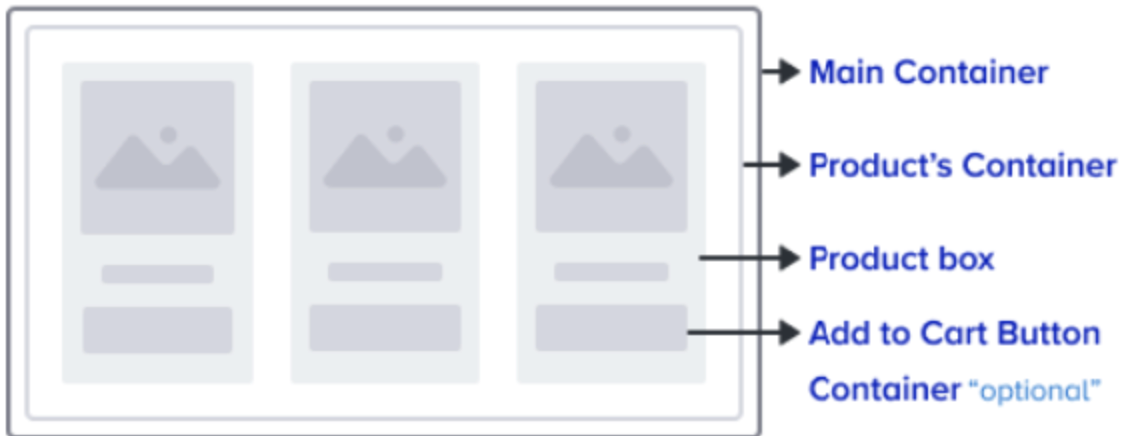
Smart Recommender suggests a four-level carousel structure as follows:
Main Container: Wraps the entire recommendation widget.
Product's Container: Contains all product cards.
Product Box: Represents a single recommended product. You can display any product attribute to show your customers, including a Visit Product Page button. When a user clicks here, the user will be redirected to a product detail page.
Add to Cart Button (optional): Enables users to add items directly to the cart from the widget. This is required for Insider One to collect and add to cart metrics and display them on the analytics page.
The example HTML structures are as follows:
For Cross-Platform Campaigns or Single-Platform Desktop Web Campaigns:
<div class="ins-preview-wrapper-{variation's id} ins-sr-api-wrapper">
    <div class="ins-web-smart-recommender-body" data-recommended-items="[product_id1, product_id2, product_idn]">
        <div class="ins-web-smart-recommender-box-item">
            <div class="ins-product-box ins-element-link ins-sr-api" ins-product-id="{product's id}" data-product-categories="{product category list}" event-collection="true">
                <!-- Product Image, Name, Price, Go to Product Button etc.-->
            </div>
            <div class="ins-add-to-cart-wrapper" ins-product-id="{product's id}">
                <!-- Add To Cart Button -->
                <div class="ins-element-link ins-sr-api">
                    Add To Cart
                </div>
            </div>
        </div>
    </div>
</div>
For the Main Container
<div class="ins-preview-wrapper-{variation's id} ins-sr-api-wrapper"></div>ins-preview-wrapper-{variation's id}
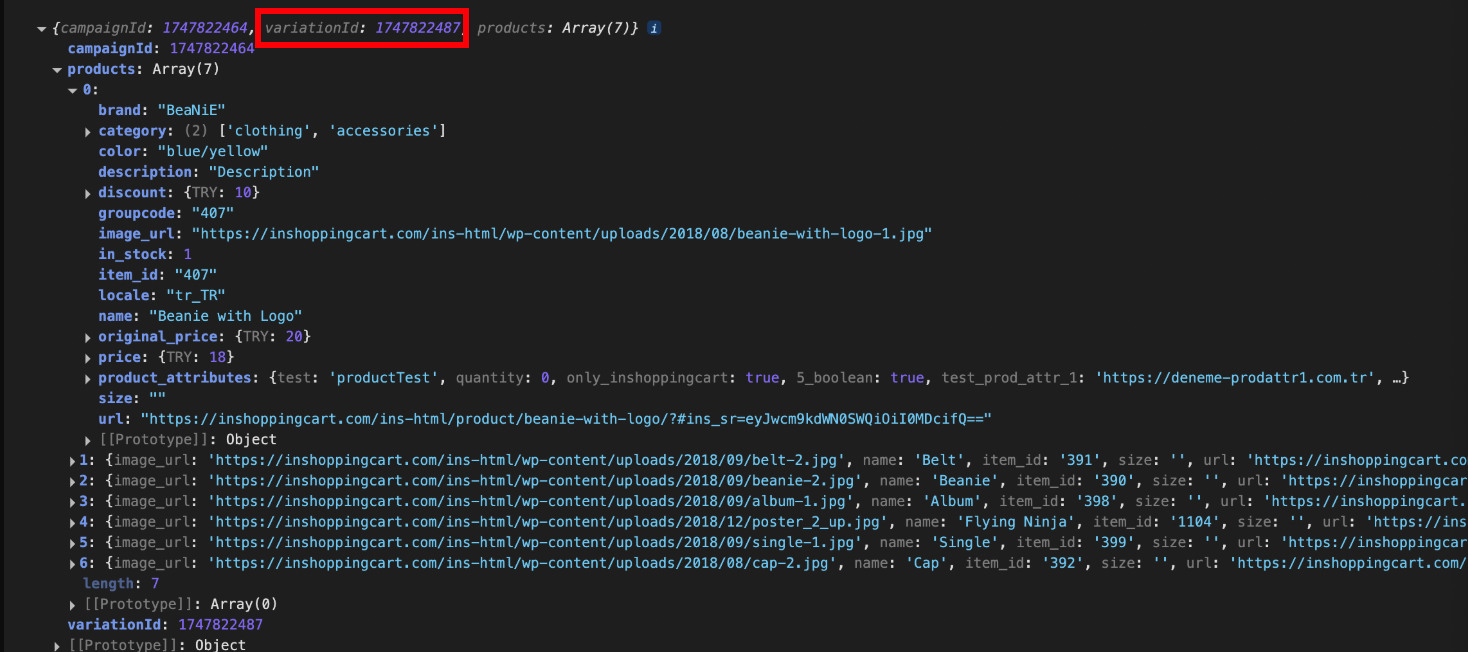
Replace variationId with the variationId fetched from the SDK event
ins-sr-api-wrapper
For the Products' Container
<div class="ins-web-smart-recommender-body" data-recommended-items="[product_id1, product_id2, product_idn]"></div>Class names
ins-web-smart-recommender-body
Attributes
data-recommended-items
This attribute’s value should be the list of product ids of products in the product cards container, formatted as a stringified version of an array of product ids.
Example: data-recommended-items=”[407,408,409,410,411,412,413]”
Replace product_id1, product_id2, etc., with each product objects' item_id field fetched from the SDK event.
For the Product Box
<div class="ins-web-smart-recommender-box-item">
  <div class="ins-product-box ins-element-link ins-sr-api" ins-product-id="{product's id}" data-product-categories="{product category list}" event-collection="true">
  </div>
</div>
Parent element class names:
ins-web-smart-recommender-box-item
Child element class names and attributes:
Class names
ins-product-box
ins-element-link
ins-sr-api
Attributes
ins-product-id
This attribute’s value should be the product id of each product card. Example: ins-product-id=”407”
Replace {product’s id} with the related product object's item_id field value fetched from the SDK event
data-product-categories
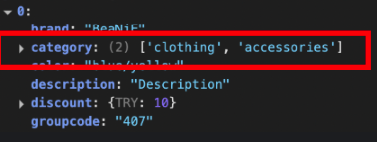
This attribute’s value should be the category list for each product card. Example: data-product-categories="[clothing, accessories]”.
Replace {product category list} with the related product object’s category field value fetched from the SDK event
event-collection
The value should be true. Example: event-collection=true
For the Add to Cart Button Container
<div class="ins-add-to-cart-wrapper" ins-product-id="{product's id}">
                <div class="ins-element-link ins-sr-api">
                    Add To Cart
                </div>
            </div>
Parent element class names and attributes:
Class names
ins-add-to-cart-wrapper
Attributes
ins-product-id
This attribute’s value should be the product id of each product card. Example: ins-product-id=”407”
Replace {product’s id} with the related product object's item_id field value fetched from the SDK event.
Child element class names:
Class names
ins-element-link
ins-sr-api
For Single Platform Mobile Web Campaigns:
Apply almost the same configuration with Cross Platform and Desktop Web Campaigns. The only differences are
Products' Container class names are different
For Cross Platform and Desktop Web: ins-web-smart-recommender-body
For Mobile Web: ins-mobile-web-smart-recommender-body
Product Box class names are different
For Cross Platform and Desktop Web: ins-web-smart-recommender-box-item
For Mobile Web: ins-mobile-web-smart-recommender-box-item
<div class="ins-preview-wrapper-{variation's id} ins-sr-api-wrapper">
    <div class="ins-mobile-web-smart-recommender-body" data-recommended-items="[product_id1, product_id2, product_idn]">
        <div class="ins-mobile-web-smart-recommender-box-item">
            <div class="ins-product-box ins-element-link ins-sr-api" ins-product-id="{product's id}" data-product-categories="{product category list}" event-collection="true">
                <!-- Product Image, Name, Price, Go to Product Button etc. -->
            </div>
            <div class="ins-add-to-cart-wrapper" ins-product-id="{product's id}">
                <!-- Add To Cart Button -->
                <div class="ins-element-link ins-sr-api">
                    Add To Cart
                </div>
            </div>
        </div>
    </div>
</div>
Rendering
The same event listener is used as in Track 1, but the handleRecoResponse function will include analytics-related additions to the HTML builder for rendering.
// Example SDK call for basic data fetching
Insider.eventManager.once('ins-sr:only-api-campaign:load', function (event, data) {
    // Replace 123456 with the actual Campaign ID
    if (data && data.campaignId === 123456) {
        handleRecoResponse(data);
    }
});
Here is an example function for rendering your carousel in Smart Recommender format to collect analytics metrics:
function handleRecoResponse(response) {
    const container = document.getElementById('smart-recommender-carousel-container');
    if (response && response.products && response.products.length > 0) {
        const campaignId = response.campaignId;
        const variationId = response.variationId;
        const productIds = response.products.map(product => product.item_id);
        const stringifiedProductIds = JSON.stringify(productIds);

        let htmlContent = `<div class="ins-preview-wrapper-${variationId} ins-sr-api-wrapper">
    <div class="ins-web-smart-recommender-body" data-recommended-items='${stringifiedProductIds}'>`;

        response.products.forEach((product) => {
            const analyticsAttrs = `ins-product-id="${product.item_id}" data-product-categories='${JSON.stringify(product.category)}'`;
            htmlContent += `
        <div class="ins-web-smart-recommender-box-item">
            <div class="ins-product-box ins-element-link ins-sr-api" ${analyticsAttrs} event-collection="true">
                <a href="${product.url}">
                    <img src="${product.image_url}" alt="${product.name}">
                    <p>${product.name}</p>
                    <span class="price">${product.price.EUR}</span>
                </a>
            </div>
        </div>`;
        });

        htmlContent += `
    </div>
</div>`;
        container.innerHTML = htmlContent;
    } else {
        if (container) container.style.display = 'none';
    }
}
Debugging and testing
To test the analytics enabling Track 2 integration, Smart Recommender provides a debugger console. On the Smart Recommender listing page, click the Test Integration button in your campaign row to open the Debugger Console.

Navigate to the Smart Recommender SDK tab, where the following items are monitored individually to ensure integration health:
ins-preview-wrapper-variationId ins-sr-api-wrapper
ins-web-smart-recommender-body
ins-web-smart-recommender-box-item
data-recommended-items
ins-product-box
ins-product-id
data-product-categories
event-collection="true"


Error and fallback management
Because the JavaScript SDK operates using an event-based model rather than direct promises or callbacks, logic-related errors are typically handled silently or resolved through fallback behaviors defined in the campaign configuration. Client-side resilience is therefore achieved primarily through controlled rendering logic.
Graceful degradation
The handleRecoResponse function should include logic to hide the recommendation container when the response.products array is empty. This prevents rendering empty or broken UI components and ensures a clean user experience.
Strategy-based fallback behavior
When the response contains no products, it indicates that the recommendation strategy associated with the Campaign ID returned zero results for the given user or context. In such cases, the system respects the minimum display thresholds configured in the campaign, and no recommendations are rendered.
This approach ensures consistent behavior across edge cases while maintaining visual integrity and honoring campaign configuration rules.