When creating a new email template, you often have to perform the same actions. For example, imagine you have a website where you publish products. If you need to send an email about the promotion with a link to 5 products from your site, you need to download 5 pictures, their product names, and their prices, and include links to them in the Buy button.
The downloaded elements are usually used in the letter several times. For example, the name of the goods is used 3 times: in the field product names, in the title, and in the alt-text of the goods picture. The same goes for the link, we apply it in the CTA button, in the picture, in the title, etc. Tomorrow a new action is performed and it again requires repeating the steps described above. And what if there are 50 products instead of 5?
To reduce time spent on routine operations, we have created a new entity—a smart element that automates this process! Bear in mind that initially, you will have to sweat a bit before the magic happens.
This article explains the following:
What is a smart element?
A smart element is a structure, container, or strip that contains all the usual elements (product title, picture, price, description, Buy button) and that also allows data to be obtained via variables from external sources.
To set up a smart element, start by designing it. Arrange the elements in the desired order and decide on their appearance. Then add the variables and specify the rules for collecting the desired values and where to apply them. After this, your smart element is ready to use.
Choose a link to the product page on the site, and the system will automatically “pull” the necessary data from that page and apply it to specified places in your email, saving you significant time.
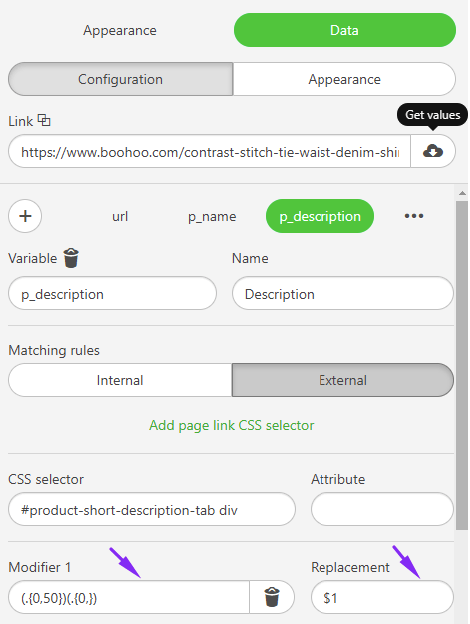
It is worth noting that our system allows clipping of product names to display only the first 50 characters of a product name that contains 150 characters. To do it, you need to insert the combination (.{0,50})(.{0,}) in the Modifier field where 50 stands for the number of characters you want to show. Replace "50" and enter the combination $1 in the Replacement field.
Product prices in emails now match those shown on your website.
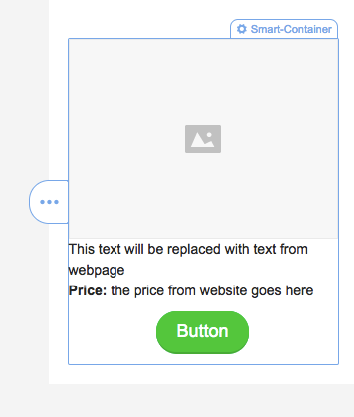
Create a smart container for a product card
Imagine you're creating a product card located on your website. To do it, you need a picture of the product, its name, and price.
In the new Drag & Drop Editor, you can drop the structure from two containers. In the first container, add the necessary blocks (picture, two blocks of text, button) – you do the “skeleton” of the goods card.
Next, you select the container with the base blocks, clicking on the blue label Container from the top, and select the Data tab in the sidebar, and click on the Begin button to activate the Smart property.
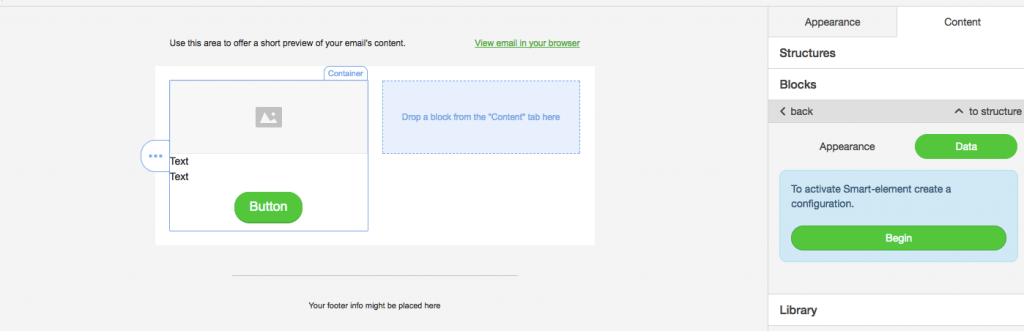
As a result, a visual designer will be displayed instead of a button, in which we can:
- Configure all possible rules for obtaining values and applying them through variables to the desired blocks inside my letter. To do this, we need the Configuration tab.
- View and manually adjust (if desired) the received values of the configured variables from the site in the Appearance tab.
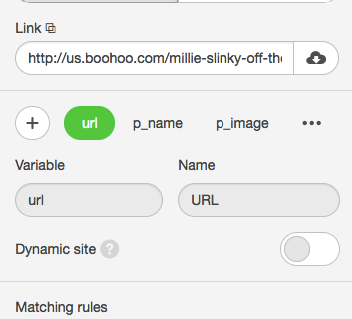
Proceed to the configuration and add variables. For convenience, click the icon to add a variable. A list of the most popular ones, which are most often used for goods/products or blog entries, will be displayed. Please note that as soon as we activate the smart property for any object, by default, a variable URL is created, which cannot be deleted.
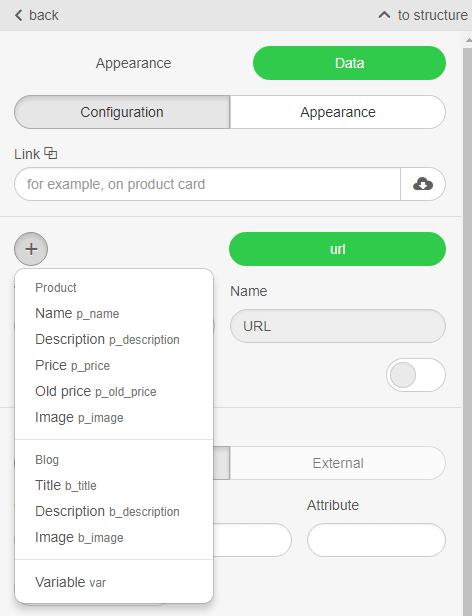
To make a card with a picture, name, and price, you add the variables Name, Image, and Price from the Product section. Each added variable creates its configuration tab.
Next, I need to configure the rules for obtaining values for these variables and their application in my smart element. To do this, go to the control of Matching rules, which consists of two tabs:
- Internal rules
Here, you set the rules for where exactly you need to apply the already obtained values of the variables in our smart elements. - External rules
It configures the rules for where you need to get the values of variables from the site we need. Also, some controls allow you to convert values using regular expressions or apply various formatting options.
The rules for each tab are configured through the standard HTML element search mechanism through CSS selectors and Attributes.
Since this process requires a certain knowledge of the device sites, let’s look at each variable in more detail.
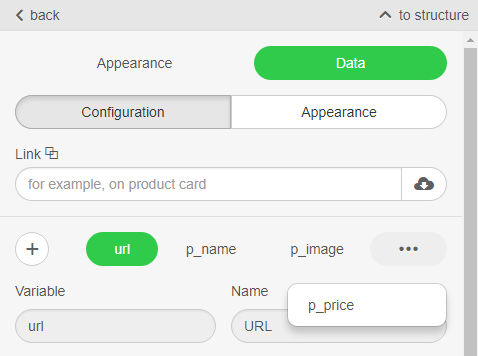
Variable URL
This variable has a Dynamic site control, which is disabled by default. If the site from which you want to get values for any of the smart element variables is dynamic, check this box by putting the checkbox opposite.
A dynamic site is a website that is created from the CLIENT side based on JavaScript, i.e., receiving HTML pages. It is impossible to find necessary elements there without running all the required scripts before.
Since you need to have a link in the smart element to the site by clicking on the Buy button and the product image, in the Internal rules tab you
prescribe the rule that the value of the variable is set to all the elements of a (CSS selector field) in the attribute href (the Attribute field).
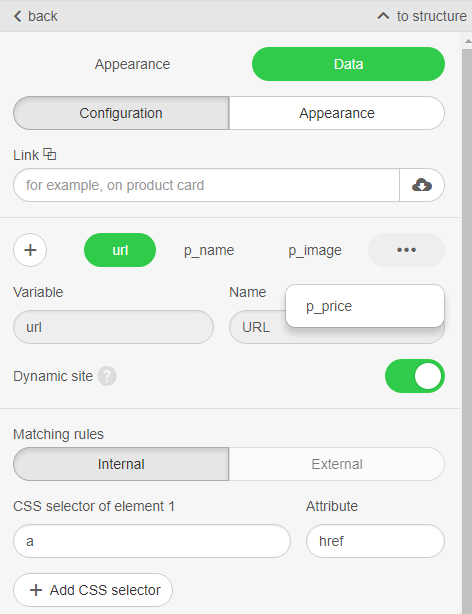
Note that for this variable, the External Rules tab is not available, since the site itself is the source of the data.
Variable for Product picture
Let’s start with the rule of getting the product image for the External Rule tab. To do this, open the product page, point the cursor at the picture, right-click to open the context menu, and select Inspect element (note that this menu item may be called differently on your computer, for example, Inspect). As a result, the console opens, where we will see CSS selectors with attributes.
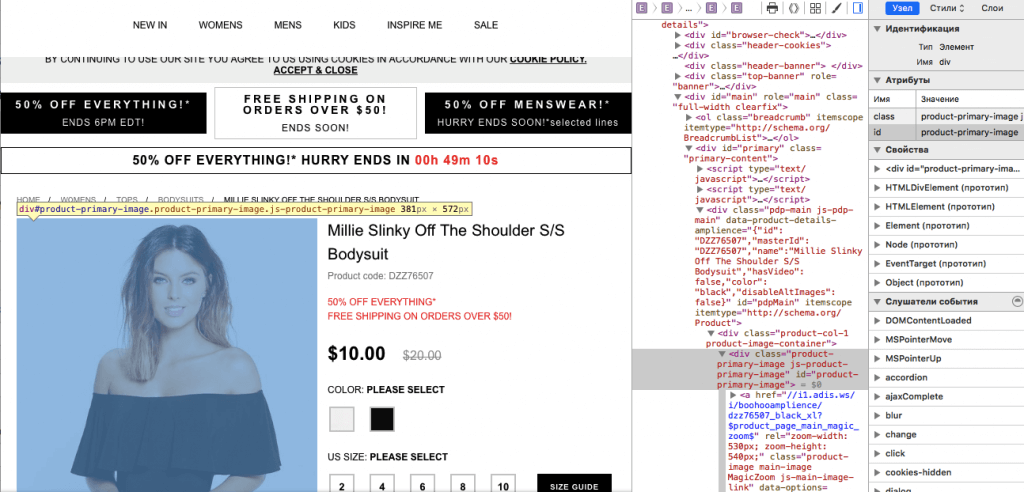
In my case, the rule for obtaining the image was as follows:
CSS selector: div # product-primary-image.product-primary-image.js-product-primary-image a
Attribute: href
We set them in the appropriate fields of the External Rules tab. For the Internal rules tab, I specify:
CSS selector: .esd-block-image .adapt-img
Attribute: src
Thanks to this rule, the resulting image value will be applied to the src attribute in the Picture block.
Variables for Product name and Price
The principle of action here is the same as in the case of the picture.
The first one you use for the title, and the second one for the price. The content for the first block will be filled only from the site. For the price block, some content will be pulled from the site, and some will be a constant. For example:
In the second text block, the selected word Price” will be a constant, and the text will be replaced with the value obtained from the site.
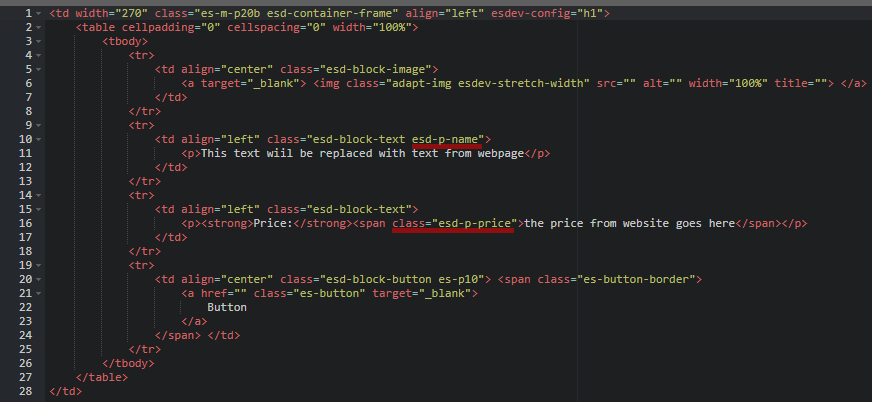
For our smart element to distinguish between these blocks (which text field to use for the title and which for the price), and to understand where to use the received content, we need to add a unique class in the HTML code editor for each one. In my case, these will be the esd-p-name and esd-p-price classes.
Now we fill in each variable with alternate internal and external rules for controlling Matching rules.
In my case, for the variable Name:
- internal rules
CSS selector: .esd-block-text.esd-p-name
Attribute: empty
CSS-selector 2: .esd-block-image a img
Attribute: title
CSS-selector 3: .esd-block-image a img
Attribute: alt - external rules
CSS selector: h1.product-name.js-product-name
Attribute: empty
For the variable Price
- internal rules
CSS selector: .esd-p-price
Attribute: empty - external rules
CSS selector: span[itemprop=price]
Attribute: empty
That’s all. The most difficult thing is done! Now, a small final step is needed to get the values from a link from an external site. To do this, simply paste the link into the Link field and wait a few seconds for the data to be displayed.
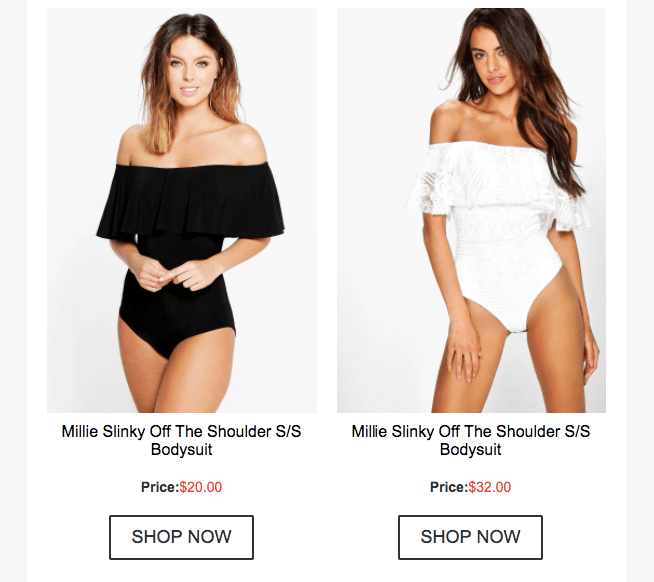
Here it is – the smart element has worked! The template displays the name, picture, and price of the product from our website. Now all that’s left to do is edit the goods card's styles. Take a look at this!

In the Appearance tab, we see all the data that is displayed in our template, and then we can correct it without worrying that it will somehow affect the formatting styles.

Since our smart element is already configured, to create a similar product card from another page of the site, you need to specify another path in the Link field, and the product card will be filled with new data automatically – it will save you a lot of time!
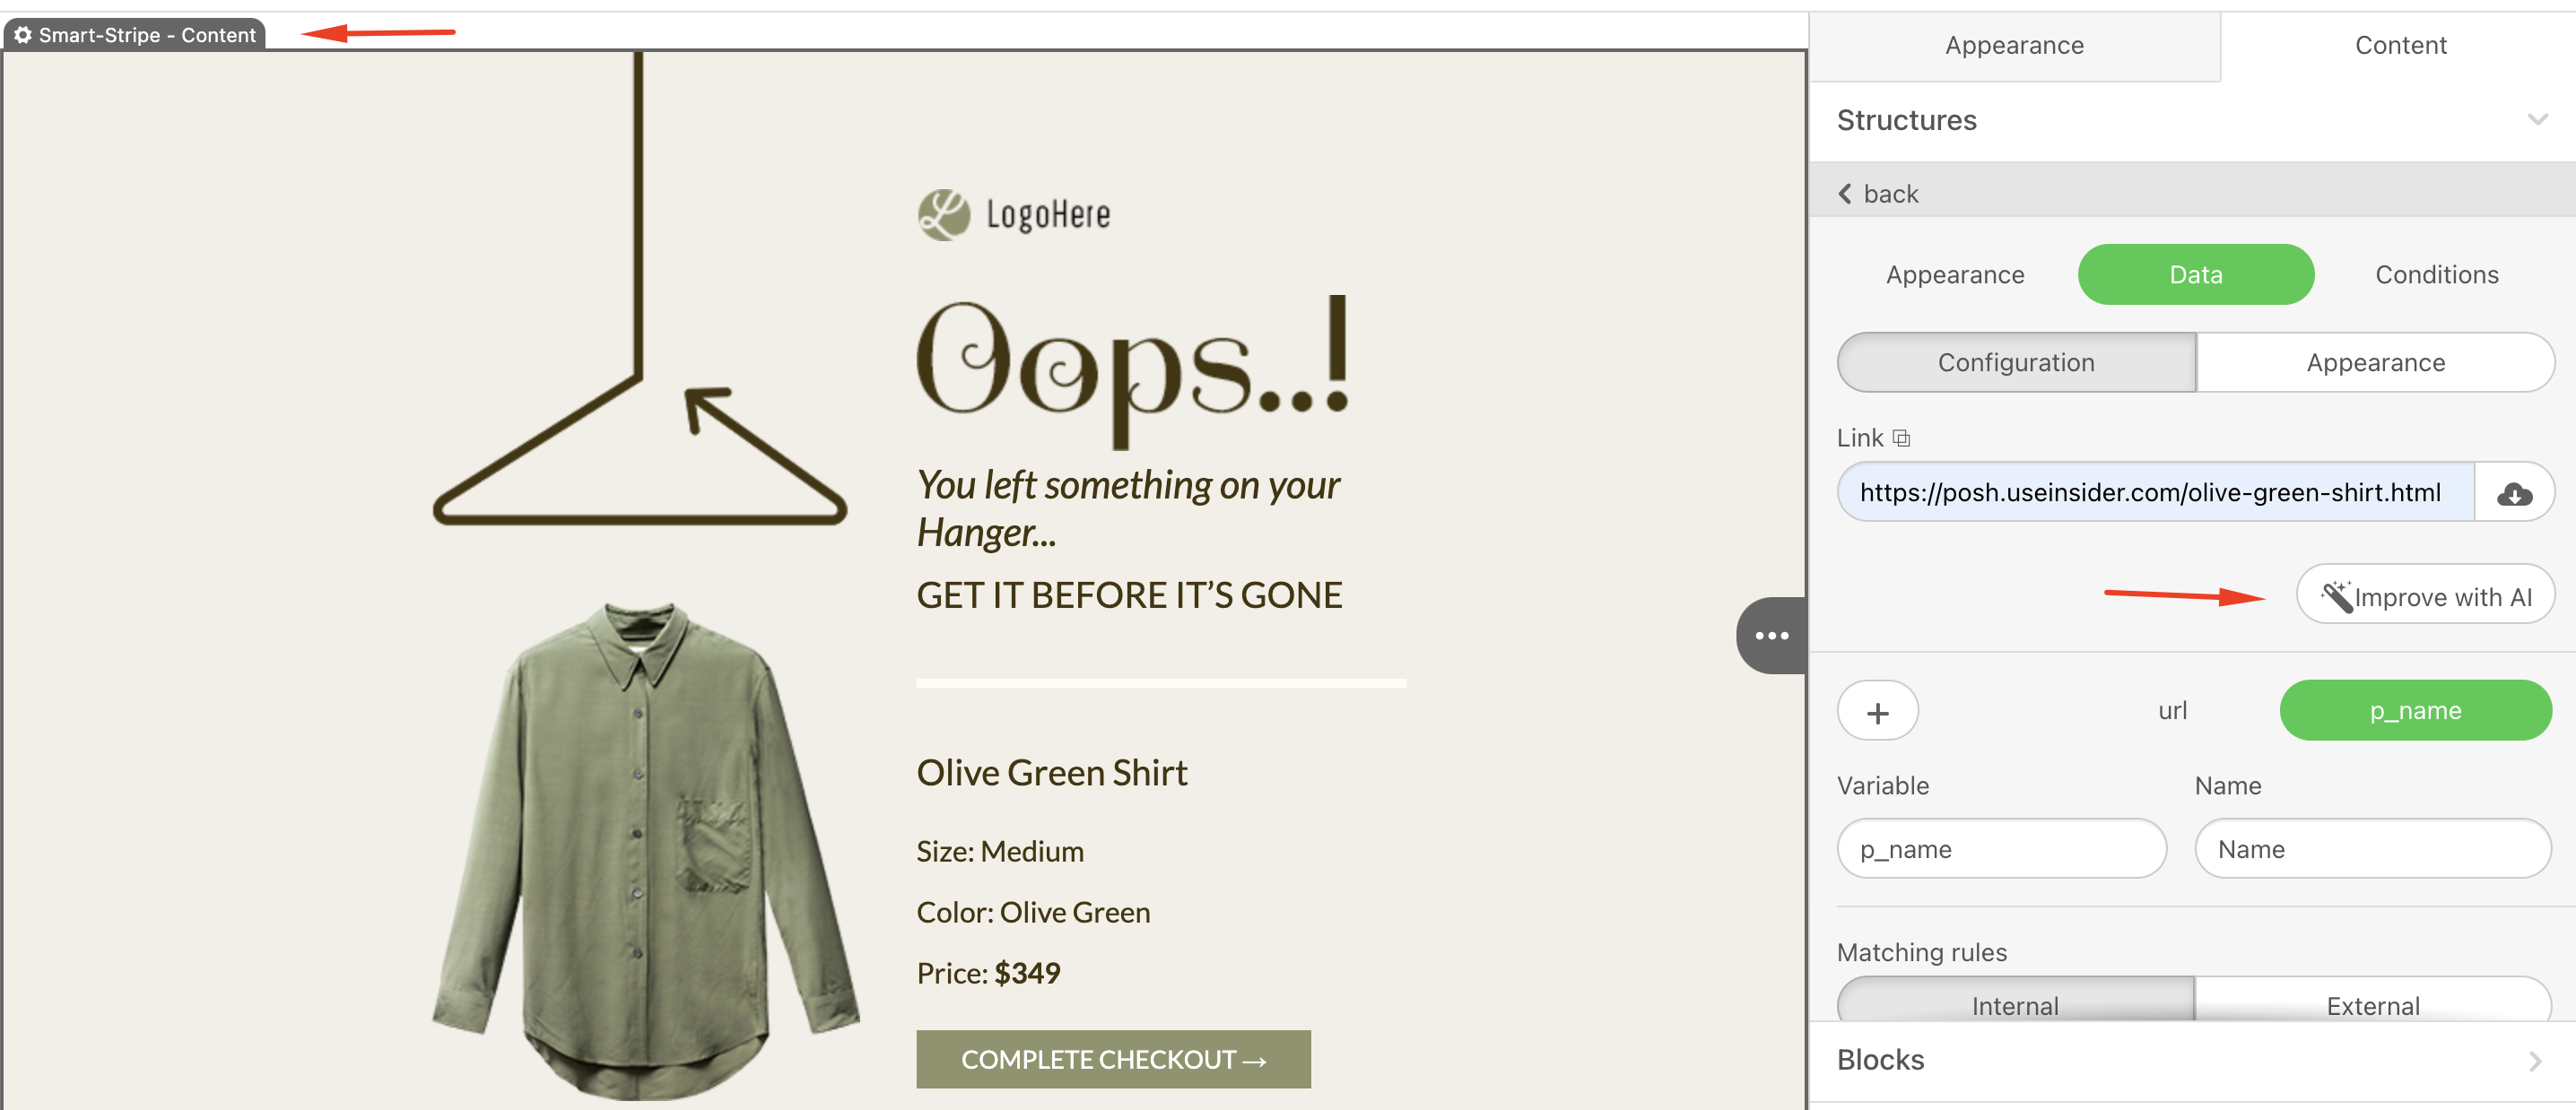
Utilize AI for smart modules
Using AI text generators can significantly reduce the time and effort required to conduct research, write, and format content. With this tool, you can devote more attention to editing and creating visuals for your material.
To use AI in your smart elements, configure the smart element and click the Improve with AI button to ameliorate the text blocks inside the smart module.