Users who book a one-way flight often intend to book a return flight later, but may postpone the decision while finalizing travel plans. This delay creates an opportunity for travel companies and airline platforms to proactively remind users to complete their round-trip booking.
The Return Flight use case focuses on identifying users who have purchased or booked an outbound flight but have not yet booked a corresponding return flight within a certain time window. By detecting this behavior and sending timely reminders, businesses can encourage users to complete their travel itinerary on the same platform.
With a well-designed journey, you can remind users about return flight options while their travel intent is still high. Personalized messaging can include destination-specific offers or convenient round-trip recommendations that match the original flight route.
This approach helps travel businesses increase booking completion rates while providing travelers with a convenient and helpful reminder.
How does Return Flight help?
Implementing a return flight reminder strategy offers several benefits for travel platforms and airlines.
Fragmented travel planning: Many users book flights step by step. They may initially purchase the outbound flight and plan the return leg later. If you do not engage them at the right moment, they may book their return flight on another platform.
High purchase intent: Users who already booked an outbound flight have demonstrated strong travel intent. Encouraging them to complete their round-trip booking has a higher probability of conversion compared to targeting new users.
Competitive advantage: Flight prices and availability change quickly. If a user searches for return flights later on a competitor platform, you may lose the opportunity to capture that booking.
Timely engagement increases conversions: Sending a reminder shortly after the outbound booking ensures the user receives the message while they are still actively planning their trip.
What goals can you achieve by a Return Flight journey?
Increase revenue: Encouraging users to book their return flights on the same platform increases total booking value and drives incremental revenue.
Improve conversion rate: Targeting users who have already purchased an outbound flight allows you to reach a high-intent audience and improve booking completion rates.
Enhance user experience: Providing relevant reminders to help users complete their travel plans offers a smoother, more convenient travel booking experience.
Strengthen customer retention: When users complete both legs of their trip through your platform, they are more likely to return for future travel bookings.
Technical requirements
Your website must have a cart structure that makes information about cart items available.
Cart items and purchase information must be collected. Once your website is mapped by Insider One during onboarding, It starts collecting this information by default. This does not require any additional integration.
The Web SDK Integration must be implemented to track cart items and purchased items.
Before using any channel in your journeys, the respective channel integrations should be completed. Depending on the channels you want to use in your journeys, additional integrations might be required.
If you need custom events, create them and pass them to Insider One.
If you have a mobile app, SDK Integration must be implemented.
For further integration details, refer to the Architect Integration Guide.
Create a Return Flight journey
You can create a Return Flight journey to identify users who booked a flight but did not plan and book the return flight for that route, to prompt them to purchase the return flight and increase your conversions and average purchase amount.
Below is an example scenario for the airlines and airports industry businesses.
John books a flight from Istanbul to Paris on your travel platform. After completing the booking, he plans to decide on the return date later.
Once John books the outbound flight, he enters a journey designed to encourage him to complete his round-trip booking. Here’s how you can structure your journey;
Starter: The journey begins when a user performs the Flight Booking/Purchase event. This event includes parameters such as departure airport, arrival airport, departure date, and flight details.
These parameters will later be used to determine whether the user has purchased the corresponding return flight. However, you do not need to specify the event parameters when you create the journey with that starter.
Wait for 3 hours: After the user books the outbound flight, add a Wait for Some Time element and set it to 3 hours. This waiting period allows users to naturally complete the return booking if they are still browsing or comparing options.
Check whether the user purchased a return flight ticket: Add a Check Conditions element to determine whether the user has booked a return flight during the waiting period.
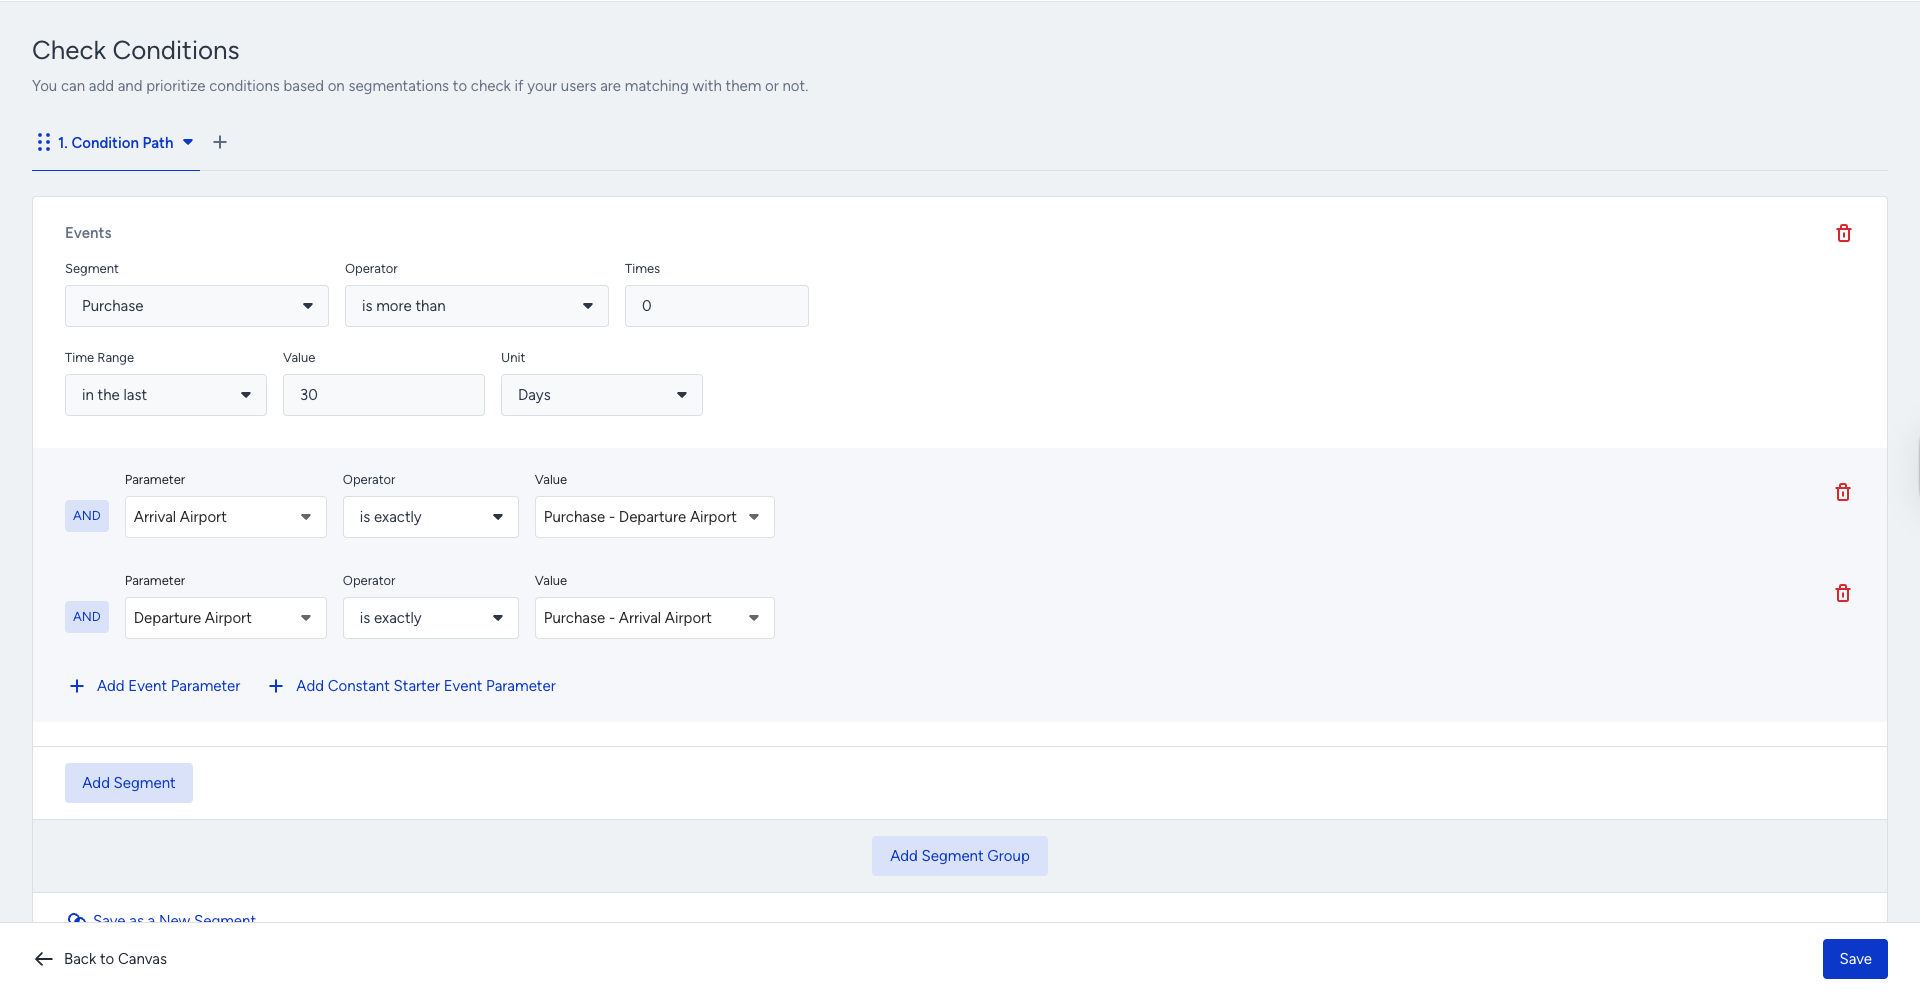
The event to check is again Flight Booking, but this time use Constant Starter Event Parameters to verify whether the newly booked flight corresponds to the return route. Add the following Constant Starter Event Parameters:
Arrival Airport is exactly the Starter Event’s Departure Airport
Departure Airport is exactly the Starter Event’s Arrival Airport
This ensures the system checks whether the user booked the reverse route of the original flight, which indicates a return flight booking.
If John has already booked his return flight (“matching path”), you can recommend a visit plan or enter the user into the Check-in Reminder journey.
If John has not booked his return flight yet (“not matching path”), you can send follow-up communications.
Send a reminder message: If the return flight has not been purchased, you can send a reminder via Email, Web Push Notification, App Push Notification, or SMS.
To increase engagement, the message can include suggested return flights based on the outbound route, limited-time offers for round-trip bookings, and personalized travel recommendations.
Optional follow-up: You can optionally add additional steps, such as:
Waiting another 24 hours
Checking again whether the return flight has been booked
Sending a follow-up reminder or offering a limited-time discount
This ensures you maintain engagement without overwhelming the user with messages.
Step 1: Select the starter
Return Flight is a real-time scenario which means it requires immediate interaction with the user.
On Event starter tracks user events and takes them immediately on the journey when the users perform the specified event. You can select the flight booking or purchase event to take users on a journey when they make a purchase.
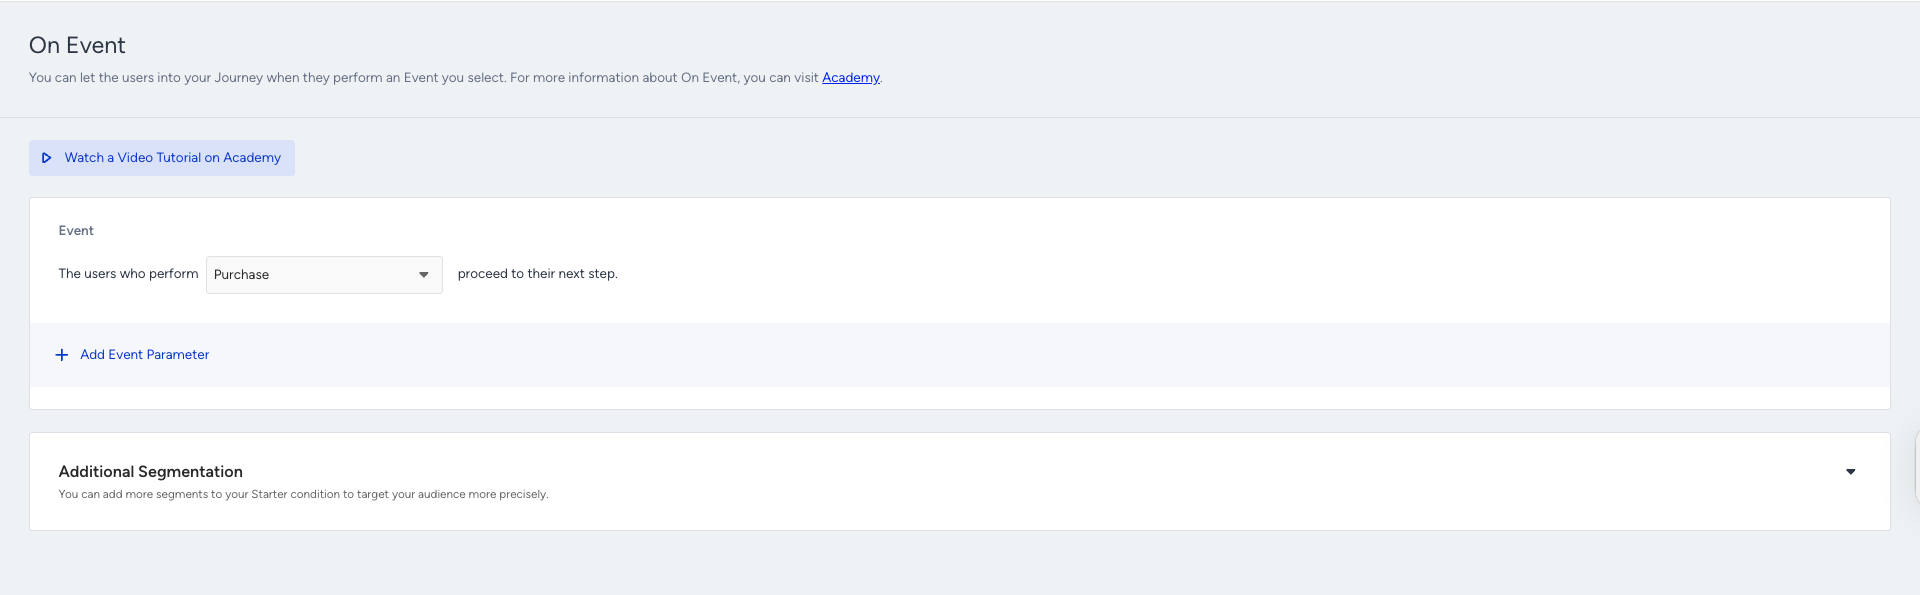
The On Event starter considers every platform to take users, such as website, mobile app, offline data (passed by CRM API). You can have custom events for different scenarios such as booking, watching series, etc.
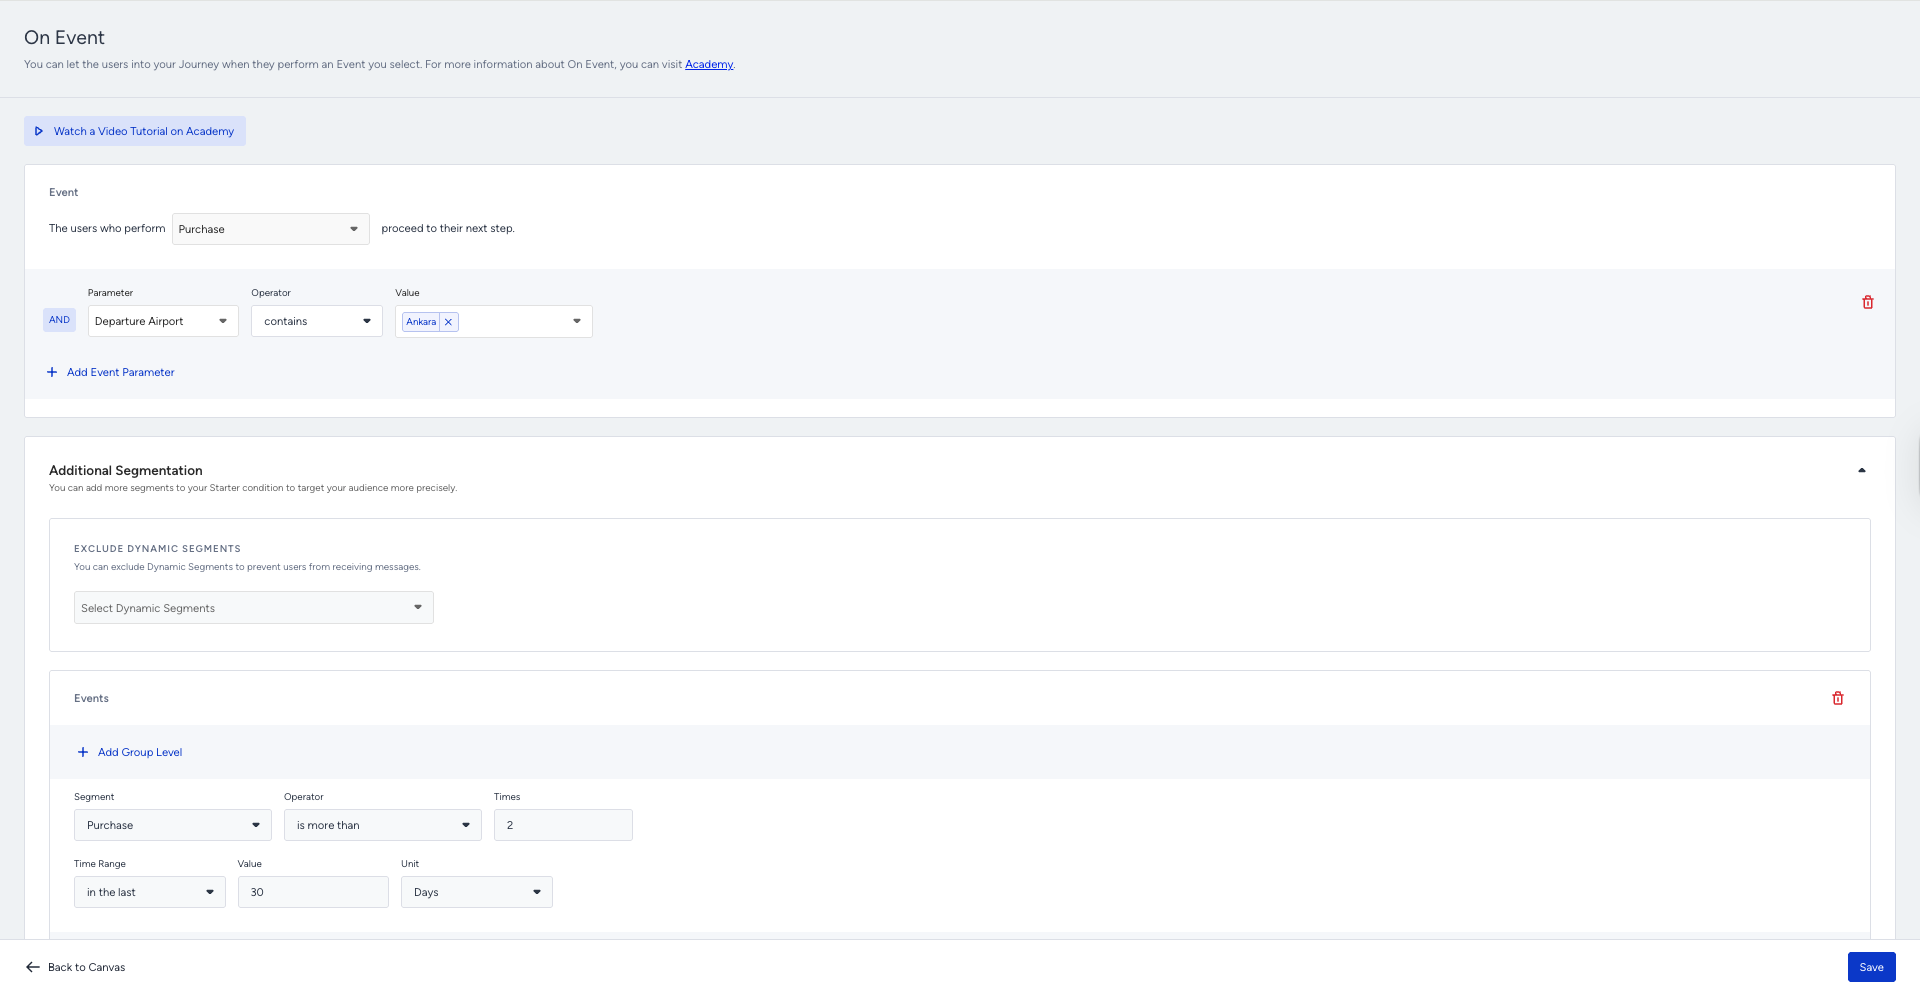
Step 2: Target the correct segment
If you have any additional conditions or segments to guide users on the journey, you can add an optional segment filter to control whether they meet your condition. E.g., targeting users who made a purchase and who made a purchase at least twice in the last 30 days.
Step 3: Build your journey
3.1.: Wait before sending a message
After you decide on the segmentation, you can add the Wait for Some Time element after the starter before sending the initial message. Adding wait element in the journey flow is recommended, but optional.
3.2.: Filter your users
You can add the Check Conditions element to filter users for different paths on the journey flow based on:
Whether they purchased an ancillary product or not
Whether they have returned the flight ticket or not
Their previous purchase history, including frequency, value, and product categories
Their language
Any attribute or event parameters you want
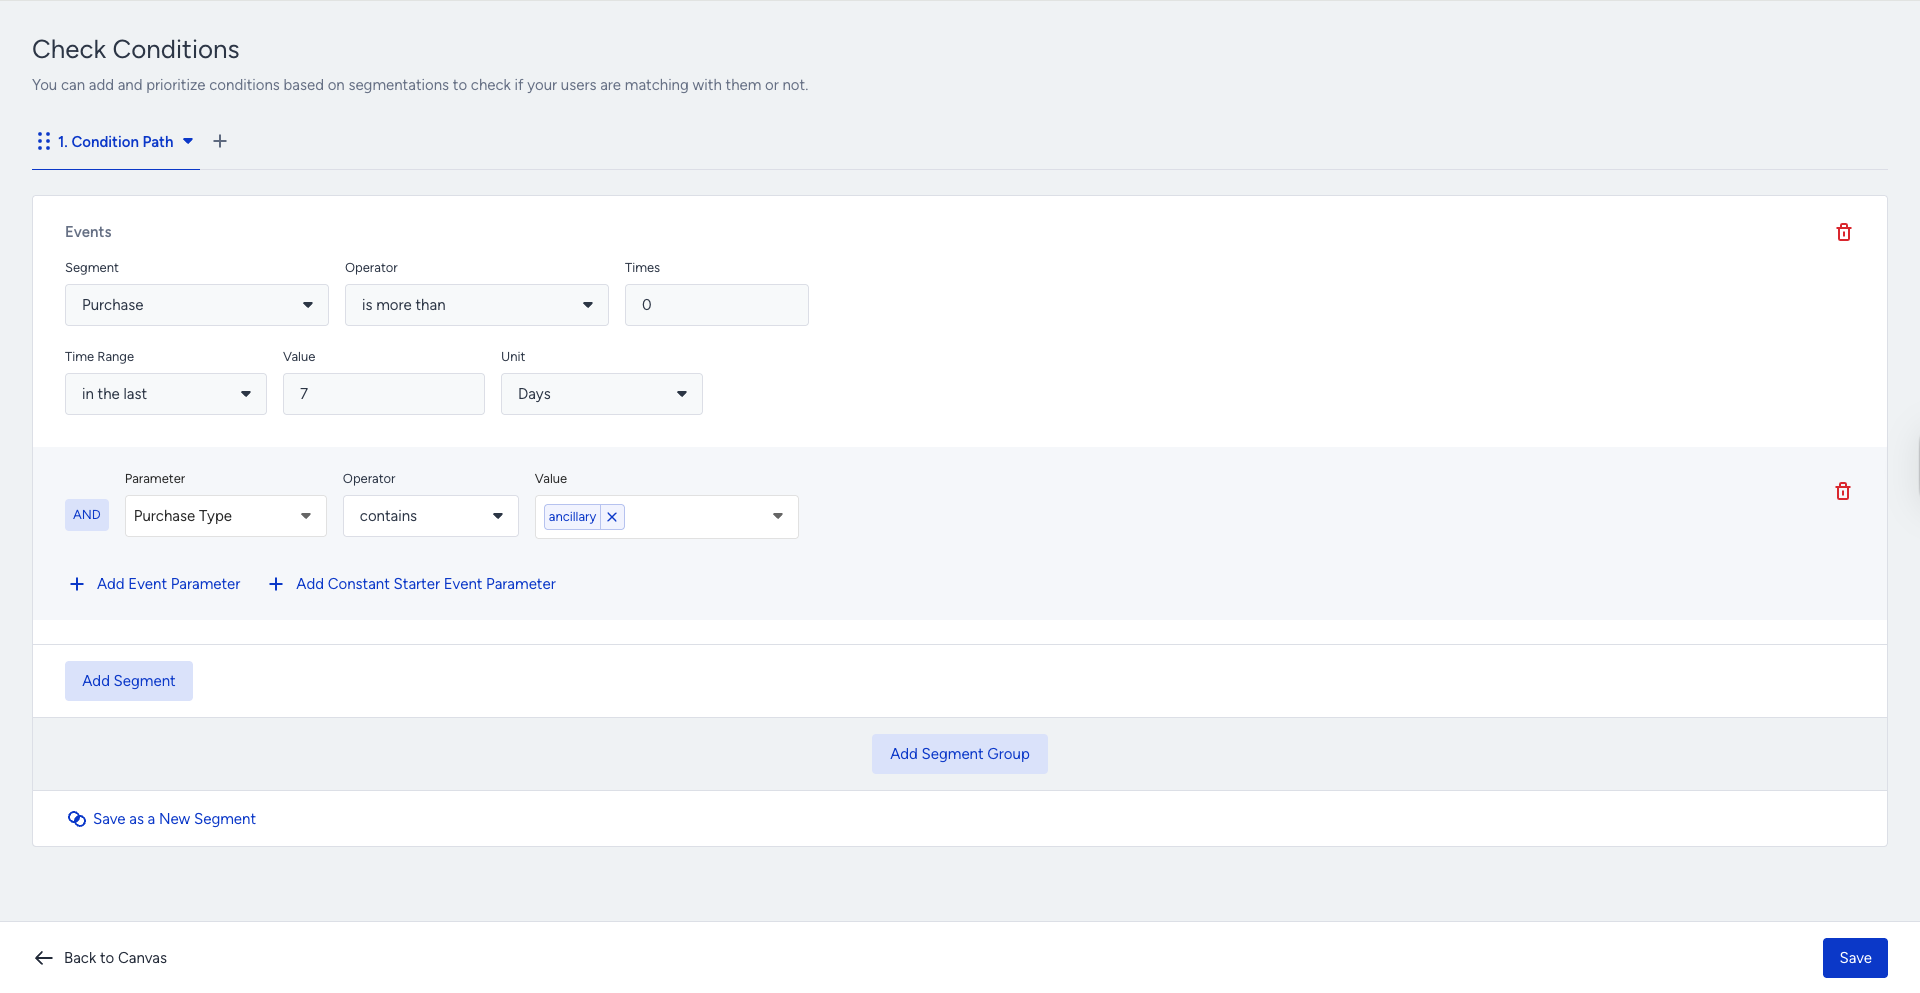
Step 3.2.1.: Filter your Users with Constant Starter Event Parameters
You should use Constant Starter Event Parameters when you create a return flight use case to ensure that your users purchase a flight with the arrival and departure airports reversed.
This feature ensures that your follow-up messaging is always relevant to users by letting you check whether they have already booked a return flight. You can check the exact arrival and departure airports, or any other event parameter the user set, improving accuracy and conversion rates. It automatically and dynamically compares all event parameters from the starter event (purchase/flight booking) with those in the Check Conditions event.
The Constant Starter Event Parameters help ensure the starter event’s parameters match the event parameters selected in the Check Conditions.
3.3.: Check your users' reachability before sending a message
Before sending a flight promotion message, you can check if users are reachable on that channel. If not, you can try another channel on another path. Also, you can use Next Best Channel to increase the possibility of engagement.
.png)
3.4.: Create your content and send your messages
After deciding how you want to continue with the communication for the return flight ticket, you can design your content via Email, SMS, App Push, Web Push, Facebook, On-Site, and In-App.
You may send a return flight booking email with a complementary or ancillaries product.
You may send a “thank you for purchase” message.
You may show personalized recommended ancillary products by the “purchased together” algorithm on the website.
You may want to get feedback from users to know their booking experience.
You can add the last purchased item information into the content.
Personalization | Description |
|---|---|
last_purchase_date | Last Purchase Date |
last_purchase_amount | Last Purchase Amount |
last_purchased_product_name | Last Purchased Product Name |
last_purchased_product_url | Last Purchased Product URL |
You can also use the last 8 purchased items' information in Email and Call an API channels.
Personalization | Description |
|---|---|
Purchased Item Name (1,2,..,8) | Item name |
Purchased Item URL (1,2,..,8) | Item’s page (product page link) |
Purchased Item Image (1,2,..,8) | Item’s image link |
Purchased Item ID (1,2,..,8) | Product ID |
Purchased Item Price (1,2,..,8) | Updated price according to your currency settings in the Inone (e.g. 19,9 or 19,99 dollars) |
Purchased Item Formatted Price (1,2,..,8) | Price according to Inone currency settings with 2 decimals (e.g. 19,90 or 19,99 dollars) |
Purchased Item Original Price (1,2,..,8) | Undiscounted price if there is a discount (e.g. 19,9 or 19,99 dollars) |
Purchased Item Original Formatted Price (1,2,..,8) | Undiscounted price if there is a discount with 2 decimals (e.g. 19,90 or 19,99 dollars) |
Purchased Item Quantity (1,2,..,8) | Quantity of the same purchased item |
Purchased Items' Currency | Item currency |
Total Purchased Item Count | Total purchased item count |
Total Purchased Amount | Total purchased item value |
Total Purchased Item Kind | Number of different purchased items. It is also used for Display Conditions to show more or less rows in the email content. |
Purchased Items are automatically grouped based on the same last purchase transaction that the user has made.
.png)
Alternatively, you can directly add the purchase event’s parameters to the content. Make sure you send events and their parameters from your platforms (website, mobile app).
You can utilize and customize ready-to-use confirmation email templates placed in the Select Templates.
.png)
.png)
In-App
You can have a survey in your app using the In-App channel.
.png)
SMS
.png)
Follow-up messages, tips, and best practices
Designing an effective follow-up strategy is essential for maximizing the impact of your Return Flight journey. Since users who booked an outbound flight already have strong travel intent, thoughtful, well-timed follow-up communication can significantly increase the likelihood that they complete their return booking.
Below are several recommendations to improve engagement and conversion rates for this use case.
Send a timely follow-up reminder: If the user does not book the return flight after the first reminder, you can add another Wait for Some Time element (for example, 24 hours) before sending a second message.
This additional reminder helps capture users who are still planning their trip but have not yet finalized their return date. However, avoid sending too many reminders within a short time period, as this may cause message fatigue.
Personalize the return flight recommendation: Personalization significantly improves engagement in travel-related messaging. Since the journey starts with a Flight Booking event, you can use the starter event parameters to personalize your messages. Examples of personalization include:
Displaying the original route (e.g., Paris → Istanbul) in the return flight recommendation
Suggesting return flights based on the same airports used in the outbound booking
Highlighting popular return dates based on typical travel durations
This makes the reminder feel relevant and helpful rather than promotional.
Highlight price or availability changes: Flight prices and seat availability can change quickly. Including dynamic messaging related to pricing or availability can create urgency and encourage users to finalize their booking sooner.
For example, you can:
Notify users when return flight prices are increasing.
Highlight limited seat availability on popular return routes.
Suggest alternative return times or airlines if the preferred option becomes limited.
These elements can motivate users to complete their purchase before the opportunity changes.
After sending a return flight booking message, you can track whether users complete your desired goal over time. You can add a Wait element to give users time, then add the Check Conditions element to check whether users perform the specified action. Thus, you can send more relevant, contextual messages by branching the journey flow to the different paths.
For example, you can have a custom attribute or event to control. When you have a feedback or survey form, you can have an attribute for negative, positive responses, or have a “submit feedback form” custom event.
You can also ask users to join your loyalty program or subscribe to your newsletter. You can check if they join a while after you sent the return flight message.

You can tag users based on their feedback responses after they make a purchase. You can add the Update User Attribute element to the journey flow and update their “purchase experience” attribute value as “good” or “bad”.

You can pass this valuable information to your CRM with the users' email addresses or phone numbers through the Call an API channel.
You can send users to a contact list to know their email addresses and retarget them via email.
.png)
You may also consider not sending many messages to not bother users. They could find constant messaging annoying. You can set Journey Entry Capping to prevent overcommunication by preventing users from being taken on journeys.
You can set special Goals, in addition to purchase, for users who enter a return flight journey. For example: hotel bookings, ancillary purchases, coupon redemptions, destination page visits, etc. You can create a custom event to set goals, or use default events and their parameters.
.png)
You may have an Ancillary Upsell journey besides the Return Flight journey. Sending separate recommendation content and promotions to users can be overcommunication, and they may feel disturbed. You can check Journey Prioritization to avoid those kinds of frustrations.
Keep the message clear and action-oriented: Your message should focus on a single, clear objective: encouraging the user to complete their return flight booking.
Best practices for message content include:
Using concise and engaging titles.
Including a clear call-to-action such as “Book Your Return Flight”.
Adding a direct link to the return flight search or booking page.
Clear and action-oriented messaging reduces friction and makes it easier for users to take the next step.
You can check multiple reachabilities on channels for users at the same time, and you can lead them to the corresponding path.
.png)
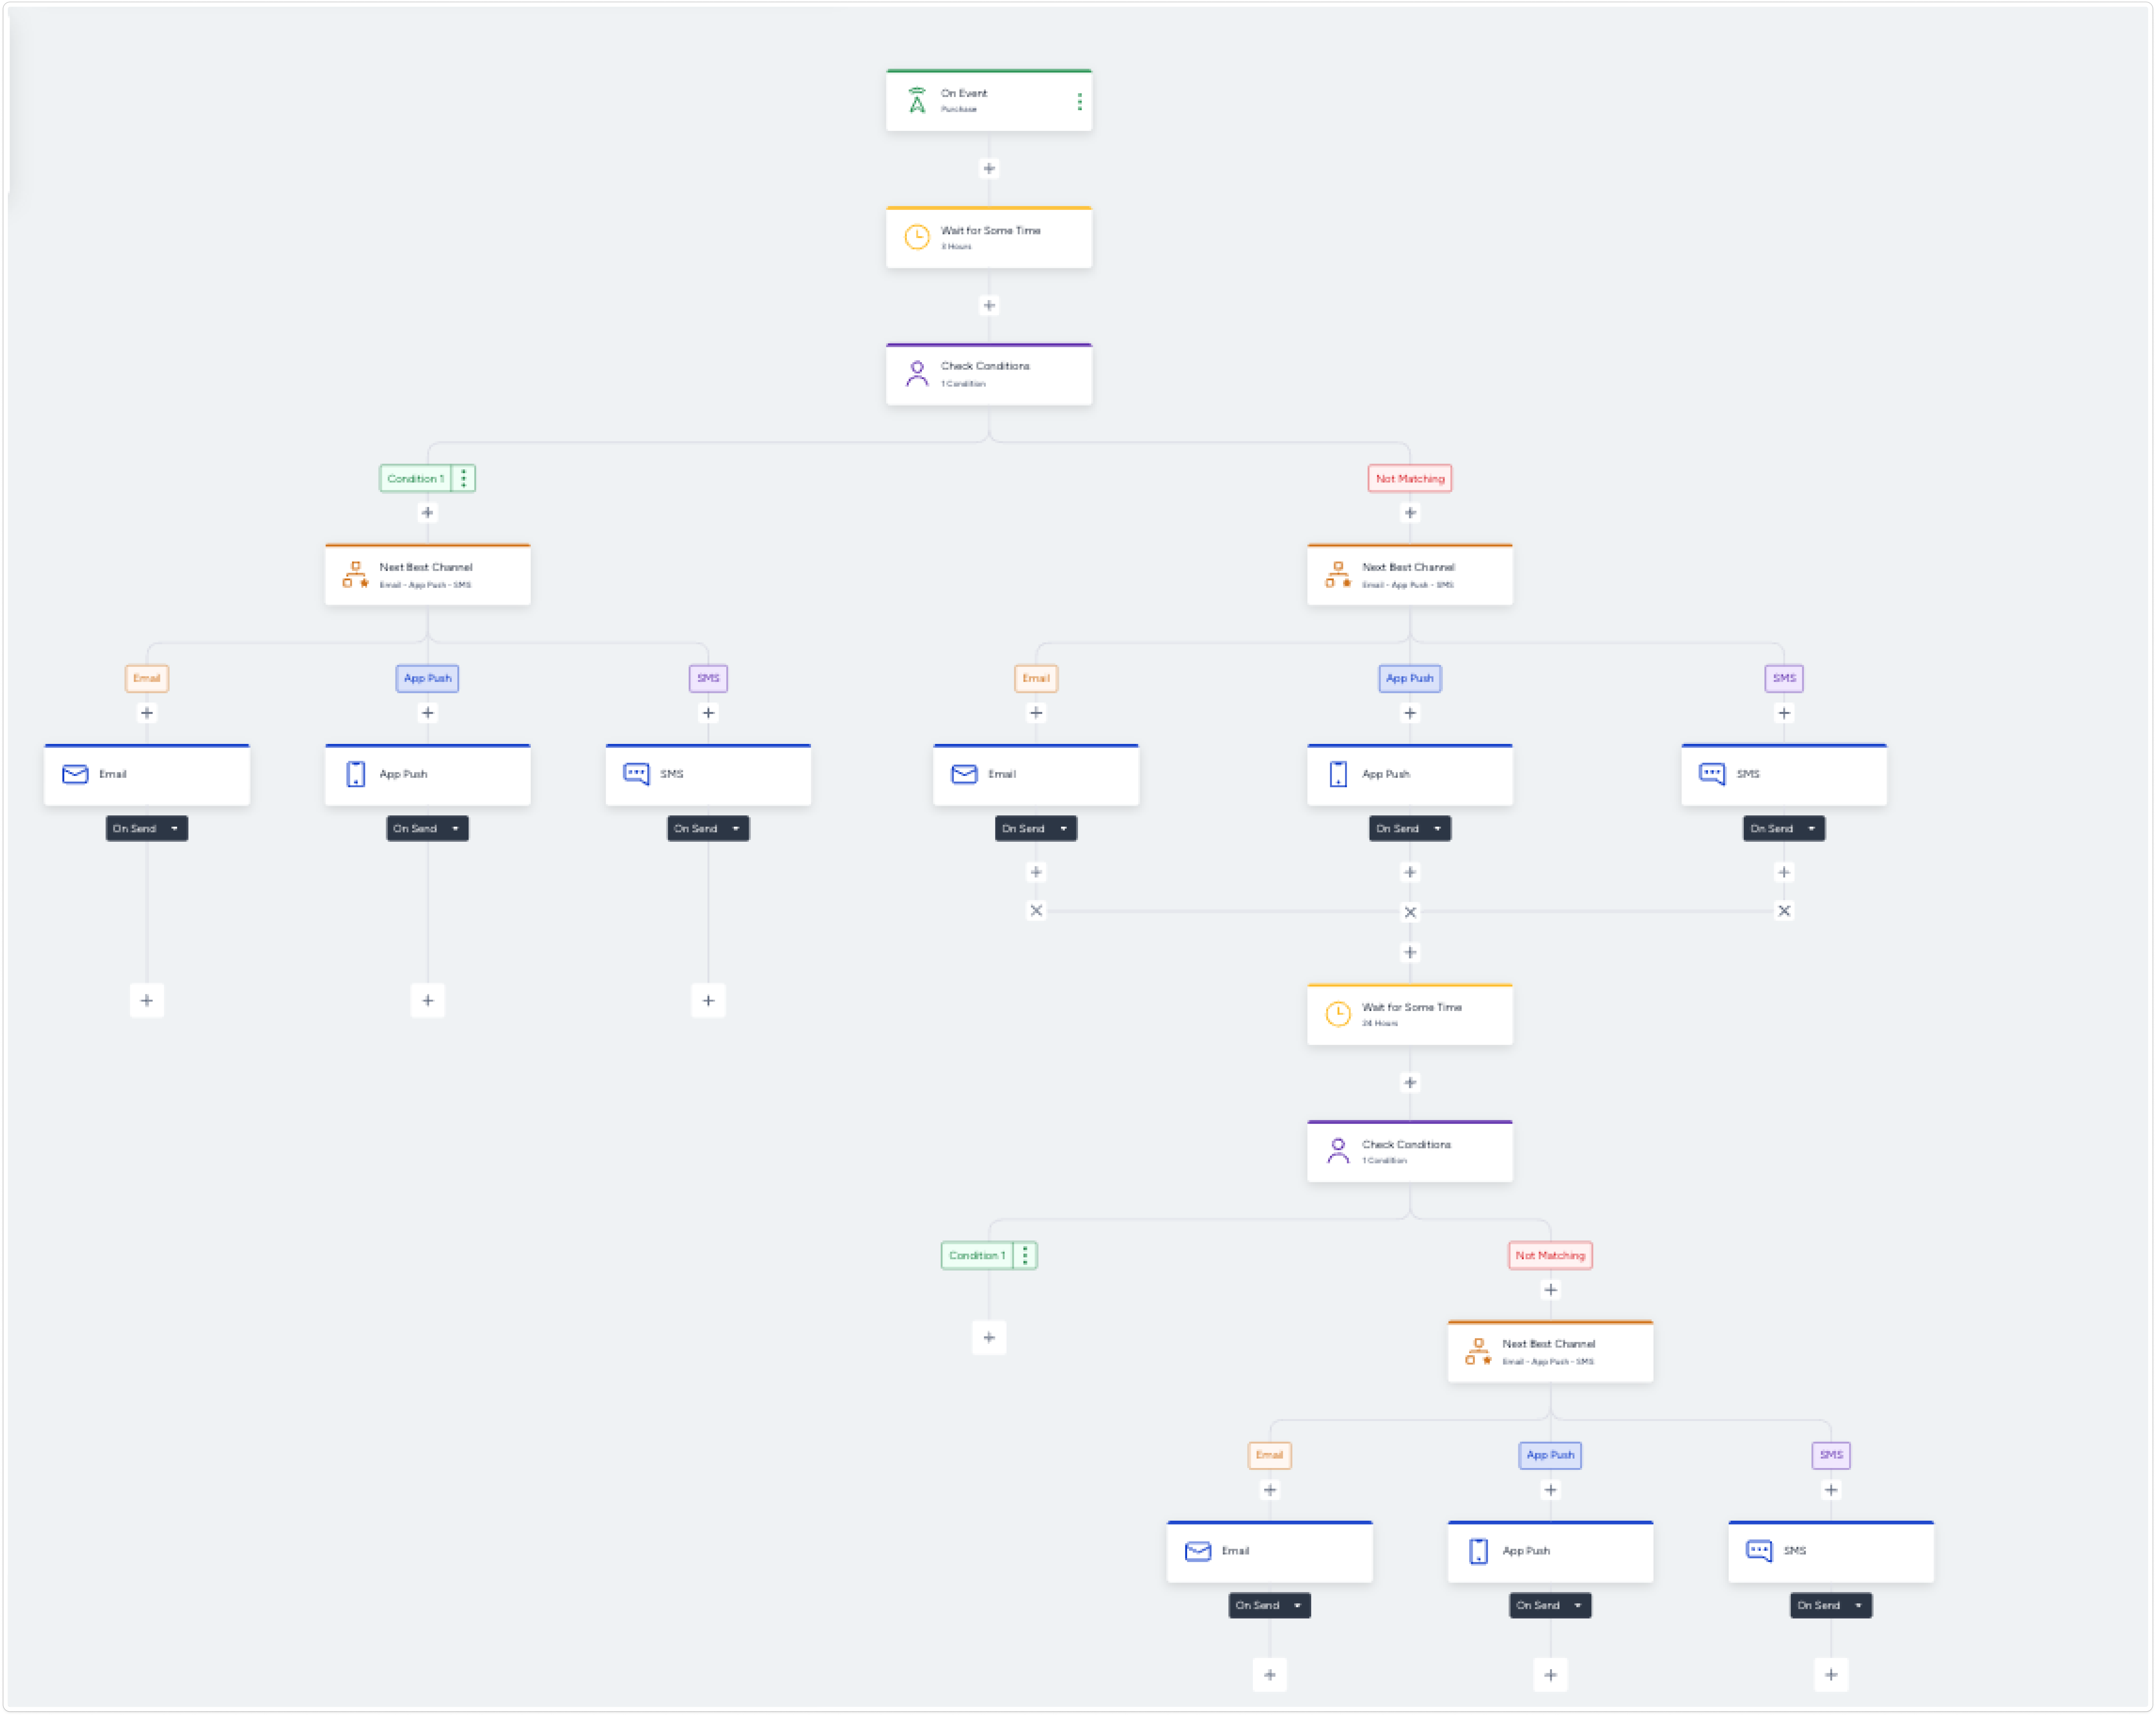
Example flow
Below is an example return flight journey flow.