Using Liquid tags while creating a template from the Template Library is currently unavailable. If a template contains a Liquid tag, the system validation will prevent it from being saved. Support for Liquid tags in Template Library templates is planned for a future release.
Liquid is a templating language that lets you inject dynamic, personalized content into your email campaigns. Instead of a one-size-fits-all message, you write a single template, and Liquid automatically fills in the right data for each recipient, their name, city, loyalty tier, last purchase, and much more.
Liquid is available in promotional standalone emails, promotional Architect emails, Transactional Journey Email Channel, and Transactional Email API v2.
In Insider One Email, Liquid is available in the subject line, preheader, and the email html. This guide walks you through the following concepts and covers everything you need to start using it confidently.
The Liquid Tags feature is available for early access. To activate it for your account, contact the Insider One team.
You can enable Liquid Tags per campaign in the Design step of the campaign flow.
Step 1: Liquid Tags toggle
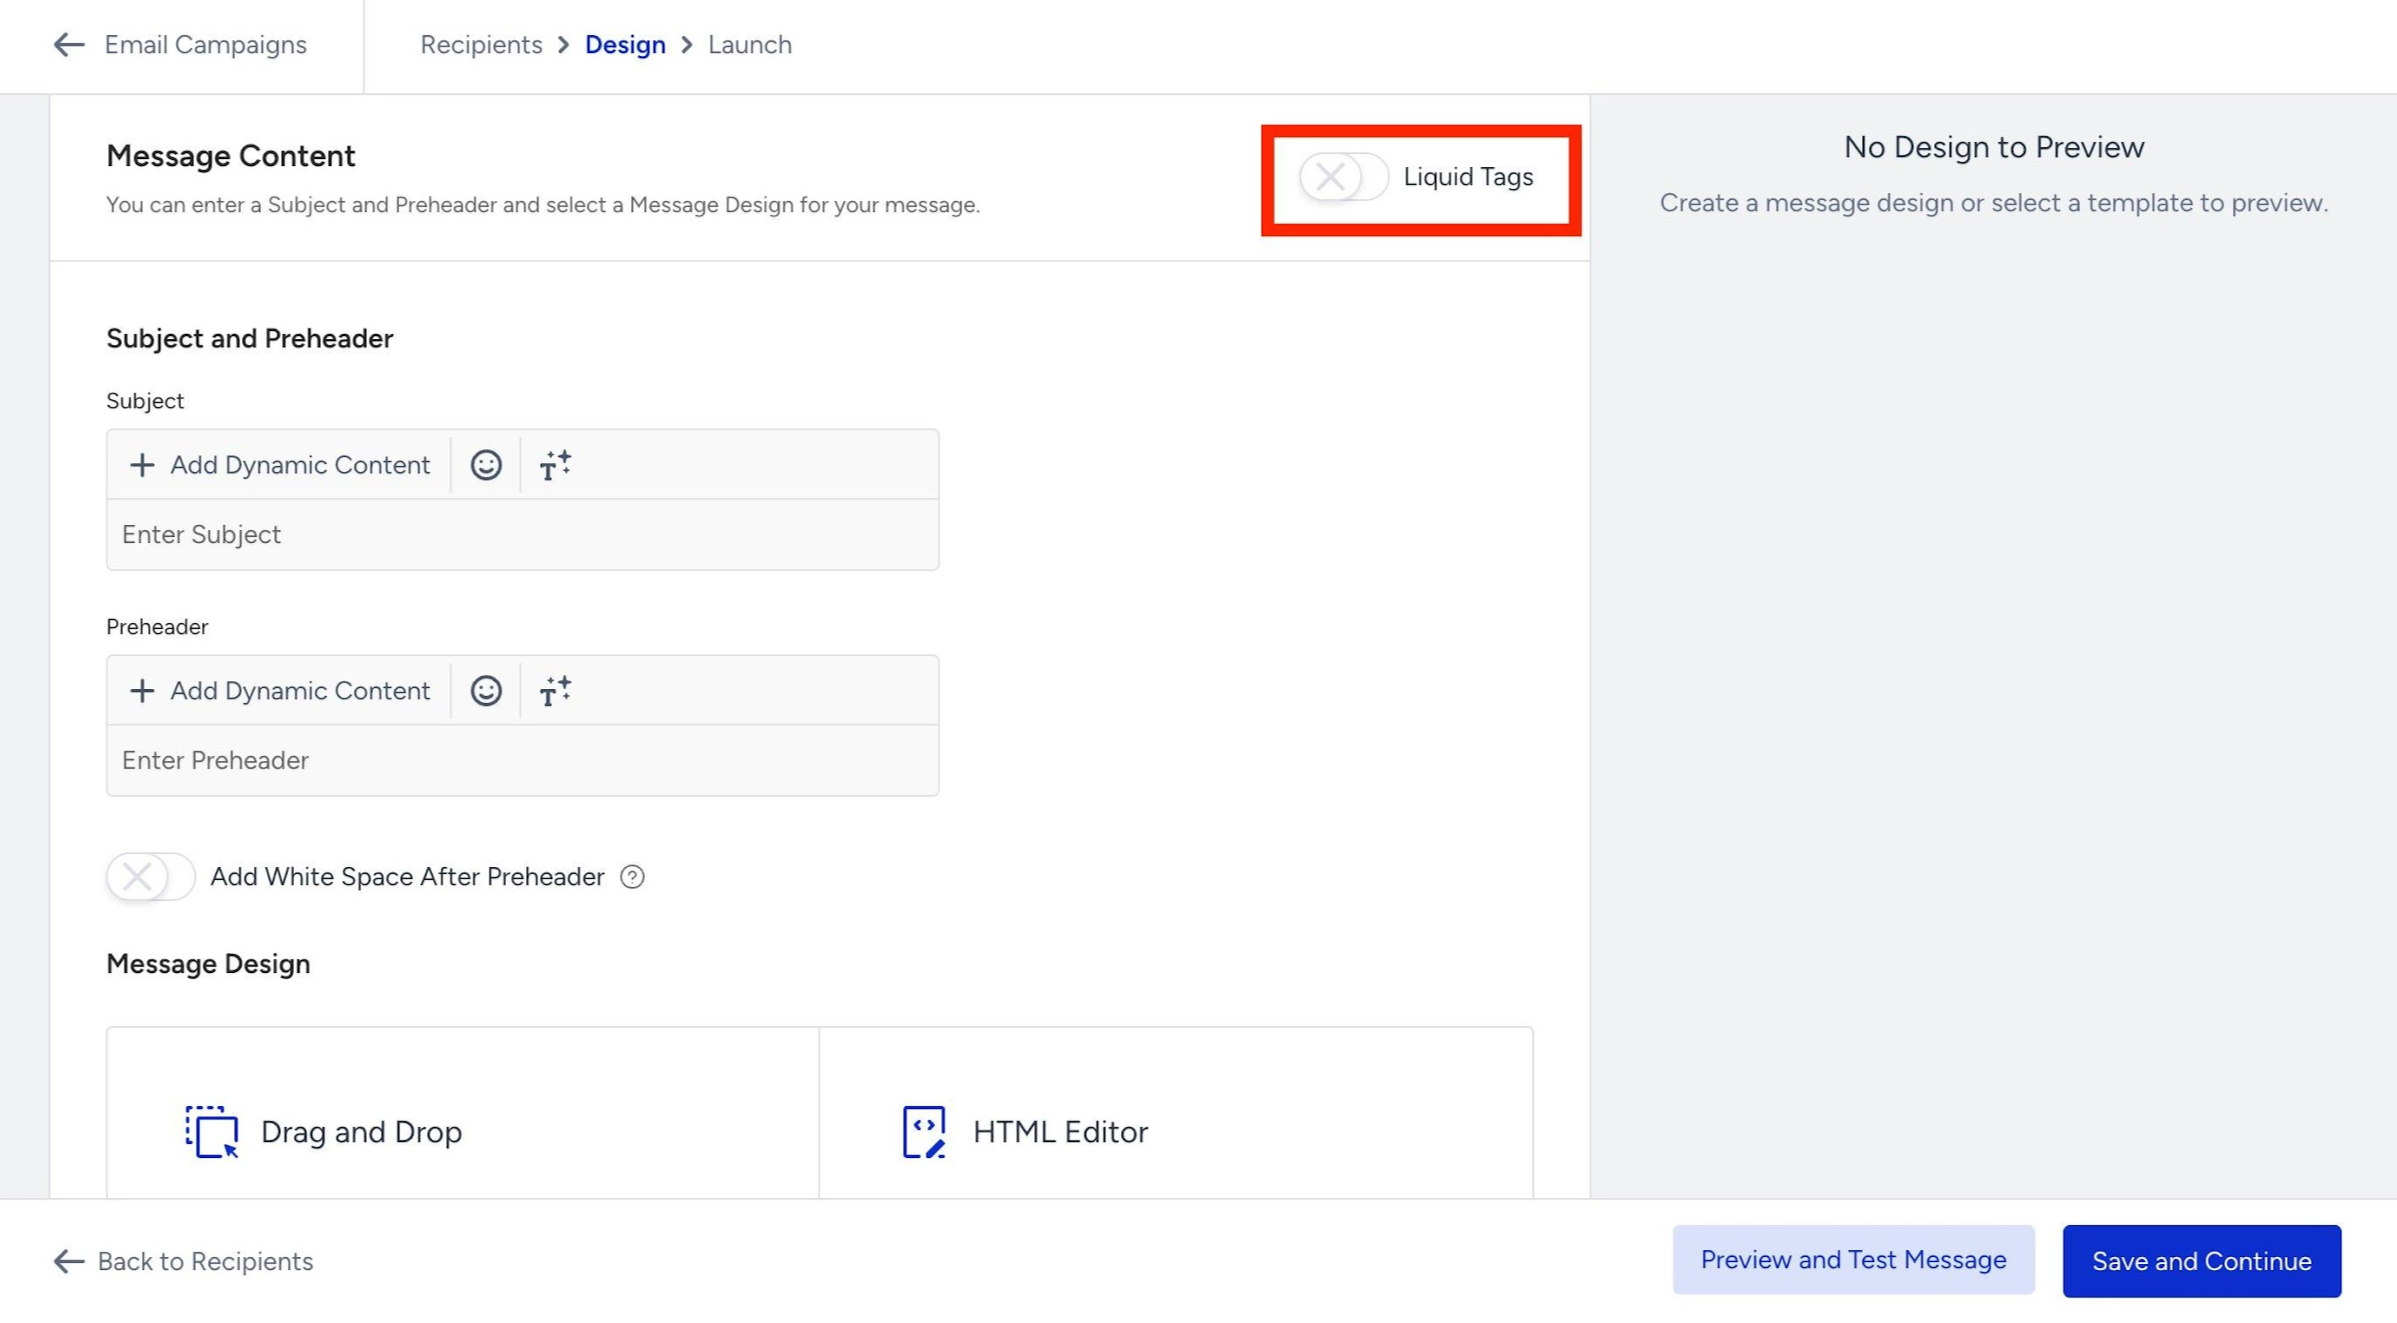
In your email campaign, navigate to the Design step. On the Message Content screen, you will see a Liquid Tags toggle in the top-right corner.
This toggle is turned off by default. In this case, the legacy syntax is available for use within subject, preheader, and email HTML.
Step 2: Default mode: Dynamic content chips
When the Liquid Tags toggle is off, the subject and preheader fields use the standard Dynamic Content interface. You can click the Add Dynamic Content button to browse and insert personalization attributes as interactive chips. This requires no code.
You can use this option if you only need simple personalization, like inserting a first name or a city, and prefer a visual, no-code experience.
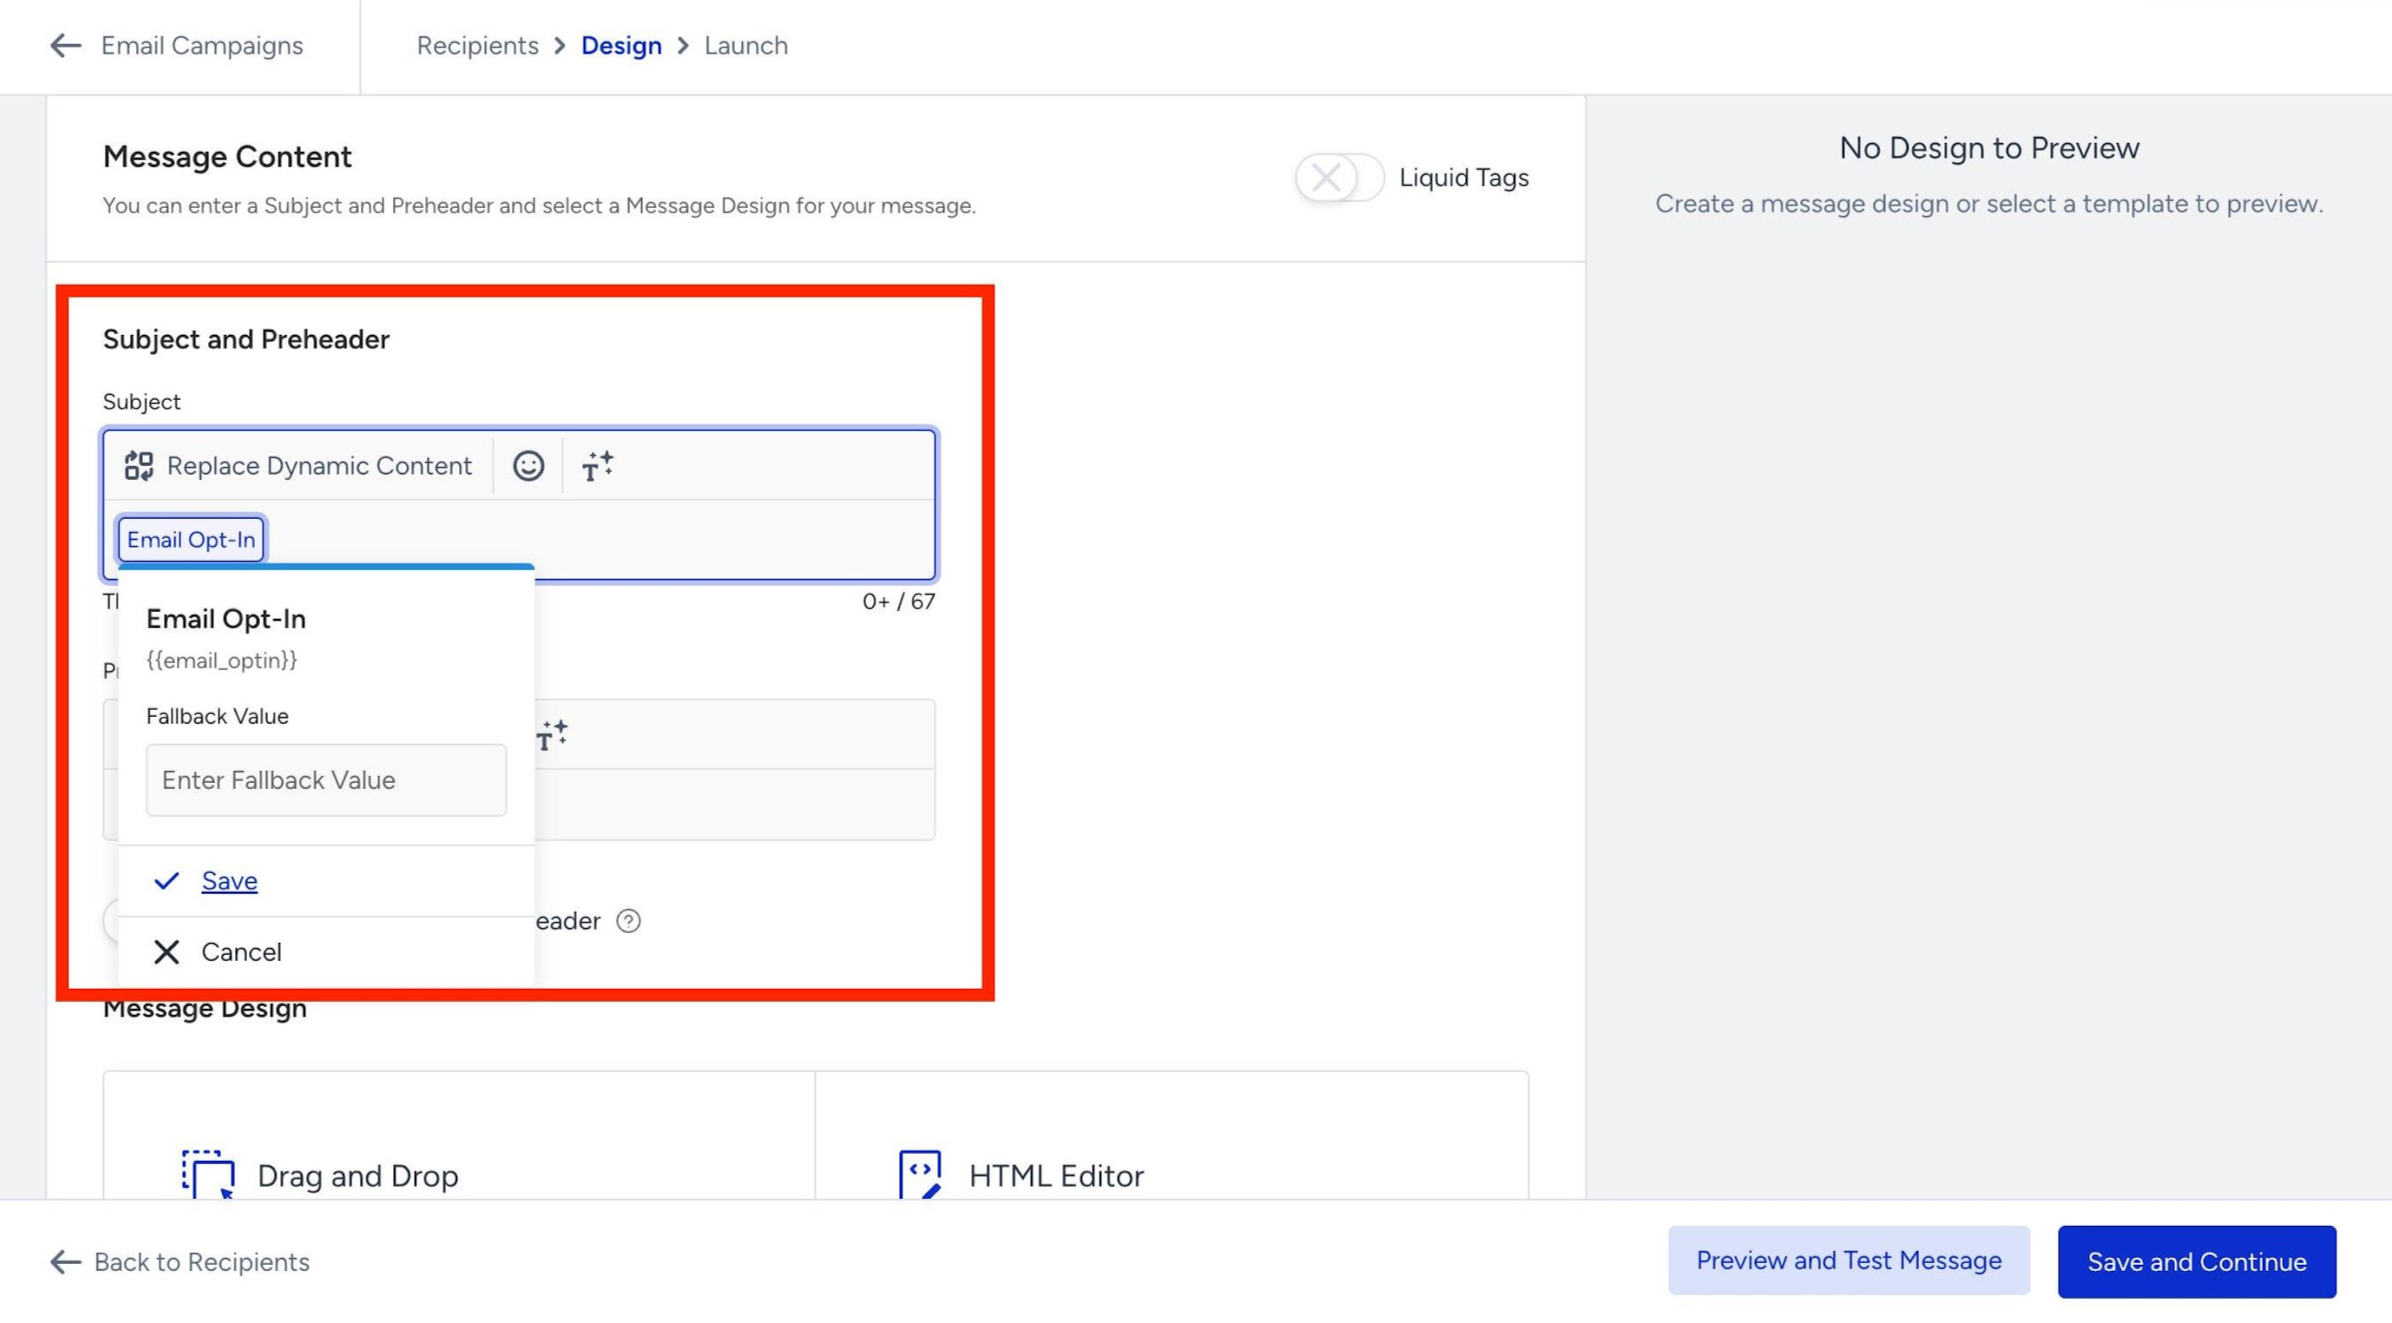
With the Liquid Tags toggle off, attributes appear as clickable chips. You can set a fallback value for each one.
Liquid in the Transactional Journey Email Channel
The same Liquid filters are available in the Transactional Journey Email Channel, and the steps for writing Liquid syntax are no different from the promotional email channels. However, dynamic content works differently here.
Transactional Journeys are not connected to the Unified Customer Database (UCD). This means the dynamic content you normally rely on in standalone email campaigns or Architect emails, such as user attributes and events, recommendations, coupons, product catalog data, and so on, is unavailable to use with Liquid in the transactional journey email channel.
Instead, all dynamic content comes from the API call that triggers the journey. Values are passed at entry time, and before any value can be used in Liquid, it must be explicitly defined in the On API Call starter and then sent as part of the dynamic_attributes object in the journey trigger request. Liquid lets you work with them directly inside your email template using conditional logic, filters, fallbacks, and array iteration. To see the available data types, refer to Dynamic Content in Transactional Journeys.
Liquid in the Transactional Email API (v2)
Starting with Transactional Email API v2, Liquid is also supported in API-triggered transactional emails. The same Liquid syntax, objects with {{ }}, tags with {% %}, and filters with |, applies, and all filters listed in Filters, including Insider One exclusives like time_format and money_format, are available.
Unlike panel campaigns, there is no Liquid Tags toggle for API sends. You write Liquid directly in the subject and the HTML content of your API request, and the template is rendered per recipient at send time.
Liquid personalization is available only in v2 (POST /mail/v2/send). The v1 endpoint supports simple {{placeholder}} substitution via dynamic_fields but does not process Liquid logic, filters, or loops. V1 remains supported until summer 2027; if you are integrating now, use v2.
Where does data come from?
Like Transactional Journeys, the Transactional Email API is not connected to the Unified Customer Database (UCD). Insider’s standard dynamic content, such as user attributes, events, recommendations, coupons, and product catalog data, is not available as Liquid variables.
Instead, all dynamic content comes from the fields object you send for each recipient in the request. Every key in fields becomes a Liquid variable in that recipient's rendered email:
{
  "subject": "Order {{ order.id }} confirmed",
  "from": { "email": "no-reply@acme.com", "name": "Acme Store" },
  "recipients": [
    {
      "email": "alice@example.com",
      "fields": {
        "first_name": "Alice",
        "order": {
          "id": "A-1024",
          "total": 149.90,
          "items": [
            { "name": "Sneakers", "qty": 1, "price": 129.90 },
            { "name": "Socks", "qty": 2, "price": 10.00 }
          ]
        }
      }
    }
  ],
  "content": [
    { "type": "text/html", "value": "<p>Hi {{ first_name }}, your order {{ order.id }} is confirmed.</p>" }
  ]
}
Structured data: nested objects and lists
fields supports structured data, so you can go beyond flat key-value pairs:
Nested objects are accessed with dot notation: {{ order.total }}, {{ address.city }}
Lists are iterated with {% for %} loops.
{% for item in order.items %}
  {{ item.qty }} x {{ item.name }} — {{ item.price | money_format }}
{% endfor %}
Conditional content shows or hides blocks per recipient:
{% if order.total > 100 %}
  Your order ships free!
{% endif %}
This makes v2 a natural fit for order confirmations, shipping updates, and booking details, where each recipient's email is built from their own items, amounts, and dates.
Handling missing data
The same defensive patterns apply as in panel campaigns. Use the default filter for fallbacks, {{ first_name | default: "there" }}, and guard clauses to validate required fields before rendering. Since all data comes from your API call, a missing variable usually means the field was not included in that recipient's fields object; check the key names and nesting in your request payload.
Validate before you send
Instead of the Preview and Test Message panel, the API provides a dedicated validation endpoint. POST /mail/v2/validate checks your template's Liquid syntax, and can optionally render it with sample data without sending an email. Validate templates as part of your integration or CI flow to catch unclosed tags, missing colons in filters, and misspelled filter names before a send goes live.
Limits
Constraint | Value |
|---|---|
Recipients per request | 100 |
Top-level fields keys per recipient | 150 |
fields nesting depth | 5 |
Serialized fields per recipient | 256 KB |
For the full parameter reference and error codes, refer to POST /mail/v2/send and Transactional Emails.
Step 3: Enable Liquid Tags
To enable Liquid syntax, turn on the Liquid Tags toggle. A confirmation prompt will appear to explain that enabling Liquid Tags will clear all existing content in the Subject, Preheader, and Message Design fields. This change applies to all variants of the campaign.
Click the Enable and Delete button to confirm, or Cancel to keep your current setup.
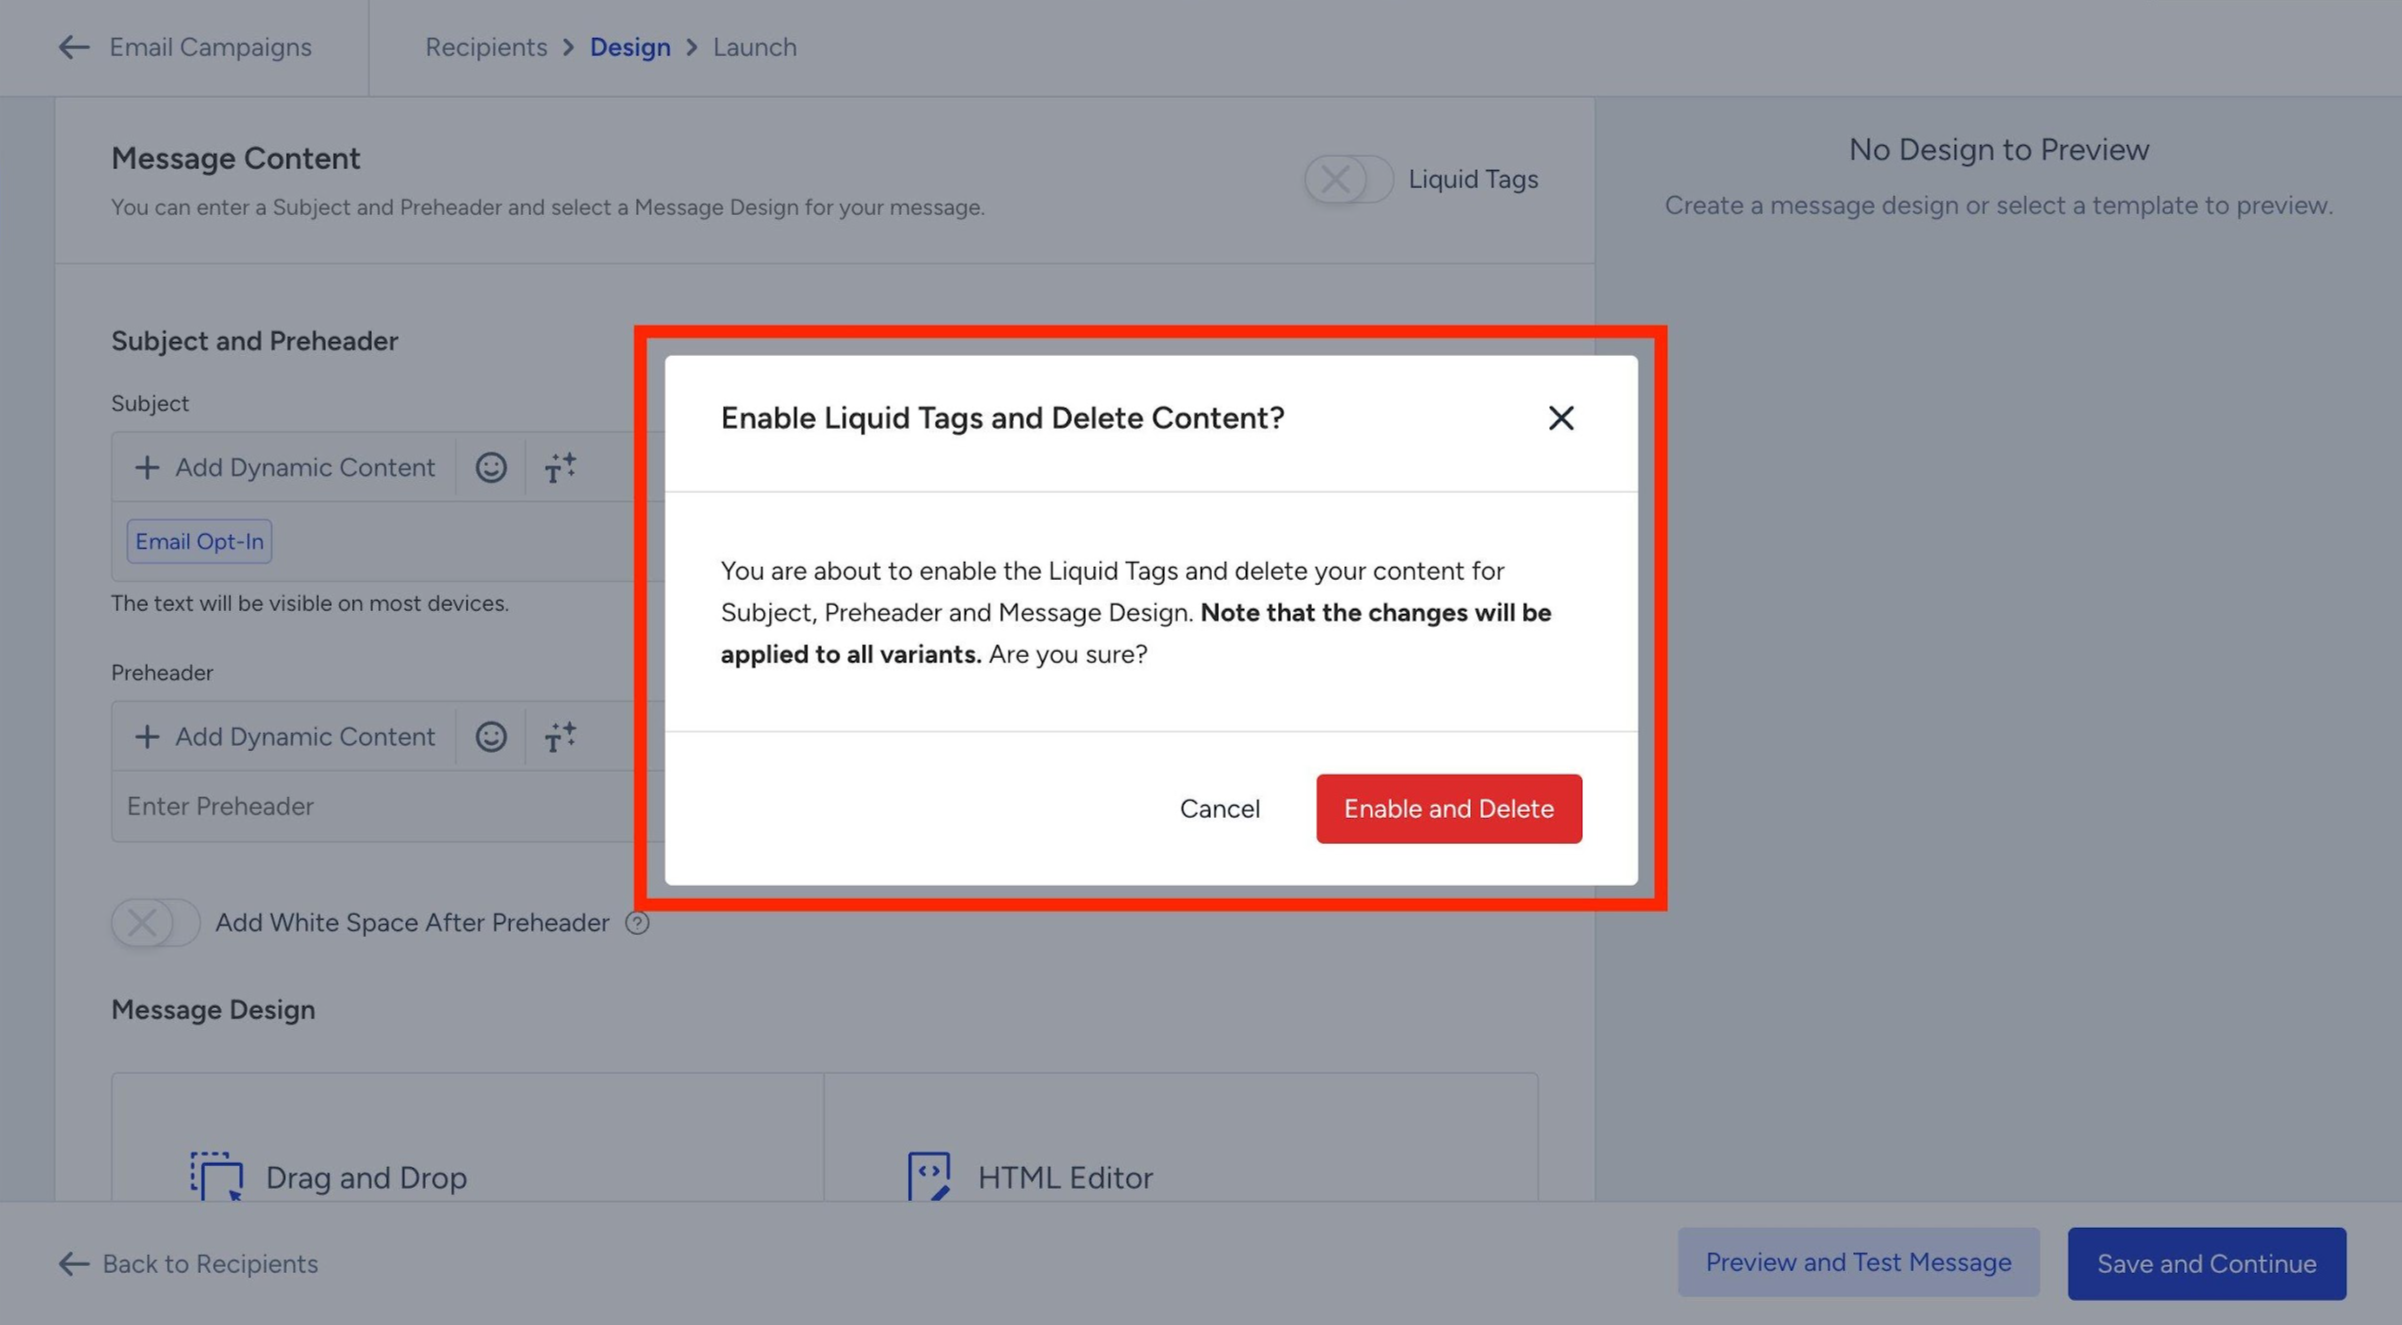
Enabling Liquid Tags permanently deletes any existing content in the Subject, Preheader, and Message Design for this campaign. Copy your subject line and preheader text before switching if you want to keep them.
Step 4: Personalize subject & preheader with Liquid
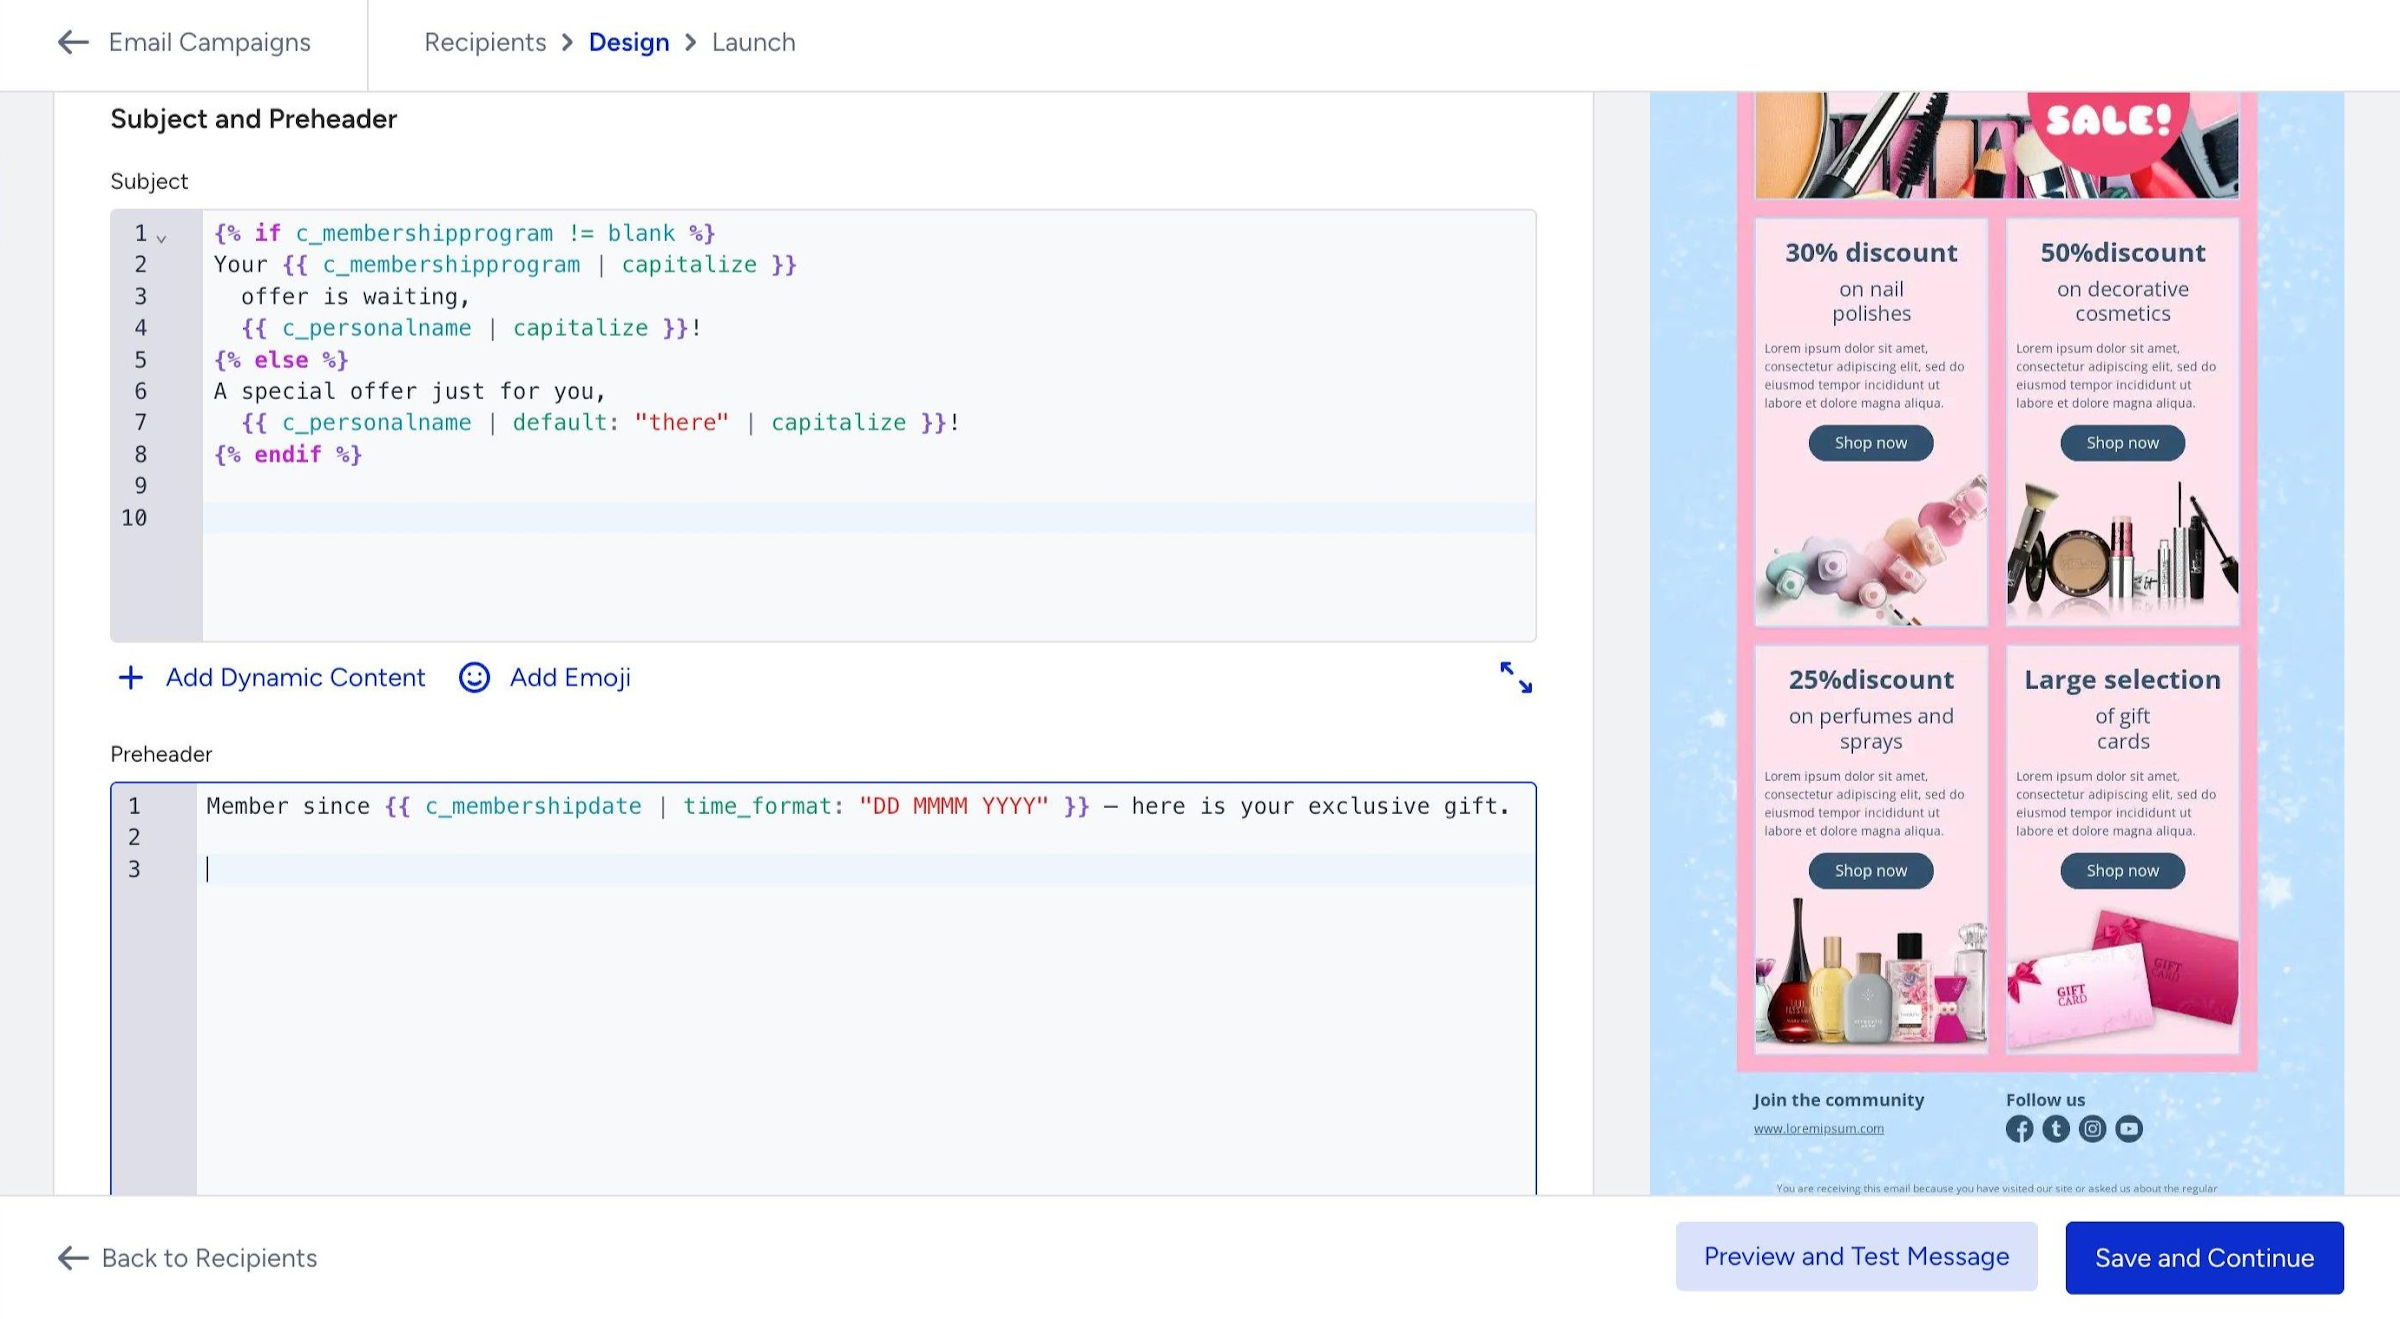
Once enabled, the Subject and Preheader fields switch to a code-friendly editor with line numbers. You can type Liquid syntax directly into these fields.

Once you add your Liquid code to the Subject and Preheader fields, you can click the Preview and Test Message button at the bottom right to open the preview panel.
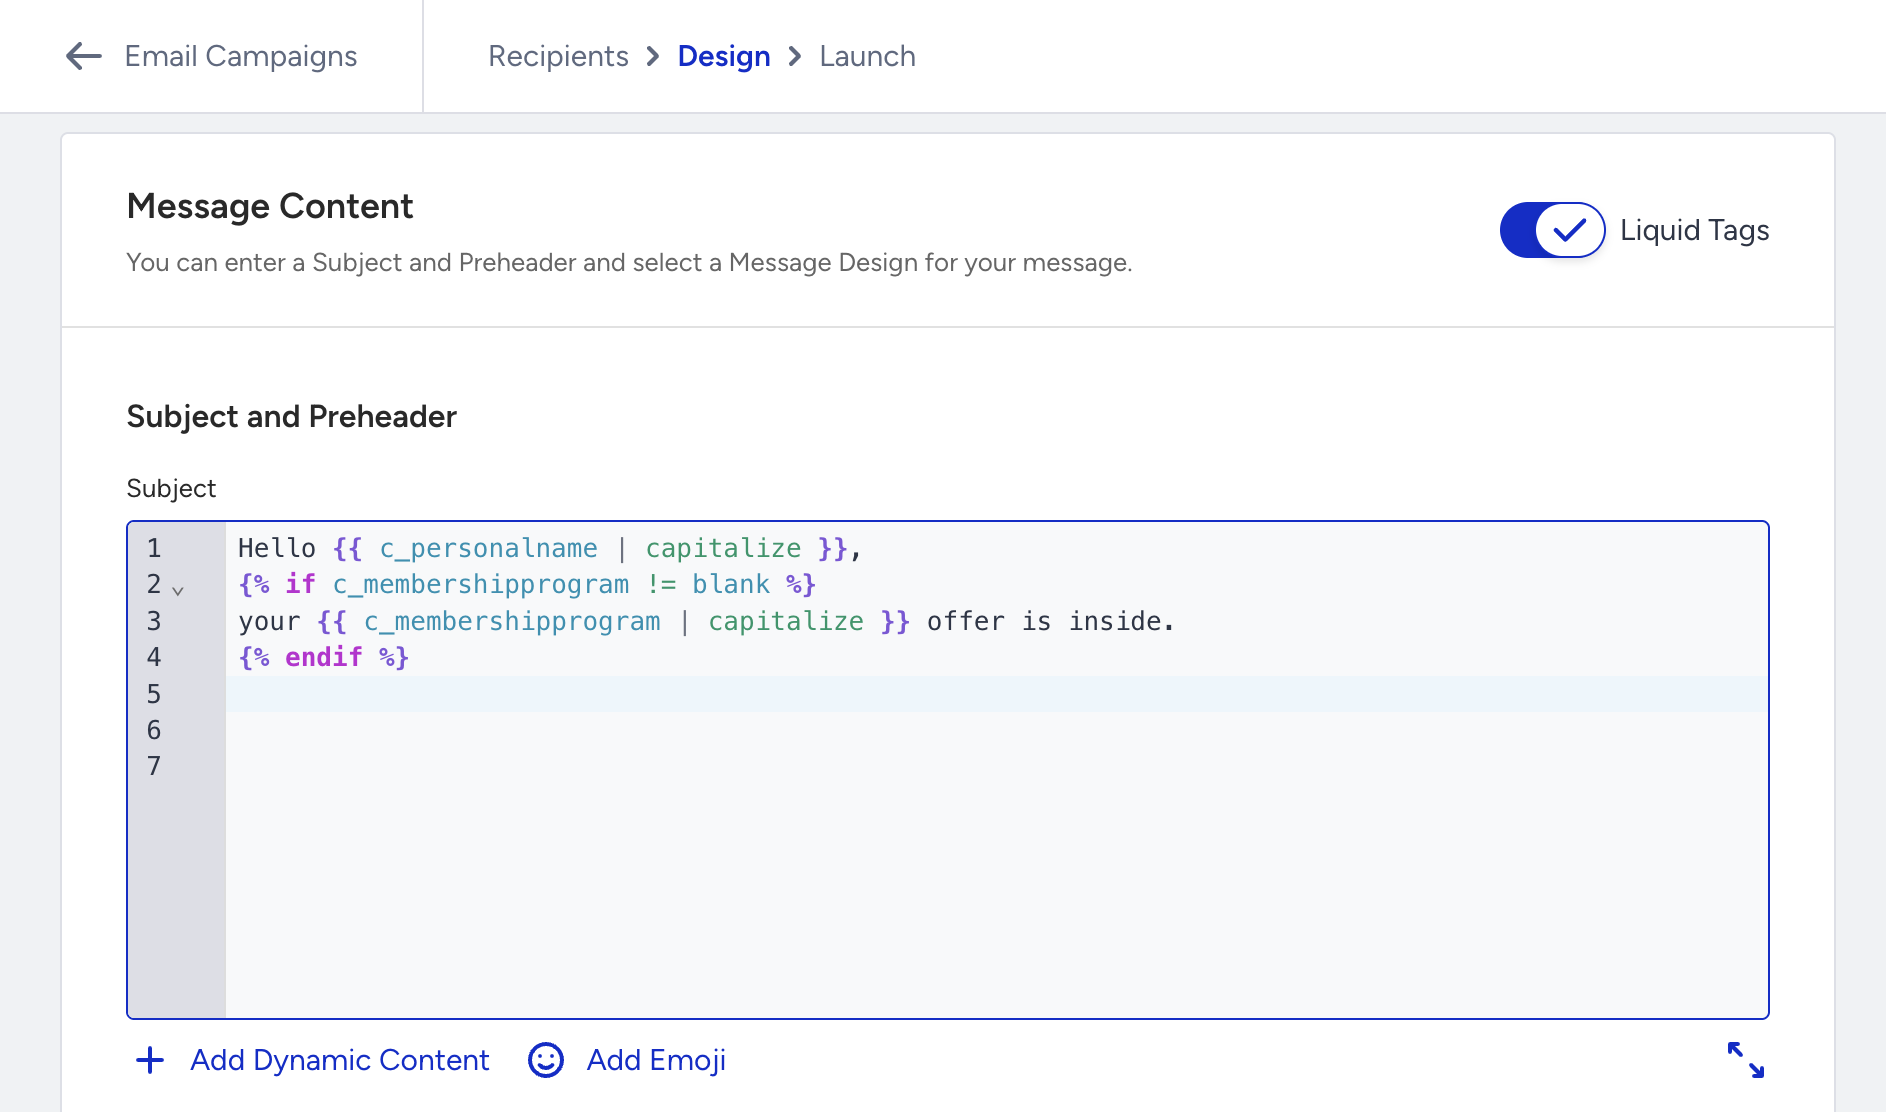
You can write Liquid code directly in these fields, or use the Add Dynamic Content button to insert attribute variable names without typing them manually.
Step 5: Liquid Errors
If your Liquid code contains a syntax error, the editor highlights the line with a red dot and outlines the field in red. A validation message appears below the field. You cannot proceed to the next step until the error is resolved.
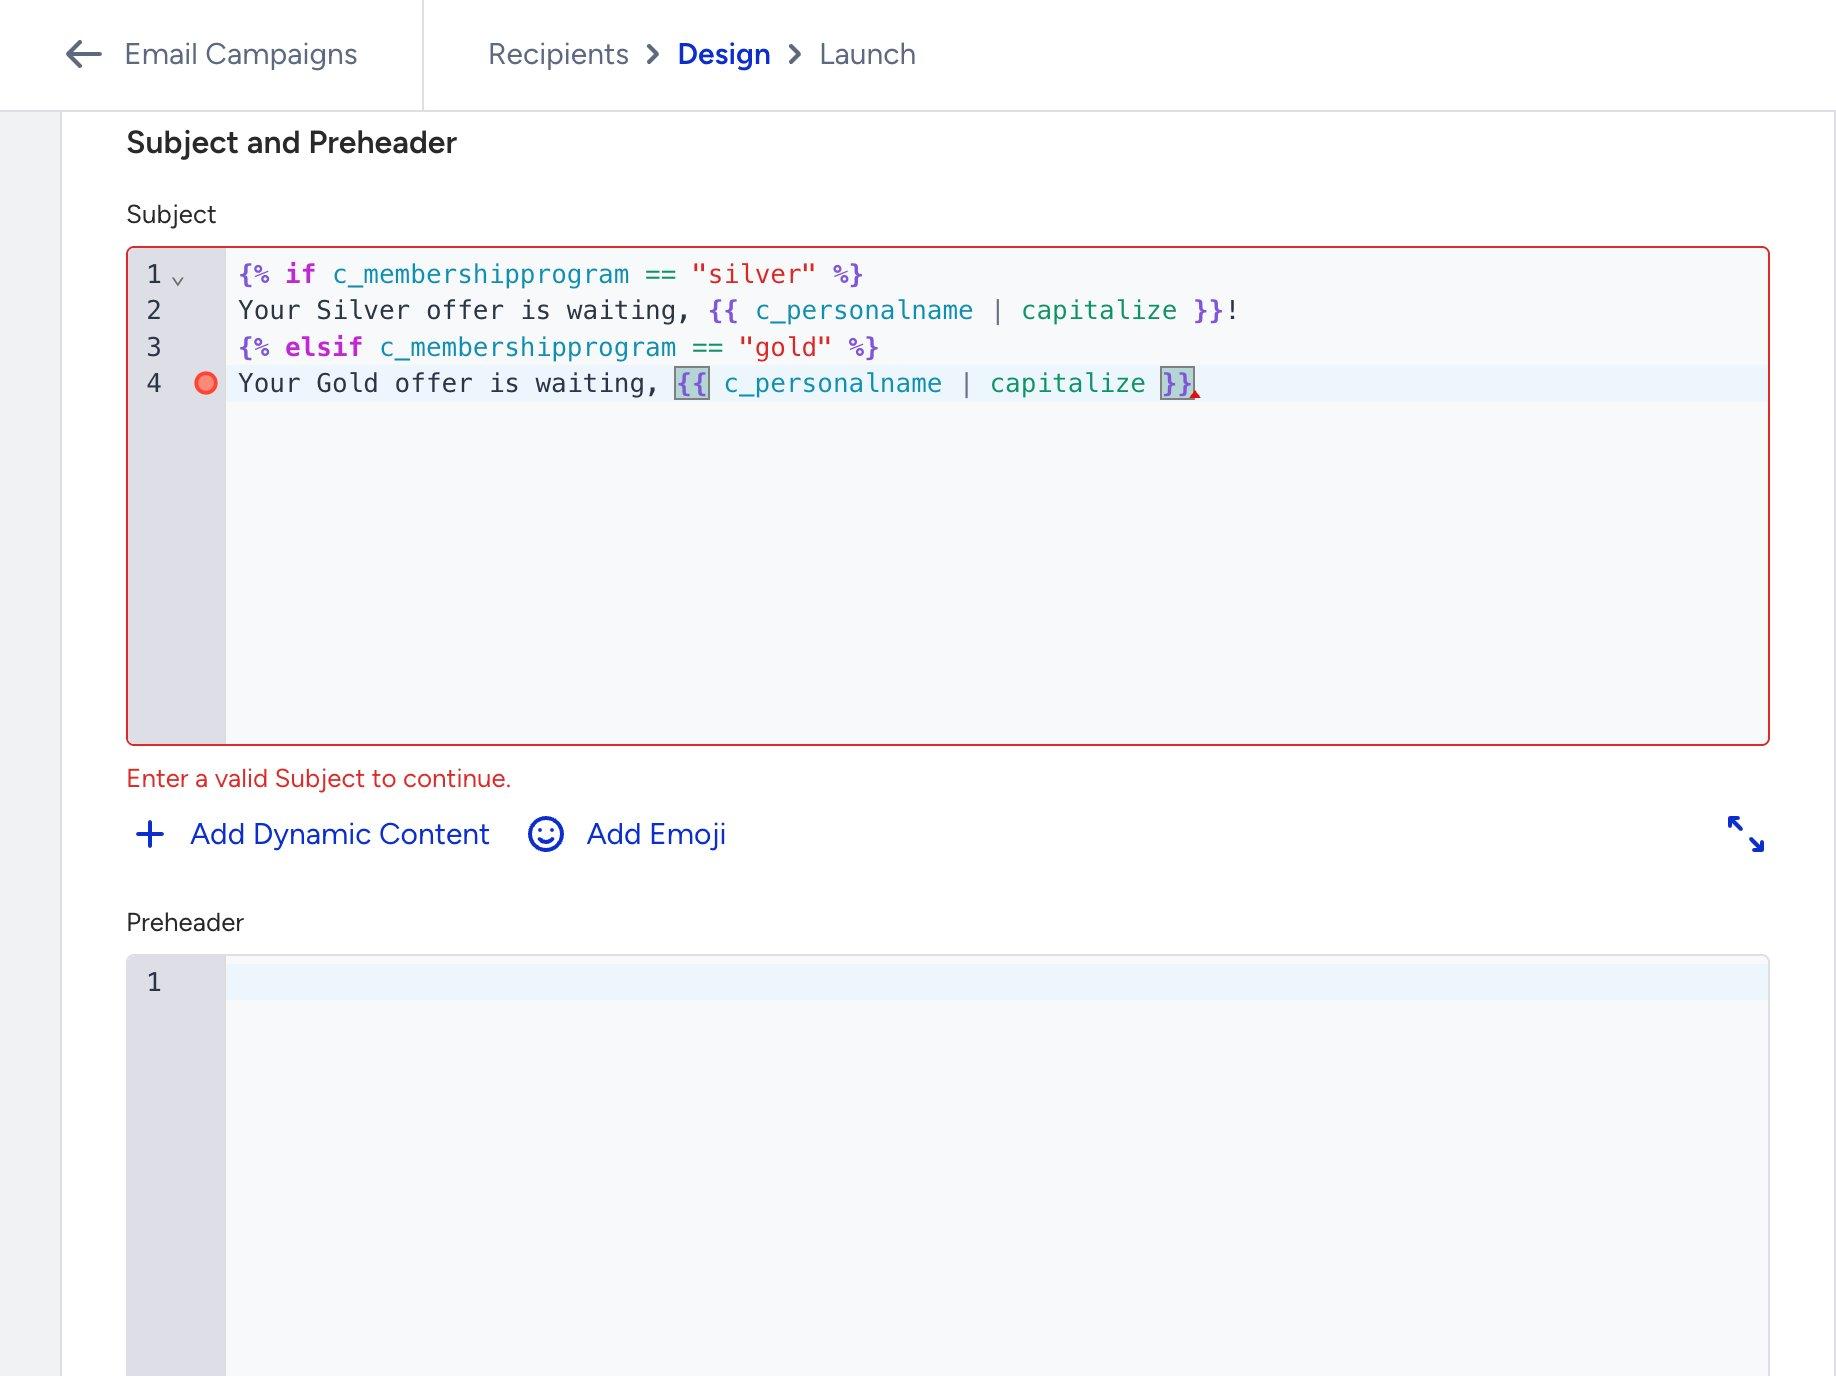
The most common causes of validation errors are as follows:
Unclosed tags
Every {% if %} must be closed with {% endif %}, and every {% for %} with {% endfor %}. This is the most frequent validation error.
Missing colon in a filter
You must write {{ date | time_format: "DD MMMM" }}, but not {{ date | time_format "DD MMMM" }}. The colon between the filter name and its argument is required.
Unmatched quotation marks
Every opening " must have a closing ". An unclosed string will cause the rest of the template to be misread.
Misspelled filter names
Liquid does not recognize filters that do not exist. For example, titlecase is not a valid filter, the correct filter is capitalized.
Step 6: Liquid Syntax in the editor
Liquid is not limited to the Subject and Preheader fields. You can write Liquid syntax directly inside the email body as well, in both the Drag & Drop Editor and the HTML editor.
Drag & Drop Editor
New version of the Drag & Drop Editor is required to use Liquid Tags in the editor. You can contact the Insider One team for activation.
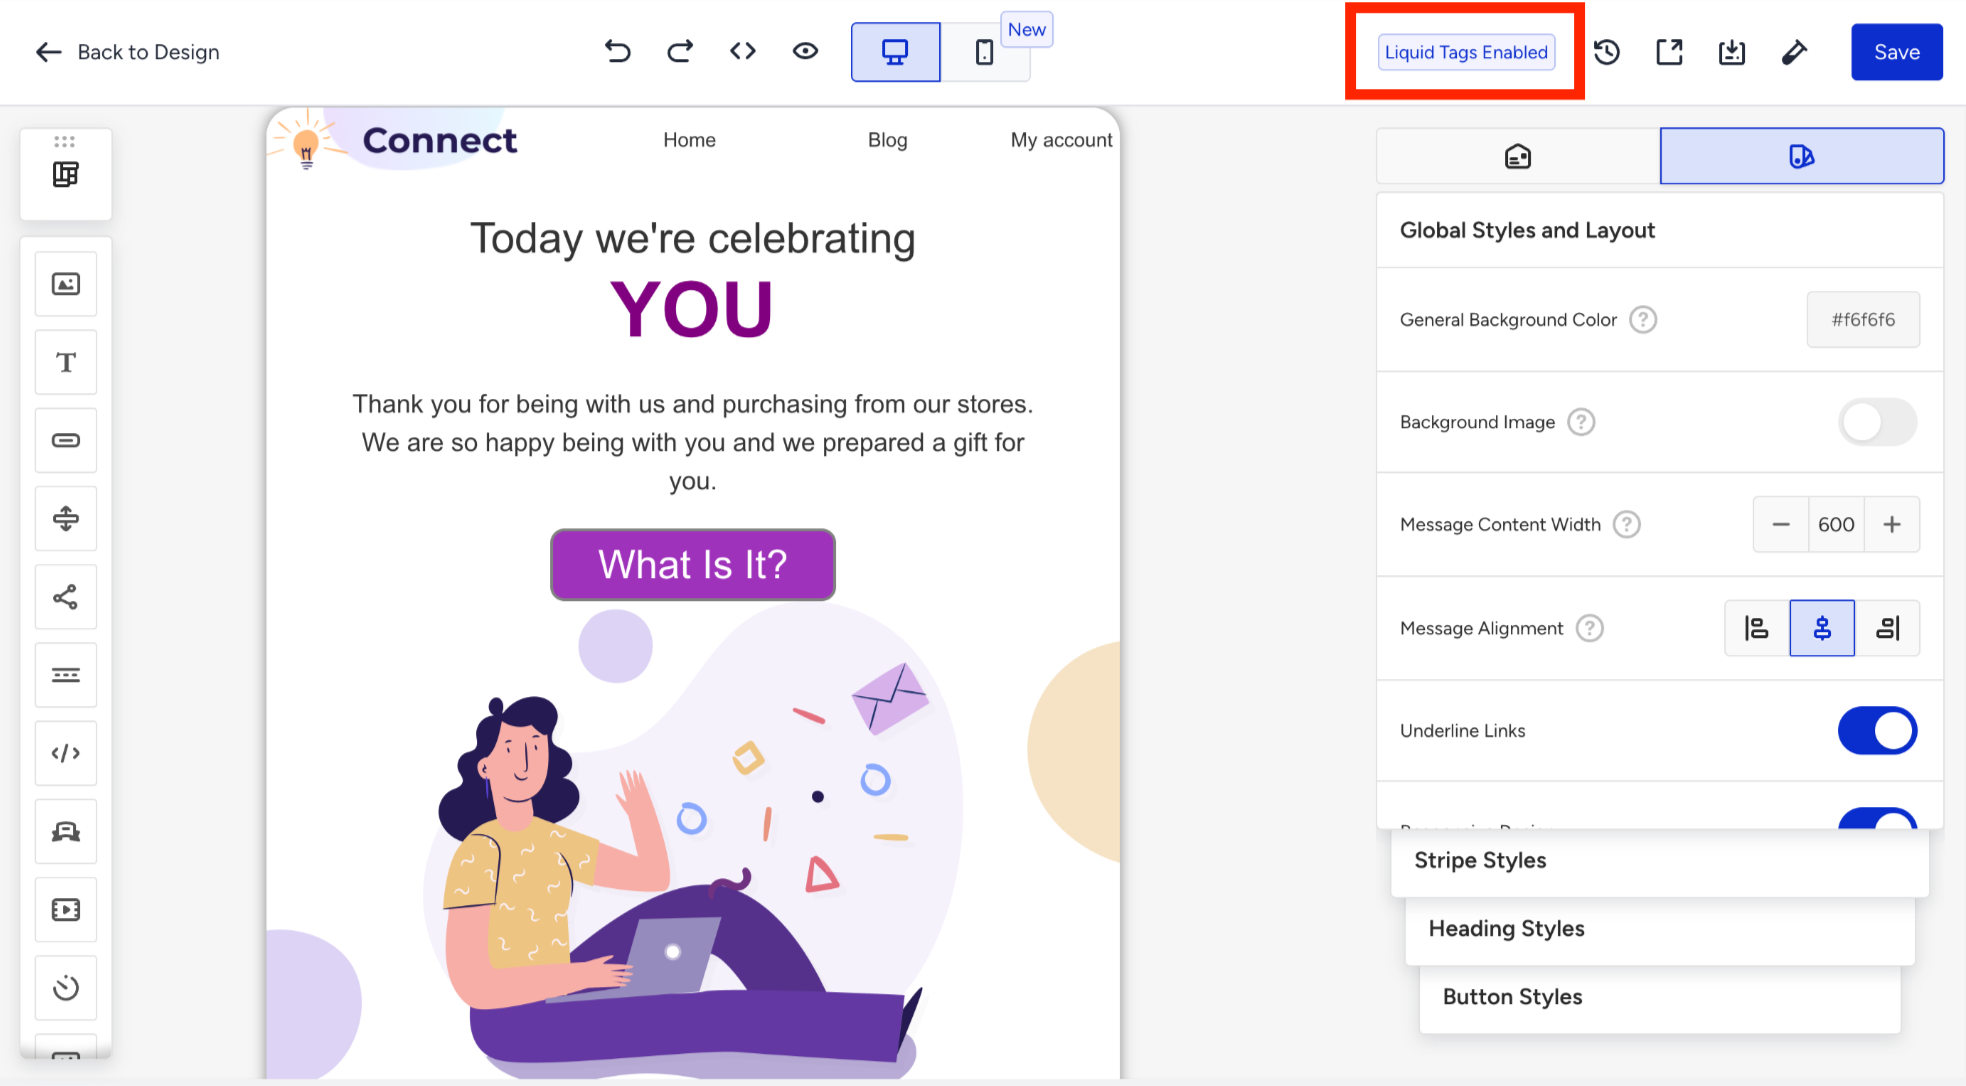
The Liquid Tags Enabled badge appears in the editor's top toolbar, confirming that Liquid will be processed when the campaign is sent.
You can also write Liquid code directly inside any Text Block in the email editor. This lets you personalize the body copy of your email to greet users by name, show different paragraphs based on their membership tier, display formatted dates and amounts, and more.
To add Liquid to a text block:
1. Click on the text block in the editor to select it. You will see a settings panel on the right.
2. Type your Liquid code directly into the text area.
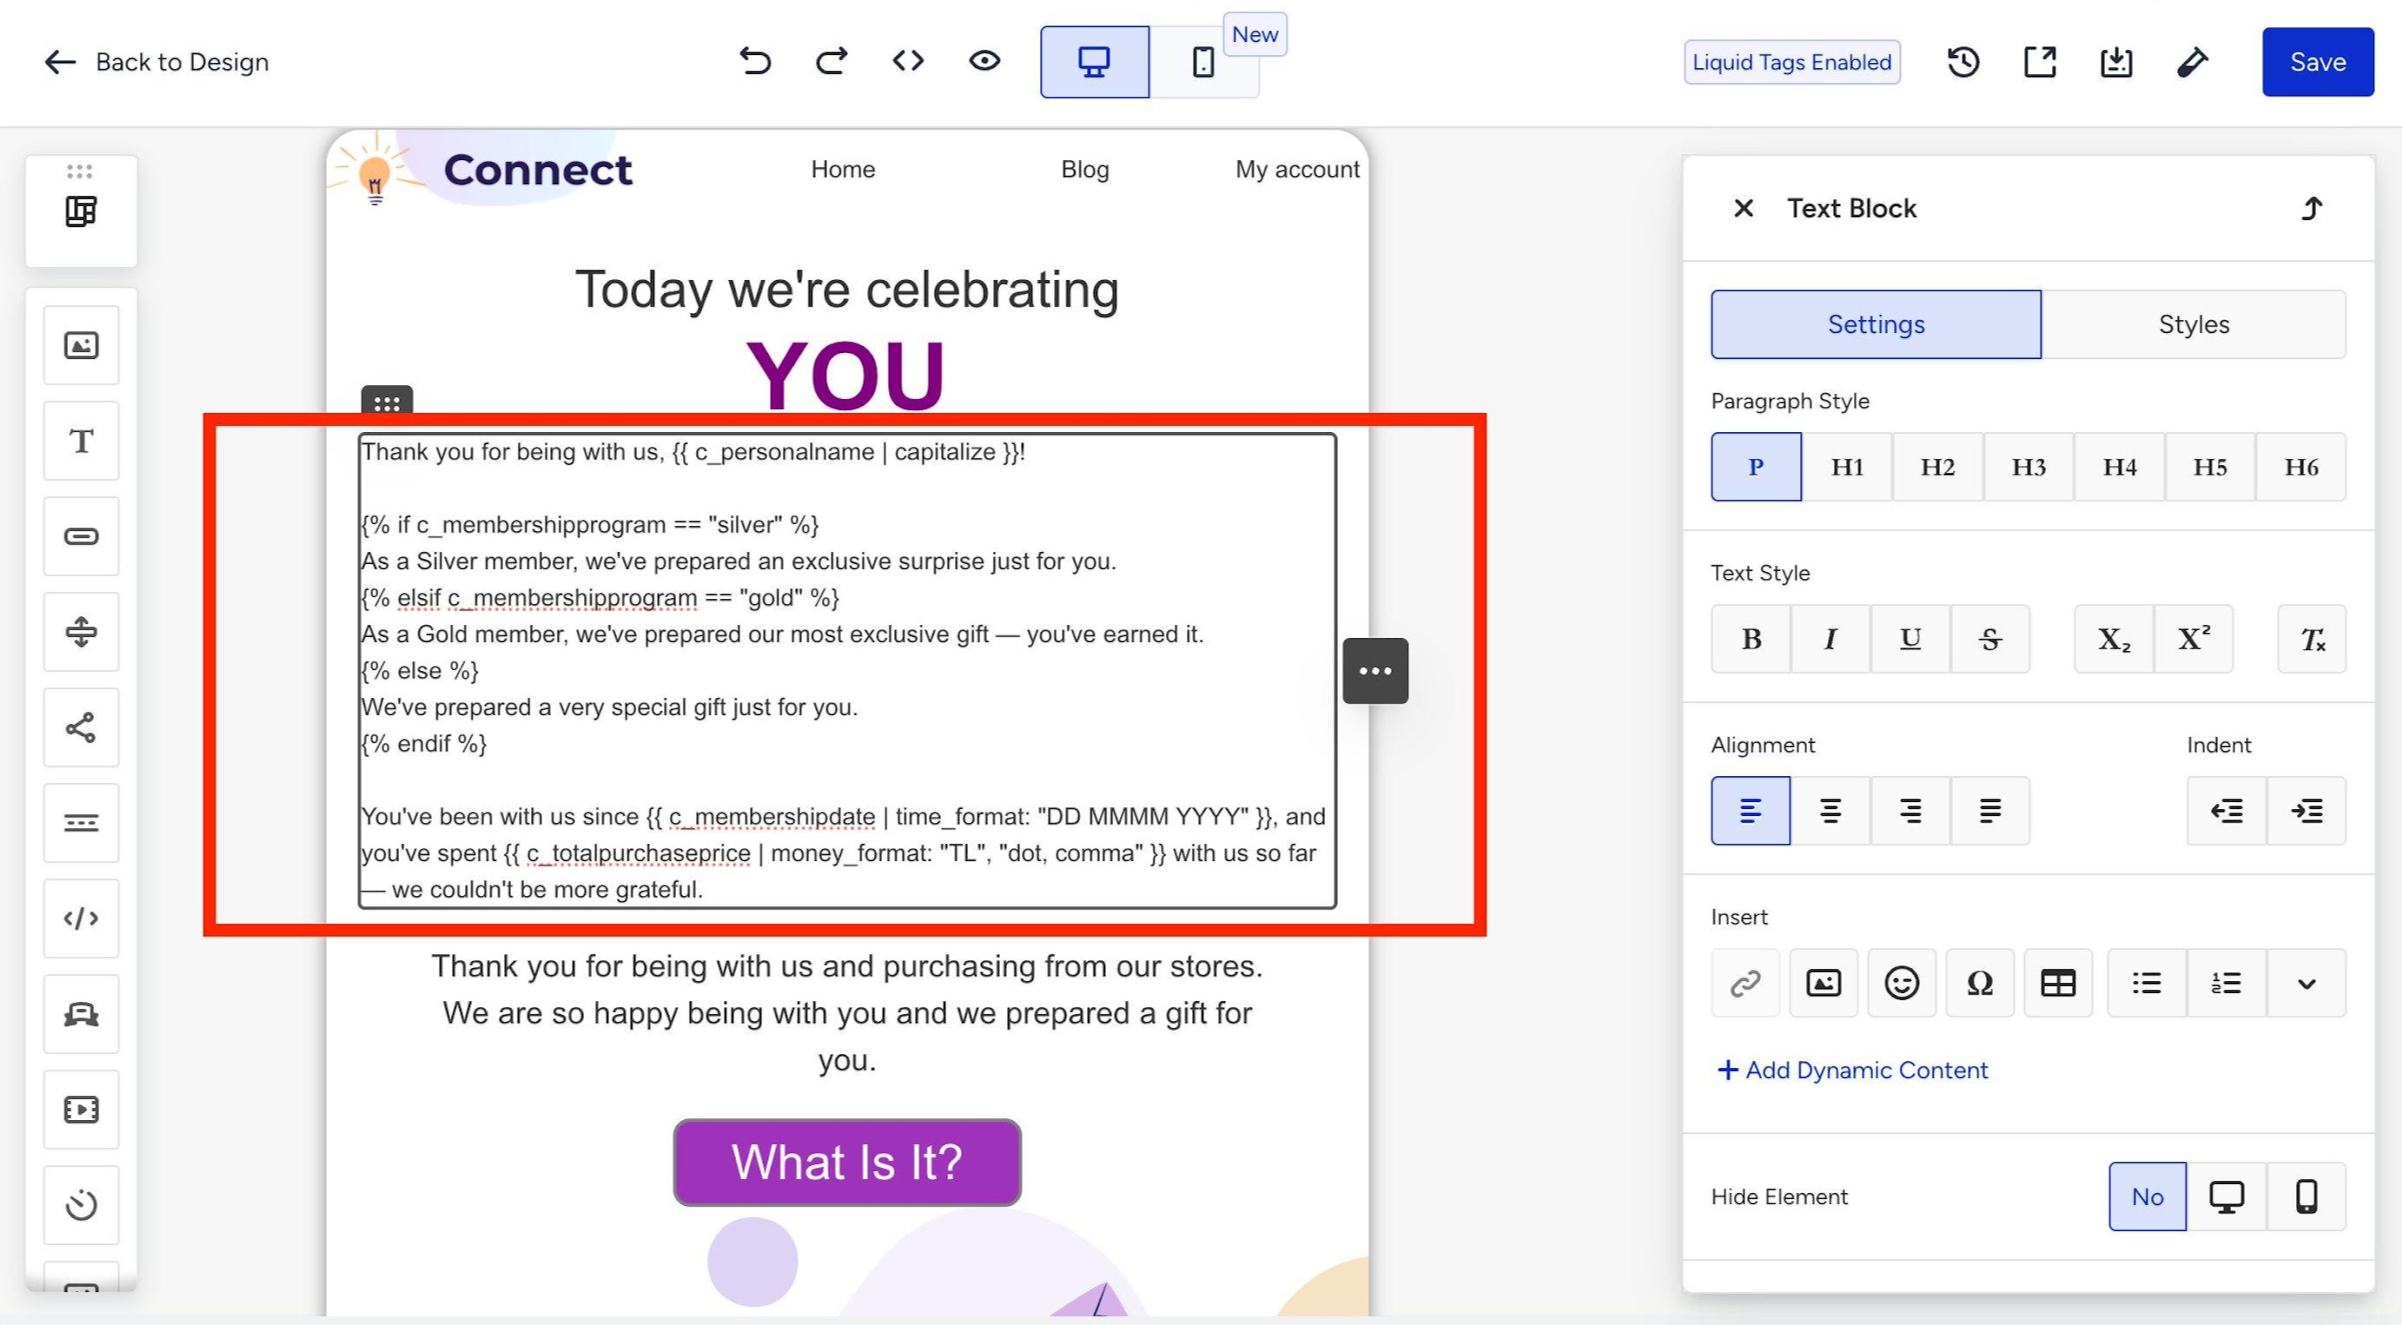
When Liquid Tags are enabled, all text blocks in the email body support Liquid syntax. The code is processed at send time. Recipients see the rendered output, not the raw Liquid code.
HTML editor
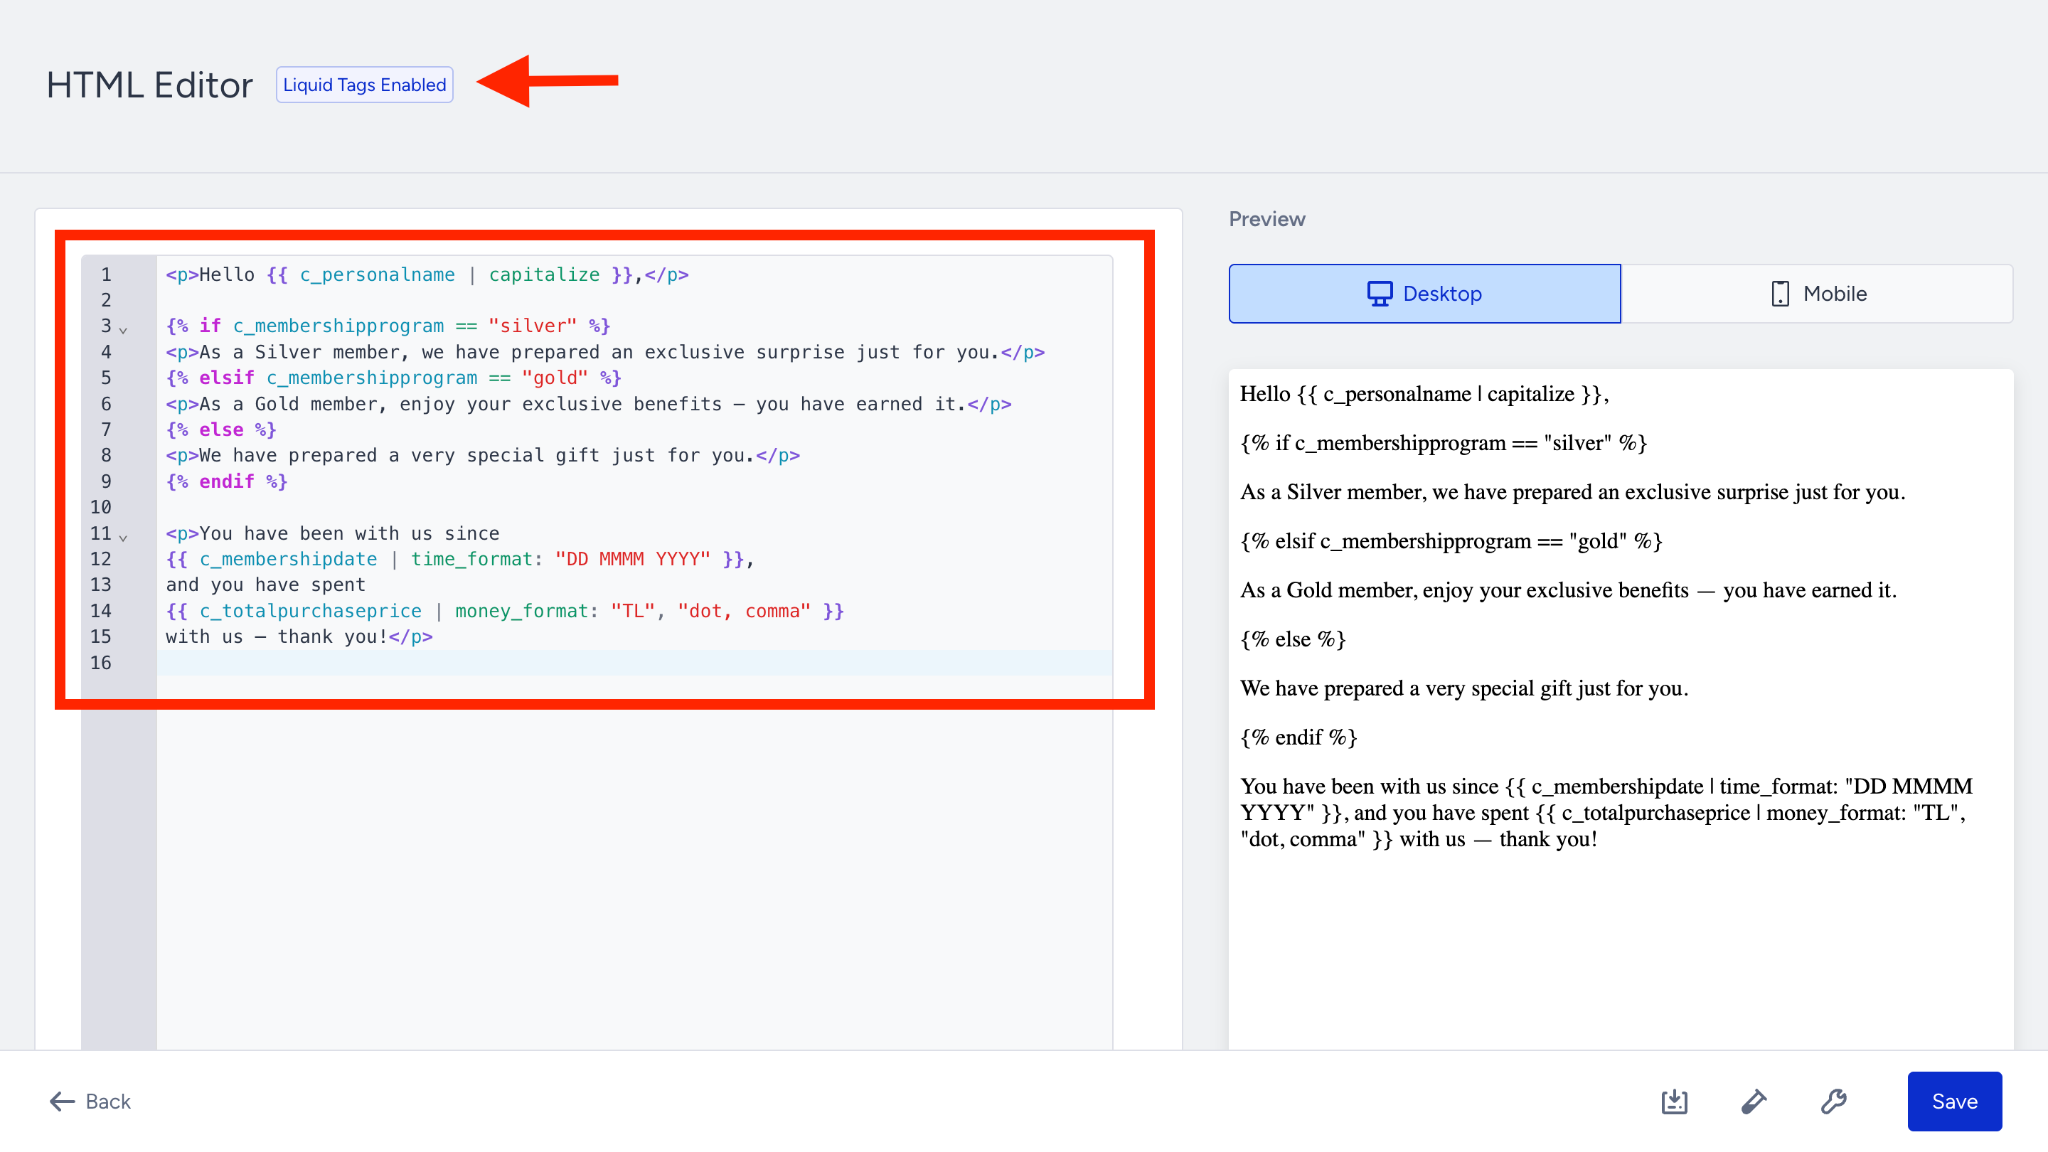
If you are building your email in the HTML editor, Liquid works exactly the same way. The HTML editor is available as a Message Design option in the Design step alongside the Drag & Drop Editor, and is the preferred choice for teams who build emails in full HTML.
With Liquid Tags enabled, you can write Liquid syntax inline anywhere in your HTML: inside paragraph text, headings, button labels, or any other element. The same rules apply, you create objects with {{ }}, tags with {% %}, and filters with |.
The Liquid Tags Enabled badge appears at the top of the HTML editor, confirming that your Liquid code will be processed when the campaign is sent.
Step 7: Preview and test your email
Before sending, you can preview how your Liquid code renders for a specific user and send a test email to verify the output. This is the most reliable way to confirm that your conditions, filters, and fallbacks are working correctly.
1. Click the Preview and Test Message button at the bottom of the Message Content screen. The preview panel opens on the right side of the screen.
2. In the Previewing as field, search for a user by email address. Insider One renders your Liquid code using that user's real attribute values. The inbox preview on the left updates immediately, showing exactly how the subject line and preheader will look like for that user.
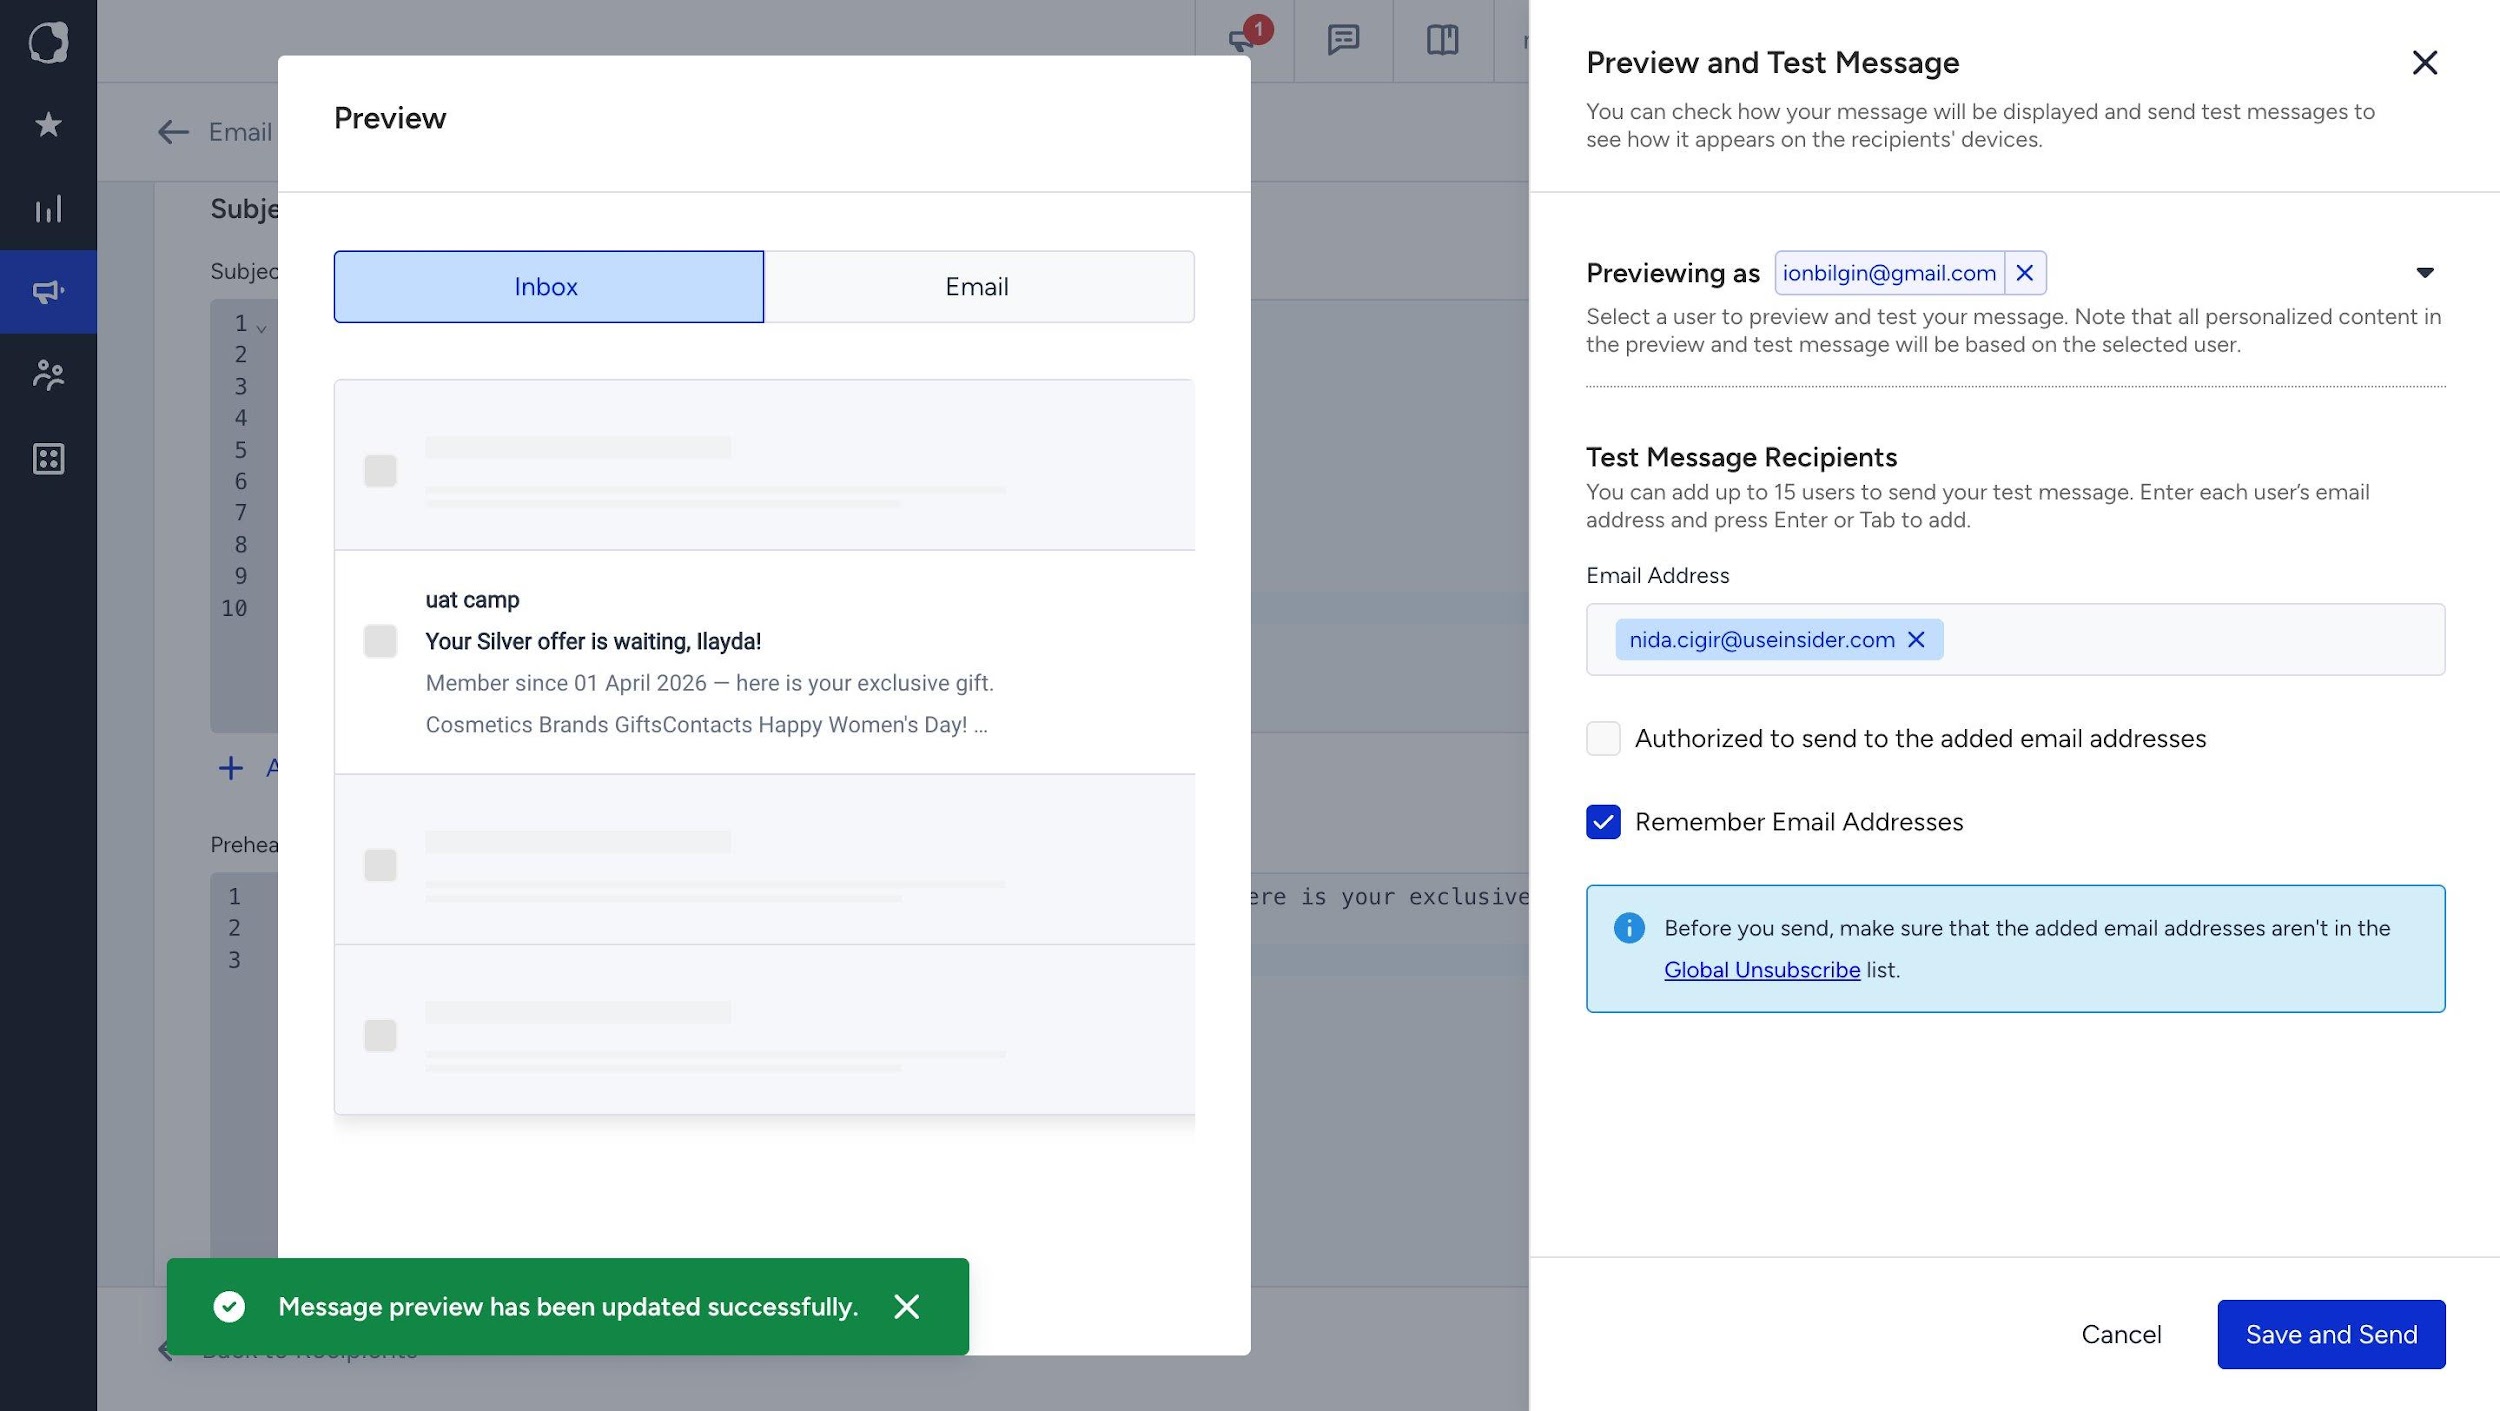
3. Under Test Message Recipients, enter up to 15 email addresses. Check the Authorized to send to the added email addresses box and click the Save and Send button. The test email will render Liquid using the selected user's data, so the output reflects real personalization. Refer to Send a Test Email for further details.
Use cases in practice
The following examples were tested live in the Insider One Email editor. Each use case shows the Liquid code written in the Subject and Preheader fields, followed by how the email appears in the inbox preview.
The sample user has the following attributes set: c_personalname = ilayda, c_membershipprogram = silver, c_membershipdate = 01 April 2026, c_totalpurchaseprice = 100.
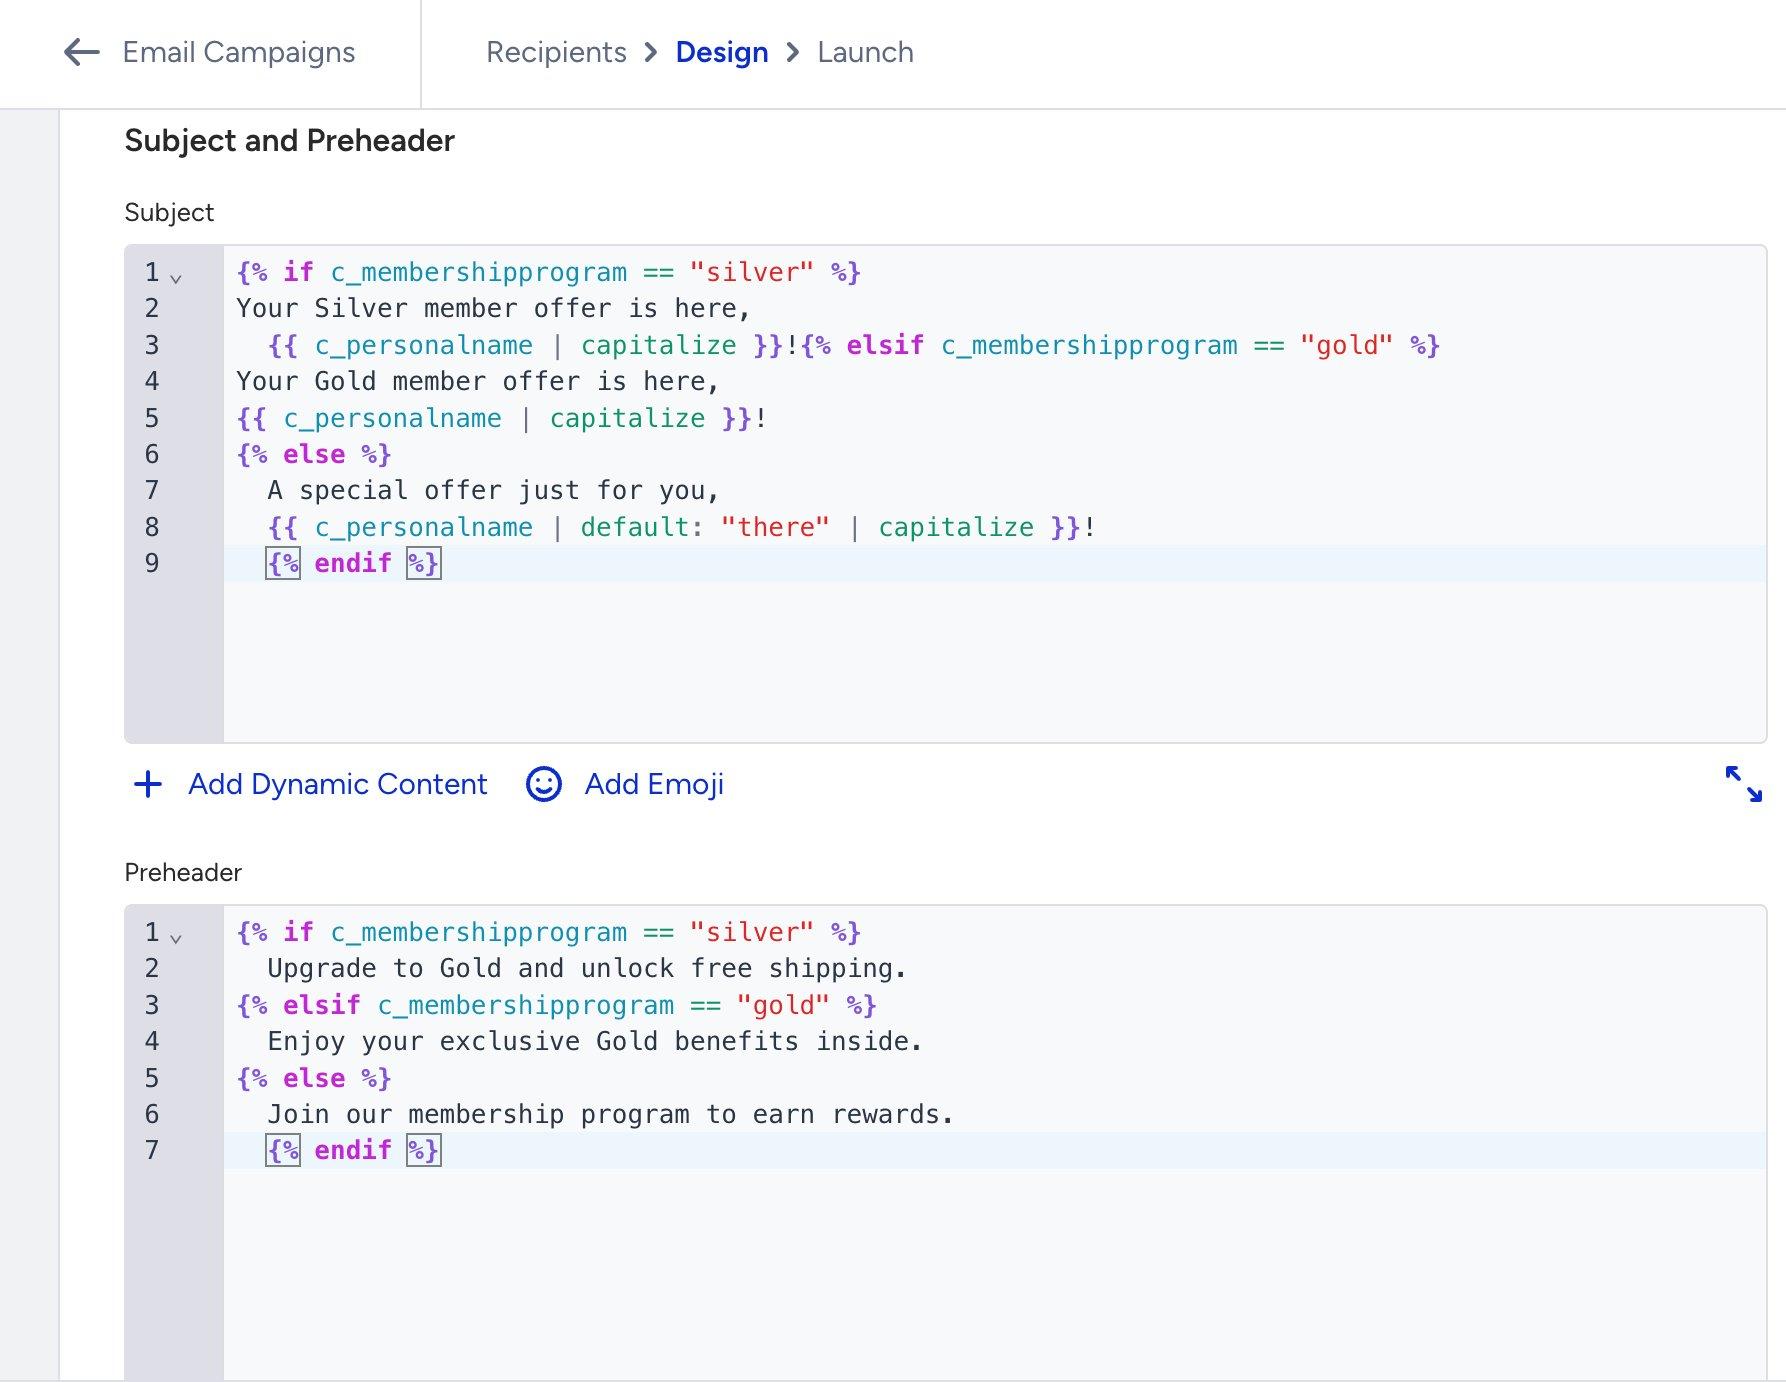
Use case 1: Membership tier greeting
You can greet users by name and show different subject lines and preheaders based on their membership tier. This example uses if / elsif / else to handle three tiers and a fallback.
Code
Inbox preview
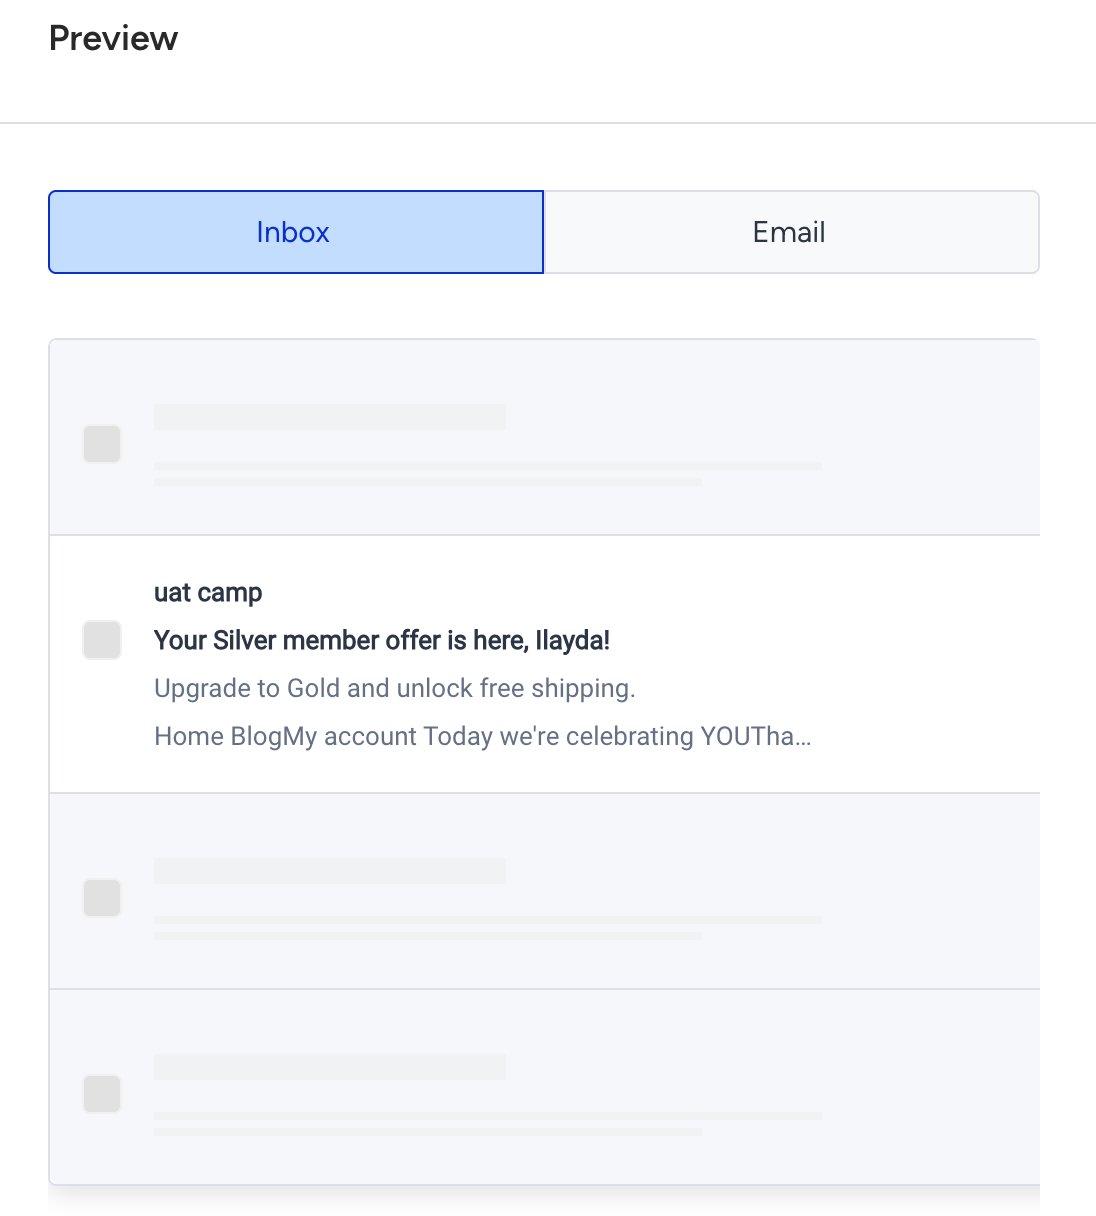
The if / elsif / else logic evaluates c_membershipprogram and picks the right subject and preheader for each tier automatically. Users with no tier hit the else fallback.
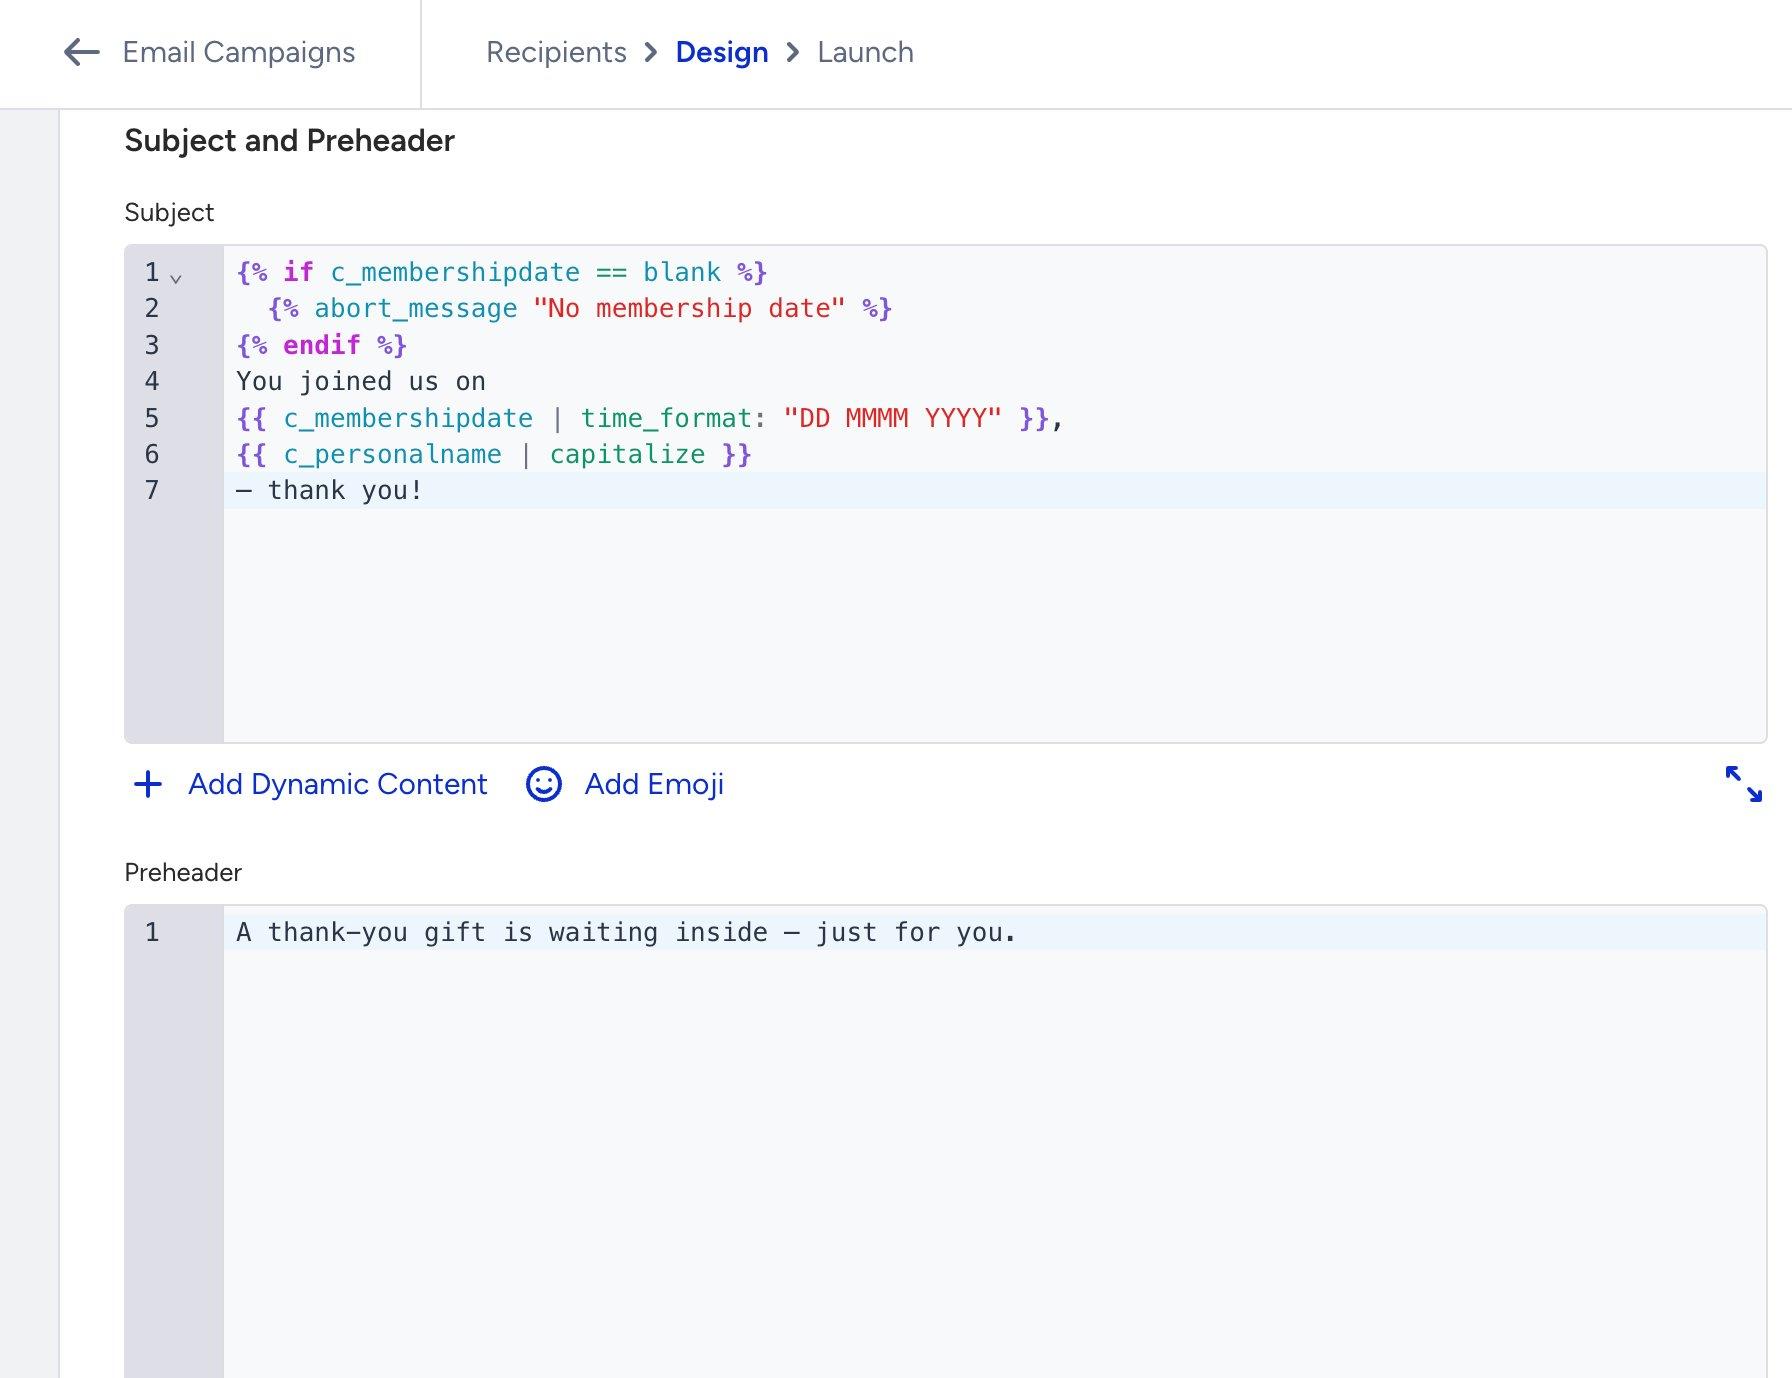
Use case 2: Membership start date with time_format
You can display the user's membership start date in a human-readable format using the time_format filter. If no date is on file, abort_message prevents the send.
Code
Inbox preview
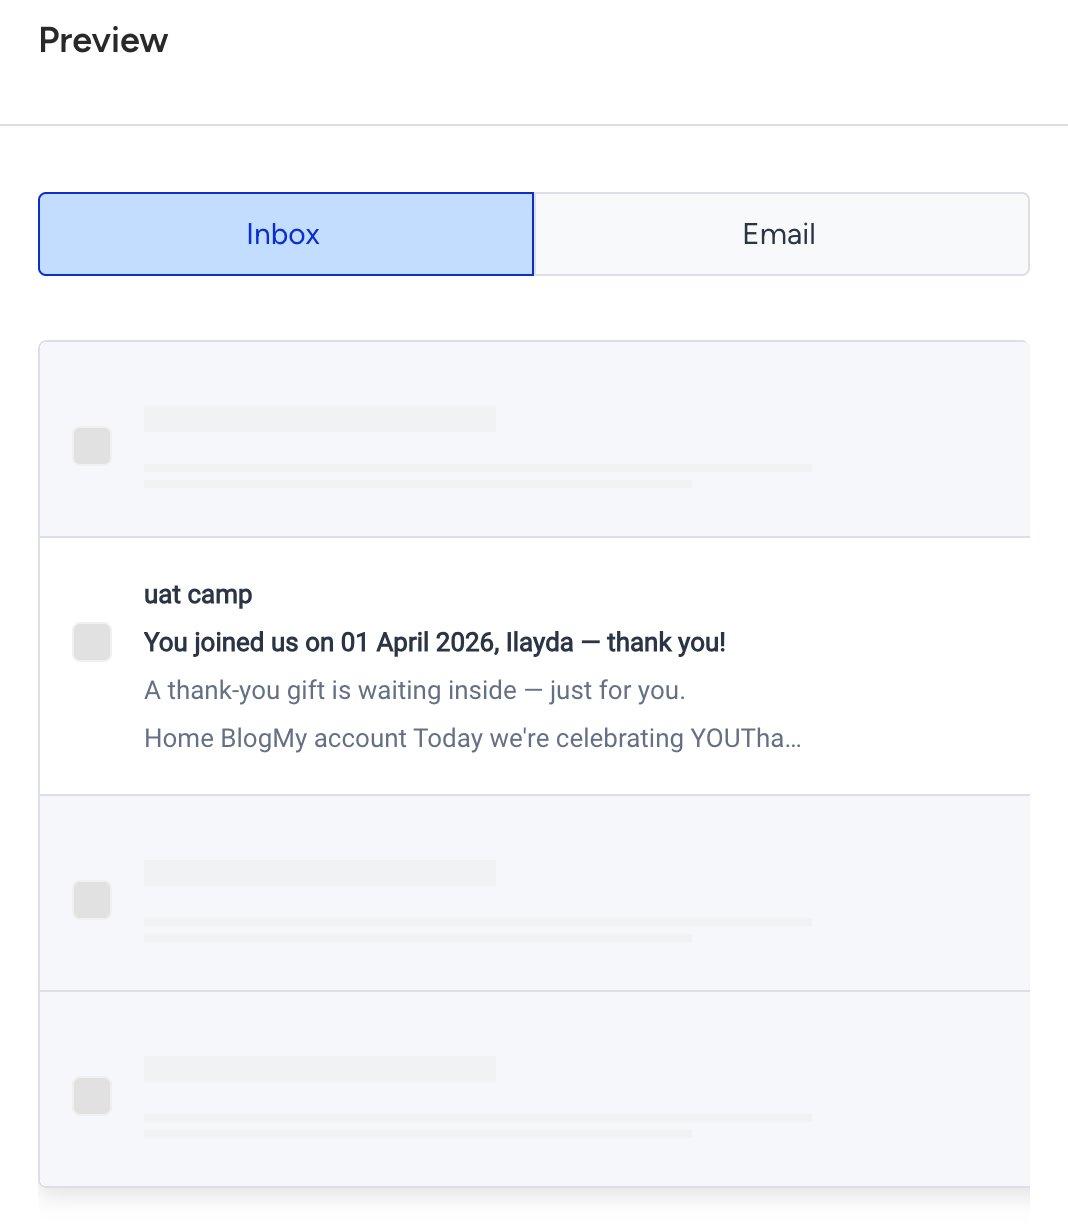
Insider One exclusive: time_format
The date stored as 2026-04-01 is automatically formatted into "01 April 2026" using the DD MMMM YYYY token pattern. You can use any combination of day, month, and year tokens to display dates in the format that works best for your audience
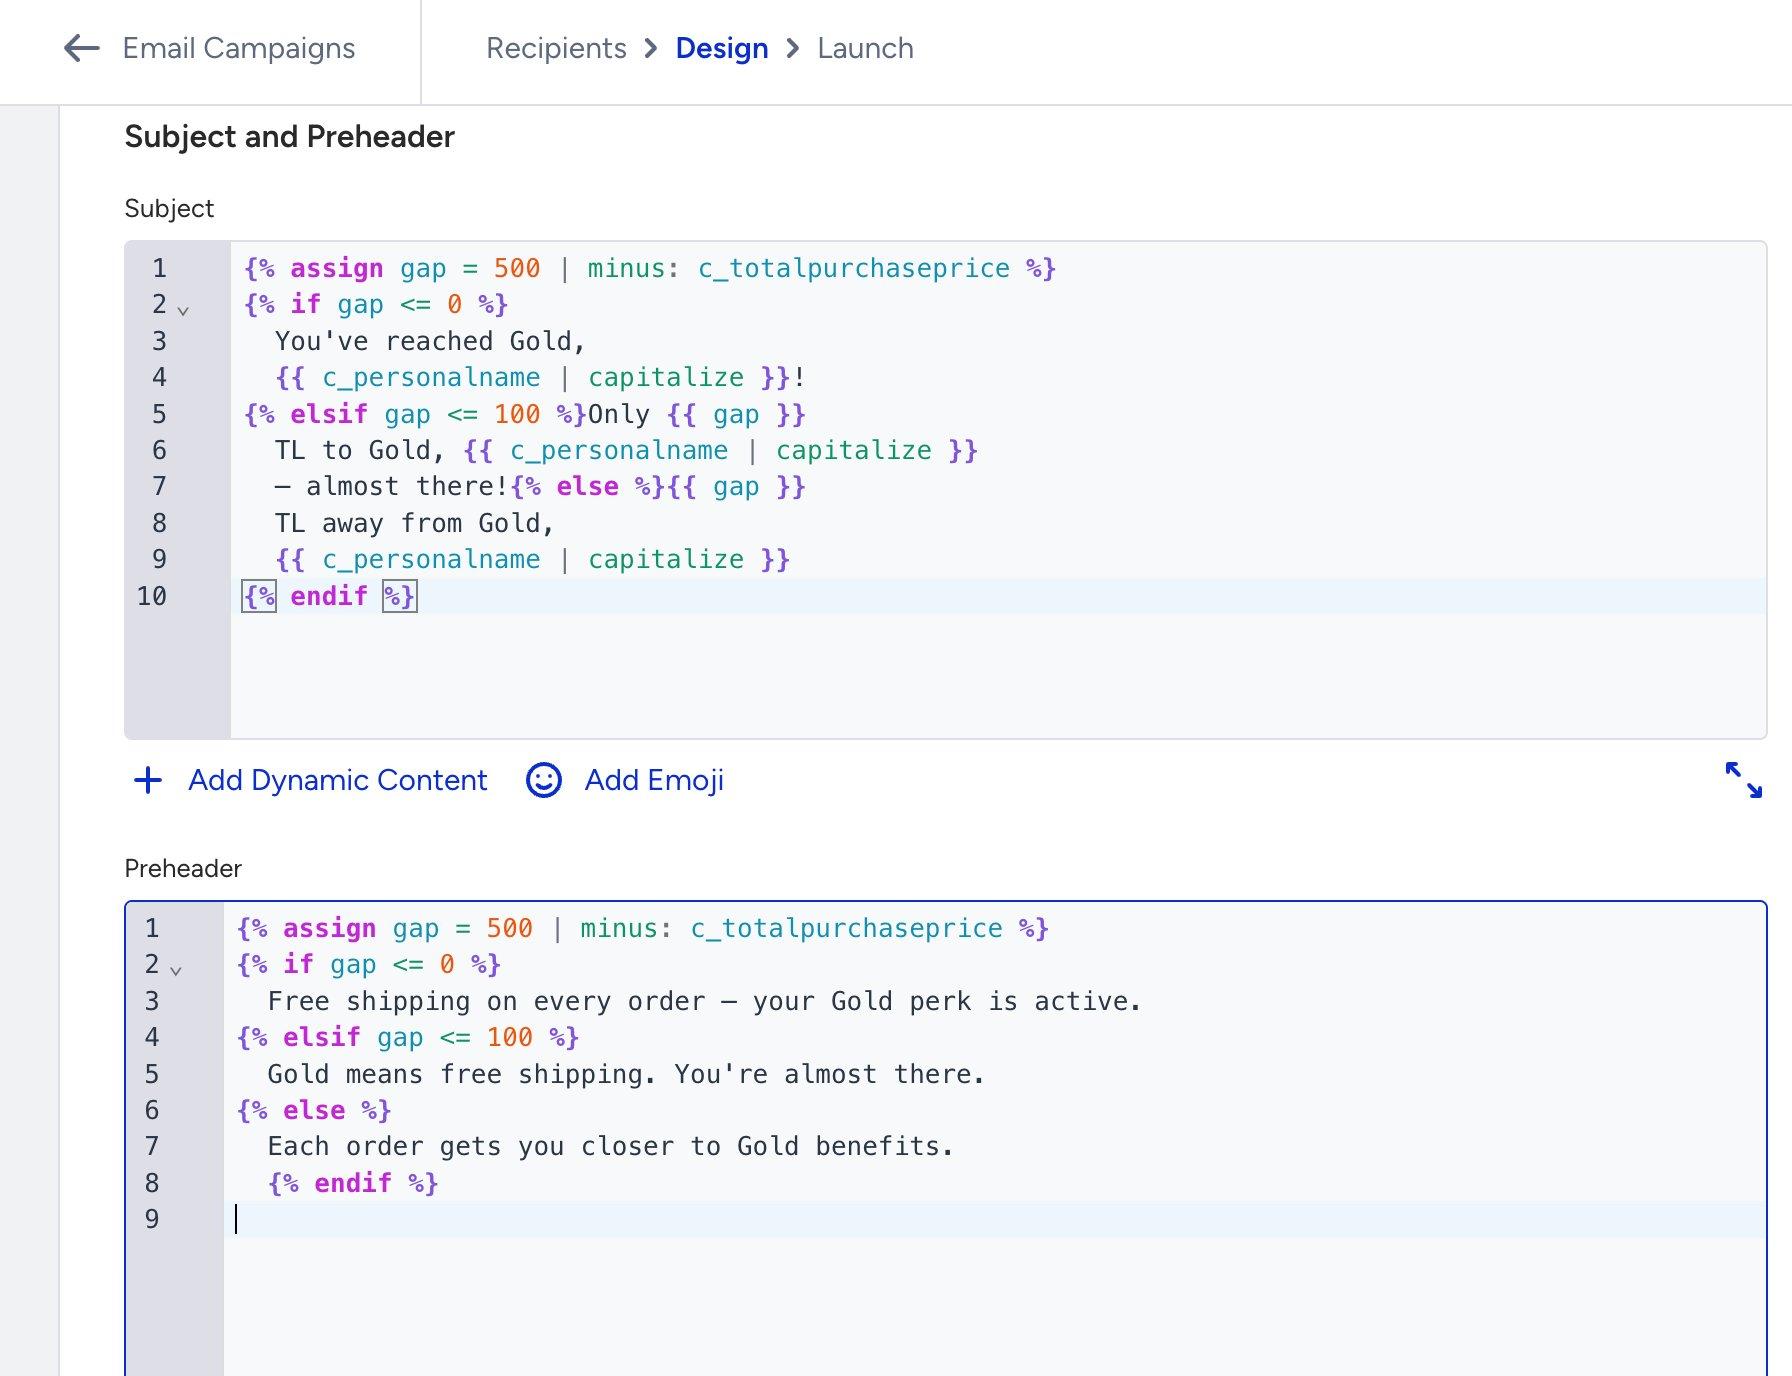
Use case 3: Gold upgrade nudge
You can calculate how far a user is from the next membership tier and show a different message depending on how close they are. This example uses assign to compute the gap and if / elsif / else to branch on the result.
Code
Inbox preview
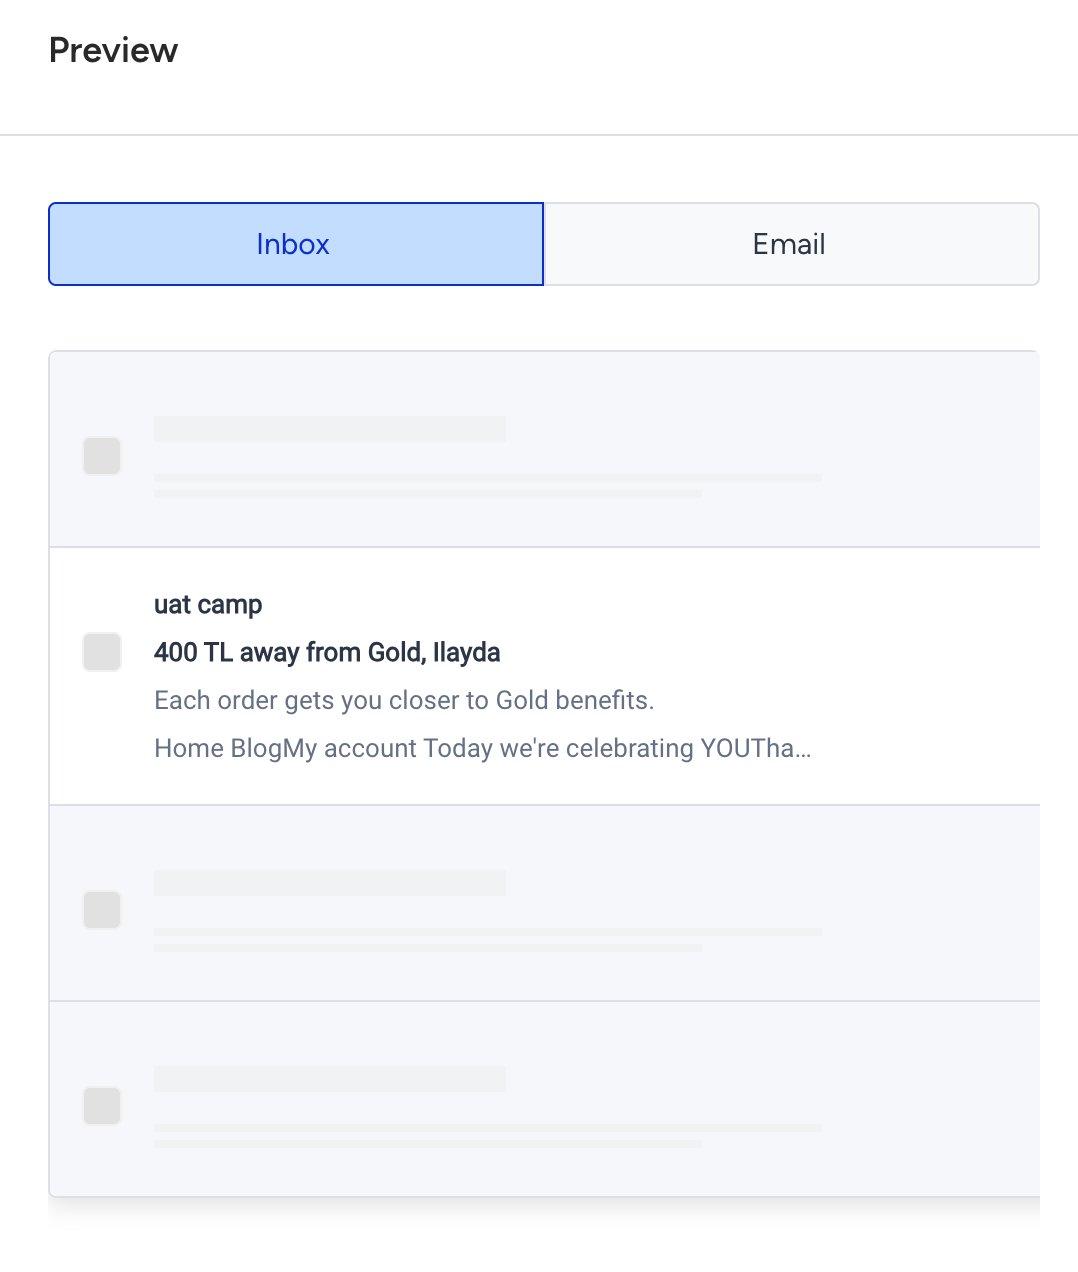
assign stores the computed gap value so it can be reused in both the Subject and Preheader without calculating it twice. The Gold threshold (500) can be updated in one place and all branches update automatically.
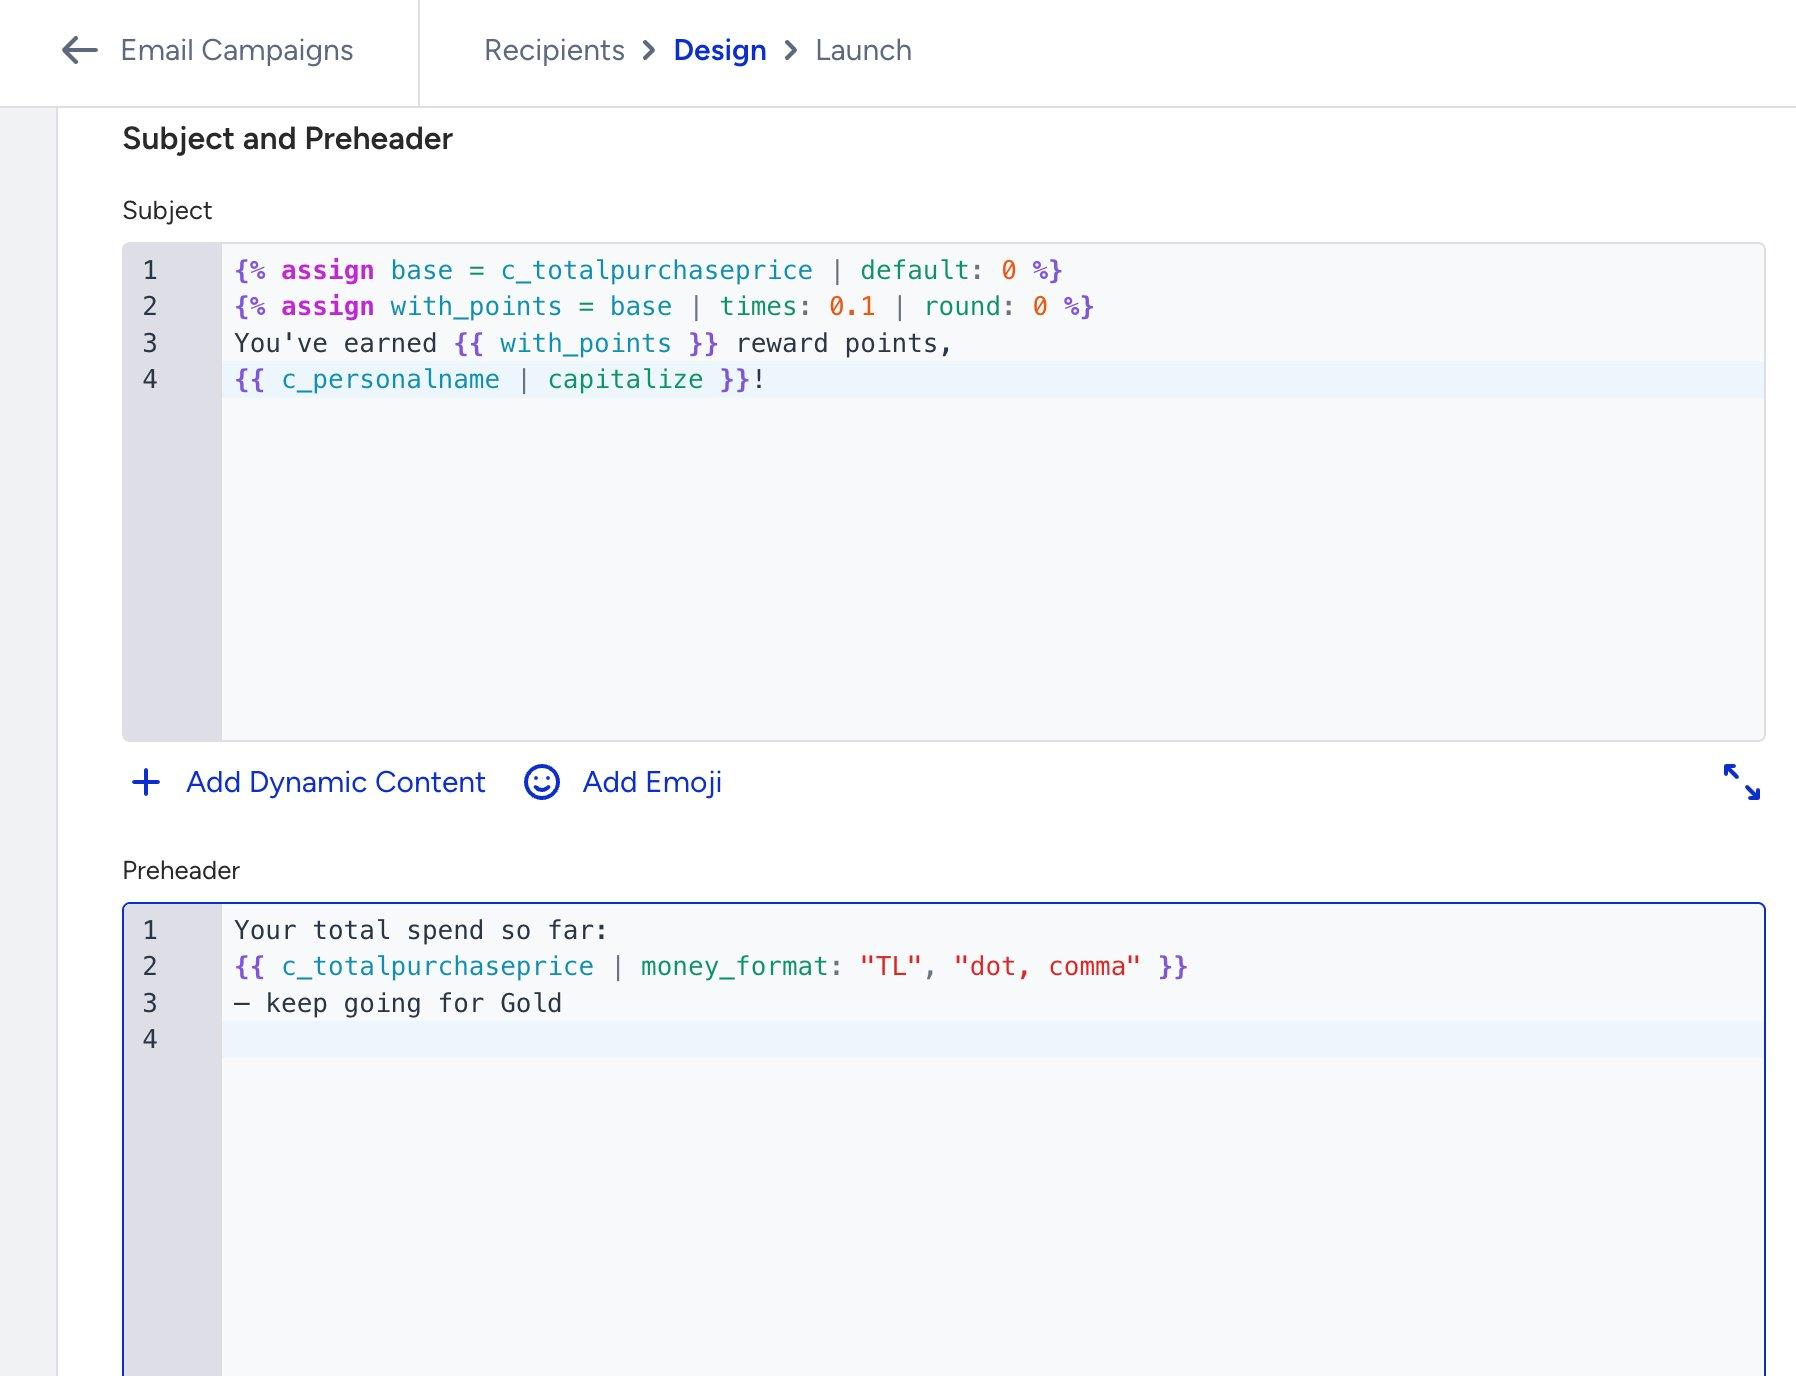
Use case 4: Reward points + money_format
You can calculate reward points from a purchase total and display the user's spend with a currency symbol and correct separators, all in a single template.
Code
Inbox preview
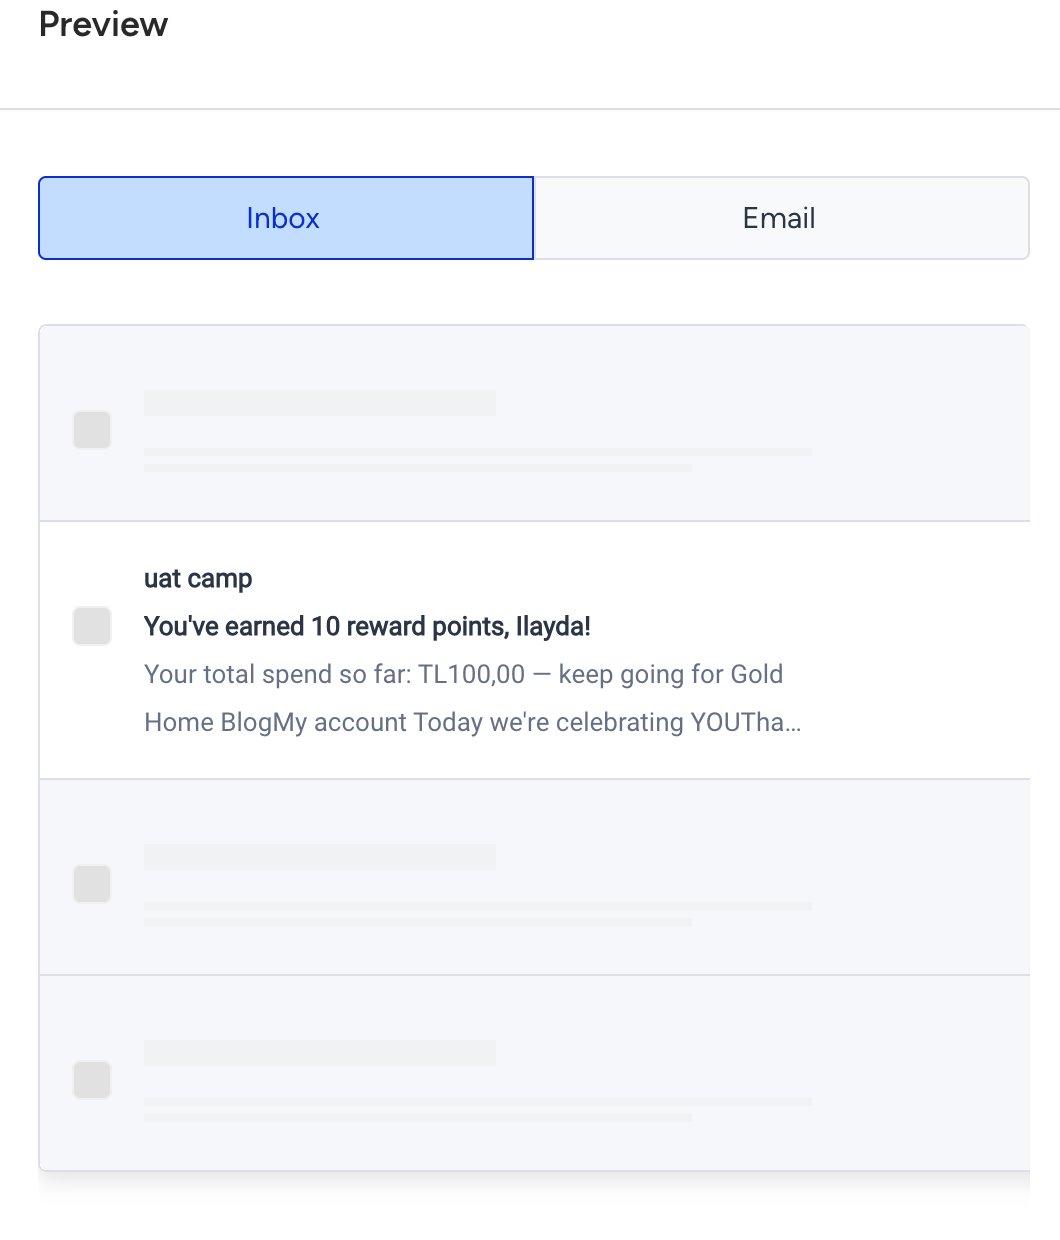
Insider One exclusive: money_format
The money_format filter adds a currency symbol and formats the number with the correct thousand and decimal separators in one step. The output TL100,00 uses dot-comma format as specified. You can switch between Turkish, US, European, and Swiss formats by changing the separator keywords.
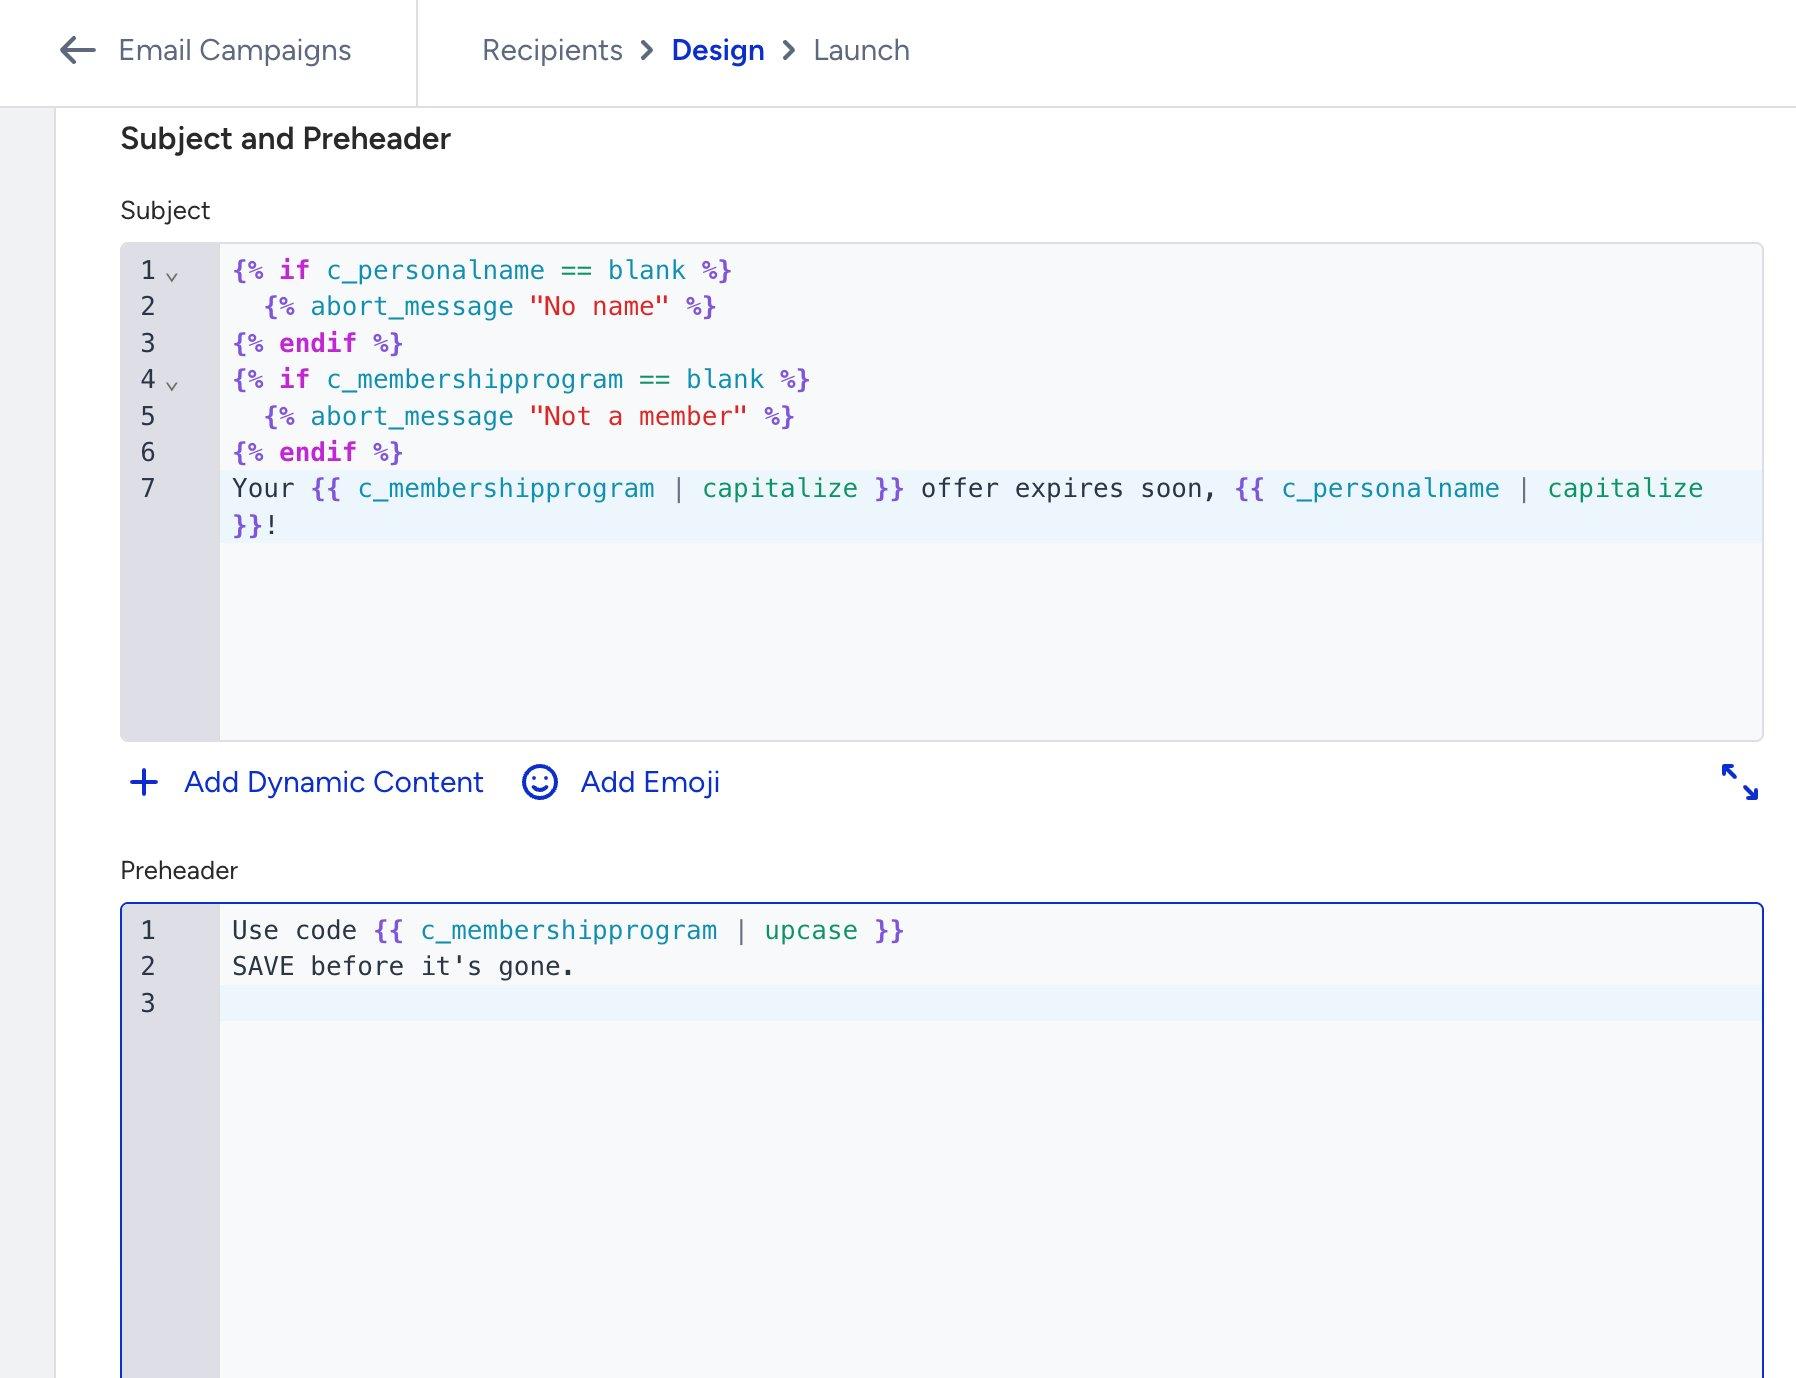
Use case 5: Guard clause pattern
You can add guard clauses at the top of the template to check that all required data exists before rendering any content. If a required field is blank, abort_message cancels the send for that user. The email is never delivered to them, and the reason is logged.
Code
Inbox preview
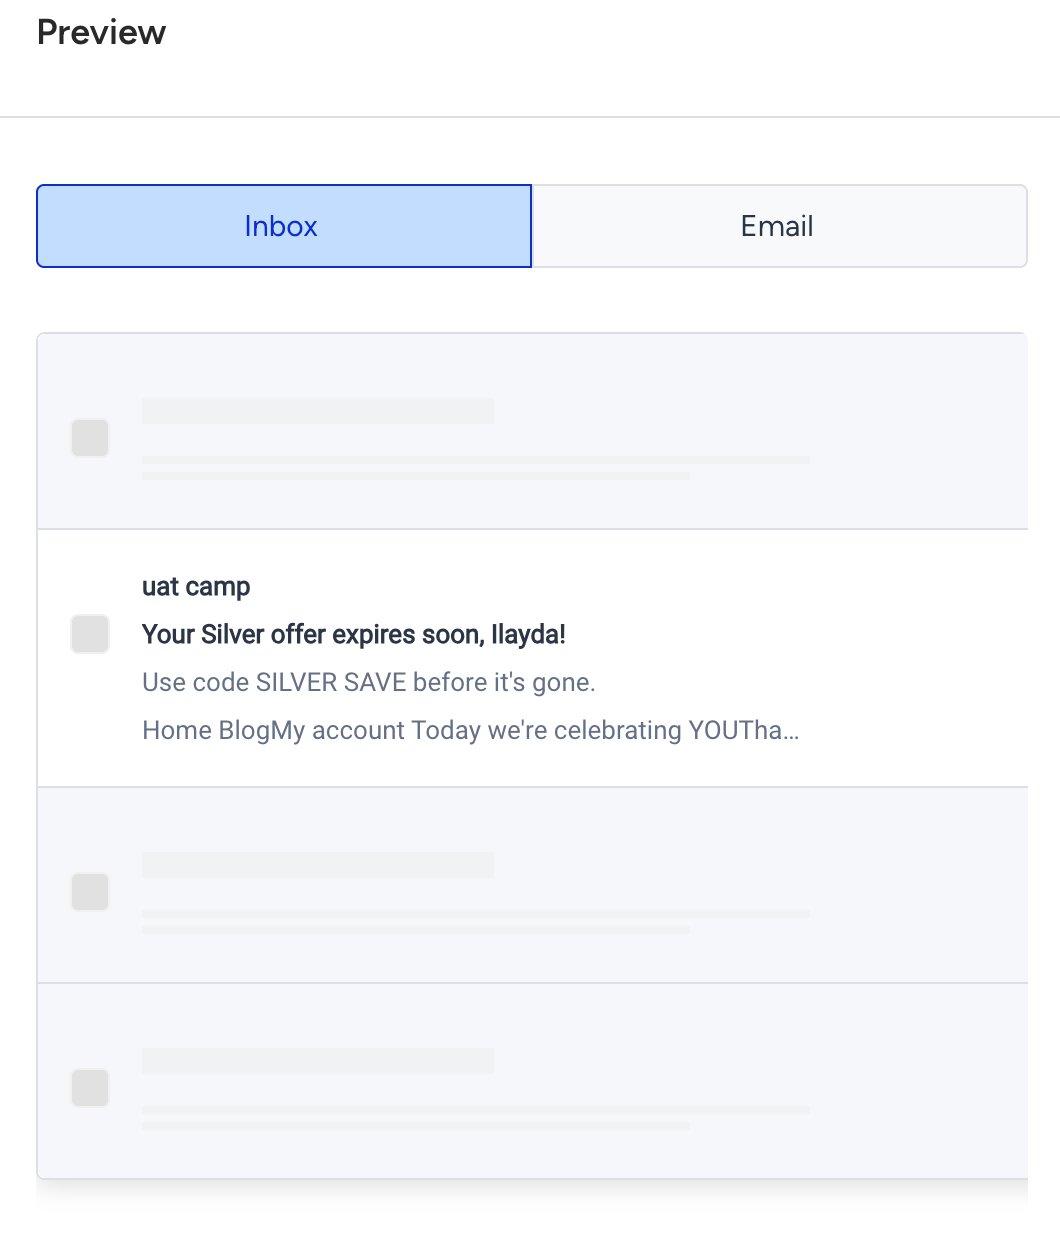
In Insider One, abort_message cancels the send only for the specific user who is missing the required data. All other users in the campaign are unaffected. This makes guard clauses safe to use in large campaigns, users with complete data receive the email normally.
Personalize with customer data
You can follow this practice when data is missing.
What happens when data is missing?
If a variable has no value for a particular user, Liquid renders it as empty, and displays no error, but just a blank space. To avoid gaps in your email, use a fallback value with the default filter:
Hello {{ name | default: "there" }}\!


→  Hello there\!    (when name is not set)

→  Hello Alice\!    (when name is "Alice")
You can also check whether a variable is blank before using it:
{% if name == blank %}

  No name on file.

{% endif %}


{% if c_loyalty_tier != blank %}

  Welcome, {{ c_loyalty_tier }} member!

{% endif %}
Use the default filter as your first line of defence. It handles both unset variables and empty values in a single, clean step.
Stop a send when data is missing
abort_message cancels the email for a specific user when required data is missing. The email is never delivered to that person, and a reason is logged so you can investigate.
This prevents embarrassing sends like 'Hi ,' (blank name) or sending a loyalty-tier offer to someone who is not enrolled.
{% if name == blank %}

  {% abort_message "Missing user name" %}

{% endif %}


{% if c_loyalty_tier == blank %}

  {% abort_message "User not enrolled in loyalty program" %}

{% endif %}


Hello {{ name }}, your {{ c_loyalty_tier }} member offer is inside.
You can put all your abort checks at the very top of your template before any content. This way, if something critical is missing, the send stops immediately and none of the template logic runs.