You cannot make any changes to External Platform Integrations without having either an Administrator or an Editor with PII access in InOne. Refer to User Roles for further information.
The data import feature lets you efficiently import large volumes of data directly from your AWS S3 bucket. This integration enhances your marketing efforts by enabling personalized and targeted campaigns with up-to-date data. It’s beneficial for businesses storing large datasets in S3 and looking to leverage them within Insider One for segmentation, personalization, and automation.
In this guide, you will learn the steps required to set up the integration and import data from Amazon S3 to Insider One, ensuring a seamless flow of information to enhance your marketing initiatives.
S3 Import functionality supports
.jsonl,.csvfiles, and attributes, event, purchase, and user delete data.
You can create a maximum of 50 Amazon S3 integrations per Insider One account.
Essentials before Integration
To make the most of the Amazon S3 integration, you'll need these essential elements:
Create a new SQS queue
S3 Bucket Designation: Identify the S3 bucket where your data is stored. This is crucial for directing Insider One to the correct data source for import.
Authorization for Insider One: Grant Insider One permission to read data from your S3 bucket. This ensures that Insider One can access and process your data securely.
SQS queue for new file notifications: Set up an SQS queue to receive notifications of new files. This allows for automated data import as new data becomes available.
IAM user: Create a dedicated IAM user with the necessary permissions. This user will facilitate secure access and management of your AWS resources.
These elements are essential to ensure a seamless and secure integration process, enabling efficient data import and utilization within Insider One.
Authorization for Insider One to Access your S3 Bucket
You can refer to the steps below to grant Insider One permission to access your S3 bucket for importing user data. Insider One supports the IAM User method, a dedicated IAM user with the necessary permissions for authorization.
For more details on policy management, you can refer to the official AWS documentation:
Definitions
IAM (Identity and Access Management): AWS service that securely controls access to AWS resources.
IAM User: An AWS identity with specific permissions that can interact with AWS resources.
SQS (Simple Queue Service): A fully managed message queuing service that enables decoupling and scaling of microservices, distributed systems, and serverless applications.
ARN (Amazon Resource Name): A unique identifier for AWS resources.
Trust Policy: A JSON policy that defines which AWS accounts or services are allowed to assume an IAM Role.
Policy: It is a JSON that defines which resources any AWS entity can access.
Before following the steps, ensure you're logged into your AWS account and authorized to create a new SQS and S3 bucket. You can log in here.
Step 1: Create S3 Source Integration
Navigate to Components > Integrations > External Integrations on the Insider One’s InOne panel.
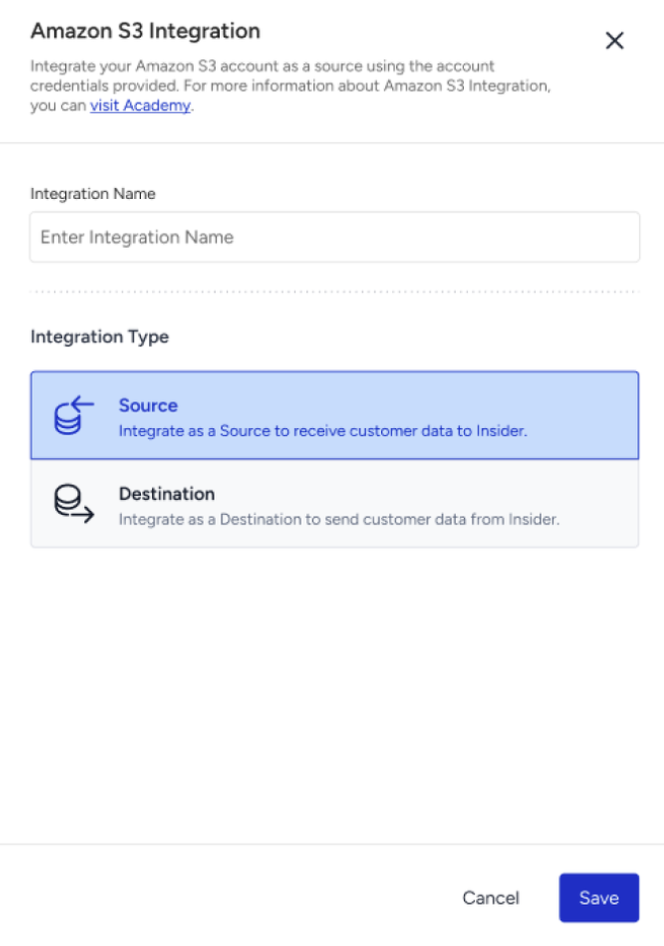
Select the Amazon S3 platform and create an S3 Source Integration.

Name your integration, select Source as the integration type, and click the Save button.
Step 2: Grant Access via IAM User
Step 2.1: Create a Source S3 Bucket
If you haven't already created a source bucket, follow these steps:
Choose the appropriate AWS Region.
Use the search bar to navigate to S3 or click here for the service.
Click Create bucket.
Enter a Bucket name (e.g., insider-user-data-bucket).
In Block Public Access settings for this bucket, ensure all options remain enabled to prevent unauthorized access.
Click Create bucket.
Please see this part for data requirements and file types.
Step 2.2: Create an SQS
Use the search bar to navigate to SQS or click here to go to the service.
Click the Create queue button.
Enter a queue name in the Name field.
In the Access policy section, click the Advanced button.
Change the required fields and paste the JSON below into the JSON editor.
{
  "Version": "2012-10-17",
  "Id": "__default_policy_ID",
  "Statement": [
    {
      "Sid": "__owner_statement",
      "Effect": "Allow",
      "Principal": {
        "Service": "s3.amazonaws.com"
      },
      "Action": "sqs:*",
      "Resource": "arn:aws:sqs:<YOUR_REGION>:<YOUR_ACCOUNT_ID>:<YOUR_SQS_QUEUE_NAME>",
      "Condition": {
        "StringEquals": {
          "aws:SourceAccount": "<YOUR_ACCOUNT_ID>"
        },
        "ArnLike": {
          "aws:SourceArn": "arn:aws:s3:::<YOUR_S3_BUCKET_NAME>"
        }
      }
    }
  ]
}
Leave the rest of the settings by default.
Click the Create queue button at the bottom of the page.
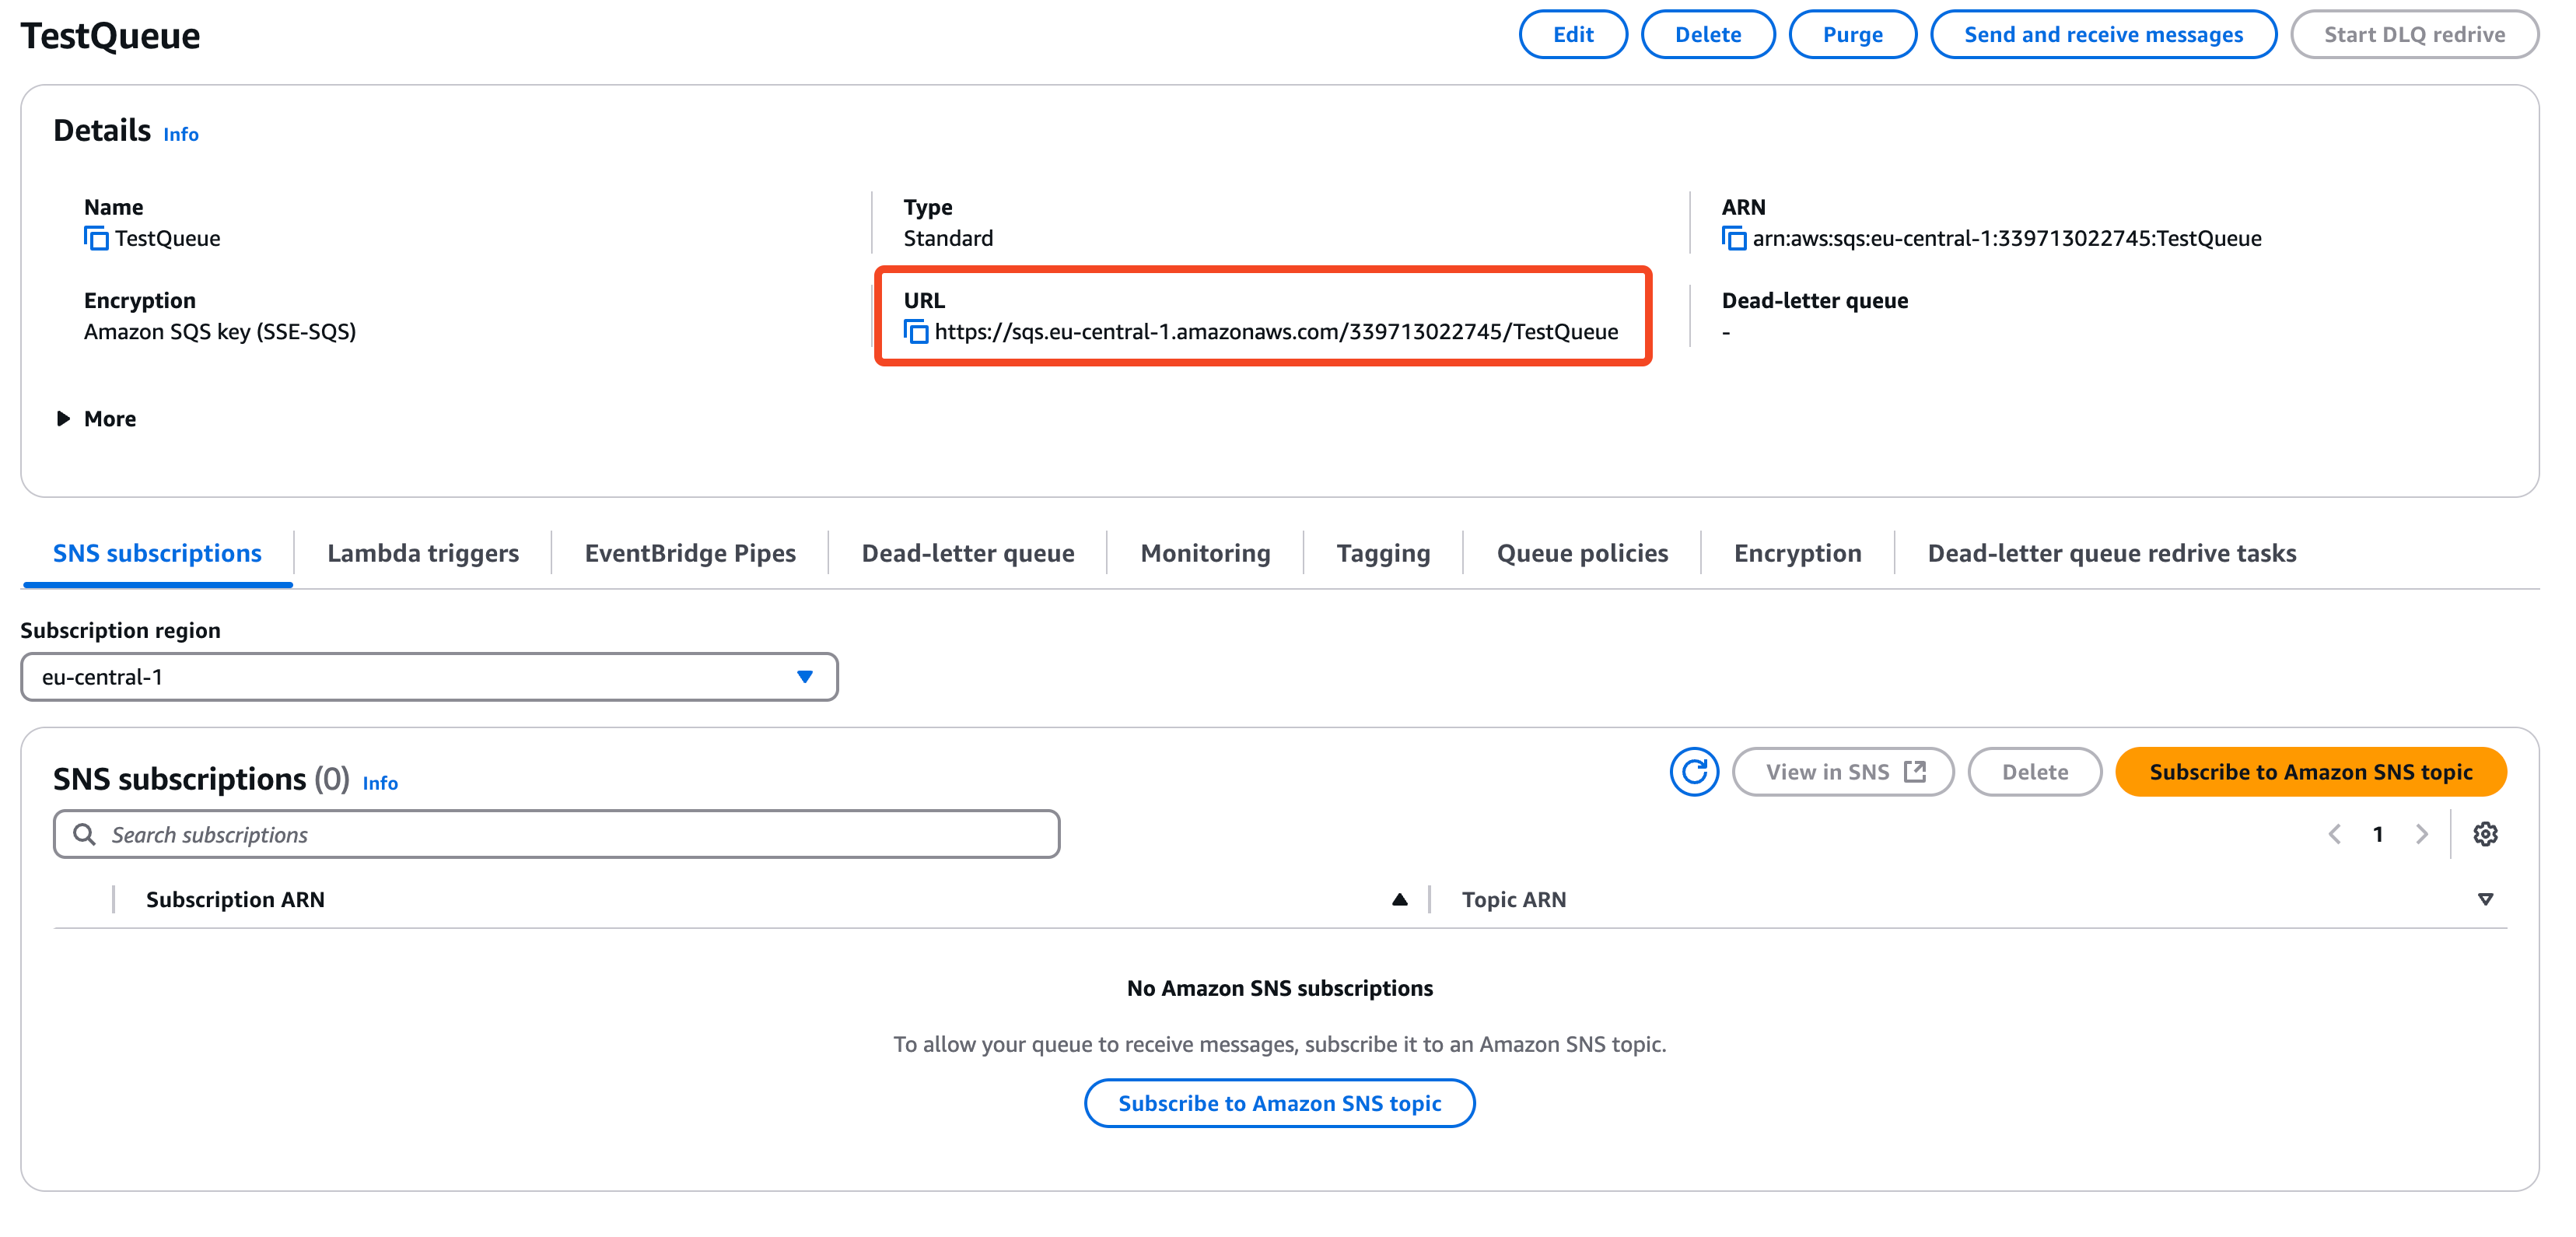
Click on the queue you have already created with this link. Copy the URL from the page that opens to register it on the Insider One’s InOne panel later.
Step 2.3: Assign SQS to S3
After completing steps 1 and 2, perform the following steps:
Enter the S3 Bucket you created earlier.
Click the Properties button in the tabs.
Find the Event notifications section and click the Create event notification button.
Fill the Event Name field as you want.
In the Event types step, select the All object create events checkbox.
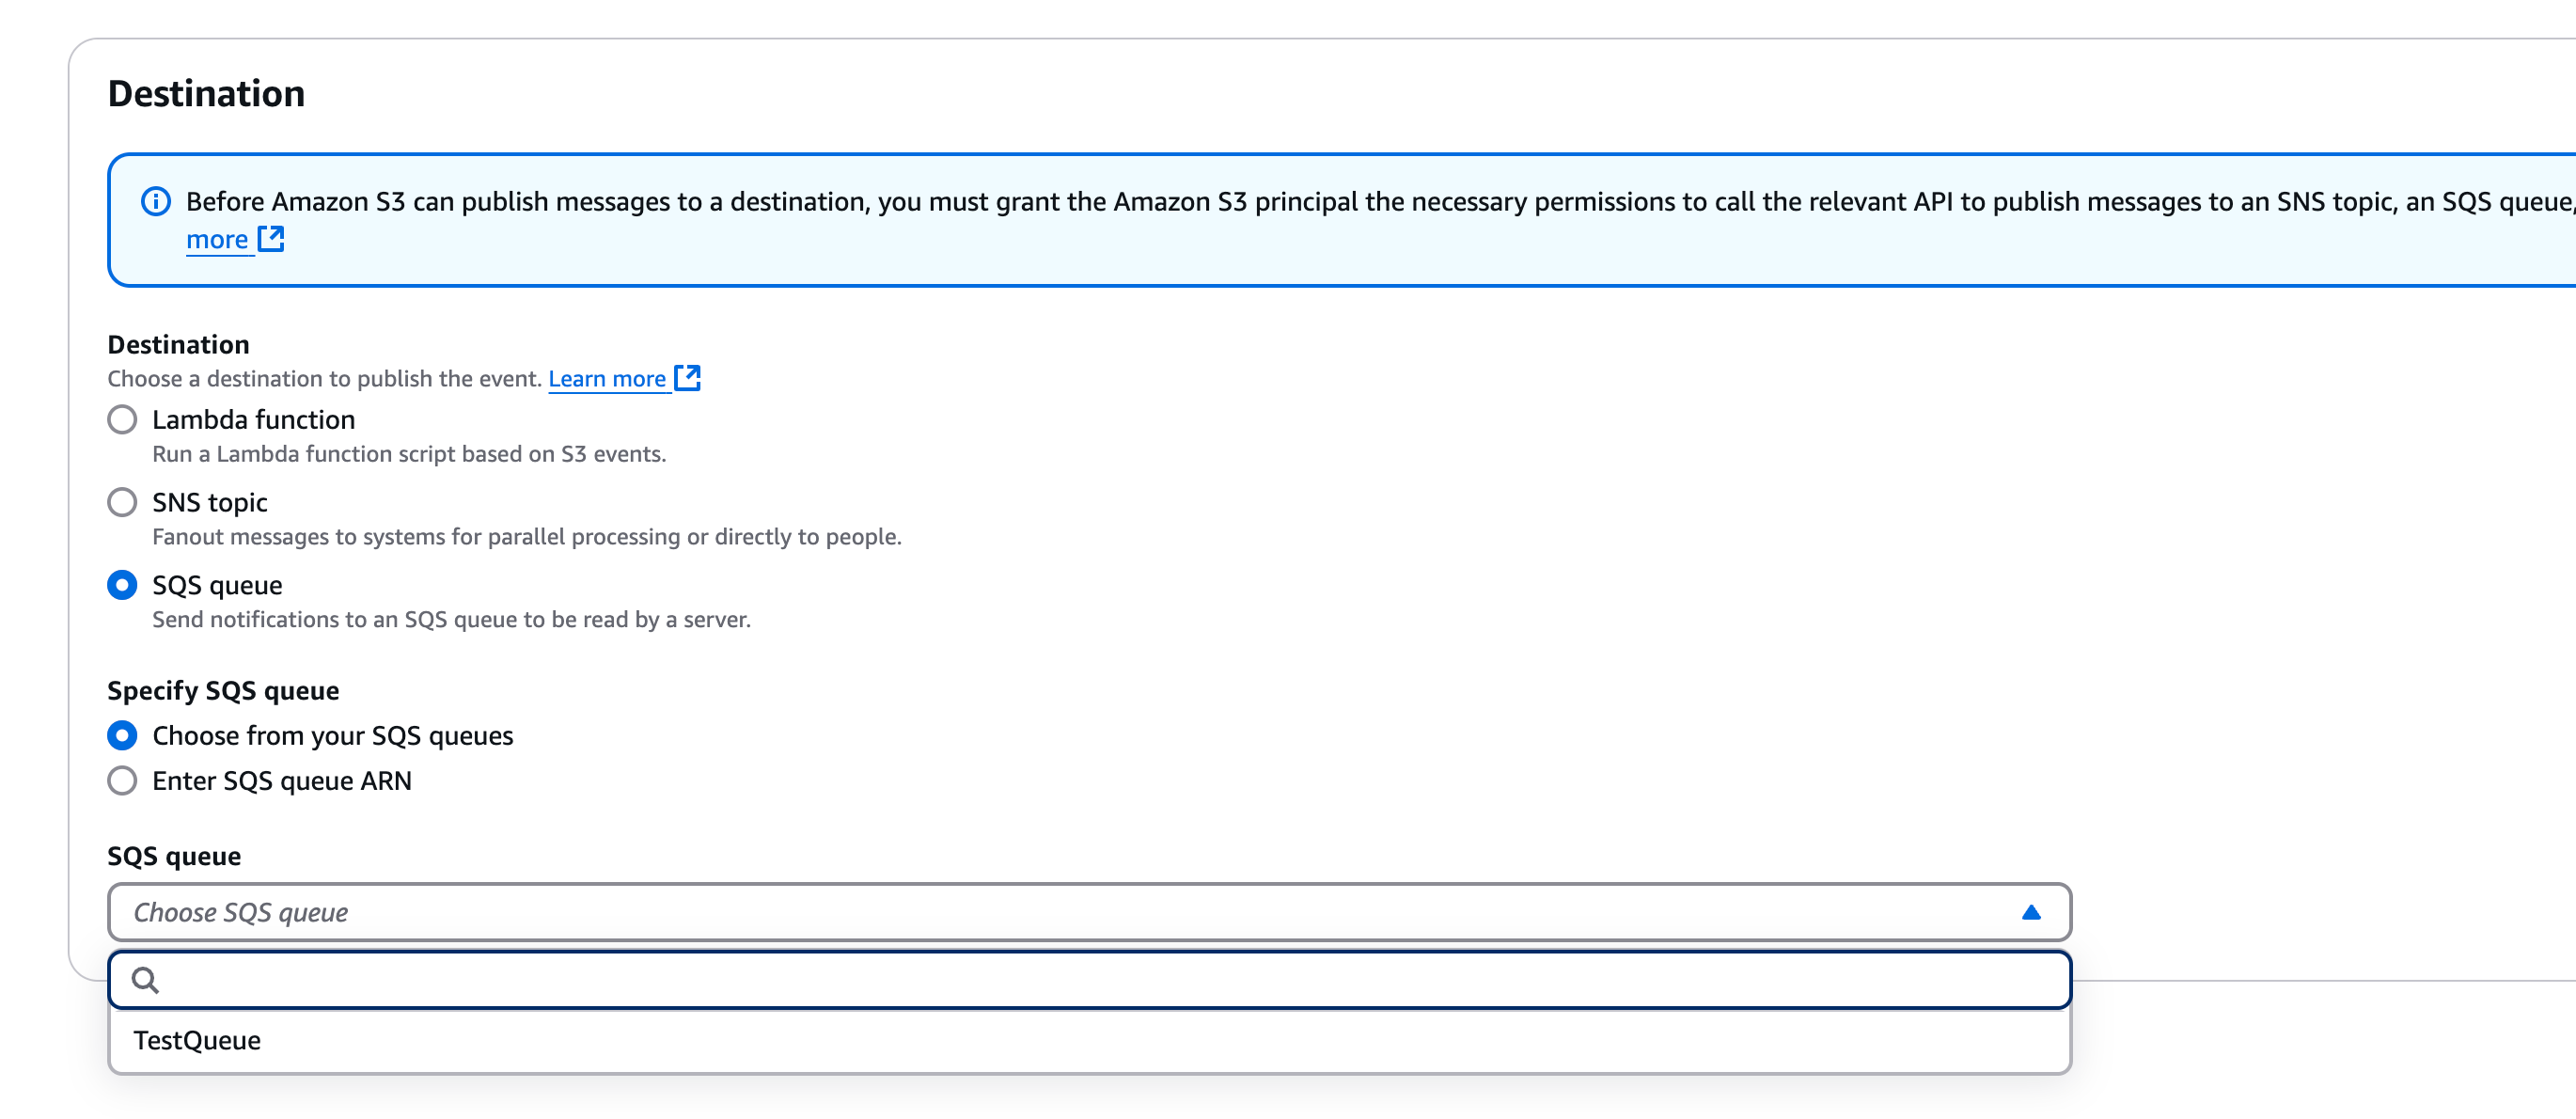
In the Destination step, first click the SQS queue button and then select the SQS you have created before from the SQS queue dropdown.
Click the Save changes button.
Create the SQS for Insider One without any messages in the queue before the integration is created; otherwise, the validation might time out.
Step 2.4: Create an IAM User
Sign in to the AWS Management Console and navigate to the IAM service.
Go to Users and click Create user.
Enter a User Name (e.g., InsiderS3Access) and click the Next button.
Click the Next button.
Step 2.5: Attach the Required Permissions
Select Attach existing policies directly.
Choose JSON in the Policy editor section.
Apply the following policy to the JSON editor and click the Next button:
{
    "Version": "2012-10-17",
    "Statement": [
        {
            "Effect": "Allow",
            "Action": [
                "sqs:ReceiveMessage",
                "sqs:DeleteMessage",
                "sqs:GetQueueUrl",
                "sqs:GetQueueAttributes"
            ],
            "Resource": [
                "arn:aws:sqs:YOUR_REGION:YOUR_ACCOUNT_ID:YOUR_SQS_QUEUE_NAME"
            ]
        },
        {
            "Effect": "Allow",
            "Action": [
                "s3:GetObject",
                "s3:ListBucket",
                "s3:GetObjectAttributes",
				"s3:PutObject"
            ],
            "Resource": [
                "arn:aws:s3:::YOUR_BUCKET_NAME",
                "arn:aws:s3:::YOUR_BUCKET_NAME/*"
            ]
        }
    ]
}
(Replace YOUR_BUCKET_NAME, YOUR_REGION, YOUR_ACCOUNT_ID, and YOUR_SQS_QUEUE_NAME with your actual values.)
Enter a name in the Policy name field.
Click the Create policy button.
Return to the user creation page and click the Refresh icon to the left of the Create policy button.
Find out your created policy via the search bar.
Click the policy checkbox and click the Next button.
Ensure that the policy adheres to the best practices outlined in the IAM Access Policies guide.
After attaching the policy, click the Create user button at the final step.
Step 2.6: Share Access Credentials
After creating the user, navigate to Security credentials.
Click the Create access key button to generate a new access key.
Select the Third-party service use case and click the Next button.
Click the Create access key button.
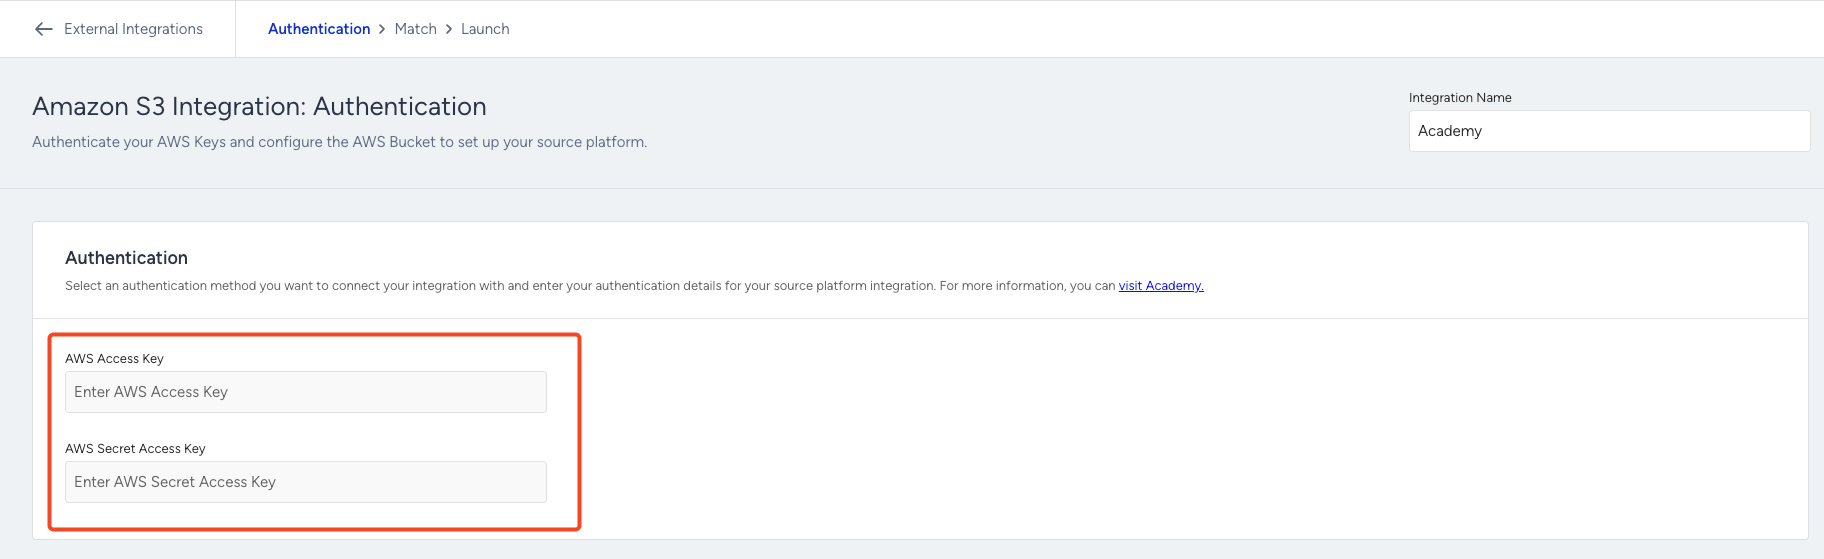
Copy the Access Key ID and Secret Access Key.
Paste SQS URL, Access Key ID, and Secret Access Key into Insider One’s InOne panel.
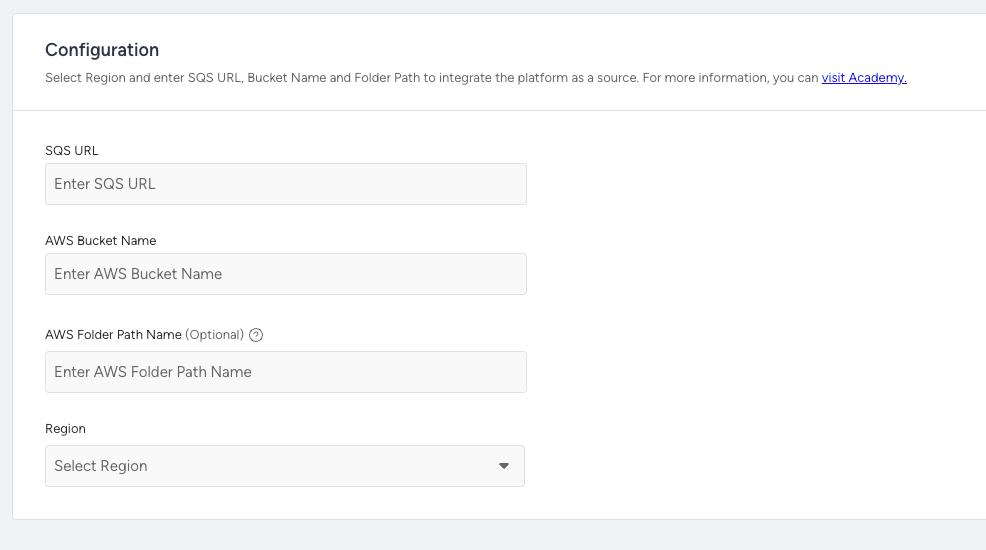
Step 3: Add your S3 Bucket Details
Add the desired AWS Bucket Name and AWS Folder Path Name on the Insider One’s InOne panel.
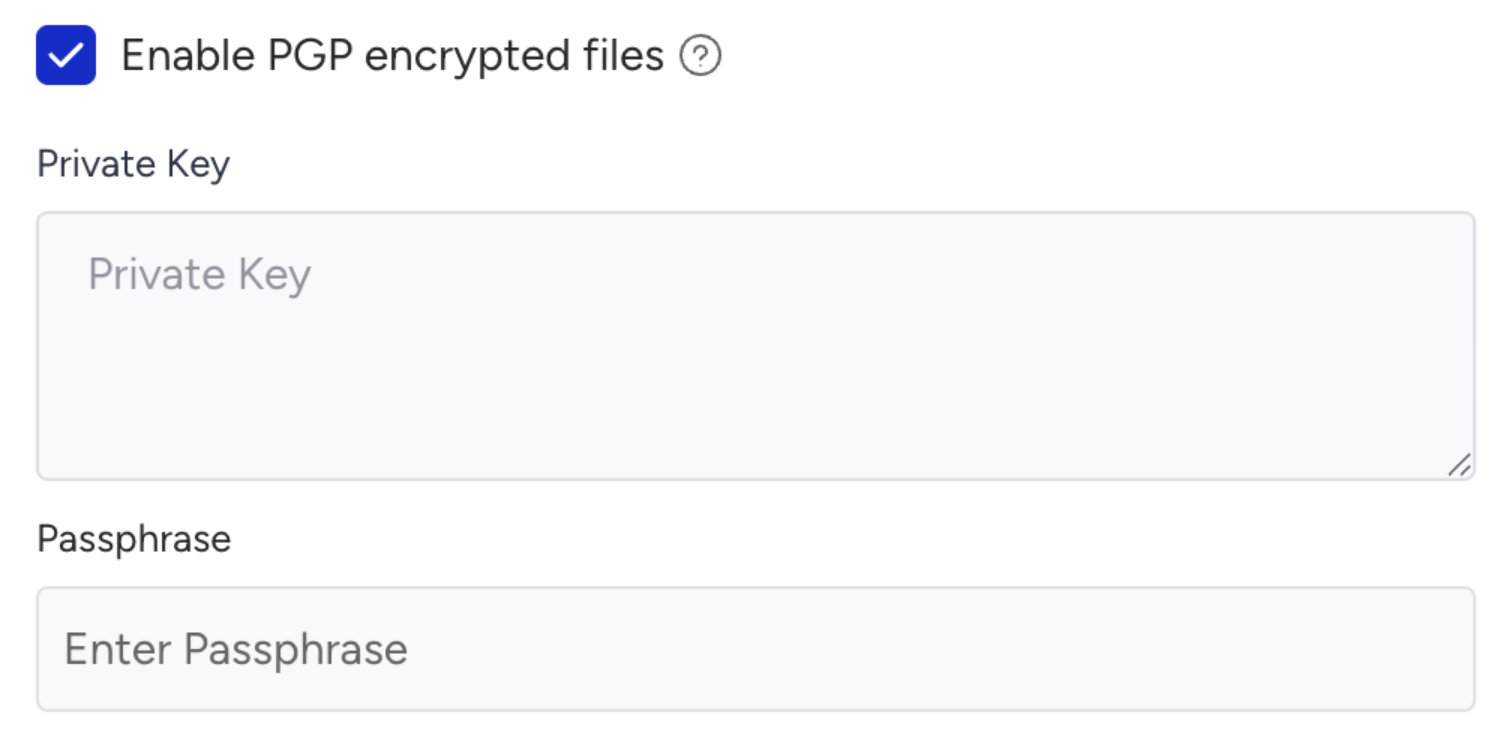
If you want to use PGP (Pretty Good Privacy) encryption to import and decode PGP encrypted files from your S3 bucket, add a Private Key and Passphrase (if needed).
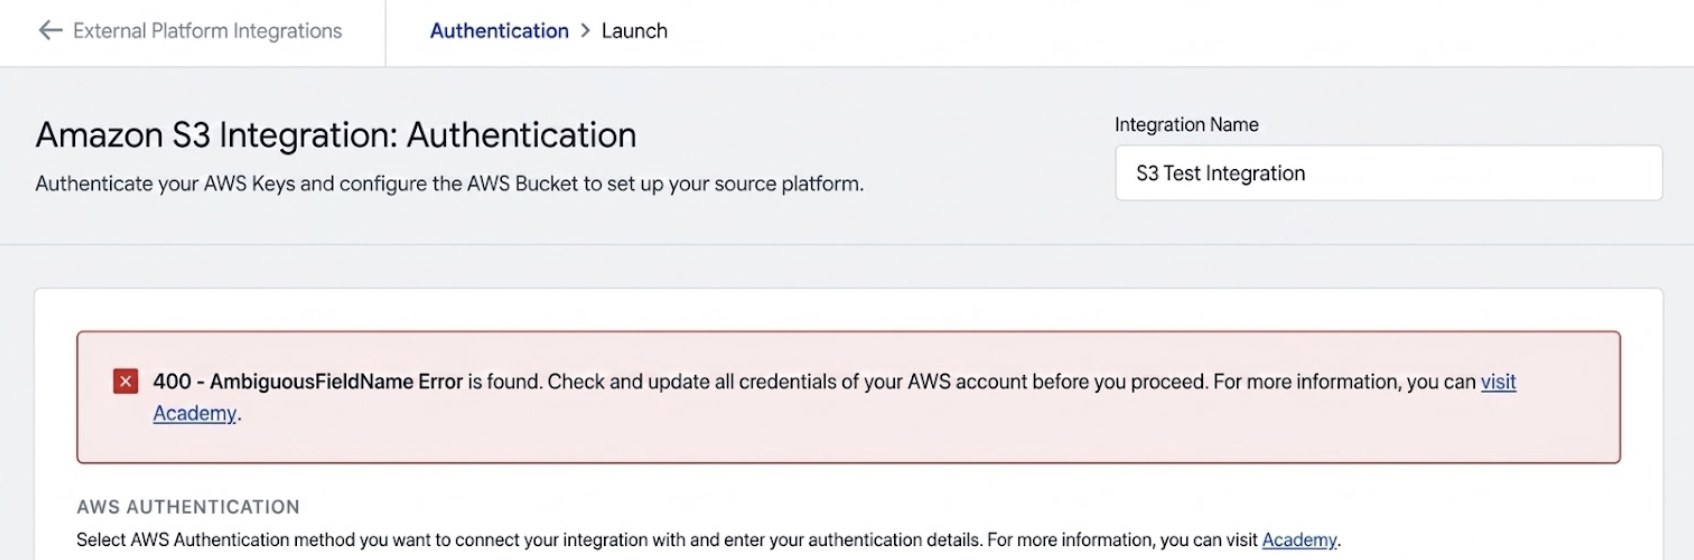
When you click the Verify Authentication button, if Insider One identifies any possible errors for authentication or folder access, it will prompt a message on top of the page with the error message. You can check the Error Responses List for the possible errors by AWS.
If you see no errors on the Authentication page, click Save and Continue.
Insider send a test file in txt format to S3 bucket during authentication process.
Step 4: Upload Mapping File (Optional)
Upload your mapping file.
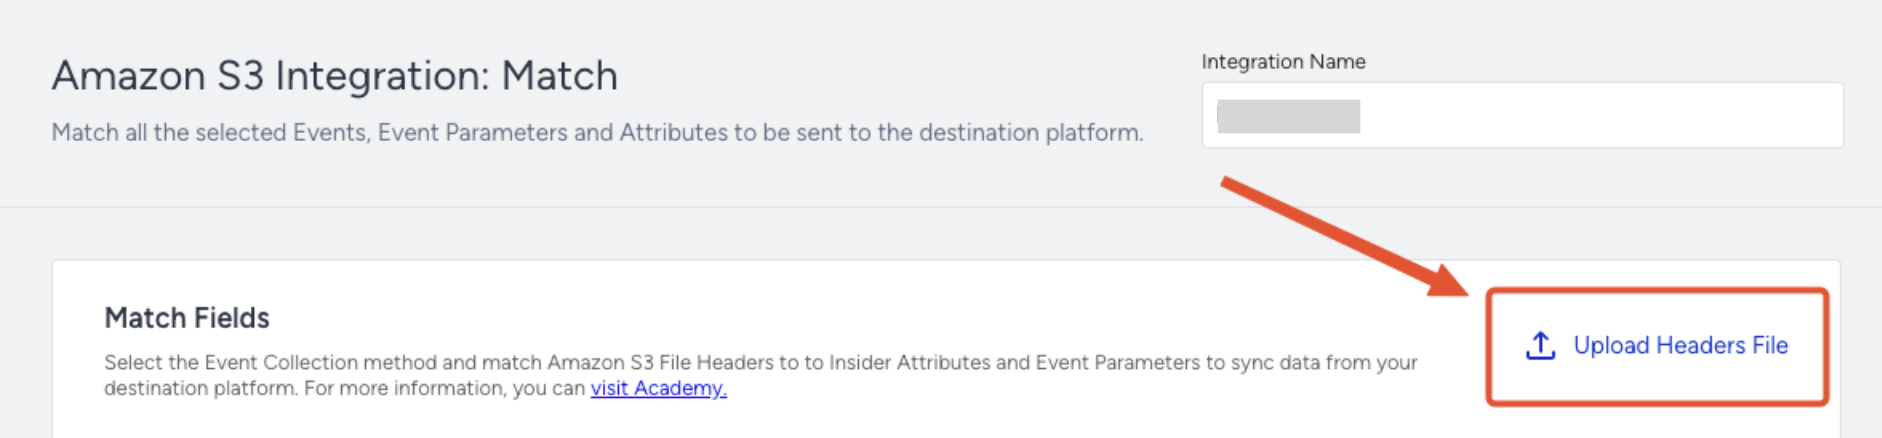
Once you upload your mapping file, all match fields will be filled automatically if the data matches; otherwise, you can easily select the headers from your file to be mapped to Insider One attributes and event parameters.
- File should contain the headers that will be synced to Insider One from your S3 bucket.
- Insider One will only read the first row of the file.
To learn how to fill in the required fields, you can refer to the video below:
Step 5: Match your Data with your S3 Bucket Files
In the Events Collection field, select the appropriate Event Collection method:
Collect from File Column: This method allows you to map a column to an event name in Insider One.
i. Select the column where your event name is mapped. If uploaded, you can select from the dropdown; otherwise, you can enter it directly in the input field. Select column values will act as event names when ingesting data to Insider One.
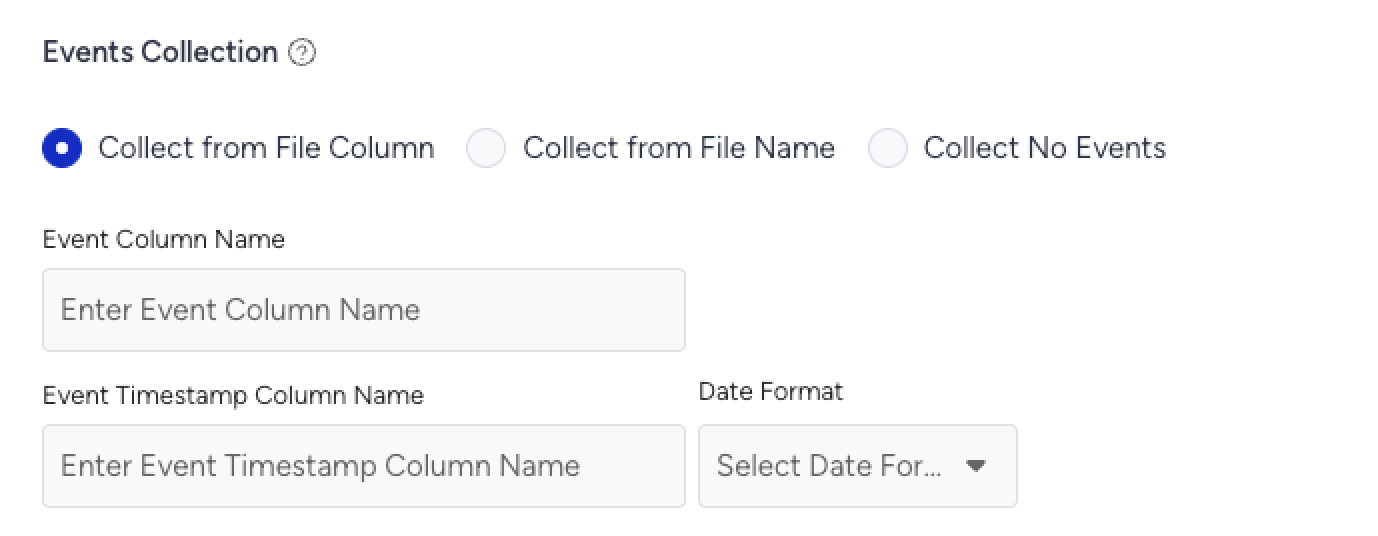
ii. Select the timestamp and timestamp format to ensure the event is synced. Each event should have its timestamp.
Timestamp in your file can have a date in any of the following formats:
- Unix Timestamp
- ISO 8601
- RFC2822
- RFC3339
b. Collect from File Name: This method maps the entire file to a single event name in Insider One.
i. Enter the file prefix, so Insider One can detect the file in your S3 bucket (via SQS) and map it as a single event in Insider One.
Example: File Name:
purchase_event_1756814468Prefix:purchase_event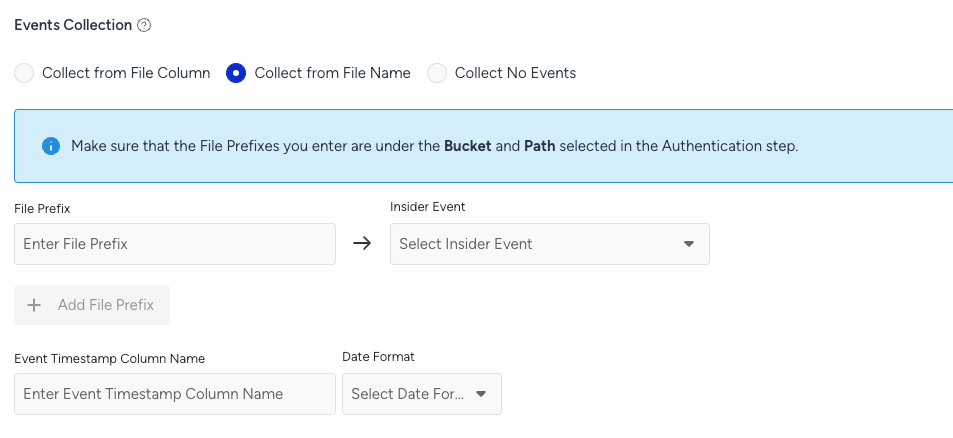
Each file must have a unique name. If file names are not unique, Insider One will reject duplicates.
File names and prefixes are case-sensitive. Make sure the prefix matches the file name exactly.
ii. Select the timestamp and timestamp format for the event to be synced. Each event should have its own timestamp.
Timestamp in your file can have a date in any of the following formats
1. Unix Timestamp
2. ISO 8601
3. RFC2822
4. RFC3339
If you send events with the same name and timestamp, Insider One treats them as duplicates and ignores them. Therefore, avoid sending different events with identical names and timestamps.
c. Collect No Events: When this option is selected, Insider One will not collect any event data from your S3 Bucket.
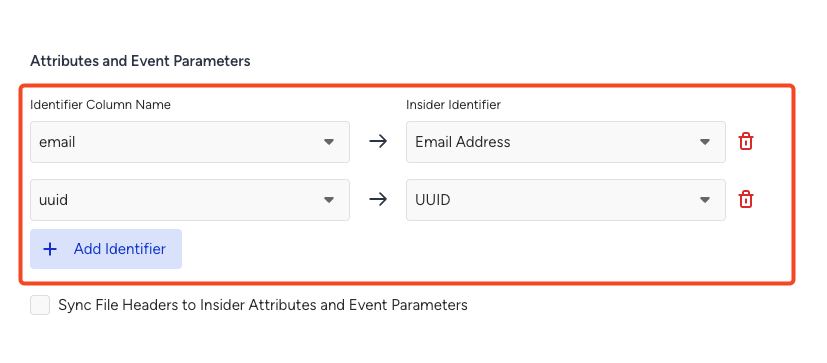
Insider One identifies and unifies incoming user records according to the identifiers, priority order, and value limits configured in Identity Resolution Management. Review these settings before your first import to understand how imported records will be matched and unified.
In the Identifier Mapping field, you can map your identifier in your S3 bucket to one of Insider One's identifiers.
You have to map at least one identifier.
Identifiers selected during identity resolution can’t be selected as attributes; ensure you select them here if you want to sync any identifier.
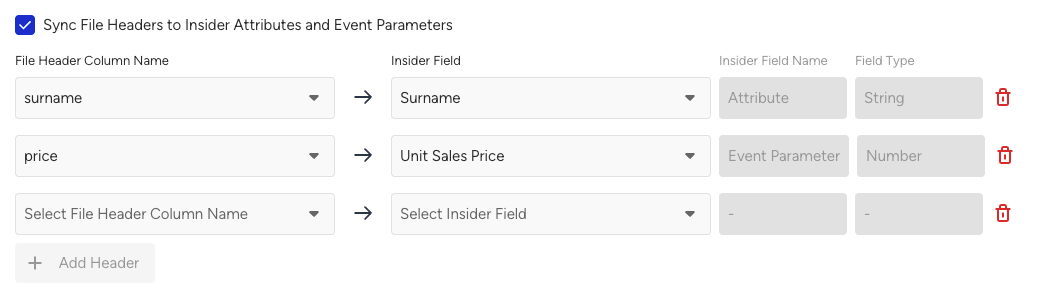
In the Attribute and Event Parameters Mapping, you must map your attribute and event parameters either manually or using the data uploaded as a file. Here, you can easily map any of the columns in your CSV or JSON file to an Insider One attribute or event parameter to be inserted. If you have uploaded a file, all the columns will be listed here; if not, you can manually insert your column names to be mapped to Insider One fields.
After following these steps, you can securely grant Insider One access to your S3 bucket via an IAM User, allowing Insider One to pull data directly from your specified S3 bucket and path. If you have any questions, please contact the Insider One team for support and assistance.
File Format
Files can be in .csv, .jsonl , csv.gz or jsonl.gz formats.
Each file must contain at least one identifier.
Each file must include at least one event or attribute; otherwise, the data will not be processed.
Each file must be comma-delimited.
Default Attribute, Event & Parameter Data Mapping table
Parameter | Type | Description | Data Type | Required |
|---|---|---|---|---|
Attribute | Attribute. The user's email address can be used as an identifier. | String | No | |
phone_number | Attribute | Attribute. User's phone number in E.164 format (e.g. +6598765432), can be used as an identifier. | String | No |
email_optin | Attribute | "Attribute. User's permission for marketing emails: True = emails allowed; False = email not allowed" | Boolean | No |
gdpr_optin | Attribute | "Attribute. User's permission for Insider One campaigns, data collection, and processing: False = user will not see any Insider One campaign or receive any message from any channel; True or empty = Insider One may interact with the user through personalization campaigns." | Boolean | No |
sms_optin | Attribute | "Attribute. User's permission for SMS: True = SMS allowed; False = SMS not allowed" | Boolean | No |
whatsapp_optin | Attribute | "Attribute. User's permission for WhatsApp Message: True = WhatsApp Message allowed False = WhatsApp Message not allowed" | Boolean | No |
name | Attribute | Attribute. User's name. | String | No |
surname | Attribute | Attribute. User's surname. | String | No |
birthday | Attribute | "Attribute. User's birthday in RFC 3339 format (e.g., 1993-03-12T00:00:00Z). Note: Ensure the birthday ends with Z to indicate UTC time; no other time offset is included." | Date/Time | No |
gender | Attribute | Attribute. Gender of the user | String | No |
age | Attribute | Attribute. Age of the user | Number | No |
language | Attribute | Language information of the user | String | No |
country | Attribute | Attribute. The user's country information in ISO 3166-1 alpha-2 format. | String | No |
city | Attribute | Attribute. City information of the user. | String | No |
uuid | Attribute | Attribute. The user’s UUID can be used as an identifier. | String | No |
event_name | Event | Name of the event | String | Yes |
timestamp | Event Parameter | Event. Event time, the purchase date for the purchase event in RFC3339 format. | Datetime | Yes |
event_group_id | Event Parameter | Event group ID | String | No (Yes, only when the event_name is purchase or cart_page_view) |
product_id | Event Parameter | Event parameter. Unique product ID. | String | No |
name | Event Parameter | Event parameter. Name of the product. | String | No |
taxonomy | Event Parameter | Event parameter. Category tree of the product. | Array | No |
currency | Event Parameter | Event parameter. Currency used for product pricing, in ISO 4217 format (e.g., USD). | String | No (Yes, only when the event_name is purchase or cart_page_view) |
quantity | Event Parameter | Event parameter. Quantity of the product. | Integer | No (Yes, only when the event_name is purchase) |
unit_price | Event Parameter | Event parameter. Price of the product without any discount(s). | Float | No |
unit_sale_price | Event Parameter | Event parameter. Unit price of the product. | Float | No (Yes, only when the event_name is purchase or cart_page_view) |
color | Event Parameter | Event parameter. Color of the product (selected by user). | String | No |
size | Event Parameter | Event parameter. Size of the product (selected by user). | String | No |
shipping_cost | Event Parameter | Event parameter. Shipping cost of the items in the basket. | String | No |
promotion_name | Event Parameter | Event parameter. Name of the promotion. | String | No |
promotion_discount | Event Parameter | Event parameter. The total amount of discount applied by promotions. | Float | No |
For all default events and attributes, refer to Events & Attributes.
If you have purchase event in your S3 file, please make sure to;
If in a basket, there are more than single item, make sure to add those as seperated rows into your S3 file.
Include e_guid(event_group_id) parameter for each purchase event. This is needed to connect different products to single cart.
Use the RFC3339 time format, except when sending time via event timestamp.
Accepted boolean values:
true / TRUE / True → will be written as true
false / FALSE / False → will be written as false
1 → will be written as true
0 → will be written as false
Example File Formats
JSONL example file
CSV example file
Limitations
Only
.csv,.jsonl,csv.gz,jsonl.gz,csv.asc,jsonl.asc,csv.gpg,jsonl.gpg,csv.pgpandjsonl.pgpfile formats are supported; other file formats are not supported.5 GB file size limit: If a file exceeds 5 GB, the entire file will be skipped.
Only one bucket per integration: Each integration can be linked to only one S3 bucket.
Maximum of 1 path per bucket: You can specify one path per integration.
All JSONL lines must be valid: Every line in a JSONL file must be properly formatted; otherwise, the file will be skipped.
An identifier must be included in the file. Otherwise, the file will not be processed.
Any custom attribute or event parameter must be created on Insider One’s Attributes and Events page first; otherwise, the data will not be ingested.
File names must be unique. If a file with the same name has already been processed within the last 30 days, it will be skipped (e.g., a repeated purchase_timestamp.csv file will not be ingested again).
The maximum number of files that can be ingested per day is 25.
The maximum total file size per day is the combined size of all files and must not exceed 20 GB.
Each row (user) must be under 5 MB; rows exceeding this limit will not be upserted.
Data Import Logic
During the Amazon S3 → Insider synchronization:
If any identifier coming from Amazon S3 is invalid, the entire record is not sent.
If an attribute coming from Amazon S3 is invalid, only that specific attribute is skipped.
If an event parameter coming from Amazon S3 is invalid, the entire event is excluded from processing.
Important: Event Deduplication & Re-Ingestion Behavior
Duplicate Detection Rule: Insider One treats events with the same event name and timestamp as duplicates.
If multiple events with identical names and timestamps are sent within the same sync, only one will be processed and the others will be ignored.Avoid Updating Previously Synced Events: Do not update rows that were already consumed by Insider One in a previous sync.
Updating these rows triggers re-ingestion, which may create duplicate events in Insider.
Recommendation: Ensure each event has a unique timestamp (when applicable) and avoid modifying historical event records after they have been successfully synced.
You can track every sync on the integration's Monitoring screen. Each run displays its status, success rate, and any errors found. For the full list of import errors, their meanings, and how to resolve them, see the Error Guide.
Troubleshooting
What should I do if I get the error “400 - CouldNotReachTheSqsQueue error was found. Check and update your Amazon S3 authentication to continue.”?
You must ensure that:
The notification between the S3 bucket and the SQS is configured correctly.
The SQS they provided to Insider One is not being used elsewhere. If it is used elsewhere, the notification could also be consumed there, preventing proper verification.
What should I do if I get the error “403 Forbidden - AccessDenied Error is found. Check and update all credentials of your AWS account before you proceed."?
This error means AWS returned an HTTP 403 when Insider One tried to verify your credentials. The IAM user associated with the Access Key ID and Secret Access Key you entered does not have the permissions Insider One needs on your S3 bucket (or the linked SQS queue, if you are using the source flow).
Make sure the IAM user has the required permissions on your bucket.
Make sure the AWS Region selected in the integration exactly matches the region where your S3 bucket lives. A region mismatch is returned by AWS as the same 403 error.
If the credentials were rotated, deactivated, or deleted since you set up the integration, generate a new Access Key ID and Secret Access Key in AWS IAM and update them in the Auth step of the integration.
Check that there is no explicit Deny on the IAM user, the bucket policy, or any Service Control Policy (SCP) applied to your AWS account. An explicit Deny or an SCP rule at the organization level will override an Allow and is not always visible in the user's own policy.
FAQ
Q: What happens if there are existing messages in the queue before launching the integration?
A: If the integration is paused, messages in the SQS queue will still be collected. Once resumed, files will be processed, but delays might cause:
Campaign delays – Real-time updates will be delayed, reducing engagement.
Missed opportunities – New leads and user actions won’t be processed.
Outdated data – Segmentation and personalization might become less effective.
Inaccurate metrics – Reports might not reflect real-time user behavior.
To minimize impact, reactivate the integration promptly to ensure all accumulated data is processed.
Q: Can I use the same S3 bucket for multiple integrations?
A: No, each integration can only be linked to a single S3 bucket.
Q: Does the integration support delta updates or only full data loads?
A: The integration supports full data loads but does not automatically handle incremental or delta updates. Each update must be provided in a new file and pushed to the SQS queue.
Q: Can I use a file format other than JSON or CSV?
A: No, only JSON and CSV formats are supported. Any other format will be ignored.
Q: Does the integration support GZIP?
A: Yes, it supports JSON and CSV gzip formats. Make sure that your file type is csv.gz and jsonl.gz.
Q: How does Insider One handle file parsing errors?
A: If the file contains errors (e.g., invalid JSON or improperly structured CSV), the entire file will be skipped.
Q: How long do I need to keep my files in the S3 bucket?
A: Although Insider One will process your files in near real-time, we highly recommend keeping your files in the bucket for at least 12 hours to ensure Insider One can completely read and sync the data.
Q: What happens if Insider One cannot authenticate with my S3 bucket?
A: If authentication fails, an error message will appear on the authentication page detailing the issue (e.g., incorrect IAM permissions, invalid credentials, or inaccessible paths). You can refer to the AWS article for possible errors.
Q: Do I need an UPDATED_AT column like in data warehouse integrations?
A: No, this integration does not require or support the UPDATED_AT column. New files are processed based on S3 event notifications rather than an update timestamp.
Q: Is it mandatory to include an identifier in the file?
A: Yes, an identifier must be included. However, if the file contains only an identifier without an event or attribute, the data will not be processed.
Q: What happens if a custom attribute or event parameter is not created in Insider One?
A: If a custom attribute or event parameter does not exist in Insider One, the data will not be ingested. You must create the attribute or event parameter on Insider One’s Attributes and Events page before sending data.
Q: Does the integration support user deletion events?
A: No, user deletion events are not currently supported.
Q: How does Insider One handle data ingestion errors?
A: When importing data from Amazon S3, the system applies specific error-handling rules to ensure valid data is still processed whenever possible:
Attribute errors: If an attribute is sent in the wrong data type and triggers an error, only that attribute is rejected. The rest of the data in the same row is successfully ingested.
Event parameter errors: If an event parameter has the wrong data type and causes an error, the entire event is rejected. None of the event’s data will be imported.
Date-time values: When attributes or event parameters include date-time inputs, only RFC 3339-formatted values are accepted (for example, 2025-11-11T14:30:00Z).
Any other date-time format will be rejected.
Q: Does Insider One support multiple buckets to be connected?
A: Yes, you can connect up to 5 different buckets to sync your data to Insider One. The limit can be adjusted according to your use case.