You cannot make any changes to External Platform Integrations without having either an Administrator or an Editor with PII access in InOne. Refer to User Roles for further information.
This guide explains how to set up the Microsoft Dynamics CRM integration in InOne. Once configured, InOne regularly pulls records from your Dynamics 365 environment and syncs them as user profiles, attributes, and behavioral events in Insider One.
The integration supports two use cases and two authentication methods, resulting in four configuration options. The table below helps you choose the right setup.
Use Case | OAuth Authorization Code | OAuth Client Credentials |
|---|---|---|
Sync Dynamic Lists: | Syncs Marketing List members using user-based authentication. | Syncs Marketing List members using server-to-server authentication. |
Sync User and Lead Profiles: | Syncs any CRM entity using user-based authentication. | Syncs any CRM entity using server-to-server authentication. |
Requirements
Before you start the setup, make sure you have the following information ready. This will help you complete the configuration without interruptions.
Information | Notes |
|---|---|
Dynamics 365 Web API URL | Format: |
Azure AD App Client ID | Navigate to Azure Portal > App Registrations > your app > Overview. |
Azure AD App Client Secret | Navigate to Azure Portal > App Registrations > your app > Certificates and Secrets. |
Token URL (Client Credentials only) | The OAuth 2.0 token endpoint for your Azure AD tenant. |
Scopes (Client Credentials only) | Typically: |
Marketing List name (Dynamic Lists only) | The Dynamics Marketing List you want to sync. |
You also need admin or appropriate permissions to access the InOne panel, and a Microsoft Dynamics 365 instance with an active Web API endpoint.
Step 1: Create a new integration
Navigate to InOne > Components > Integrations > External Integrations.
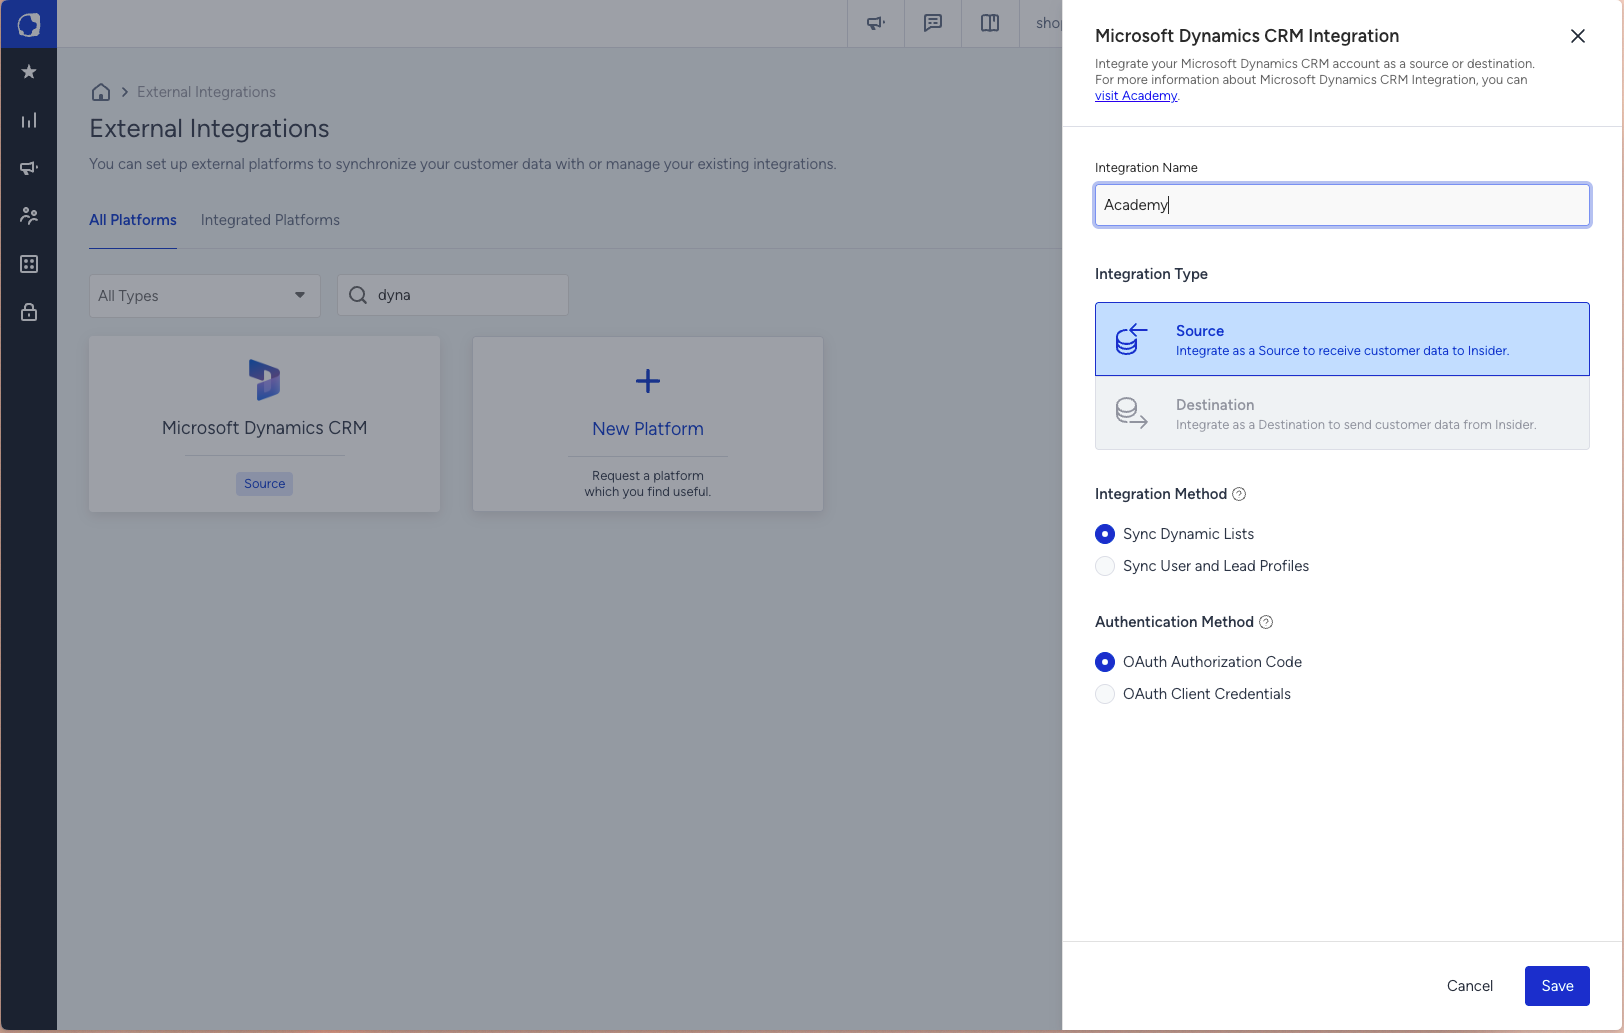
Search for "dynamic" and click the Microsoft Dynamics CRM tile.
A setup panel opens on the right. Fill in the following fields:
Field | Description |
|---|---|
Integration Method | Sync Dynamic Lists: Syncs contacts from a Dynamics Marketing List into Insider One user profiles. Sync User and Lead Profiles: syncs any CRM entity using configurable field mappings and incremental fetch modes. |
Authentication Method | OAuth Authorization Code: Opens a browser login prompt to authorize access. Requires user interaction once during setup. OAuth Client Credentials: Uses server-to-server authentication with no browser pop-up. |
Click Save to proceed.
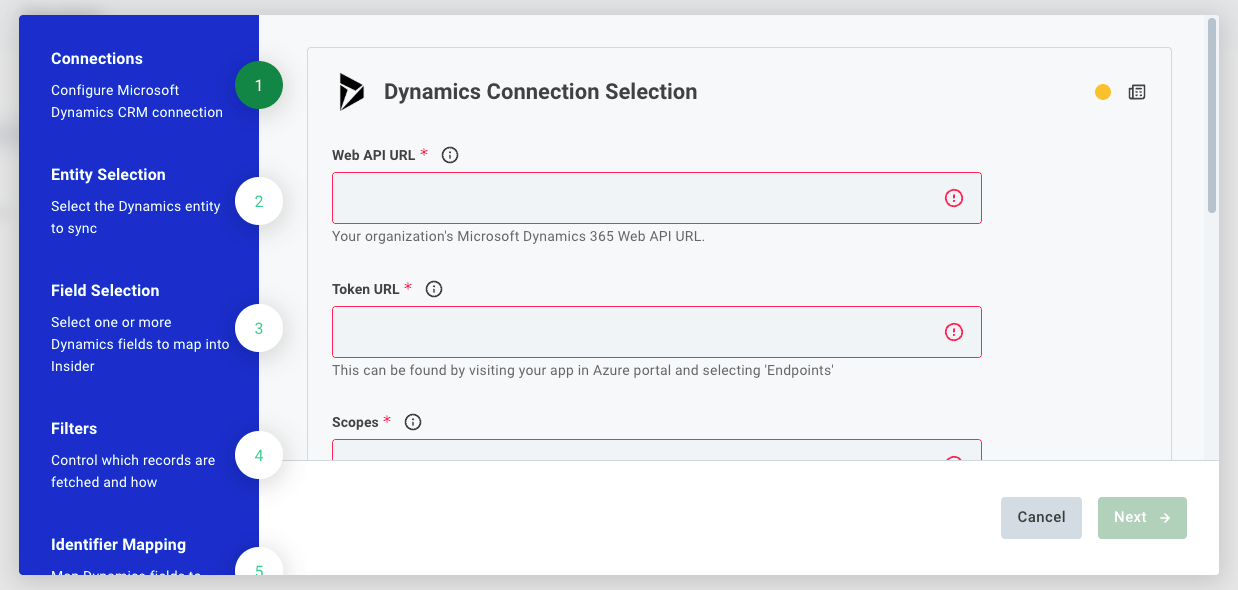
Step 2: Connect your Dynamics Account
Fill in the connection form based on the Authentication Method you selected in Step 1. Both methods use an Azure AD App Registration.
OAuth Authorization Code
Field | Description |
|---|---|
Web API URL | Base URL of your Dynamics 365 Web API. Format: |
Scopes | Replace the URL with your base domain: |
Click Connect. A browser pop-up opens asking you to sign in with your Microsoft account. After completing the login, close the pop-up tab. The status indicator in the top-right corner of the panel turns green to confirm the connection succeeded.
The user authenticating must have access to consent to the following permissions in Microsoft Entra:
Delegated Dynamic CRM
user_impersonation
offline_access
OAuth Client Credentials
Field | Description |
|---|---|
Web API URL | Base URL of your Dynamics 365 Web API. Format: |
Token URL | The OAuth 2.0 token endpoint for your Azure AD tenant. Format: |
Scopes | The permission scopes required to access Dynamics. Typically: |
Client ID | The Application (Client) ID from your Azure AD App Registration. |
Client Secret | The client secret generated under Certificates and Secrets. |
Click Connect. No browser pop-up appears; the connection is established server-to-server. The status indicator turns green to confirm success.
Click Next to proceed.
Step 3: Select your data source
This step differs based on the Integration Method chosen in Step 1.
Dynamic Lists
Select the Marketing List from the Selected Dynamic List dropdown. InOne will fetch all contacts that are members of this list on each sync run.
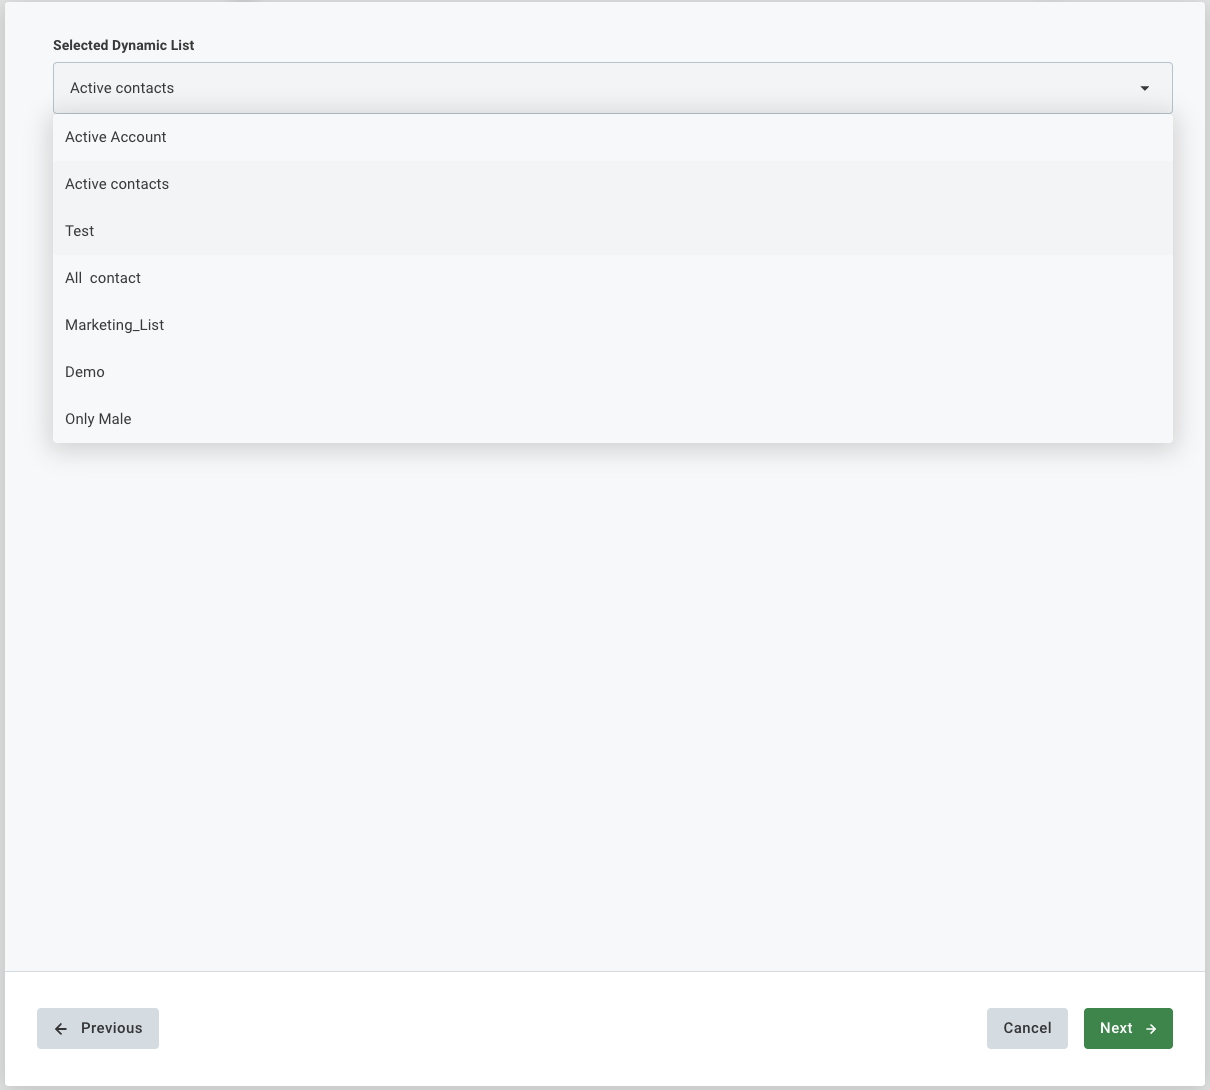
If your list does not appear in the dropdown, confirm the Azure app has read permissions for Marketing Lists in Dynamics.
You can only sync one list per integration instance. To sync multiple lists, create separate integrations.
Sync User and Lead Profiles
Field | Description |
|---|---|
Selected Entity | Choose which Dynamics entity to sync (e.g., contact, lead, or a custom entity). The dropdown is populated dynamically from your Dynamics environment. |
Fetch Mode | Controls which records are retrieved on each run:
|
Days To Get | Lookback window in days. Applies only to "Always Fetch All Records" mode. When greater than 0, only records modified within the last N days are fetched. Leave at 0 to fetch all records regardless of modification date. |
Click Next when done.
Step 4: Select fields to sync
Choose which Dynamics fields to retrieve. Only fields added here will be available in subsequent mapping steps.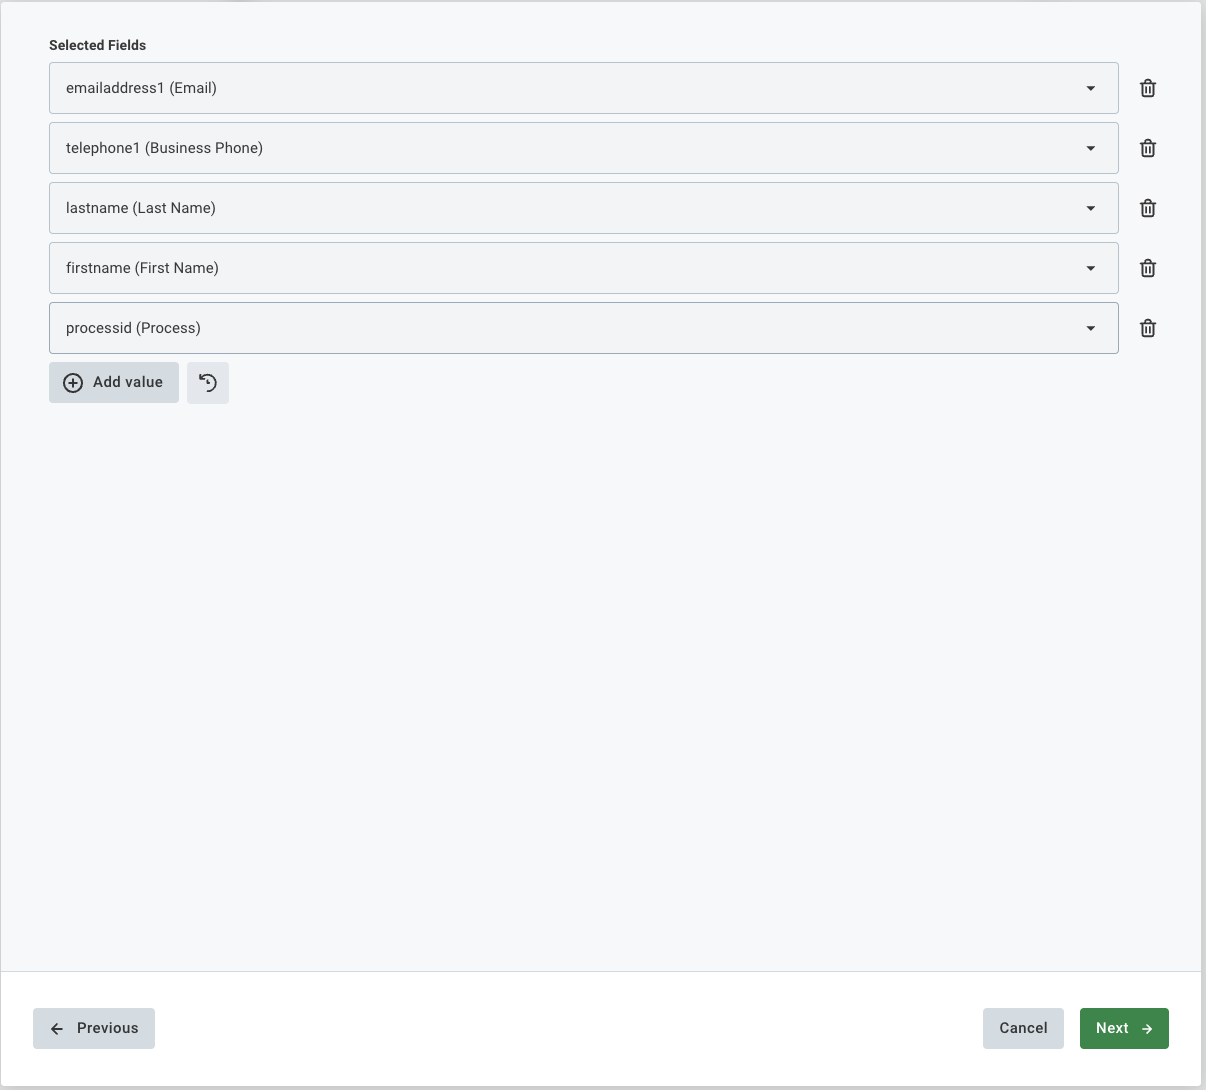
Click Add value to open the field selector dropdown.
Select the Dynamics fields you need. Add as many as required.
Click the trash icon to remove a field; click the reset icon to restore defaults.
Always include at least one identifier field such as
emailaddress1ortelephone1. Without an identifier, Insider One cannot match incoming records to existing user profiles.
Common fields to include:
Field | Description |
|---|---|
| Primary email address. Required for email-based identification. |
| Business phone number. |
| Contact name fields. |
| Unique GUID for the contact. Use as a UUID identifier. |
Click Next when done.
Step 5: Apply Record Filters (Optional)
Filter which records are fetched using FetchXML, Microsoft's XML-based query language for Dynamics 365. Leave the field as _none_ to sync all records without filtering.
Record Filters: A FetchXML filter snippet. Set to _none_ to disable filtering and sync all records.
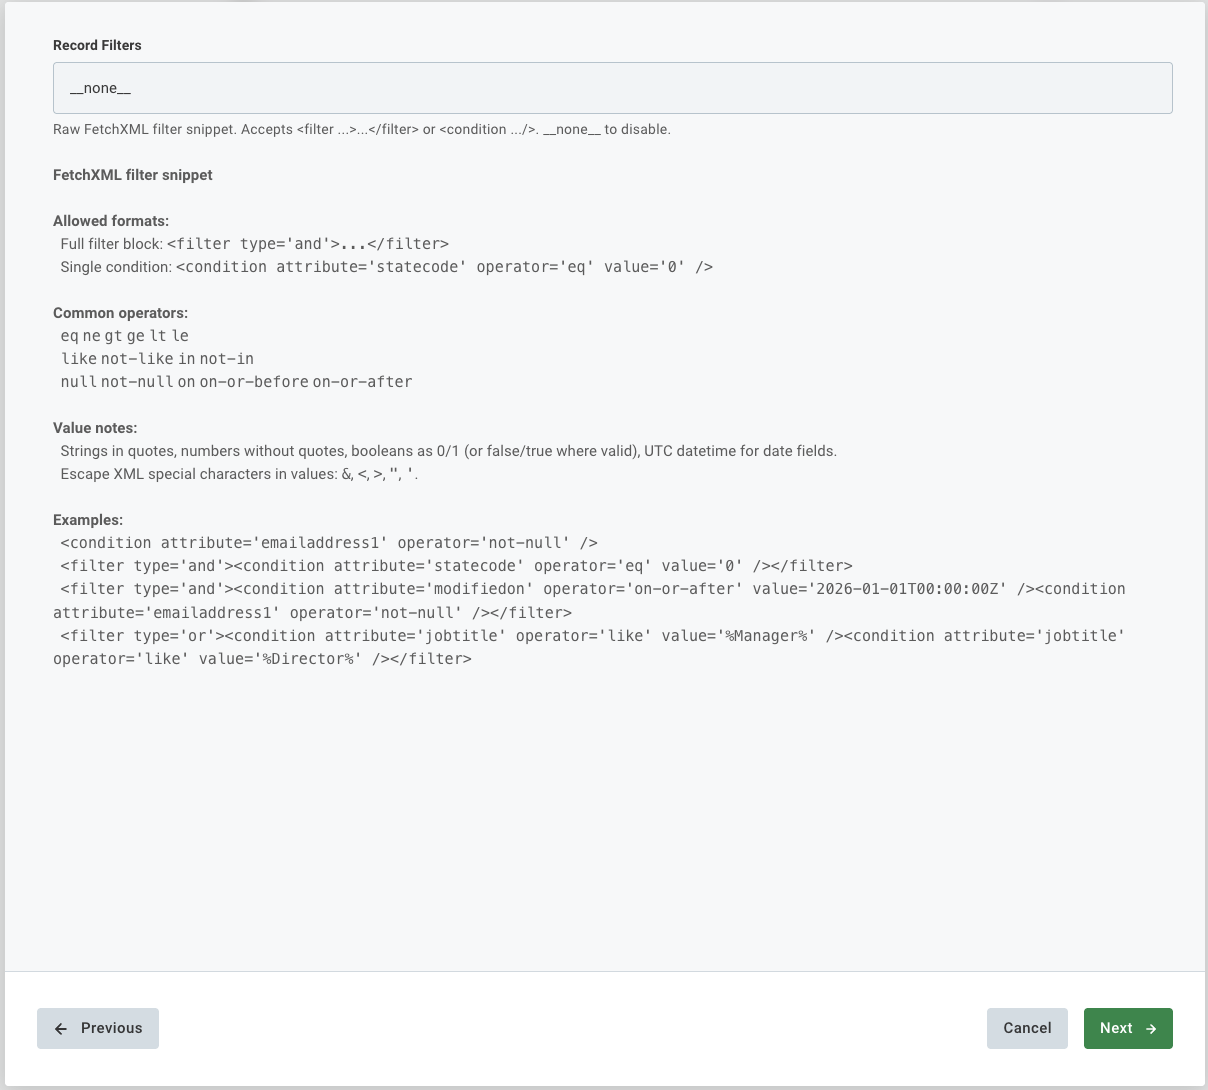
Accepted Formats
Full filter block:
<filter type='and'>...</filter>Single condition:
<condition attribute='statecode' operator='eq' value='0' />
Common Operators
Operator | Description |
|---|---|
| Equal / Not equal |
| Greater than / Greater or equal / Less than / Less or equal |
| Pattern matching (use |
| Value is in / not in a list |
| Field is empty / not empty |
| Date comparisons |
Value Formatting Rules
Strings must be enclosed in single quotes.
Numbers should not have quotes.
Boolean values: use
0for false,1for true (orfalse/truewhere valid).Date values must be in UTC format:
2026-01-01T00:00:00Z.Escape XML special characters in values:
&→&|<→<|>→>|'→'|"→"
Examples
Sync only contacts with a non-null email:
<condition attribute='emailaddress1' operator='not-null' />Sync only active contacts (statecode = 0):
<filter type='and'>
  <condition attribute='statecode' operator='eq' value='0' />
</filter>
Contacts modified since 2026-01-01 who also have an email:
<filter type='and'>
  <condition attribute='modifiedon' operator='on-or-after' value='2026-01-01T00:00:00Z' />
  <condition attribute='emailaddress1' operator='not-null' />
</filter>
Validate your FetchXML in the Dynamics Advanced Find tool before pasting it here. Escape XML special characters in values:
&→&,<→<,>→>,'→'.
Once you have entered your filter (or left it as _none_), click Next.
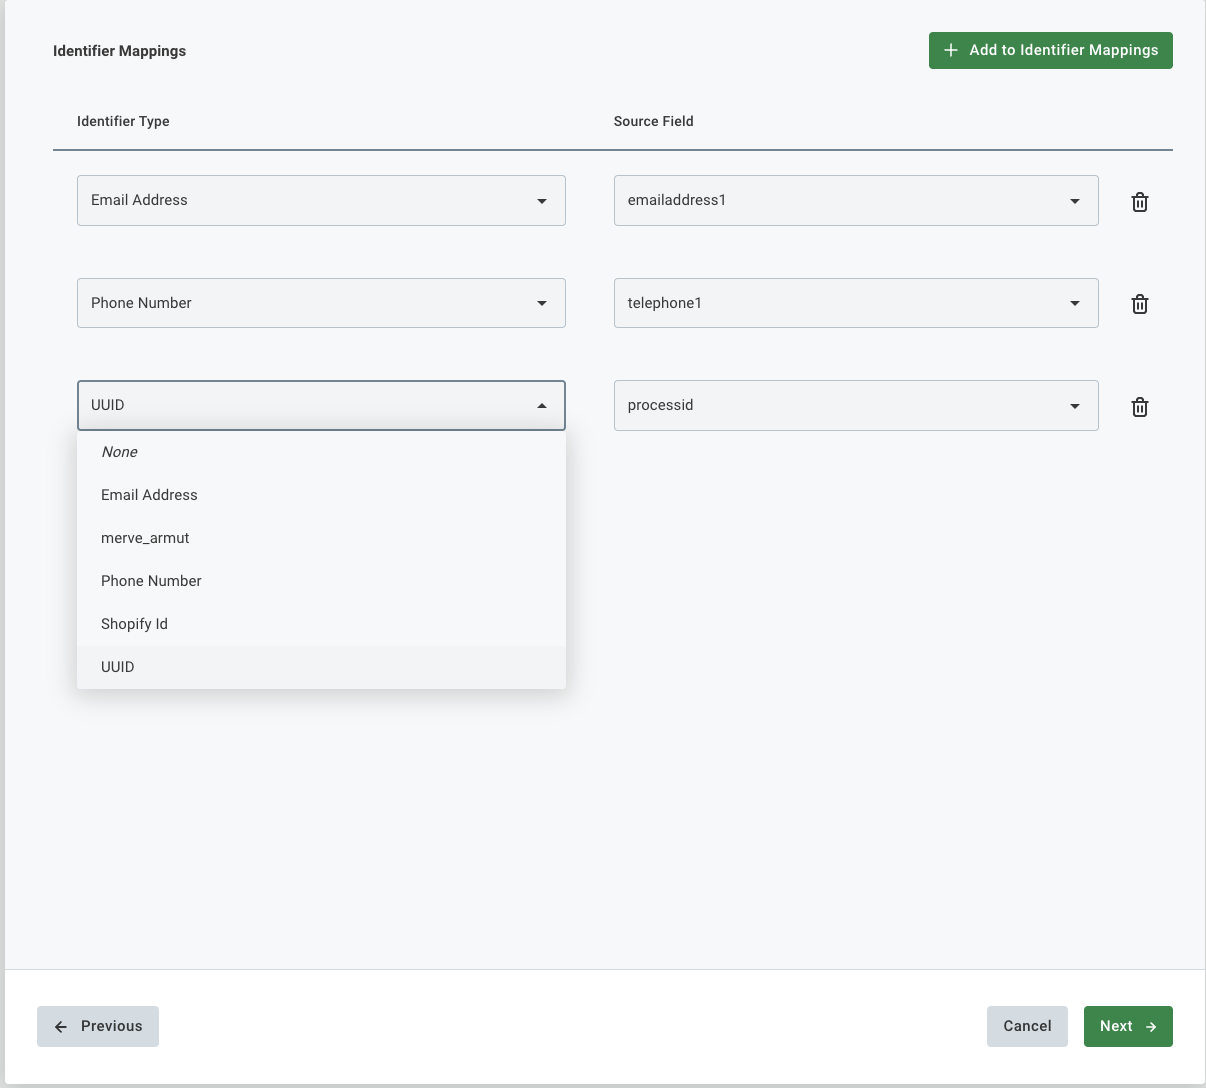
Step 6: Configure Identifier Mappings
Identifiers tell Insider One how to match incoming Dynamics records to existing user profiles. At least one is required.
How identifiers work: When a record arrives from Dynamics, Insider One looks up existing user profiles using the mapped identifier values. If a match is found, the profile is updated. If no match is found, a new profile is created.
Field | Description |
|---|---|
Identifier Type | The Insider One identifier type to map to. Options include Email Address, Phone Number, UUID, and any custom identifiers configured for your account. |
Source Field | The Dynamics field whose value will be used for this identifier. Must be one of the fields selected in Step 4. |
Common mappings: Email Address → emailaddress1, Phone Number → telephone1, UUID → contactid.
You can add multiple identifier types. Insider One will attempt to match on all of them, improving deduplication across data sources.
Make sure to select your identifier field in Step 4 in order it to be shown here, otherwise, problems might occur when syncing your identifier and data.
Click + Add to Identifier Mappings to add rows. Click Next when done.
Step 7: Configure Field Mappings (User Attributes)
Map Dynamics fields to Insider One user profile attributes.
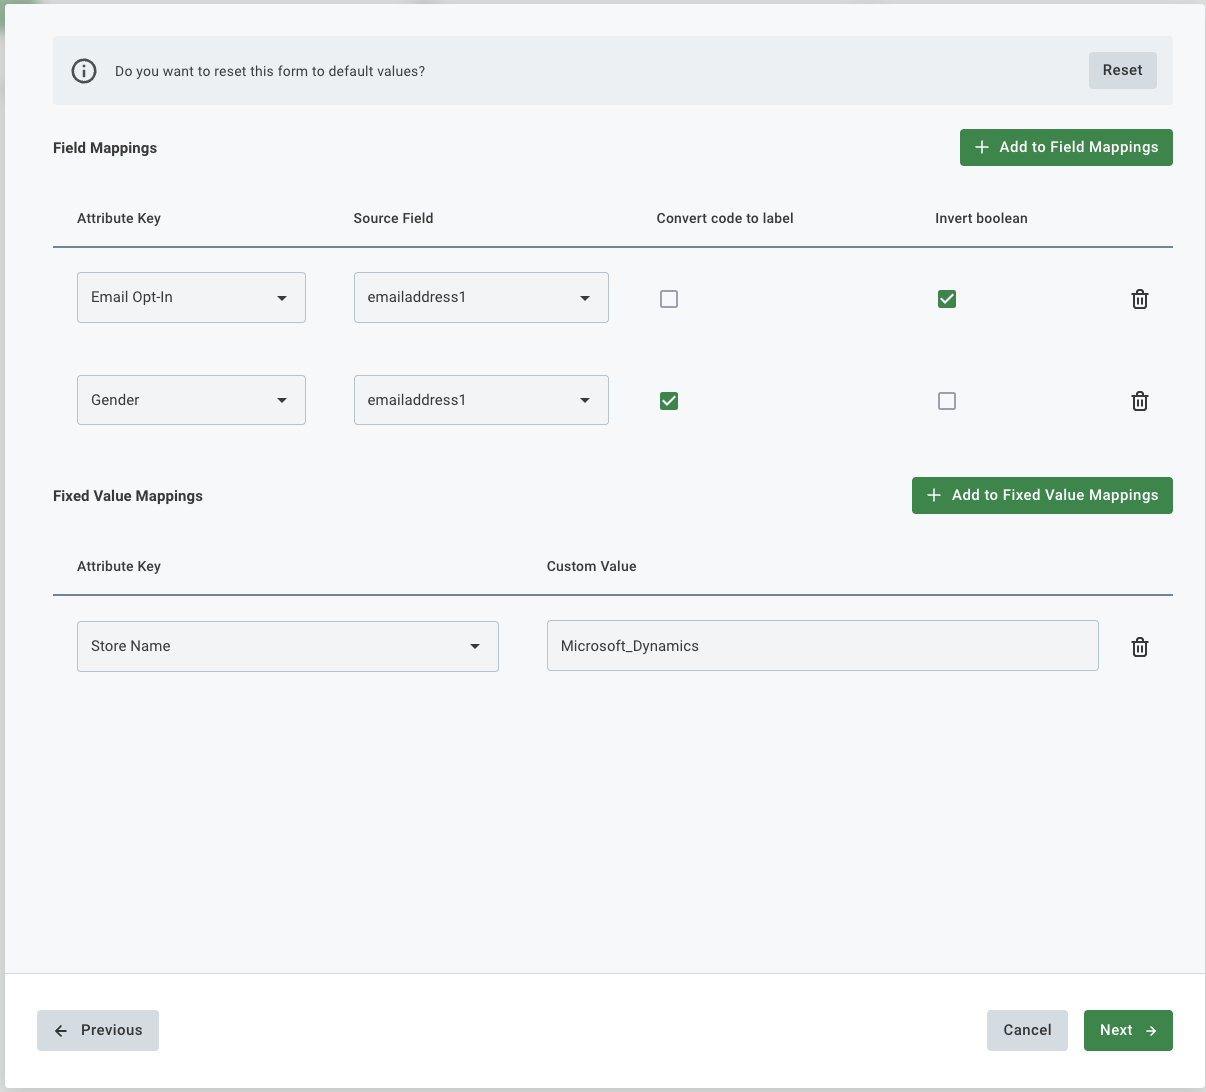
Field Mappings
Each row maps a Dynamics source field to an Insider One attribute.
Field | Description |
|---|---|
Attribute Key | The Insider One user attribute to populate (e.g., Email Opt-In, Gender, First Name, Last Name). Choose from the dropdown showing all standard and custom attributes for your account. |
Source Field | The Dynamics field providing the value. Must be a field selected in Step 4. |
Convert code to label | When enabled, numeric option set codes from Dynamics are converted to their human-readable label. For example, a gender field that stores |
Invert boolean | When enabled, the boolean value is flipped before sending to Insider One. Useful for mapping opt-out fields from Dynamics (e.g., |
Example Mappings
Field | Description |
|---|---|
Email Opt-In ← emailaddress1 | With Invert boolean enabled: maps the opt-out field from Dynamics and inverts it to get the opt-in value for Insider One. |
Gender ← emailaddress1 | With Convert code to label enabled: the raw option set code from Dynamics is converted to its label (e.g., |
Fixed Value Mappings
Set a constant value for an Insider One attribute on every synced record, regardless of what Dynamics contains. Useful for tagging records by data source.
Field | Description |
|---|---|
Attribute Key | The Insider One attribute to set. |
Custom Value | The static value written for every synced record. For example, setting |
Click Next when done.
Step 8: Configure Event Mappings (Optional)
Send a behavioral event to Insider One for each synced record. Useful when the Dynamics entity represents a transaction or activity such as a purchase or form submission.
This step is optional. To skip it, leave the Map events checkbox unchecked.
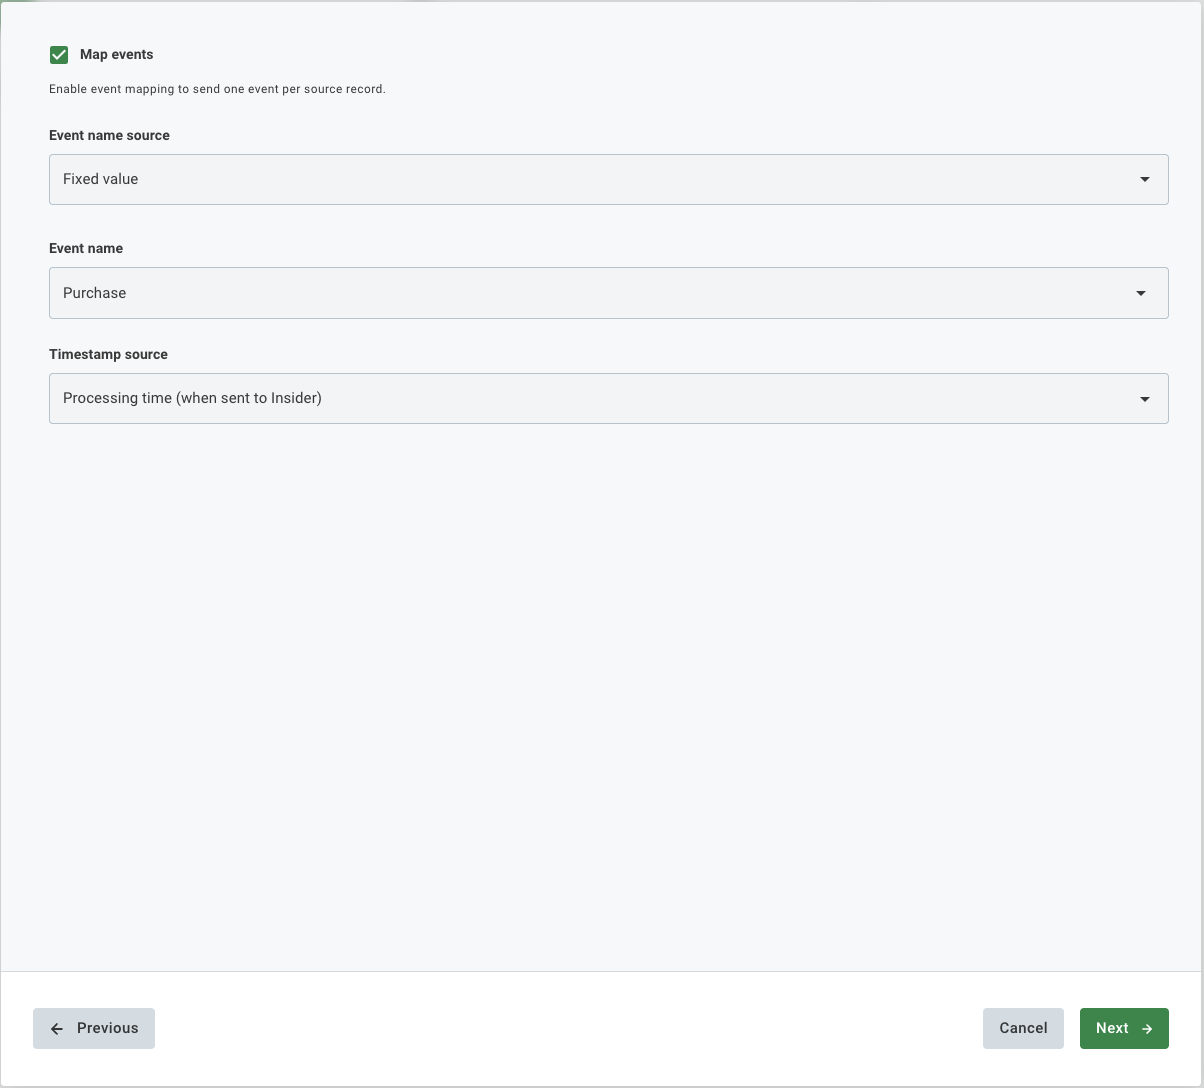
Option A: Fixed Event Name
Use this when every record should trigger the same event type.
Field | Description |
|---|---|
Event name source | Set to "Fixed value". |
Event name | The Insider One event type to fire for every record (e.g., Purchase, Page View). Choose from standard or custom events in your account. |
Timestamp source | "Processing time" uses the sync execution time as the event timestamp. Alternatively, select a Dynamics field to use its value as the timestamp, which is useful for historical imports. |
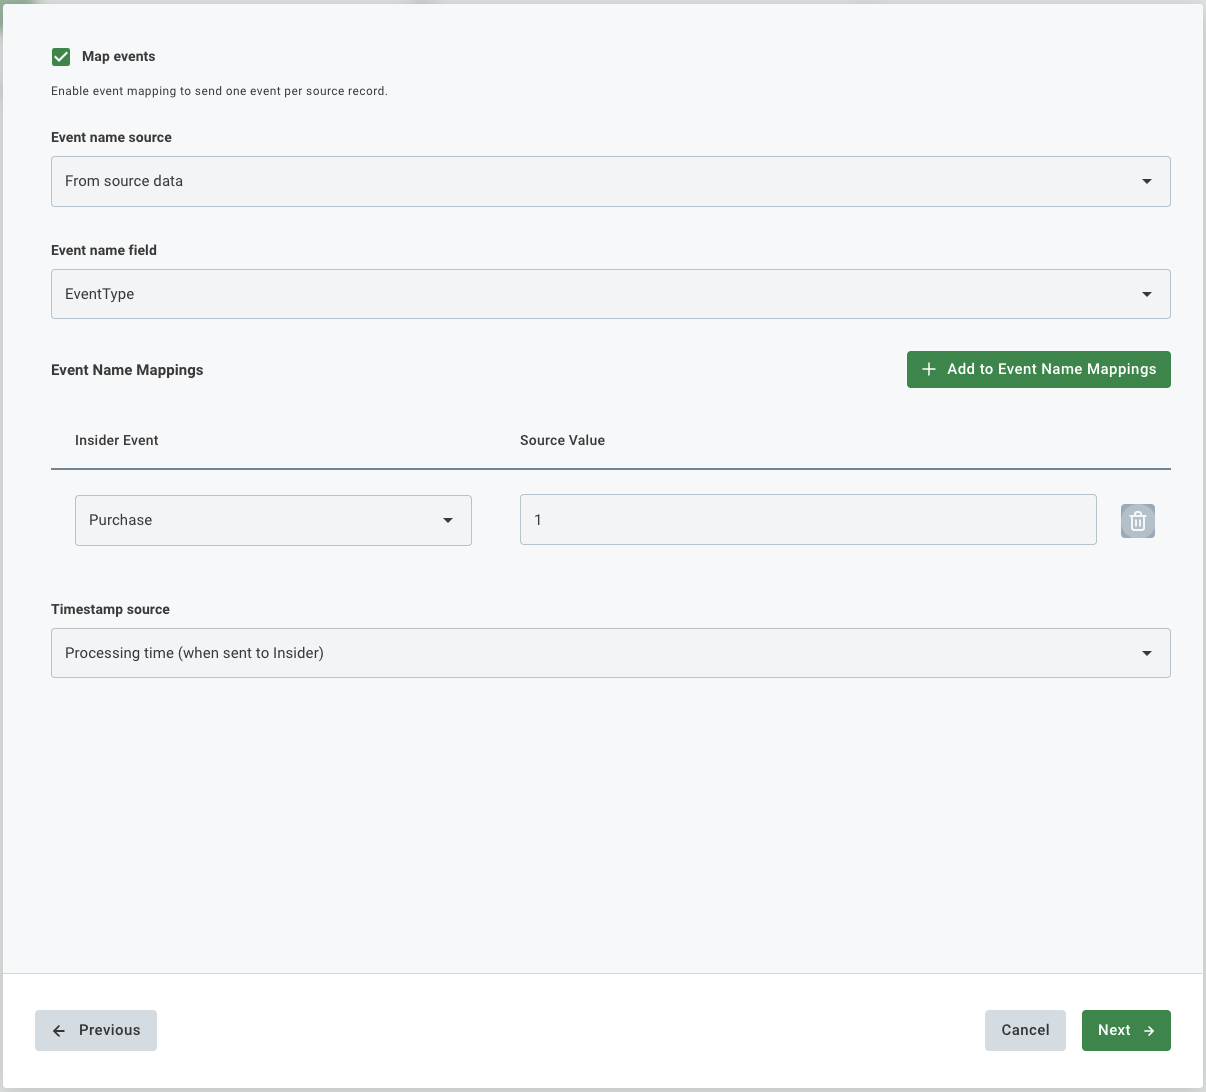
Option B: Dynamic Event Name
Use this when the event type varies per record and is stored in a Dynamics field.
Field | Description |
|---|---|
Event name source | Set to "From source data". |
Event name field | The Dynamics field containing the event type value (e.g., |
Event Name Mappings | A translation table mapping raw Dynamics values to Insider One event types. For example, if |
Timestamp source | "Processing time" uses the sync execution time as the event timestamp. Alternatively, select a Dynamics field to use its value as the timestamp, which is useful for historical imports. |
Event Field Mappings
Define what data is sent with each event, using the same pattern as Step 7.
Field | Description |
|---|---|
Parameter | The Insider One event parameter to populate (e.g., Purchase, Product ID). |
Source Field | The Dynamics field providing the value. |
Fixed Value Mappings are also available here for static event parameters that apply to every event, regardless of the source data.
Click Finish when done.
Step 9: Schedule and Advanced Settings
Schedule
Set how often the sync runs using the cron field or the visual schedule picker. All times are in UTC. The default is 0 * * * * (every hour).
Expression | Meaning |
|---|---|
| Every hour |
| Once daily at midnight UTC |
| Once daily at 06:00 UTC (09:00 Turkey time) |
| Every 20 minutes |
| Every Monday and Wednesday at midnight UTC |
Phone Settings
Field | Description |
|---|---|
Convert phone to international format | Strips non-digit characters and adds a "+" prefix to normalize phone numbers to E.164 format. Enable this if phone values in Dynamics are not already formatted correctly. |
Add country code | Prepends the country dial code if not already present. Use this if Dynamics phone numbers are stored without a country code. |
Invalid Identifier Strategy
Controls what happens when an identifier value fails validation (e.g., a malformed email or phone number without a country code).
Skip identifier (default): the invalid identifier is dropped; the record is still upserted using any other valid identifiers.
Skip user: the entire record is dropped if any identifier is invalid.
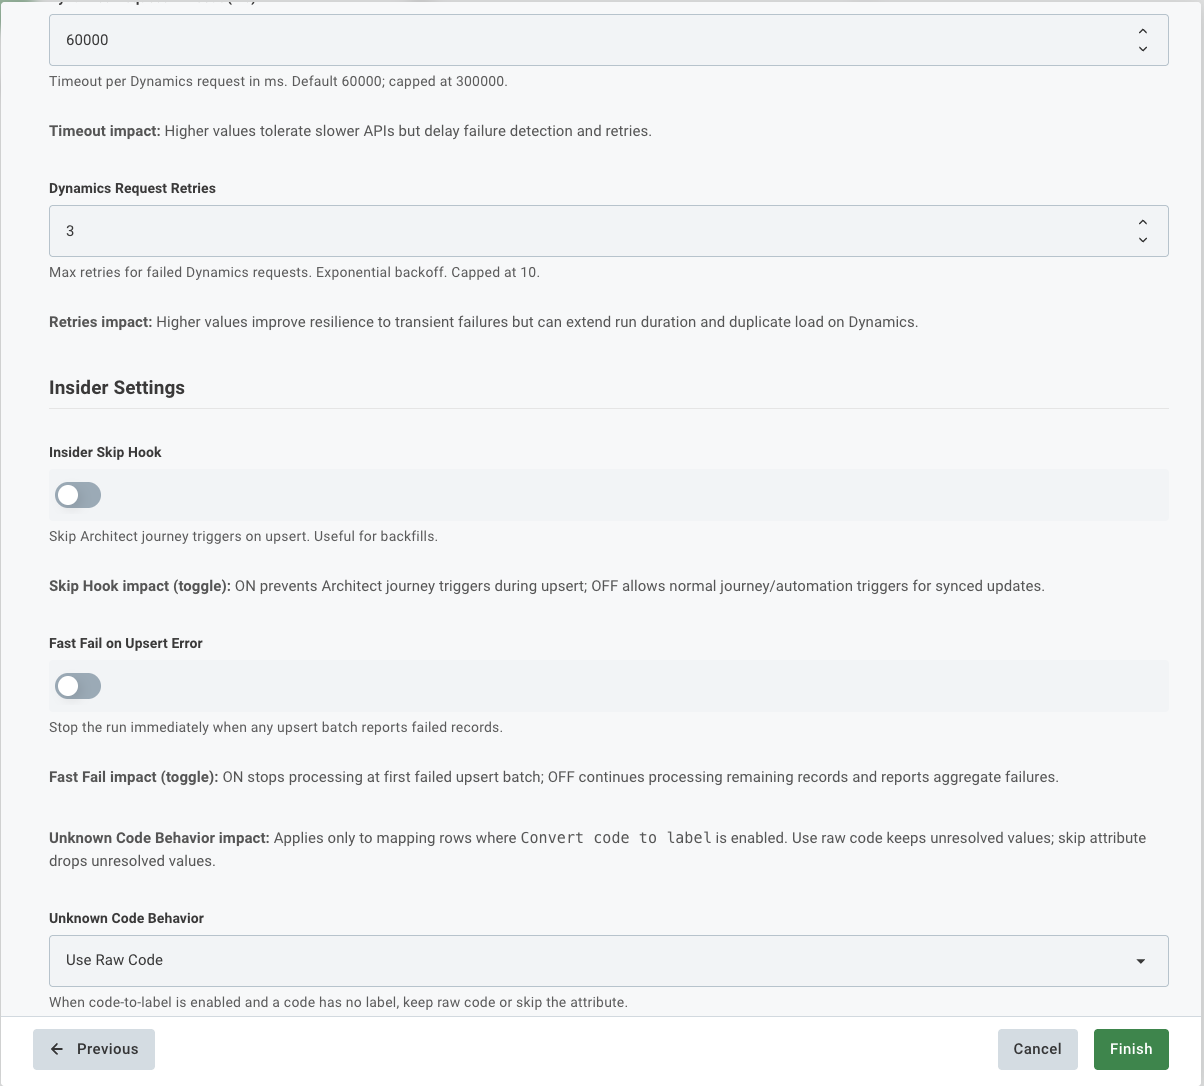
Advanced Settings
These are pre-configured with sensible defaults and rarely need changing.
Dynamics Settings
Field | Default | Max | Description |
|---|---|---|---|
Page Size | 500 | 5000 | Records fetched per API request. Lower this if you encounter timeout errors on large datasets. |
Request Timeout | 60,000 ms | 300,000 ms | Maximum wait time for a single Dynamics API response. Increase if your Dynamics instance is slow or handles very large pages. |
Request Retries | 3 | 10 | Automatic retry count for failed API requests. Uses exponential backoff between attempts. |
Insider One Settings
Field | Default | Description |
|---|---|---|
Skip Hook | OFF | When ON, Architect journey triggers are suppressed for all records synced in this run. Recommended for large historical backfills to prevent unintended journey enrollments. |
Fast Fail on Upsert Error | OFF | When ON, the sync stops immediately on the first failed upsert batch. Leave OFF unless you need strict all-or-nothing behavior. |
Unknown Code Behavior | Use Raw Code | Applies to fields with "Convert code to label" enabled. "Use Raw Code" sends the numeric code as-is when no label mapping exists. "Skip attribute" omits the attribute for that record instead. |
Click Finish to save and activate the integration.
After setup: What happens next?
Once you click Finish, the integration is saved and runs automatically on the configured schedule.
First sync: Runs at the next scheduled time. You can also trigger it manually from the Integrated Platforms tab.
Profile creation: Records from Dynamics appear as user profiles in Insider One, enriched with the attributes you mapped.
Ongoing syncs: Each run upserts records. New contacts create profiles; existing ones are updated.
Event tracking: If event mapping is configured, one behavioral event per record is sent on each sync run.
To edit or pause the integration, navigate to External Integrations > Integrated Platforms, find the integration, and select it to open its settings. Use the toggle to pause without deleting.
Troubleshooting
Symptom | What to check |
|---|---|
Yellow connection indicator | Credentials entered but not verified. Click Connect again and confirm Client ID, Client Secret, and Web API URL are all correct. |
No lists in the dropdown | The Azure app may not have permission to read Marketing Lists. Verify the app has the Dynamics CRM User role or appropriate API permissions in Azure AD. |
No entities in the dropdown | Same as above; confirm the app has read access to the entity type you need. |
Records not appearing in Insider One | Confirm that at least one Identifier Mapping is configured. Verify the source field (e.g., |
FetchXML filter errors | Validate your FetchXML in the Dynamics Advanced Find tool before pasting it here. Confirm XML special characters are properly escaped. |
Sync runs but no events sent | Confirm the "Map events" checkbox is checked, and at least one Event Name Mapping row is configured. |
Sync User and Lead Profiles not picking up new records | Check the Fetch Mode setting. "Only Updated" skips newly created records. Switch to "New and Updated Since Last Sync" if you need both. |
Frequently Asked Questions
Q: Does the Dynamic Lists sync pull all contacts every time, or only changes?
A: It pulls all current members of the Marketing List on every run. There is no built-in incremental tracking for Dynamic Lists. To reduce unnecessary load on large lists, use the Record Filters step to add a modifiedon FetchXML condition so only recently changed records are fetched.
Since the Insider One upsert API is idempotent, re-sending unchanged data updates the profile without creating duplicates, but it does still count toward your API usage.
Running a Dynamic Lists sync on a very frequent schedule against a large list will generate significant Dynamics API calls on every execution. Use the Schedule and Record Filters settings to keep the load within acceptable limits.
Q: Can I sync multiple Marketing Lists at the same time?
A: Yes, but each list requires its own integration instance. Create one integration per list, give each a descriptive name (for example, "Dynamics Active Contacts" and "Dynamics VIP Segment"), and configure them independently.
Q: What happens if a contact record has no value in the identifier field?
A: The behavior depends on the Invalid Identifier Strategy setting in Step 9. With the default "Skip identifier" option, the record is still upserted using any other valid identifier mappings. If no identifier has a valid value, the record is skipped entirely, and Insider One cannot create or update a profile for it.
Always include the identifier fields (such as
emailaddress1) in the Field Selection step so they are available for mapping. A field that was not selected in Step 4 cannot be used as an identifier in Step 6.
Q: What is the difference between OAuth Authorization Code and OAuth Client Credentials?
A: OAuth Authorization Code requires a real user to log in through a browser pop-up during setup. The connection is authorized on behalf of that user, and their Dynamics permissions apply. OAuth Client Credentials is server-to-server with no browser popup, and authenticates using only the Client ID and Secret. It is better suited for automated or unattended setups where no human login is practical. If the user who authorized an Authorization Code connection leaves the organization or loses access, the connection will stop working and needs to be reauthorized.
For production integrations, OAuth Client Credentials is generally preferred because it does not depend on an individual user account remaining active.
Q: Will syncing contacts trigger Architect journeys?
A: By default, yes. If a synced contact matches an Architect journey entry condition, the journey will be triggered. To suppress this, enable the Skip Hook toggle in the Advanced Settings section of Step 9. This is especially important for large historical backfills where you do not want thousands of contacts to enter journeys at once.
Q: Can I run both Dynamic Lists and Sync User and Lead Profiles integrations at the same time?
A: Yes. These are independent integrations and can run simultaneously. If both integrations may sync the same contact, make sure their identifier mappings are consistent so Insider One merges the data into the same profile rather than creating duplicates.
Q: How can I verify that a sync run completed successfully?
A: Go to External Integrations > Integrated Platforms, find your integration, and open the Executions tab. Each run is listed with its start time, status, number of records read, records successfully upserted, and any failures. Failed records include error details you can use for troubleshooting.
Q: Does re-syncing the same data create duplicate profiles or events in Insider One?
A: For user profiles and attributes, no. The Insider One upsert API is idempotent, so re-sending the same user just updates the existing profile. For behavioral events, yes. Events are not deduplicated by default, so if the same record is synced again with event mapping enabled, a second event will be sent. Avoid re-syncing event data unless you intentionally want to record those events again.
Be careful when re-running a Sync User and Lead Profiles integration with event mapping enabled. Each execution sends one event per record, so repeated runs against the same dataset will generate duplicate events in Insider One.